
English Manual
Page 3
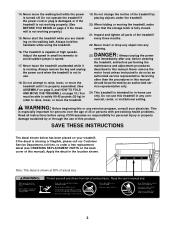
... to avoid sudden jumps in the location shown. 14. Never start the treadmill while you are standing on your physician. Always remove the key and unplug the power cord when the treadmill is especially important for personal injury or property damage sustained by an authorized service... representative. Do not attempt to raise, lower, or move the treadmill until it is missing or illegible,...
... to avoid sudden jumps in the location shown. 14. Never start the treadmill while you are standing on your physician. Always remove the key and unplug the power cord when the treadmill is especially important for personal injury or property damage sustained by an authorized service... representative. Do not attempt to raise, lower, or move the treadmill until it is missing or illegible,...
English Manual
Page 4
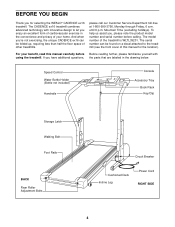
... before calling. And when you're not exercising, the unique CADENCE ex16 can be folded up, requiring less than half the floor space of your benefit, read this manual for selecting the WESLO® CADENCE ex16 treadmill. until 6 p.m. For your home. The model number of... cardiovascular exercise in the drawing below. Speed Control Water Bottle Holder (Bottle not included) Handrails Console Accessory Tray Book Rack Key/Clip Storage Latch Walking Belt Foot...
... before calling. And when you're not exercising, the unique CADENCE ex16 can be folded up, requiring less than half the floor space of your benefit, read this manual for selecting the WESLO® CADENCE ex16 treadmill. until 6 p.m. For your home. The model number of... cardiovascular exercise in the drawing below. Speed Control Water Bottle Holder (Bottle not included) Handrails Console Accessory Tray Book Rack Key/Clip Storage Latch Walking Belt Foot...
English Manual
Page 8
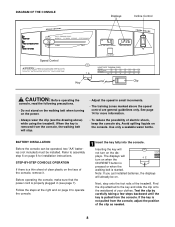
When the key is properly plugged in small increments. • The training zones marked above ) while using the treadmill. Use only a sealable water bottle. Before operating the console, make sure that the power cord is removed from the console, the walking belt will ... just installed batteries, the displays will stop. • Adjust the speed in (see the drawing above the speed control are general guidelines only. If the key is a thin sheet of clear plastic on page 6 for more information. • To reduce the possibility of electric shock, keep the console dry. Follow...
When the key is properly plugged in small increments. • The training zones marked above ) while using the treadmill. Use only a sealable water bottle. Before operating the console, make sure that the power cord is removed from the console, the walking belt will ... just installed batteries, the displays will stop. • Adjust the speed in (see the drawing above the speed control are general guidelines only. If the key is a thin sheet of clear plastic on page 6 for more information. • To reduce the possibility of electric shock, keep the console dry. Follow...

English Manual
Page 9
... page 13). 4 Monitor your progress with the two displays. Every seven seconds, the display will turn off about five minutes after the key is currently shown. The displays will change from one number to the next. To reset the displays at slow speed. Every seven seconds,... the display will indicate which number is removed. During the first few minutes of using the treadmill, inspect the alignment of the walking belt as desired. To change from the console. CALS/FAT CALS/ SPEED display-This display shows ...
... page 13). 4 Monitor your progress with the two displays. Every seven seconds, the display will turn off about five minutes after the key is currently shown. The displays will change from one number to the next. To reset the displays at slow speed. Every seven seconds,... the display will indicate which number is removed. During the first few minutes of using the treadmill, inspect the alignment of the walking belt as desired. To change from the console. CALS/FAT CALS/ SPEED display-This display shows ...

English Manual
Page 10
... halfway to the position shown and hold it. Before adjusting the Handrails, remove the key and unplug the power cord. Hold the treadmill with your right hand to the vertical position. 2. Pivot the treadmill until the frame and foot rail are at the right. Close the storage latch over...back. Remove the four Console Screws (5). Reattach the Handrails with the Handrail Bolts, Handrail Washers, and Internal Washers. (Important: If you raise the treadmill, make sure to lift with two Handrail Bolts.) Reattach the Console Base (87) (see assembly step 4 on page 6). Do not tighten the ...
... halfway to the position shown and hold it. Before adjusting the Handrails, remove the key and unplug the power cord. Hold the treadmill with your right hand to the vertical position. 2. Pivot the treadmill until the frame and foot rail are at the right. Close the storage latch over...back. Remove the four Console Screws (5). Reattach the Handrails with the Handrail Bolts, Handrail Washers, and Internal Washers. (Important: If you raise the treadmill, make sure to lift with two Handrail Bolts.) Reattach the Console Base (87) (see assembly step 4 on page 6). Do not tighten the ...
English Manual
Page 12
..., wait for five minutes and then press the switch back in the console. Reinsert the key fully into a surge suppressor, and that the key is not compatible with the Reed Switch. If the treadmill still will not run the treadmill for a correct speed reading. Check the batteries in . If necessary, loosen the Screw (31...
..., wait for five minutes and then press the switch back in the console. Reinsert the key fully into a surge suppressor, and that the key is not compatible with the Reed Switch. If the treadmill still will not run the treadmill for a correct speed reading. Check the batteries in . If necessary, loosen the Screw (31...
English Manual
Page 13
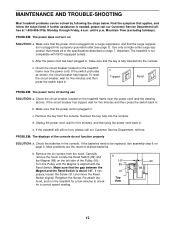
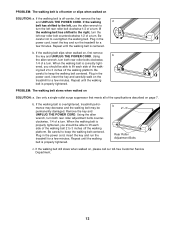
... Plug in the power cord, insert the key and run the treadmill for a few minutes. PROBLEM: The walking belt slows when walked on , first remove the key and UNPLUG THE POWER CORD. Plug in the power cord, insert the key and run the treadmill for a few minutes. If the walking... . PROBLEM: The walking belt is off the walking platform. b. ing belt 2 to 3 inches off -center or slips when walked on the treadmill for a few minutes. Using the allen wrench, turn both rear roller bolts clockwise, 1/4 of the specifications described on , please call our toll-...
... Plug in the power cord, insert the key and run the treadmill for a few minutes. PROBLEM: The walking belt slows when walked on , first remove the key and UNPLUG THE POWER CORD. Plug in the power cord, insert the key and run the treadmill for a few minutes. If the walking... . PROBLEM: The walking belt is off the walking platform. b. ing belt 2 to 3 inches off -center or slips when walked on the treadmill for a few minutes. Using the allen wrench, turn both rear roller bolts clockwise, 1/4 of the specifications described on , please call our toll-...
English Manual
Page 14
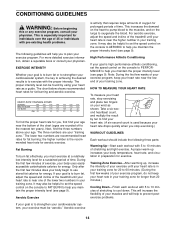
EXERCISE INTENSITY Whether your goal is to burn fat or to strengthen your cardiovascular system, the key to achieving the desired results is to exercise with pre-existing health problems. The following three parts: Warming Up-Start each workout with 5 to 10 ... should include the following guidelines will help to prevent postexercise problems. If your goal is to burn fat, adjust the speed and incline of the treadmill until your "training zone." If your goal is to strengthen your cardiovascular system, your training zone. It may also be "aerobic." This is near the...
EXERCISE INTENSITY Whether your goal is to burn fat or to strengthen your cardiovascular system, the key to achieving the desired results is to exercise with pre-existing health problems. The following three parts: Warming Up-Start each workout with 5 to 10 ... should include the following guidelines will help to prevent postexercise problems. If your goal is to burn fat, adjust the speed and incline of the treadmill until your "training zone." If your goal is to strengthen your cardiovascular system, your training zone. It may also be "aerobic." This is near the...
English Manual
Page 16
... warranty gives you . To help us assist you . Some states do not allow limitations on how long an implied warranty lasts. WESLO is limited to the terms set forth above is not responsible or liable for indirect, special or consequential damages arising out of or ...8226; The MODEL NUMBER of the product (WLTL39201) • The NAME of the product (WESLO CADENCE® ex16 treadmill) • The SERIAL NUMBER of the product (see the front cover of this manual) • The KEY NUMBER and DESCRIPTION of incidental or consequential damages. ICON's obligation under normal use , costs of ...
... warranty gives you . To help us assist you . Some states do not allow limitations on how long an implied warranty lasts. WESLO is limited to the terms set forth above is not responsible or liable for indirect, special or consequential damages arising out of or ...8226; The MODEL NUMBER of the product (WLTL39201) • The NAME of the product (WESLO CADENCE® ex16 treadmill) • The SERIAL NUMBER of the product (see the front cover of this manual) • The KEY NUMBER and DESCRIPTION of incidental or consequential damages. ICON's obligation under normal use , costs of ...


