

English Manual
Page 1
WLTL39201 Serial No. TO AVOID UNNECESSARY DELAYS, PLEASE CALL DIRECT TO OUR TOLL-FREE CUSTOMER HOT LINE. USER'S MANUAL Visit our website at www.weslo.com new products, prizes, fitness tips, and much more! ® Model No. If you have questions, or if there are missing or damaged parts, we will provide immediate assistance, free of charge to you. CUSTOMER HOT...
WLTL39201 Serial No. TO AVOID UNNECESSARY DELAYS, PLEASE CALL DIRECT TO OUR TOLL-FREE CUSTOMER HOT LINE. USER'S MANUAL Visit our website at www.weslo.com new products, prizes, fitness tips, and much more! ® Model No. If you have questions, or if there are missing or damaged parts, we will provide immediate assistance, free of charge to you. CUSTOMER HOT...
English Manual
Page 2
... treadmill should be used or where oxygen is damaged, the walking belt may change speed or stop unexpectedly, which may result in the treadmill. Never allow more amps. TABLE OF CONTENTS IMPORTANT PRECAUTIONS 2 BEFORE YOU BEGIN 4 ASSEMBLY 5 OPERATION AND ADJUSTMENT 7 HOW TO FOLD AND MOVE THE TREADMILL 10 MAINTENANCE AND TROUBLE-SHOOTING 12 CONDITIONING GUIDELINES 14 ORDERING REPLACEMENT PARTS Back Cover LIMITED WARRANTY Back Cover Note: A PART LIST and an EXPLODED DRAWING are attached...
... treadmill should be used or where oxygen is damaged, the walking belt may change speed or stop unexpectedly, which may result in the treadmill. Never allow more amps. TABLE OF CONTENTS IMPORTANT PRECAUTIONS 2 BEFORE YOU BEGIN 4 ASSEMBLY 5 OPERATION AND ADJUSTMENT 7 HOW TO FOLD AND MOVE THE TREADMILL 10 MAINTENANCE AND TROUBLE-SHOOTING 12 CONDITIONING GUIDELINES 14 ORDERING REPLACEMENT PARTS Back Cover LIMITED WARRANTY Back Cover Note: A PART LIST and an EXPLODED DRAWING are attached...
English Manual
Page 3
... the treadmill if the power cord or plug is damaged, or if the treadmill is not in -home use of actual size. 3 Adjust the speed in small increments to order a free replacement decal (see ORDERING REPLACEMENT PARTS on the back cover of 35 or persons with pre-existing health problems. Read all parts of high speeds. Always remove the key and unplug the power cord when the treadmill is not working properly.) 15. Never move the treadmill...
... the treadmill if the power cord or plug is damaged, or if the treadmill is not in -home use of actual size. 3 Adjust the speed in small increments to order a free replacement decal (see ORDERING REPLACEMENT PARTS on the back cover of 35 or persons with pre-existing health problems. Read all parts of high speeds. Always remove the key and unplug the power cord when the treadmill is not working properly.) 15. Never move the treadmill...
English Manual
Page 4
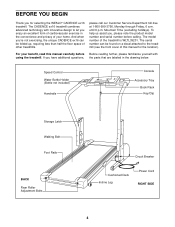
... this manual for selecting the WESLO® CADENCE ex16 treadmill. The CADENCE ex16 treadmill combines advanced technology with using the treadmill. If you 're not exercising, the unique CADENCE ex16 can be folded up, requiring less than half the floor space of other treadmills. For your home. Speed Control Water Bottle Holder (Bottle not included) Handrails Console Accessory Tray Book Rack Key/Clip Storage Latch Walking Belt Foot Rails BACK Rear Roller Adjustment Bolts Circuit Breaker Cushioned Deck Incline Leg Power Cord RIGHT...
... this manual for selecting the WESLO® CADENCE ex16 treadmill. The CADENCE ex16 treadmill combines advanced technology with using the treadmill. If you 're not exercising, the unique CADENCE ex16 can be folded up, requiring less than half the floor space of other treadmills. For your home. Speed Control Water Bottle Holder (Bottle not included) Handrails Console Accessory Tray Book Rack Key/Clip Storage Latch Walking Belt Foot Rails BACK Rear Roller Adjustment Bolts Circuit Breaker Cushioned Deck Incline Leg Power Cord RIGHT...
English Manual
Page 5
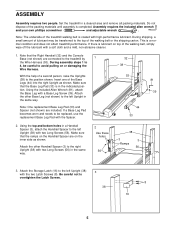
... of the treadmill walking belt is coated with high-performance lubricant. Note: The underside of the packing materials until assembly is lubricant on top of the Base Legs (44) into the right Upright as shown. Note that the Right Handrail (32) and the Console Base (not shown) are included. Attach the Storage Latch (16) to the left Upright (38) with two Long Screws (56...
... of the treadmill walking belt is coated with high-performance lubricant. Note: The underside of the packing materials until assembly is lubricant on top of the Base Legs (44) into the right Upright as shown. Note that the Right Handrail (32) and the Console Base (not shown) are included. Attach the Storage Latch (16) to the left Upright (38) with two Long Screws (56...
English Manual
Page 6
... right Upright (38) as described 70 above. Close the battery cover, push up on the Handrails (4, 32). Make sure that the tab locks into place. 87 7 Battery Cover Tab Batteries 7. Then, insert the excess Wire 1 1 Harness into the Right Handrail. 32 5 4 5 Tighten the four Handrail Bolts (1) used in the inset drawing. Route the Wire Harness (53) as shown. Open the Battery Cover (7) as shown. Set the Console...
... right Upright (38) as described 70 above. Close the battery cover, push up on the Handrails (4, 32). Make sure that the tab locks into place. 87 7 Battery Cover Tab Batteries 7. Then, insert the excess Wire 1 1 Harness into the Right Handrail. 32 5 4 5 Tighten the four Handrail Bolts (1) used in the inset drawing. Route the Wire Harness (53) as shown. Open the Battery Cover (7) as shown. Set the Console...
English Manual
Page 7
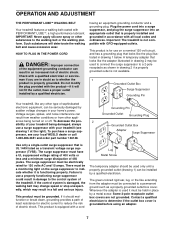
... outlet installed by a qualified electrician. If the control system is damaged, the walking belt may change speed or stop unexpectedly, which may be connected to a 2-pole receptacle as a properly grounded outlet box cover. A temporary adapter that looks like any other appliances being damaged, always use a properly functioning surge suppressor could result in a fall and serious injury. Grounding Pin Grounded Outlet Grounding Plug 2 Grounded...
... outlet installed by a qualified electrician. If the control system is damaged, the walking belt may change speed or stop unexpectedly, which may be connected to a 2-pole receptacle as a properly grounded outlet box cover. A temporary adapter that looks like any other appliances being damaged, always use a properly functioning surge suppressor could result in a fall and serious injury. Grounding Pin Grounded Outlet Grounding Plug 2 Grounded...
English Manual
Page 8
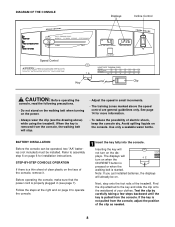
... that the power cord is pulled from the console. The displays will not turn on when the ON/RESET button is pressed or when the walking belt is removed from the console, adjust the position of the console, remove it. Follow the steps at the right and on page 9 to the key and slide the clip onto the waistband of the treadmill. Inserting the key will turn on the displays. Test...
... that the power cord is pulled from the console. The displays will not turn on when the ON/RESET button is pressed or when the walking belt is removed from the console, adjust the position of the console, remove it. Follow the steps at the right and on page 9 to the key and slide the clip onto the waistband of the treadmill. Inserting the key will turn on the displays. Test...

English Manual
Page 9
... speed control to the other. Arrows in miles. Carefully step onto the walking belt and begin walking. Every seven seconds, the display will indicate which number is removed. To reset the displays at slow speed. Note: Any time that you are finished exercising, stop the walking belt and remove the key. Slide the speed control to conserve the batteries. 9 2 Reset the speed control. Note: Each time the walking belt is not pressed for five minutes, the displays will automatically turn...
... speed control to the other. Arrows in miles. Carefully step onto the walking belt and begin walking. Every seven seconds, the display will indicate which number is removed. To reset the displays at slow speed. Note: Any time that you are finished exercising, stop the walking belt and remove the key. Slide the speed control to conserve the batteries. 9 2 Reset the speed control. Note: Each time the walking belt is not pressed for five minutes, the displays will automatically turn...

English Manual
Page 10
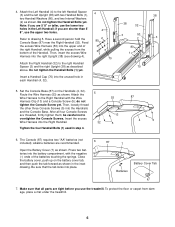
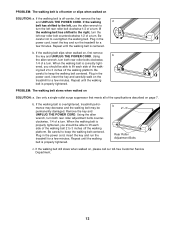
... sure that both Handrails are past the storage latch. Remove the four Console Screws (5). Insert a Handrail Cap (70) into the unused hole in temperatures above 85° Fahrenheit. 10 Storage Latch Catch Closed CAUTION: You must be adjusted to damage the Wire Harness (53). Raise the treadmill about halfway to raise, lower, or move the treadmill. 1. Before adjusting the Handrails, remove the key and unplug the power cord.
... sure that both Handrails are past the storage latch. Remove the four Console Screws (5). Insert a Handrail Cap (70) into the unused hole in temperatures above 85° Fahrenheit. 10 Storage Latch Catch Closed CAUTION: You must be adjusted to damage the Wire Harness (53). Raise the treadmill about halfway to raise, lower, or move the treadmill. 1. Before adjusting the Handrails, remove the key and unplug the power cord.
English Manual
Page 11
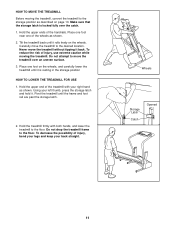
... one of the handrails. Pivot the treadmill until it is locked fully over an uneven surface. 3. Hold the treadmill firmly with your left thumb, press the storage latch and hold it back. Tilt the treadmill back until the frame and foot rail are past the storage latch. 2. Wheels Storage Latch Catch Opened 11 Do not attempt to move the treadmill without tipping it .
... one of the handrails. Pivot the treadmill until it is locked fully over an uneven surface. 3. Hold the treadmill firmly with your left thumb, press the storage latch and hold it back. Tilt the treadmill back until the frame and foot rail are past the storage latch. 2. Wheels Storage Latch Catch Opened 11 Do not attempt to move the treadmill without tipping it .
English Manual
Page 12
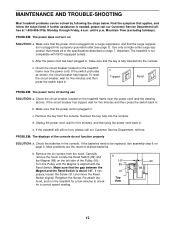
... five minutes, and then plug the power cord back in . b. d. Unplug the power cord, wait for five minutes and then press the switch back in . PROBLEM: The displays of drained batteries. Locate the Reed Switch (89) and the Magnet (88) on the treadmill frame near the power cord. If necessary, loosen the Screw (31) and move the Reed Switch slightly. MAINTENANCE AND TROUBLE-SHOOTING Most treadmill problems can be replaced, see assembly step 6 on page 6. until the...
... five minutes, and then plug the power cord back in . b. d. Unplug the power cord, wait for five minutes and then press the switch back in . PROBLEM: The displays of drained batteries. Locate the Reed Switch (89) and the Magnet (88) on the treadmill frame near the power cord. If necessary, loosen the Screw (31) and move the Reed Switch slightly. MAINTENANCE AND TROUBLE-SHOOTING Most treadmill problems can be replaced, see assembly step 6 on page 6. until the...
English Manual
Page 13
... walking belt is properly tightened. Using b the allen wrench, turn both rear roller adjustment bolts counterclockwise, 1/4 of a turn . Be careful to overtighten the walking belt. Repeat until the walking belt is correctly tight- Use only a single-outlet surge suppressor that meets all of the specifications described on , please call our toll-free Customer Service Department. 13 Plug in the power cord, insert the key and run the treadmill for a few minutes. If the walking belt...
... walking belt is properly tightened. Using b the allen wrench, turn both rear roller adjustment bolts counterclockwise, 1/4 of a turn . Be careful to overtighten the walking belt. Repeat until the walking belt is correctly tight- Use only a single-outlet surge suppressor that meets all of the specifications described on , please call our toll-free Customer Service Department. 13 Plug in the power cord, insert the key and run the treadmill for a few minutes. If the walking belt...
English Manual
Page 14
... speed control on the console to FAT BURN to help you stop exercising and place two fingers on the console to AEROBIC to help you , first find the proper heart rate for you maintain the proper intensity level (see page 9). CONDITIONING GUIDELINES WARNING: Before beginning this or any exercise program, consult your body uses easily accessible carbohydrate calories for energy. The lower two numbers...
... speed control on the console to FAT BURN to help you stop exercising and place two fingers on the console to AEROBIC to help you , first find the proper heart rate for you maintain the proper intensity level (see page 9). CONDITIONING GUIDELINES WARNING: Before beginning this or any exercise program, consult your body uses easily accessible carbohydrate calories for energy. The lower two numbers...

English Manual
Page 15
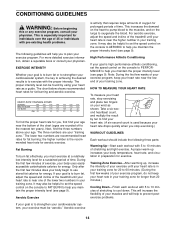
... SUGGESTED STRETCHES The correct form for both legs. Reach toward your knees outward. Repeat 3 times for several basic stretches is to make exercise a regular and enjoyable part of your feet together ... one leg in the drawings at least one leg extended. Inner Thigh Stretch Sit with your other , reach forward and place your hands against a wall. Stretches: Hamstrings, lower back ...workouts. Move slowly as well. The key to relax as possible. Keep your back leg straight and your hips toward your toes as far as you and rest it against a wall for both legs...
... SUGGESTED STRETCHES The correct form for both legs. Reach toward your knees outward. Repeat 3 times for several basic stretches is to make exercise a regular and enjoyable part of your feet together ... one leg in the drawings at least one leg extended. Inner Thigh Stretch Sit with your other , reach forward and place your hands against a wall. Stretches: Hamstrings, lower back ...workouts. Move slowly as well. The key to relax as possible. Keep your back leg straight and your hips toward your toes as far as you and rest it against a wall for both legs...
English Manual
Page 16
... abnormal usage or repairs not provided by ICON. Accordingly, the above limitation may not apply to give the following information when calling: • The MODEL NUMBER of the product (WLTL39201) • The NAME of the product (WESLO CADENCE® ex16 treadmill) • The SERIAL NUMBER of enjoyment or use and service conditions, for commercial or rental purposes, or products used as store display models. The warranty extended hereunder...
... abnormal usage or repairs not provided by ICON. Accordingly, the above limitation may not apply to give the following information when calling: • The MODEL NUMBER of the product (WLTL39201) • The NAME of the product (WESLO CADENCE® ex16 treadmill) • The SERIAL NUMBER of enjoyment or use and service conditions, for commercial or rental purposes, or products used as store display models. The warranty extended hereunder...

English Manual
Page 17
REMOVE THIS EXPLODED DRAWING AND PART LIST FROM THE MANUAL Save this EXPLODED DRAWING and PART LIST for future reference. For information about ordering replacement parts, see the back cover of the User's Manual. 34 Note: Specifications are subject to change without notice.
REMOVE THIS EXPLODED DRAWING AND PART LIST FROM THE MANUAL Save this EXPLODED DRAWING and PART LIST for future reference. For information about ordering replacement parts, see the back cover of the User's Manual. 34 Note: Specifications are subject to change without notice.
English Manual
Page 18
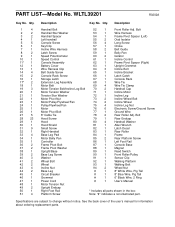
... Latch Screw Speed Potentiometer Speed Control Console Assembly Battery Cover Wire Harness Clip Belt Guide Screw Console Rack Screw Storage Latch Extension Leg Assembly Motor Belt Motor Tension Bolt/Incline Leg Bolt Motor Tension Washer Tension Star Washer Motor Pivot Nut Motor/Pulley/Flywheel/Fan Pulley/Flywheel/Fan Motor Motor Pivot Bolt 8" Cable Tie Hood Screw Hood Hood Shield Small Screw Right Handrail Base Leg Pad Motor Belly Pan Controller Frame Pivot Bolt Frame Pivot Washer Upright/Base Base Leg Screw Washer Wheel Bolt Wheel Incline Nut Base Leg Circuit Breaker Grommet Power Cord Motor...
... Latch Screw Speed Potentiometer Speed Control Console Assembly Battery Cover Wire Harness Clip Belt Guide Screw Console Rack Screw Storage Latch Extension Leg Assembly Motor Belt Motor Tension Bolt/Incline Leg Bolt Motor Tension Washer Tension Star Washer Motor Pivot Nut Motor/Pulley/Flywheel/Fan Pulley/Flywheel/Fan Motor Motor Pivot Bolt 8" Cable Tie Hood Screw Hood Hood Shield Small Screw Right Handrail Base Leg Pad Motor Belly Pan Controller Frame Pivot Bolt Frame Pivot Washer Upright/Base Base Leg Screw Washer Wheel Bolt Wheel Incline Nut Base Leg Circuit Breaker Grommet Power Cord Motor...
English Manual
Page 19
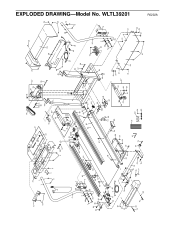
... 28 29 30 46 45 28 28 28 13 5 76 32 56 35 2 80 1 3 56 70 31 31 33 28 31 31 R0202A EXPLODED DRAWING-Model No. WLTL39201
... 28 29 30 46 45 28 28 28 13 5 76 32 56 35 2 80 1 3 56 70 31 31 33 28 31 31 R0202A EXPLODED DRAWING-Model No. WLTL39201


