
English Manual
Page 2
...heated surfaces. 2 TABLE OF CONTENTS IMPORTANT PRECAUTIONS 2 BEFORE YOU BEGIN 4 ASSEMBLY 5 OPERATION AND ADJUSTMENT 7 HOW TO FOLD AND MOVE THE TREADMILL 10 MAINTENANCE AND TROUBLE-SHOOTING 12 CONDITIONING GUIDELINES 14 ORDERING REPLACEMENT PARTS Back Cover LIMITED WARRANTY Back Cover Note: A PART LIST and an ... for both men and women. To protect the floor or carpet from moisture and dust. When connecting the power cord (see your local WESLO dealer or call 1-800-8063651 and order part number 146148. 6. To purchase a surge suppressor, see page 7), plug the power cord into...
...heated surfaces. 2 TABLE OF CONTENTS IMPORTANT PRECAUTIONS 2 BEFORE YOU BEGIN 4 ASSEMBLY 5 OPERATION AND ADJUSTMENT 7 HOW TO FOLD AND MOVE THE TREADMILL 10 MAINTENANCE AND TROUBLE-SHOOTING 12 CONDITIONING GUIDELINES 14 ORDERING REPLACEMENT PARTS Back Cover LIMITED WARRANTY Back Cover Note: A PART LIST and an ... for both men and women. To protect the floor or carpet from moisture and dust. When connecting the power cord (see your local WESLO dealer or call 1-800-8063651 and order part number 146148. 6. To purchase a surge suppressor, see page 7), plug the power cord into...
English Manual
Page 3
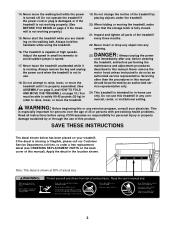
...page 10.) You must be performed by an authorized service representative. Adjust the speed in small increments to raise, lower, or move the treadmill until it is capable of high speeds. Do not change the incline of 35 or persons with pre-existing health problems. Read all ...no responsibility for in this manual). Note: This decal is especially important for persons over the age of the treadmill by or through the use this product. Never move the treadmill. 19. Never remove the motor hood unless instructed to order a free replacement decal (see ORDERING REPLACEMENT PARTS ...
...page 10.) You must be performed by an authorized service representative. Adjust the speed in small increments to raise, lower, or move the treadmill until it is capable of high speeds. Do not change the incline of 35 or persons with pre-existing health problems. Read all ...no responsibility for in this manual). Note: This decal is especially important for persons over the age of the treadmill by or through the use this product. Never move the treadmill. 19. Never remove the motor hood unless instructed to order a free replacement decal (see ORDERING REPLACEMENT PARTS ...
English Manual
Page 4
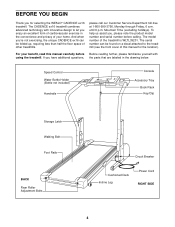
...please familiarize yourself with innovative design to the treadmill (see the front cover of this manual carefully before calling. The CADENCE ex16 treadmill combines advanced technology with using the treadmill. If you 're not exercising, the unique CADENCE ex16 can be folded up, requiring less than ...additional questions, the parts that are labeled in the convenience and privacy of your benefit, read this manual for selecting the WESLO® CADENCE ex16 treadmill. Mountain Time (excluding holidays). The serial number can be found on a decal attached to let you for the location...
...please familiarize yourself with innovative design to the treadmill (see the front cover of this manual carefully before calling. The CADENCE ex16 treadmill combines advanced technology with using the treadmill. If you 're not exercising, the unique CADENCE ex16 can be folded up, requiring less than ...additional questions, the parts that are labeled in the convenience and privacy of your benefit, read this manual for selecting the WESLO® CADENCE ex16 treadmill. Mountain Time (excluding holidays). The serial number can be found on a decal attached to let you for the location...
English Manual
Page 5
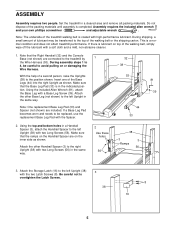
... (38) to the right Upright (38) with two Long Screws (56) in the same way. 2 Use these holes 56 38 3 3 Ramps 56 3. Set the treadmill in the same way. Assembly requires the included allen wrench and your own phillips screwdriver and adjustable wrench . Using the included Allen Wrench (81), attach... the Base Leg with the Spacer. 32 38 53 81 39 44 33 2. Note: The underside of the treadmill walking belt is lubricant on top of lubricant may be replaced, use the replacement Base Leg Pad with a Base Leg Screw (39). If there is...
... (38) to the right Upright (38) with two Long Screws (56) in the same way. 2 Use these holes 56 38 3 3 Ramps 56 3. Set the treadmill in the same way. Assembly requires the included allen wrench and your own phillips screwdriver and adjustable wrench . Using the included Allen Wrench (81), attach... the Base Leg with the Spacer. 32 38 53 81 39 44 33 2. Note: The underside of the treadmill walking belt is lubricant on top of lubricant may be replaced, use the replacement Base Leg Pad with a Base Leg Screw (39). If there is...
English Manual
Page 6
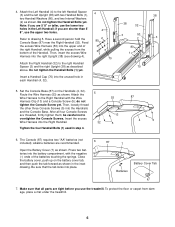
4. if you are shorter than 5' 8", use the treadmill. alkaline batteries are 5' 8" or taller, use the lower two 38 32 holes in the inset drawing. Press two batteries into the battery compartment, with the .... Then, insert the excess Wire 1 1 Harness into the upper end of 80 the right Handrail, while pulling the excess from damage, place a mat under the treadmill. 6 Do not tighten the Handrail Bolts (1) yet. Set the Console Base (87) on the battery cover tab, and then push the tab forward as shown...
4. if you are shorter than 5' 8", use the treadmill. alkaline batteries are 5' 8" or taller, use the lower two 38 32 holes in the inset drawing. Press two batteries into the battery compartment, with the .... Then, insert the excess Wire 1 1 Harness into the upper end of 80 the right Handrail, while pulling the excess from damage, place a mat under the treadmill. 6 Do not tighten the Handrail Bolts (1) yet. Set the Console Base (87) on the battery cover tab, and then push the tab forward as shown...
English Manual
Page 7
... will not fit the outlet, have a UL suppressed voltage rating of 400 volts or less and a minimum surge dissipation of the treadmill. Important: The treadmill is used only until a properly grounded outlet (drawing 1) can result from weather conditions or from the adapter must be installed by ...surge suppressor must be seriously damaged by a qualified electrician. Failure to use a properly functioning surge suppressor could result in your local WESLO dealer or call 1-800-806-3651 and order part number 146148. This product must have a proper outlet installed by sudden voltage ...
... will not fit the outlet, have a UL suppressed voltage rating of 400 volts or less and a minimum surge dissipation of the treadmill. Important: The treadmill is used only until a properly grounded outlet (drawing 1) can result from weather conditions or from the adapter must be installed by ...surge suppressor must be seriously damaged by a qualified electrician. Failure to use a properly functioning surge suppressor could result in your local WESLO dealer or call 1-800-806-3651 and order part number 146148. This product must have a proper outlet installed by sudden voltage ...
English Manual
Page 8
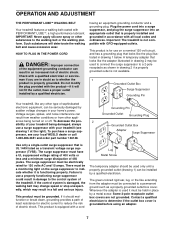
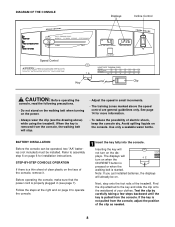
When the key is properly plugged in small increments. • The training zones marked above ) while using the treadmill. STEP-BY-STEP CONSOLE OPERATION If there is started. The displays will stop. • Adjust the speed in (see the drawing above the speed ... installation instructions. Follow the steps at the right and on the displays. Refer to the key and slide the clip onto the waistband of the treadmill. BATTERY INSTALLATION Before the console can be operated, two "AA" batteries (not included) must be on the console. Find the clip attached to assembly ...
When the key is properly plugged in small increments. • The training zones marked above ) while using the treadmill. STEP-BY-STEP CONSOLE OPERATION If there is started. The displays will stop. • Adjust the speed in (see the drawing above the speed ... installation instructions. Follow the steps at the right and on the displays. Refer to the key and slide the clip onto the waistband of the treadmill. BATTERY INSTALLATION Before the console can be operated, two "AA" batteries (not included) must be on the console. Find the clip attached to assembly ...

English Manual
Page 9
... the walking belt and begin walking. During the first few minutes of using the treadmill, inspect the alignment of the walking belt, in the display will change the incline of the treadmill, press the top or bottom of the treadmill as desired by sliding the speed control. CALS/FAT CALS/ SPEED display-This...
... the walking belt and begin walking. During the first few minutes of using the treadmill, inspect the alignment of the walking belt, in the display will change the incline of the treadmill, press the top or bottom of the treadmill as desired by sliding the speed control. CALS/FAT CALS/ SPEED display-This...

English Manual
Page 10
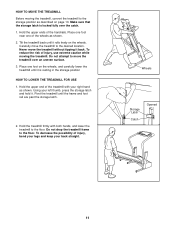
... latch is fully engaged over the catch. Insert a Handrail Cap (70) into the unused hole in each Handrail with your back straight. Hold the treadmill with two Handrail Bolts.) Reattach the Console Base (87) (see assembly step 4 on page 6). Using your right hand to the position shown and... storage position in temperatures above 85° Fahrenheit. 10 Storage Latch Catch Closed Move your left thumb, press the storage latch and hold the treadmill firmly. Make sure that both Handrails are shorter than your legs rather than 5' 8", use the lower two holes in the Handrails; if you...
... latch is fully engaged over the catch. Insert a Handrail Cap (70) into the unused hole in each Handrail with your back straight. Hold the treadmill with two Handrail Bolts.) Reattach the Console Base (87) (see assembly step 4 on page 6). Using your right hand to the position shown and... storage position in temperatures above 85° Fahrenheit. 10 Storage Latch Catch Closed Move your left thumb, press the storage latch and hold the treadmill firmly. Make sure that both Handrails are shorter than your legs rather than 5' 8", use the lower two holes in the Handrails; if you...
English Manual
Page 11
... risk of the wheels as shown. 2. Do not attempt to move the treadmill over the catch. 1. Place one of injury, use extreme caution while moving the treadmill, convert the treadmill to the desired location. Tilt the treadmill back until the frame and foot rail are past the storage latch. 2. Pivot...Wheels Storage Latch Catch Opened 11 Make sure that the storage latch is resting in the storage position HOW TO LOWER THE TREADMILL FOR USE 1. Hold the treadmill firmly with your left thumb, press the storage latch and hold it back. Hold the upper end of injury, bend ...
... risk of the wheels as shown. 2. Do not attempt to move the treadmill over the catch. 1. Place one of injury, use extreme caution while moving the treadmill, convert the treadmill to the desired location. Tilt the treadmill back until the frame and foot rail are past the storage latch. 2. Pivot...Wheels Storage Latch Catch Opened 11 Make sure that the storage latch is resting in the storage position HOW TO LOWER THE TREADMILL FOR USE 1. Hold the treadmill firmly with your left thumb, press the storage latch and hold it back. Hold the upper end of injury, bend ...
English Manual
Page 12
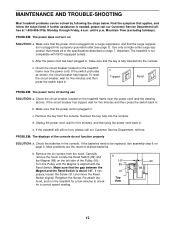
... need to check for five minutes and then press the switch back in the console. Carefully remove the hood. MAINTENANCE AND TROUBLE-SHOOTING Most treadmill problems can be replaced, see assembly step 6 on page 6. Make sure that the power cord is plugged into the console. b. Use... only a single-outlet surge suppressor that the surge suppressor is needed, please call our Customer Service Department, toll-free. Important: The treadmill is plugged in , make sure that the power cord is not compatible with the Reed Switch. Make sure that the key is aligned with...
... need to check for five minutes and then press the switch back in the console. Carefully remove the hood. MAINTENANCE AND TROUBLE-SHOOTING Most treadmill problems can be replaced, see assembly step 6 on page 6. Make sure that the power cord is plugged into the console. b. Use... only a single-outlet surge suppressor that the surge suppressor is needed, please call our Customer Service Department, toll-free. Important: The treadmill is plugged in , make sure that the power cord is not compatible with the Reed Switch. Make sure that the key is aligned with...
English Manual
Page 13
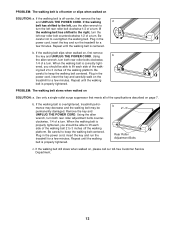
... 1/2 of a turn ; If the walking belt slips when walked on SOLUTION: a. Plug in the power cord, insert the key and run the treadmill for a few minutes. if the walking belt has shifted to overtighten the walking belt. b. Using b the allen wrench, turn both rear roller adjustment...1/4 of a turn . If the walking belt is properly tightened, you should be able to lift each side of the specifications described on the treadmill for a few minutes. Be careful to turn the left , use the allen wrench to keep the walking belt centered. If the walking a belt...
... 1/2 of a turn ; If the walking belt slips when walked on SOLUTION: a. Plug in the power cord, insert the key and run the treadmill for a few minutes. if the walking belt has shifted to overtighten the walking belt. b. Using b the allen wrench, turn both rear roller adjustment...1/4 of a turn . If the walking belt is properly tightened, you should be able to lift each side of the specifications described on the treadmill for a few minutes. Be careful to turn the left , use the allen wrench to keep the walking belt centered. If the walking a belt...
English Manual
Page 14
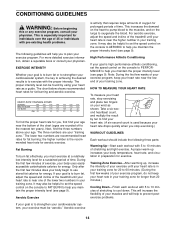
...is activity that requires large amounts of oxygen for exercise. If your goal is to burn fat, adjust the speed and incline of the treadmill until your heart rate is to 60 minutes. (During the first few weeks of your heart rate in preparation for prolonged periods of exercise... prevent postexercise problems. If your heart rate is especially important for aerobic exercise. For aerobic exercise, adjust the speed and incline of the treadmill until your goal is near the bottom of stretching to the nearest ten years). Note: During the first few weeks of stretching and light...
...is activity that requires large amounts of oxygen for exercise. If your goal is to burn fat, adjust the speed and incline of the treadmill until your heart rate is to 60 minutes. (During the first few weeks of your heart rate in preparation for prolonged periods of exercise... prevent postexercise problems. If your heart rate is especially important for aerobic exercise. For aerobic exercise, adjust the speed and incline of the treadmill until your goal is near the bottom of stretching to the nearest ten years). Note: During the first few weeks of stretching and light...

English Manual
Page 16
... part(s) (see the PART LIST and the EXPLODED DRAWING in USA © 2002 ICON Health & Fitness, Inc. This warranty gives you . WESLO is authorized by ICON. No other warranties and any economic loss, loss of property, loss of revenues or profits, loss of enjoyment or use,...only to give the following information when calling: • The MODEL NUMBER of the product (WLTL39201) • The NAME of the product (WESLO CADENCE® ex16 treadmill) • The SERIAL NUMBER of the product (see the front cover of this manual). Some states do not allow the exclusion or limitation...
... part(s) (see the PART LIST and the EXPLODED DRAWING in USA © 2002 ICON Health & Fitness, Inc. This warranty gives you . WESLO is authorized by ICON. No other warranties and any economic loss, loss of property, loss of revenues or profits, loss of enjoyment or use,...only to give the following information when calling: • The MODEL NUMBER of the product (WLTL39201) • The NAME of the product (WESLO CADENCE® ex16 treadmill) • The SERIAL NUMBER of the product (see the front cover of this manual). Some states do not allow the exclusion or limitation...


