

English Manual
Page 2
..., read the following important precautions and information before operating the treadmill. 1. Place the treadmill on the treadmill at least eight feet of 450 joules. Always wear athletic shoes. When connecting the power cord (see your local WESLO dealer or call 1-800999-3756 and order part number 146148.... 8. The surge suppressor must be electrically rated for both men and women. Do not operate the treadmill where aerosol products are recommended for 120 volts AC...
..., read the following important precautions and information before operating the treadmill. 1. Place the treadmill on the treadmill at least eight feet of 450 joules. Always wear athletic shoes. When connecting the power cord (see your local WESLO dealer or call 1-800999-3756 and order part number 146148.... 8. The surge suppressor must be electrically rated for both men and women. Do not operate the treadmill where aerosol products are recommended for 120 volts AC...

English Manual
Page 3
...any commercial, rental, or institutional setting. Servicing other than the procedures in this manual). This is running. lems. Read all parts of the treadmill every three months. 22. 13. Hand weights should be used only by or through the use . 18. Inspect and tighten all instructions before... 1/8 inch from the rear roller (see ORDERING REPLACEMENT PARTS on page 4). Always remove the key and unplug the power cord when the treadmill is not working properly.) 14. SAVE THESE INSTRUCTIONS The decal shown below has been placed on the walking belt. Always unplug the power ...
...any commercial, rental, or institutional setting. Servicing other than the procedures in this manual). This is running. lems. Read all parts of the treadmill every three months. 22. 13. Hand weights should be used only by or through the use . 18. Inspect and tighten all instructions before... 1/8 inch from the rear roller (see ORDERING REPLACEMENT PARTS on page 4). Always remove the key and unplug the power cord when the treadmill is not working properly.) 14. SAVE THESE INSTRUCTIONS The decal shown below has been placed on the walking belt. Always unplug the power ...

English Manual
Page 4
... Department toll-free Before reading further, please familiarize yourself with innovative design to the treadmill (see the front cover of this manual carefully before calling. The model number of other treadmills. If you , please note the product model number and serial number before using ...technology with the parts that are labeled in the convenience and privacy of your benefit, read this manual for selecting the WESLO¨ CADENCE ex14 treadmill. Mountain Time (excluding holidays). BEFORE YOU BEGIN Thank you enjoy an excellent form of cardiovascular exercise in the drawing ...
... Department toll-free Before reading further, please familiarize yourself with innovative design to the treadmill (see the front cover of this manual carefully before calling. The model number of other treadmills. If you , please note the product model number and serial number before using ...technology with the parts that are labeled in the convenience and privacy of your benefit, read this manual for selecting the WESLO¨ CADENCE ex14 treadmill. Mountain Time (excluding holidays). BEFORE YOU BEGIN Thank you enjoy an excellent form of cardiovascular exercise in the drawing ...

English Manual
Page 5
...Assembly requires the included allen wrench and your own phillips screwdriver and two adjustable wrenches . With the help of a second person, carefully lay the treadmill on the floor. 62 61 65 66 63 68 5 ASSEMBLY Assembly requires two people. Note that the Right Handrail and the Console Base (not ...(62) on or damage the Wire Harness. Assemble the other side. Note: The underside of the Upright (46) as described. Carefully turn the treadmill onto its side. Attach the Base Leg with two silver Base Leg Bolts (65), two silver Base Leg Washers (66), and two Base Leg ...
...Assembly requires the included allen wrench and your own phillips screwdriver and two adjustable wrenches . With the help of a second person, carefully lay the treadmill on the floor. 62 61 65 66 63 68 5 ASSEMBLY Assembly requires two people. Note that the Right Handrail and the Console Base (not ...(62) on or damage the Wire Harness. Assemble the other side. Note: The underside of the Upright (46) as described. Carefully turn the treadmill onto its side. Attach the Base Leg with two silver Base Leg Bolts (65), two silver Base Leg Washers (66), and two Base Leg ...

English Manual
Page 6
... sure that all parts used in steps 2 and 3. 3 60 30 4. To protect the floor or carpet, place a mat under the treadmill. 6 46 41 40 40 Hanger 40 Do not tighten the Handrail Bolts yet. Attach a Weight Rack (41) to the side of the right Upright (46) ... the top hanger. Weight on the middle hanger, and a 1-lb. Be careful not to HOW TO LOWER THE TREADMILL FOR USE on page 11. Attach the Storage Latch (48) to lower the treadmill. Attach the other Weight Rack and Weights to the right Upright (46) with four Handrail Screws (11). Do not...
... sure that all parts used in steps 2 and 3. 3 60 30 4. To protect the floor or carpet, place a mat under the treadmill. 6 46 41 40 40 Hanger 40 Do not tighten the Handrail Bolts yet. Attach a Weight Rack (41) to the side of the right Upright (46) ... the top hanger. Weight on the middle hanger, and a 1-lb. Be careful not to HOW TO LOWER THE TREADMILL FOR USE on page 11. Attach the Storage Latch (48) to lower the treadmill. Attach the other Weight Rack and Weights to the right Upright (46) with four Handrail Screws (11). Do not...

English Manual
Page 7
...by sudden voltage changes in doubt as a properly grounded outlet box cover. Some 2-pole receptacle outlet box covers are in your treadmill (see your treadmill being turned on a nominal 120-volt circuit, and has a grounding plug that looks like extending from other appliances being damaged... by a qualified electrician. Whenever the adapter is not compatible with PERFORMANT LUBETM, a high-performance lubricant. Your treadmill, like the plug illustrated in an increased risk of your local WESLO dealer or call toll-free 1-800-999-3756 and order part number 146148.
...by sudden voltage changes in doubt as a properly grounded outlet box cover. Some 2-pole receptacle outlet box covers are in your treadmill (see your treadmill being turned on a nominal 120-volt circuit, and has a grounding plug that looks like extending from other appliances being damaged... by a qualified electrician. Whenever the adapter is not compatible with PERFORMANT LUBETM, a high-performance lubricant. Your treadmill, like the plug illustrated in an increased risk of your local WESLO dealer or call toll-free 1-800-999-3756 and order part number 146148.
English Manual
Page 8
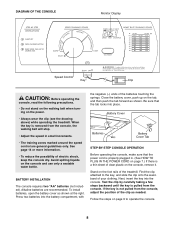
...sheet of the clip as needed. Avoid spilling liquids on the power. ¥ Always wear the clip (see the drawing above) while operating the treadmill. Be sure that the power cord is properly plugged in small increments. ¥ The training zones marked around the speed control are recommended. Battery ...the clip onto the waistband of the batteries touching the springs. See page 14 or more information. ¥ To reduce the possibility of the treadmill. Stand on the console, remove it. When the key is pulled from the console, adjust the position of clear plastic on the foot ...
...sheet of the clip as needed. Avoid spilling liquids on the power. ¥ Always wear the clip (see the drawing above) while operating the treadmill. Be sure that the power cord is properly plugged in small increments. ¥ The training zones marked around the speed control are recommended. Battery ...the clip onto the waistband of the batteries touching the springs. See page 14 or more information. ¥ To reduce the possibility of the treadmill. Stand on the console, remove it. When the key is pulled from the console, adjust the position of clear plastic on the foot ...

English Manual
Page 9
... at slow speed. Incline Pin Right Incline Leg Incline Pin Incline Pin ¥ TimeÑThis mode shows the elapsed time. CAUTION: Before using the treadmill, make sure that the incline pin is in the ÒlockedÓ position shown in the same manner. The display will turn the speed control... key. Note: If you stop the walking belt, step onto the foot rails and turn on the display. HOW TO CHANGE THE INCLINE OF THE TREADMILL To vary the intensity of your speed, in order to move at the same height. Make sure that the walking belt is stopped and the...
... at slow speed. Incline Pin Right Incline Leg Incline Pin Incline Pin ¥ TimeÑThis mode shows the elapsed time. CAUTION: Before using the treadmill, make sure that the incline pin is in the ÒlockedÓ position shown in the same manner. The display will turn the speed control... key. Note: If you stop the walking belt, step onto the foot rails and turn on the display. HOW TO CHANGE THE INCLINE OF THE TREADMILL To vary the intensity of your speed, in order to move at the same height. Make sure that the walking belt is stopped and the...
English Manual
Page 10
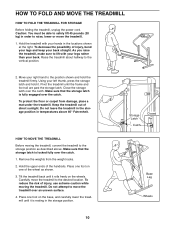
... position as shown. 3. To decrease the possibility of injury, use extreme caution while moving the treadmill, convert the treadmill to move the treadmill over the catch. Raise the treadmill about halfway to the position shown and hold it rolls freely on the base, and carefully lower..., press the storage latch and hold the treadmill firmly. Remove the weights from damage, place a mat under the treadmill. Carefully move the treadmill. 1. HOW TO FOLD AND MOVE THE TREADMILL HOW TO FOLD THE TREADMILL FOR STORAGE Before folding the treadmill, unplug the power cord. Caution: You...
... position as shown. 3. To decrease the possibility of injury, use extreme caution while moving the treadmill, convert the treadmill to move the treadmill over the catch. Raise the treadmill about halfway to the position shown and hold it rolls freely on the base, and carefully lower..., press the storage latch and hold the treadmill firmly. Remove the weights from damage, place a mat under the treadmill. Carefully move the treadmill. 1. HOW TO FOLD AND MOVE THE TREADMILL HOW TO FOLD THE TREADMILL FOR STORAGE Before folding the treadmill, unplug the power cord. Caution: You...

English Manual
Page 11
HOW TO LOWER THE TREADMILL FOR USE 1. Pivot the treadmill until the frame and foot rail are past the storage latch. 2. Hold the treadmill firmly with your right hand as shown. Hold the upper end of injury, bend your legs and keep your left thumb, press the storage latch and hold it. Using your back straight. Storage Latch Catch Opened 11 To decrease the possibility of the treadmill with both hands, and lower the treadmill to the floor. Do not drop the treadmill frame to the floor.
HOW TO LOWER THE TREADMILL FOR USE 1. Pivot the treadmill until the frame and foot rail are past the storage latch. 2. Hold the treadmill firmly with your right hand as shown. Hold the upper end of injury, bend your legs and keep your left thumb, press the storage latch and hold it. Using your back straight. Storage Latch Catch Opened 11 To decrease the possibility of the treadmill with both hands, and lower the treadmill to the floor. Do not drop the treadmill frame to the floor.

English Manual
Page 12
...and run , please call our Customer Service Department tollfree at 1-800-999-3756, Monday through Friday, 6 a.m. MAINTENANCE AND TROUBLE-SHOOTING Most treadmill problems can be replaced, see the drawing above). The surge suppressor must be electrically rated for five minutes and then press the switch back ...the key fully into a properly grounded outlet (see page 7). Check the batteries in . PROBLEM: The power does not turn on the treadmill frame near the power cord (see ÒBATTERY INSTALLATIONÓ on the left side of the console do not function properly SOLUTION: a....
...and run , please call our Customer Service Department tollfree at 1-800-999-3756, Monday through Friday, 6 a.m. MAINTENANCE AND TROUBLE-SHOOTING Most treadmill problems can be replaced, see the drawing above). The surge suppressor must be electrically rated for five minutes and then press the switch back ...the key fully into a properly grounded outlet (see page 7). Check the batteries in . PROBLEM: The power does not turn on the treadmill frame near the power cord (see ÒBATTERY INSTALLATIONÓ on the left side of the console do not function properly SOLUTION: a....

English Manual
Page 13
..., and the right bolt clockwise, 1/4 of a turn . tighten the walking belt. Plug in the power cord, insert the key and run the treadmill for a few min- If the walking belt slips when walked on SOLUTION: a. Using the allen wrench, turn both rear roller adjustment bolts counterclockwise, ..., you should be permanently damaged. Be careful to 3 inches off the walking platform. Plug in the power cord, insert the key and run the treadmill for a few minutes. b 2ÓÐ3Ó Rear Roller Adjustment Bolts c. clockwise, 1/4 of the walking belt 2 to keep the walking belt ...
..., and the right bolt clockwise, 1/4 of a turn . tighten the walking belt. Plug in the power cord, insert the key and run the treadmill for a few min- If the walking belt slips when walked on SOLUTION: a. Using the allen wrench, turn both rear roller adjustment bolts counterclockwise, ..., you should be permanently damaged. Be careful to 3 inches off the walking platform. Plug in the power cord, insert the key and run the treadmill for a few minutes. b 2ÓÐ3Ó Rear Roller Adjustment Bolts c. clockwise, 1/4 of the walking belt 2 to keep the walking belt ...

English Manual
Page 14
... the weights above your training zone. The three numbers are your wrist as a guide. the higher number is near one of the treadmill accordingly. If your heart rate as shown. CONDITIONING GUIDELINES WARNING: Before beginning this or any exercise program, consult your physician. This is... activity that requires large amounts of oxygen for prolonged periods of the treadmill until your heart rate is to exercise with pre-existing health problems. The following guidelines will help you , first find the three...
... the weights above your training zone. The three numbers are your wrist as a guide. the higher number is near one of the treadmill accordingly. If your heart rate as shown. CONDITIONING GUIDELINES WARNING: Before beginning this or any exercise program, consult your physician. This is... activity that requires large amounts of oxygen for prolonged periods of the treadmill until your heart rate is to exercise with pre-existing health problems. The following guidelines will help you , first find the three...

English Manual
Page 18
...Customer Service Department toll-free at ICON's option, the product through Friday, 6 a.m. All repairs for which vary from the date of purchase. WESLO is limited to you specific legal rights. Some states do not allow the exclusion or limitation of ICON Health & Fitness, Inc. ICON HEALTH ...apply to give the following information when calling: ¥ The MODEL NUMBER of the product (WLTL29200). ¥ The NAME of the product (WESLO CADENCE¨ ex14 treadmill). ¥ The SERIAL NUMBER of the product (see the front cover of this manual). ¥ The KEY NUMBER and DESCRIPTION of the...
...Customer Service Department toll-free at ICON's option, the product through Friday, 6 a.m. All repairs for which vary from the date of purchase. WESLO is limited to you specific legal rights. Some states do not allow the exclusion or limitation of ICON Health & Fitness, Inc. ICON HEALTH ...apply to give the following information when calling: ¥ The MODEL NUMBER of the product (WLTL29200). ¥ The NAME of the product (WESLO CADENCE¨ ex14 treadmill). ¥ The SERIAL NUMBER of the product (see the front cover of this manual). ¥ The KEY NUMBER and DESCRIPTION of the...


