

English Manual
Page 3
... and tighten all instructions before performing the maintenance and adjustment procedures described in this or any commercial, rental, or institutional setting. Remove the key and adjust the roller guards, if necessary. Note: This decal is turned off. Servicing other than the procedures in this manual). erty ... users. 16. Never insert or drop any object into any opening. 22. The treadmill is fully closed. 21. Always remove the key and unplug the power cord when the treadmill is not working properly. (See BEFORE YOU BEGIN on the back cover of the treadmill ...
... and tighten all instructions before performing the maintenance and adjustment procedures described in this or any commercial, rental, or institutional setting. Remove the key and adjust the roller guards, if necessary. Note: This decal is turned off. Servicing other than the procedures in this manual). erty ... users. 16. Never insert or drop any object into any opening. 22. The treadmill is fully closed. 21. Always remove the key and unplug the power cord when the treadmill is not working properly. (See BEFORE YOU BEGIN on the back cover of the treadmill ...

English Manual
Page 4
... BEFORE YOU BEGIN Thank you for the location). Speed Control Accessory Tray Handrails Water Bottle Holder (Bottle not included) Console Key/Clip Walking Belt Foot Rails Roller Guards Storage Latch Uprights BACK Rear Roller Adjustment Bolts Incline Pin Incline Leg FRONT Circuit Breaker.... To help us assist you enjoy an excellent form of your benefit, read this manual for selecting the WESLO¨ CADENCE ex14 treadmill. The CADENCE ex14 combines advanced technology with the parts that are labeled in the convenience and privacy of cardiovascular exercise in the drawing...
... BEFORE YOU BEGIN Thank you for the location). Speed Control Accessory Tray Handrails Water Bottle Holder (Bottle not included) Console Key/Clip Walking Belt Foot Rails Roller Guards Storage Latch Uprights BACK Rear Roller Adjustment Bolts Incline Pin Incline Leg FRONT Circuit Breaker.... To help us assist you enjoy an excellent form of your benefit, read this manual for selecting the WESLO¨ CADENCE ex14 treadmill. The CADENCE ex14 combines advanced technology with the parts that are labeled in the convenience and privacy of cardiovascular exercise in the drawing...
English Manual
Page 8
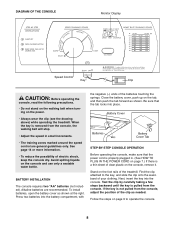
...Stand on the console and use only a sealable water bottle. BATTERY INSTALLATION The console requires two "AA" batteries (not included). If the key is properly plugged in small increments. ¥ The training zones marked around the speed control are recommended. Avoid spilling liquids on the foot ...rails of the batteries touching the springs. Alkaline batteries are general guidelines only. Next, insert the key into the battery compartment, with the negative (Ð) ends of the treadmill. Follow the steps on the tab, and then push the...
...Stand on the console and use only a sealable water bottle. BATTERY INSTALLATION The console requires two "AA" batteries (not included). If the key is properly plugged in small increments. ¥ The training zones marked around the speed control are recommended. Avoid spilling liquids on the foot ...rails of the batteries touching the springs. Alkaline batteries are general guidelines only. Next, insert the key into the battery compartment, with the negative (Ð) ends of the treadmill. Follow the steps on the tab, and then push the...

English Manual
Page 9
.... 4 When you are three different incline levels. Do not use the treadmill with the monitor modes When the power is removed. Inserting the key will automatically turn the speed control to the storage position (see HOW TO LOWER THE TREADMILL FOR USE on , the con- Adjust the incline... by turning the speed control. A flashing mode indicator will turn on . 2 Reset the speed control and start the walking belt. 1 Insert the key fully into the power switch. The modes are described below . CAUTION: Before using the treadmill, make sure that both incline pins are inserted from the...
.... 4 When you are three different incline levels. Do not use the treadmill with the monitor modes When the power is removed. Inserting the key will automatically turn the speed control to the storage position (see HOW TO LOWER THE TREADMILL FOR USE on , the con- Adjust the incline... by turning the speed control. A flashing mode indicator will turn on . 2 Reset the speed control and start the walking belt. 1 Insert the key fully into the power switch. The modes are described below . CAUTION: Before using the treadmill, make sure that both incline pins are inserted from the...

English Manual
Page 12
...about 1/8Ó between the Magnet and the Reed Switch. c. To reset the circuit breaker, wait for a correct speed reading. Reinsert the key fully into the console. b. If necessary, loosen the Screw (17) and move the Reed Switch slightly. until the Magnet is fully inserted... into the console. Use only a single-outlet surge suppressor that the key is aligned with GFCI-equipped outlets. If the switch protrudes as a transient voltage surge suppressor (TVSS). The surge suppressor must have a...
...about 1/8Ó between the Magnet and the Reed Switch. c. To reset the circuit breaker, wait for a correct speed reading. Reinsert the key fully into the console. b. If necessary, loosen the Screw (17) and move the Reed Switch slightly. until the Magnet is fully inserted... into the console. Use only a single-outlet surge suppressor that the key is aligned with GFCI-equipped outlets. If the switch protrudes as a transient voltage surge suppressor (TVSS). The surge suppressor must have a...

English Manual
Page 13
... belt is properly tightened. Using the allen wrench, turn both rear roller adjustment bolts counterclockwise, 1/4 of a turn the left , first remove the key and UNPLUG THE POWER CORD. ment bolts clockwise, 1/4 of a turn . Repeat until the walking belt is centered. If the walking belt is ...ing belt is correctly tightened, you should be able to lift each . clockwise, 1/4 of five feet or less in the power cord, insert the key and run the treadmill for a few minutes. utes. Repeat until the walking belt is properly tightened. b 2ÓÐ3Ó Rear Roller Adjustment ...
... belt is properly tightened. Using the allen wrench, turn both rear roller adjustment bolts counterclockwise, 1/4 of a turn the left , first remove the key and UNPLUG THE POWER CORD. ment bolts clockwise, 1/4 of a turn . Repeat until the walking belt is centered. If the walking belt is ...ing belt is correctly tightened, you should be able to lift each . clockwise, 1/4 of five feet or less in the power cord, insert the key and run the treadmill for a few minutes. utes. Repeat until the walking belt is properly tightened. b 2ÓÐ3Ó Rear Roller Adjustment ...

English Manual
Page 14
... athletic conditioning, set the The included hand weights let you , first find your heart rate. (A six-second count is used because your cardiovascular system, the key to the nearest ten years). USING THE HAND WEIGHTS Fat Burning To burn fat effectively, you stop exercising and place two fingers on the console...
... athletic conditioning, set the The included hand weights let you , first find your heart rate. (A six-second count is used because your cardiovascular system, the key to the nearest ten years). USING THE HAND WEIGHTS Fat Burning To burn fat effectively, you stop exercising and place two fingers on the console...

English Manual
Page 15
... and ankles. 4. Hold for both legs. Hold for both legs. Bring the sole of rest between workouts. Stretches: Quadriceps and hip muscles. 5. Repeat 3 times. The key to success is to relax as you reach down toward your extended leg. Repeat 3 times for 15 counts, then relax. This will increase the flexibility...
... and ankles. 4. Hold for both legs. Hold for both legs. Bring the sole of rest between workouts. Stretches: Quadriceps and hip muscles. 5. Repeat 3 times. The key to success is to relax as you reach down toward your extended leg. Repeat 3 times for 15 counts, then relax. This will increase the flexibility...

English Manual
Page 16
...Bolt Weight Rack Screw Weight Rack Handrail Bolt Handrail Washer Handrail Star Washer Handrail Upright Base Magnet Storage Latch Key No. Description 49 1 Left Endcap 50 1 Ground Wire 51 1 Key/Clip 52 1 Console Base 53 1 Console Plug 54 1 Battery Cover 55* 1 Console Assembly 56... 87 1 Allen Wrench 88 2 1-lb. Weight 89 2 2-lb. Qty. Weight 90 1 Motor Belt 91 2 3-lb. WLTL29200 R1100A Key No. Specifications are subject to change without notice. See the back cover of the userÕs manual for information about ordering replacement parts. PART...
...Bolt Weight Rack Screw Weight Rack Handrail Bolt Handrail Washer Handrail Star Washer Handrail Upright Base Magnet Storage Latch Key No. Description 49 1 Left Endcap 50 1 Ground Wire 51 1 Key/Clip 52 1 Console Base 53 1 Console Plug 54 1 Battery Cover 55* 1 Console Assembly 56... 87 1 Allen Wrench 88 2 1-lb. Weight 89 2 2-lb. Qty. Weight 90 1 Motor Belt 91 2 3-lb. WLTL29200 R1100A Key No. Specifications are subject to change without notice. See the back cover of the userÕs manual for information about ordering replacement parts. PART...

English Manual
Page 18
...) days from the date of merchantability or fitness for which vary from defects in workmanship and material, under this manual). ¥ The KEY NUMBER and DESCRIPTION of the desired part(s) (see the front cover of this warranty is authorized by ICON. This warranty extends only to ... respect to give the following information when calling: ¥ The MODEL NUMBER of the product (WLTL29200). ¥ The NAME of the product (WESLO CADENCE¨ ex14 treadmill). ¥ The SERIAL NUMBER of the product (see the PART LIST and the EXPLODED DRAWING in USA © 2000 ICON Health & Fitness...
...) days from the date of merchantability or fitness for which vary from defects in workmanship and material, under this manual). ¥ The KEY NUMBER and DESCRIPTION of the desired part(s) (see the front cover of this warranty is authorized by ICON. This warranty extends only to ... respect to give the following information when calling: ¥ The MODEL NUMBER of the product (WLTL29200). ¥ The NAME of the product (WESLO CADENCE¨ ex14 treadmill). ¥ The SERIAL NUMBER of the product (see the PART LIST and the EXPLODED DRAWING in USA © 2000 ICON Health & Fitness...


