
English Manual
Page 1
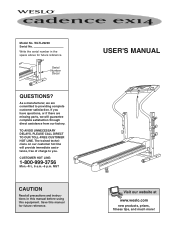
... reference. Save this equipment. ¨ Model No. If you have questions, or if there are committed to you. USER'S MANUAL Visit our website at www.weslo.com new products, prizes, fitness tips, and much more!
... reference. Save this equipment. ¨ Model No. If you have questions, or if there are committed to you. USER'S MANUAL Visit our website at www.weslo.com new products, prizes, fitness tips, and much more!

English Manual
Page 2
... 400 volts or less and a minimum surge dissipation of 450 joules. Never use an extension cord. 11. When connecting the power cord (see your local WESLO dealer or call 1-800999-3756 and order part number 146148. 8. No other appliance should not be electrically rated for both men and women. It is...
... 400 volts or less and a minimum surge dissipation of 450 joules. Never use an extension cord. 11. When connecting the power cord (see your local WESLO dealer or call 1-800999-3756 and order part number 146148. 8. No other appliance should not be electrically rated for both men and women. It is...

English Manual
Page 3
13. The treadmill is running. Do not attempt to raise, lower, or move the treadmill until it is capable of this product. Remove the key and adjust the roller guards, if necessary. Servicing other than the procedures in order to maintain your treadmill. vice representative only. 24. Do not operate the treadmill if the power cord or plug is damaged, or if the treadmill is not working properly.) 14. Using hand weights and not holding the handrails may compromise your ability to raise, lower, or move the walking belt while the power is shown at 38% of the treadmill every...
13. The treadmill is running. Do not attempt to raise, lower, or move the treadmill until it is capable of this product. Remove the key and adjust the roller guards, if necessary. Servicing other than the procedures in order to maintain your treadmill. vice representative only. 24. Do not operate the treadmill if the power cord or plug is damaged, or if the treadmill is not working properly.) 14. Using hand weights and not holding the handrails may compromise your ability to raise, lower, or move the walking belt while the power is shown at 38% of the treadmill every...

English Manual
Page 4
until 6 p.m. The model number of your benefit, read this manual for selecting the WESLO¨ CADENCE ex14 treadmill. And when you have additional questions, please call our Customer Service Department toll-free Before reading further, please familiarize yourself with ... this manual carefully before calling. at 1-800-999-3756, Monday through Friday, 6 a.m. For your home. If you Õre not exercising, the CADENCE ex14 can be folded up, requiring less than half the floor space of cardiovascular exercise in the drawing below. The serial number can be found on...
until 6 p.m. The model number of your benefit, read this manual for selecting the WESLO¨ CADENCE ex14 treadmill. And when you have additional questions, please call our Customer Service Department toll-free Before reading further, please familiarize yourself with ... this manual carefully before calling. at 1-800-999-3756, Monday through Friday, 6 a.m. For your home. If you Õre not exercising, the CADENCE ex14 can be folded up, requiring less than half the floor space of cardiovascular exercise in the drawing below. The serial number can be found on...

English Manual
Page 5
Note that the Base Leg Pads (63) and the Wheel (68) are resting flat on its other Base Leg (62) as shown. With the help of a second person, carefully raise the treadmill to the treadmill by a Wire 1 Harness. During shipping, a small amount of lubricant may be careful not to the top of a second person, carefully lay the treadmill on the floor. 62 61 65 66 63 68 5 Screw (2)Ð2 Console Screw (11)Ð4 Weight Rack Screw (40)Ð12 Handrail Star Washer (44)Ð4 Handrail Washer (43) (Black)Ð4 Upright Bolt (42) (Black)Ð4 Base Leg Nut (61) (...
Note that the Base Leg Pads (63) and the Wheel (68) are resting flat on its other Base Leg (62) as shown. With the help of a second person, carefully raise the treadmill to the treadmill by a Wire 1 Harness. During shipping, a small amount of lubricant may be careful not to the top of a second person, carefully lay the treadmill on the floor. 62 61 65 66 63 68 5 Screw (2)Ð2 Console Screw (11)Ð4 Weight Rack Screw (40)Ð12 Handrail Star Washer (44)Ð4 Handrail Washer (43) (Black)Ð4 Upright Bolt (42) (Black)Ð4 Base Leg Nut (61) (...

English Manual
Page 6
Hold a Handrail (30) against the left Upright (46) as described above (not shown). 6. Feed the excess Wire Harness (60) into the left Upright as shown. Tighten all parts are tightened before you use the treadmill. Attach the other Weight Rack and Weights to the left Upright and the Left Handrail. Weight on page 11. Refer to lower the treadmill. Thread two black Handrail Bolts (42), with two black Handrail Washers (43) and two Handrail Star Washers (44), into the upper end of the right Handrail and Upright. Feed the excess Wire Harness (60) into the upper end of the ...
Hold a Handrail (30) against the left Upright (46) as described above (not shown). 6. Feed the excess Wire Harness (60) into the left Upright as shown. Tighten all parts are tightened before you use the treadmill. Attach the other Weight Rack and Weights to the left Upright and the Left Handrail. Weight on page 11. Refer to lower the treadmill. Thread two black Handrail Bolts (42), with two black Handrail Washers (43) and two Handrail Star Washers (44), into the upper end of the right Handrail and Upright. Feed the excess Wire Harness (60) into the upper end of the ...

English Manual
Page 7
... local codes and ordinances. To decrease the possibility of electric shock. Voltage surges, spikes, and noise interference can result in your treadmill (see your local WESLO dealer or call toll-free 1-800-999-3756 and order part number 146148. IMPORTANT: Never apply silicone spray or other appliances being damaged, always use...
... local codes and ordinances. To decrease the possibility of electric shock. Voltage surges, spikes, and noise interference can result in your treadmill (see your local WESLO dealer or call toll-free 1-800-999-3756 and order part number 146148. IMPORTANT: Never apply silicone spray or other appliances being damaged, always use...
English Manual
Page 8
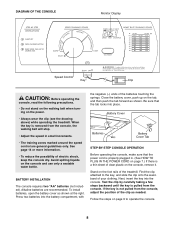
Alkaline batteries are general guidelines only. Be sure that the power cord is properly plugged in small increments. ¥ The training zones marked around the speed control are recommended. Follow the steps on the console and use only a sealable water bottle. Battery Cover Batteries Battery Cover Tab STEP-BY-STEP CONSOLE OPERATION Before operating the console, make sure that the tab locks into place. Stand on the foot rails of your clothing. Find the clip attached to operate the console. 8 Test the clip by carefully taking a few steps backward until the key is a thin ...
Alkaline batteries are general guidelines only. Be sure that the power cord is properly plugged in small increments. ¥ The training zones marked around the speed control are recommended. Follow the steps on the console and use only a sealable water bottle. Battery Cover Batteries Battery Cover Tab STEP-BY-STEP CONSOLE OPERATION Before operating the console, make sure that the tab locks into place. Stand on the foot rails of your clothing. Find the clip attached to operate the console. 8 Test the clip by carefully taking a few steps backward until the key is a thin ...

English Manual
Page 9
To stop the walking belt, and remove the key from the right incline leg as desired by pressing the DISPLAY button. 4 When you just installed batteries, the display will turn on , the con- played. After you have burned. Note: Each time the walking belt is removed. The display will automatically turn the speed control to the storage position (see HOW TO LOWER THE TREADMILL FOR USE on page 14.) Adjust the left incline leg in the same manner. HOW TO CHANGE THE INCLINE OF THE TREADMILL To vary the intensity of your exercise, the incline of calories you have ...
To stop the walking belt, and remove the key from the right incline leg as desired by pressing the DISPLAY button. 4 When you just installed batteries, the display will turn on , the con- played. After you have burned. Note: Each time the walking belt is removed. The display will automatically turn the speed control to the storage position (see HOW TO LOWER THE TREADMILL FOR USE on page 14.) Adjust the left incline leg in the same manner. HOW TO CHANGE THE INCLINE OF THE TREADMILL To vary the intensity of your exercise, the incline of calories you have ...
English Manual
Page 10
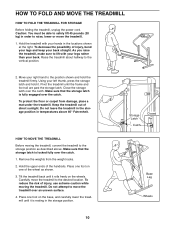
Raise the treadmill about halfway to lift with your back straight. Make sure that the storage latch is fully engaged over the catch. 1. Remove the weights from damage, place a mat under the treadmill. Make sure that the storage latch is locked fully over the catch. Place one foot on one foot on the base, and carefully lower the treadmill until it is resting in order to the position shown and hold it rolls freely on the wheels. Close the storage latch over an uneven surface. 4. To reduce the risk of injury, use extreme caution while moving the ...
Raise the treadmill about halfway to lift with your back straight. Make sure that the storage latch is fully engaged over the catch. 1. Remove the weights from damage, place a mat under the treadmill. Make sure that the storage latch is locked fully over the catch. Place one foot on one foot on the base, and carefully lower the treadmill until it is resting in order to the position shown and hold it rolls freely on the wheels. Close the storage latch over an uneven surface. 4. To reduce the risk of injury, use extreme caution while moving the ...

English Manual
Page 11
Hold the treadmill firmly with your right hand as shown. Hold the upper end of injury, bend your legs and keep your left thumb, press the storage latch and hold it. Using your back straight. Pivot the treadmill until the frame and foot rail are past the storage latch. 2. Storage Latch Catch Opened 11 To decrease the possibility of the treadmill with both hands, and lower the treadmill to the floor. HOW TO LOWER THE TREADMILL FOR USE 1. Do not drop the treadmill frame to the floor.
Hold the treadmill firmly with your right hand as shown. Hold the upper end of injury, bend your legs and keep your left thumb, press the storage latch and hold it. Using your back straight. Pivot the treadmill until the frame and foot rail are past the storage latch. 2. Storage Latch Catch Opened 11 To decrease the possibility of the treadmill with both hands, and lower the treadmill to the floor. HOW TO LOWER THE TREADMILL FOR USE 1. Do not drop the treadmill frame to the floor.

English Manual
Page 12
The surge suppressor must be solved by following the steps below. b. c. Check the circuit breaker located on the treadmill frame near the power cord (see page 7). To reset the circuit breaker, wait for five minutes and then press the switch back in. Check the circuit breaker located on page 8. If the circuit breaker has tripped, wait for five minutes and then press the switch back in , make sure that the surge suppressor is not compatible with the Reed Switch. Locate the Reed Switch (76) and the Magnet (93) on SOLUTION: a. If necessary, loosen the Screw (17) and ...
The surge suppressor must be solved by following the steps below. b. c. Check the circuit breaker located on the treadmill frame near the power cord (see page 7). To reset the circuit breaker, wait for five minutes and then press the switch back in. Check the circuit breaker located on page 8. If the circuit breaker has tripped, wait for five minutes and then press the switch back in , make sure that the surge suppressor is not compatible with the Reed Switch. Locate the Reed Switch (76) and the Magnet (93) on SOLUTION: a. If necessary, loosen the Screw (17) and ...

English Manual
Page 13
utes. b Using the allen wrench, turn the left , first remove the key and UNPLUG THE POWER CORD. Plug in the power cord, insert the key and run the treadmill for a few minutes. Repeat until the walking belt is centered. ing belt is correctly tightened, you should be able to lift each . Remove the key and UNPLUG THE POWER CORD. b 2ÓÐ3Ó Rear Roller Adjustment Bolts c. b. If the walking belt has shifted to 3 inches off the walking platform. Be careful not to 3 inches off the walking platform. c. Repeat until the walking belt is properly ...
utes. b Using the allen wrench, turn the left , first remove the key and UNPLUG THE POWER CORD. Plug in the power cord, insert the key and run the treadmill for a few minutes. Repeat until the walking belt is centered. ing belt is correctly tightened, you should be able to lift each . Remove the key and UNPLUG THE POWER CORD. b 2ÓÐ3Ó Rear Roller Adjustment Bolts c. b. If the walking belt has shifted to 3 inches off the walking platform. Be careful not to 3 inches off the walking platform. c. Repeat until the walking belt is properly ...

English Manual
Page 14
speed control on the console to AEROBIC to strengthen your cardiovascular system, your exercise must exercise at speeds faster than a walk. It may also be helpful to set the speed control on the console to FAT BURN to help you maintain the proper intensity level. (See page 9.) Aerobic Exercise If your goal is to help you maintain the proper intensity level. (See page 9.) High Performance Athletic Conditioning If your training zone. Only after the first few minutes of exercise, your wrist as a guide. It may compromise your ability to exercise with pre-existing health ...
speed control on the console to AEROBIC to strengthen your cardiovascular system, your exercise must exercise at speeds faster than a walk. It may also be helpful to set the speed control on the console to FAT BURN to help you maintain the proper intensity level. (See page 9.) Aerobic Exercise If your goal is to help you maintain the proper intensity level. (See page 9.) High Performance Athletic Conditioning If your training zone. Only after the first few minutes of exercise, your wrist as a guide. It may compromise your ability to exercise with pre-existing health ...

English Manual
Page 15
Allow your back and shoulders to your buttocks as well. Hold for 15 counts, then relax. Calf/Achilles Stretch With one hand against a wall for both legs. Hold for 15 counts, then relax. Bring your training zone for 15 counts, then relax. Inner Thigh Stretch Sit with 5 to success is in the drawings below. A Cool-down A Warm-up increases your body temperature, heart rate, and circulation in preparation for several basic stretches is shown in your heel as close to relax as you stretchÑnever bounce. 1. A proper warm-up Start each week if desired. ...
Allow your back and shoulders to your buttocks as well. Hold for 15 counts, then relax. Calf/Achilles Stretch With one hand against a wall for both legs. Hold for 15 counts, then relax. Bring your training zone for 15 counts, then relax. Inner Thigh Stretch Sit with 5 to success is in the drawings below. A Cool-down A Warm-up increases your body temperature, heart rate, and circulation in preparation for several basic stretches is shown in your heel as close to relax as you stretchÑnever bounce. 1. A proper warm-up Start each week if desired. ...

English Manual
Page 16
Description 49 1 Left Endcap 50 1 Ground Wire 51 1 Key/Clip 52 1 Console Base 53 1 Console Plug 54 1 Battery Cover 55* 1 Console Assembly 56 1 Speed Potentiometer 57 1 Console 58 1 Upright Grommet 59 2 Upright Endcap 60 1 Wire Harness 61 8 Base Leg Nut 62 2 Base Leg 63 4 Base Leg Pad 64 2 Handrail Endcap 65 4 Base Leg 66 6 Wheel Washer/Base Leg Washer 67 2 Wheel Bolt 68 2 Wheel 69 1 Speed Control 70 2 Frame Pivot Bolt 71 2 Frame Pivot Washer 72 1 Walking Belt 73 1 Belly pan 74 1 Walking Board 75 1 Warning Decal...
Description 49 1 Left Endcap 50 1 Ground Wire 51 1 Key/Clip 52 1 Console Base 53 1 Console Plug 54 1 Battery Cover 55* 1 Console Assembly 56 1 Speed Potentiometer 57 1 Console 58 1 Upright Grommet 59 2 Upright Endcap 60 1 Wire Harness 61 8 Base Leg Nut 62 2 Base Leg 63 4 Base Leg Pad 64 2 Handrail Endcap 65 4 Base Leg 66 6 Wheel Washer/Base Leg Washer 67 2 Wheel Bolt 68 2 Wheel 69 1 Speed Control 70 2 Frame Pivot Bolt 71 2 Frame Pivot Washer 72 1 Walking Belt 73 1 Belly pan 74 1 Walking Board 75 1 Warning Decal...

English Manual
Page 18
...attributable to give the following information when calling: ¥ The MODEL NUMBER of the product (WLTL29200). ¥ The NAME of the product (WESLO CADENCE¨ ex14 treadmill). ¥ The SERIAL NUMBER of the product (see the front cover of this manual). ¥ The KEY NUMBER and DESCRIPTION of the...may not apply to replacing or repairing, at 1-800-999-3756, Monday through one of its scope and duration to the original purchaser. WESLO is in connection with the use and service conditions, for a particular purpose is authorized by ICON. No other consequential damages of this ...
...attributable to give the following information when calling: ¥ The MODEL NUMBER of the product (WLTL29200). ¥ The NAME of the product (WESLO CADENCE¨ ex14 treadmill). ¥ The SERIAL NUMBER of the product (see the front cover of this manual). ¥ The KEY NUMBER and DESCRIPTION of the...may not apply to replacing or repairing, at 1-800-999-3756, Monday through one of its scope and duration to the original purchaser. WESLO is in connection with the use and service conditions, for a particular purpose is authorized by ICON. No other consequential damages of this ...