
User Manual
Page 1
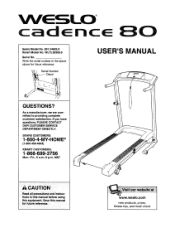
.... MST CAUTION Read all precautions and Instructions in the space above for future reference, BO USER'S MANUAL www.weslo.com new products, prizes, fitness tips, and much more! Write the serial number in this manual before using this manual for future reference. If you have questions, PLEASE CONTACT OUR CUSTOMER SERVICE DEPARTMENT DIRECTLY. SEARS CUSTOMERS: 1-800-4-MY-HOME ® (1-800-469-4663) KMART CUSTOMERS: 1-866...
.... MST CAUTION Read all precautions and Instructions in the space above for future reference, BO USER'S MANUAL www.weslo.com new products, prizes, fitness tips, and much more! Write the serial number in this manual before using this manual for future reference. If you have questions, PLEASE CONTACT OUR CUSTOMER SERVICE DEPARTMENT DIRECTLY. SEARS CUSTOMERS: 1-800-4-MY-HOME ® (1-800-469-4663) KMART CUSTOMERS: 1-866...
User Manual
Page 2
WESLO ° 80 TABLE OF CONTENTS IMPORTANT PRECAUTIONS BEFORE YOU BEGIN ASSEMBLY OPERATION AND ADJUSTMENT HOW TO FOLD AND MOVE THE TREADMILL MAINTENANCE AND TROUBLESHOOTING CONDITIONING GUIDELINES ORDERING REPLACEMENT PARTS 3 5 6 10 13 15 17 Back Cover Note: A PART IDENTIFICATION CHART, an EXPLODED DRAWING, and a PART LIST are attached in the center of ICON IP, Inc. 2 WESLO is a registered trademark of this manual.
WESLO ° 80 TABLE OF CONTENTS IMPORTANT PRECAUTIONS BEFORE YOU BEGIN ASSEMBLY OPERATION AND ADJUSTMENT HOW TO FOLD AND MOVE THE TREADMILL MAINTENANCE AND TROUBLESHOOTING CONDITIONING GUIDELINES ORDERING REPLACEMENT PARTS 3 5 6 10 13 15 17 Back Cover Note: A PART IDENTIFICATION CHART, an EXPLODED DRAWING, and a PART LIST are attached in the center of ICON IP, Inc. 2 WESLO is a registered trademark of this manual.

User Manual
Page 3
... be used or where oxygen is not working properly. (See MAINTENANCE AND TROUBLESHOOTING on the walking belt. Adjust the speed In small increments to ensure that all users of this manual and order part number 146148, or see HOW TO TURN ON THE POWER on any surface that the storage latch is running. Never leave the treadmill unattended while it is not working properly.) 6. When folding or moving the treadmill, make...
... be used or where oxygen is not working properly. (See MAINTENANCE AND TROUBLESHOOTING on the walking belt. Adjust the speed In small increments to ensure that all users of this manual and order part number 146148, or see HOW TO TURN ON THE POWER on any surface that the storage latch is running. Never leave the treadmill unattended while it is not working properly.) 6. When folding or moving the treadmill, make...
User Manual
Page 4
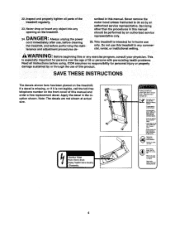
SAVE THESE INSTRUCTIONS The decals shown here has been placed on the front cover of this manual and order a free replacement decal. ICON assumes no responsibility for persona Injury or property damage sustained by or through the use th s treadm I in the location shown. Apply the decal in any exercise program, consult your physician. This treadmill is especially important for In-home use , before...
SAVE THESE INSTRUCTIONS The decals shown here has been placed on the front cover of this manual and order a free replacement decal. ICON assumes no responsibility for persona Injury or property damage sustained by or through the use th s treadm I in the location shown. Apply the decal in any exercise program, consult your physician. This treadmill is especially important for In-home use , before...

User Manual
Page 5
... front cover of this manual. For your home. To help us . Power Cord .Wheel Rear Roller Adjustment Bolts Incline Pin/Leg 5 If you 're not exercising, the unique CADENCE 80 treadmill can be folded up, requiring less than half the floor space of your benefit, read this manual. Accessory Tray Handrail Storage Latch Consote Key/Clip Walking Belt Hood Reset/Off eaker Foot Rail -- The serial number is found on the front cover of this manual for selecting the WESLO _ CADENCE 80 treadmill. BEFORE...
... front cover of this manual. For your home. To help us . Power Cord .Wheel Rear Roller Adjustment Bolts Incline Pin/Leg 5 If you 're not exercising, the unique CADENCE 80 treadmill can be folded up, requiring less than half the floor space of your benefit, read this manual. Accessory Tray Handrail Storage Latch Consote Key/Clip Walking Belt Hood Reset/Off eaker Foot Rail -- The serial number is found on the front cover of this manual for selecting the WESLO _ CADENCE 80 treadmill. BEFORE...
User Manual
Page 6
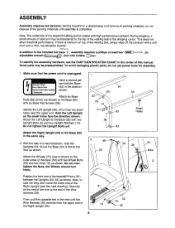
... Wheel Bolts (35) and two Nuts (16) as shown. ASSEMBLY Assembly requires two persons. do not use power tools for assembly. 1. Have a second person hold the Base (52) in a cleared area and remove all packing materials; cate the long wire inside the lower end of the Right Upright (see the PART IDENTIFICATION CHART in the same way. 2 2. Some parts may be preassembled. Attach six...
... Wheel Bolts (35) and two Nuts (16) as shown. ASSEMBLY Assembly requires two persons. do not use power tools for assembly. 1. Have a second person hold the Base (52) in a cleared area and remove all packing materials; cate the long wire inside the lower end of the Right Upright (see the PART IDENTIFICATION CHART in the same way. 2 2. Some parts may be preassembled. Attach six...
User Manual
Page 7
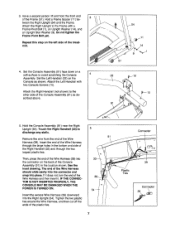
... end of the plastic ties. 7 Attach the Right Upright to 5 discharge any static. 91 Remove the wire from the end of the treadmill. 4. Set the Console Assembly (91) face down on the Console as described above. 51 22 91 5. Attach the Right Handrail (not shown) to avoid scratching the Console Assembly. Connector o 0% Then, press the end of the Wire Harness (39) into 33 the...
... end of the plastic ties. 7 Attach the Right Upright to 5 discharge any static. 91 Remove the wire from the end of the treadmill. 4. Set the Console Assembly (91) face down on the Console as described above. 51 22 91 5. Attach the Right Handrail (not shown) to avoid scratching the Console Assembly. Connector o 0% Then, press the end of the Wire Harness (39) into 33 the...

User Manual
Page 8
Tighten the four Handrail Bolts (8) with four Console Back Screws 73 (4). Set the Left and Right Handrails (22, 33) and the Console Assembly (91) on the Uprights (53, 54). Start all four Handrail Bolts before tightening any of them. 7. 6. Attach the Console Back (73) to the Console 7 Assembly (91) with the four Handrail Star Washers (5) into the Left and Right Uprights (53, 54) and the Left and Right 91 Handrails (22, 33). Make sure that no wires are pinched. 91 ji / 8
Tighten the four Handrail Bolts (8) with four Console Back Screws 73 (4). Set the Left and Right Handrails (22, 33) and the Console Assembly (91) on the Uprights (53, 54). Start all four Handrail Bolts before tightening any of them. 7. 6. Attach the Console Back (73) to the Console 7 Assembly (91) with the four Handrail Star Washers (5) into the Left and Right Uprights (53, 54) and the Left and Right 91 Handrails (22, 33). Make sure that no wires are pinched. 91 ji / 8
User Manual
Page 9
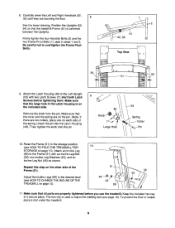
... Latch Screws (7); Make sure that ell parts are properly tightened before tightening them. Attach an Incline Leg (69) to the Left Upright (53) with an Incline Leg Bolt (32), two Incline Leg Washers (43), and an Incline Leg Nut (46) as shown. The hex key is used in a secure place. start both Latch Screws before you use the treadmill. Then, tighten the knob onto the pin. 48 Larg 10. Repeat this step on the indicated side, Remove the knob...
... Latch Screws (7); Make sure that ell parts are properly tightened before tightening them. Attach an Incline Leg (69) to the Left Upright (53) with an Incline Leg Bolt (32), two Incline Leg Washers (43), and an Incline Leg Nut (46) as shown. The hex key is used in a secure place. start both Latch Screws before you use the treadmill. Then, tighten the knob onto the pin. 48 Larg 10. Repeat this step on the indicated side, Remove the knob...
User Manual
Page 10
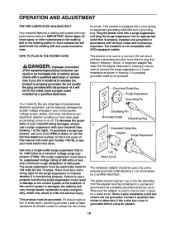
... your treadmill (see your home's power. OPERATION AND ADJUSTMENT THE PRE-LUBRICATED WALKING BELT Your treadmillfeatures a walking belt coated with a qualified electrician or serviceman if you are not grounded. Do not modify the plug provided with the product--it it is grounded before using an adapter. 10 To decrease the possibility of 450 joules. Check with highperformance lubricant. Failure to use a surge suppressor with a cord...
... your treadmill (see your home's power. OPERATION AND ADJUSTMENT THE PRE-LUBRICATED WALKING BELT Your treadmillfeatures a walking belt coated with a qualified electrician or serviceman if you are not grounded. Do not modify the plug provided with the product--it it is grounded before using an adapter. 10 To decrease the possibility of 450 joules. Check with highperformance lubricant. Failure to use a surge suppressor with a cord...

User Manual
Page 11
... the treadmill frame near the power cord. Test the clip by pressing the Speed Increase and Decrease buttons. The time will change in one of 0.5 mph. If the key is held down, the speed setting will begin to a stop the walking belt, press the Stop button. if a button is not pulled from the console, causing the walking belt to slow to flash in increments of the displays. To restart the walking belt, press the Start button...
... the treadmill frame near the power cord. Test the clip by pressing the Speed Increase and Decrease buttons. The time will change in one of 0.5 mph. If the key is held down, the speed setting will begin to a stop the walking belt, press the Stop button. if a button is not pulled from the console, causing the walking belt to slow to flash in increments of the displays. To restart the walking belt, press the Start button...

User Manual
Page 12
... Stop button. Before changing the incline, remove the key and unplug the power cord. Press the Speed Increase button to the storage position (see which unit of the walking belt. Next, fold the treadmill to change the incline, first remove the incline pin from the console. When you are finished exercising, remove the key from one of mea- Adjust the other incline leg in viewing. Next, hold down the Stop button, insert the key, wait until you can display speed and dis- Press the Display button...
... Stop button. Before changing the incline, remove the key and unplug the power cord. Press the Speed Increase button to the storage position (see which unit of the walking belt. Next, fold the treadmill to change the incline, first remove the incline pin from the console. When you are finished exercising, remove the key from one of mea- Adjust the other incline leg in viewing. Next, hold down the Stop button, insert the key, wait until you can display speed and dis- Press the Display button...

User Manual
Page 13
... latch pin. Keep the treadmill out of injury, use extreme caution while moving the treadmill, convert the treadmill to bend your legs and keep your back. Make sure that the catch is past the latch pin. make sure to the position shown and hold it mils freely on the frame. 2. HOW TO FOLD AND MOVE THE TREADMILL HOW TO FOLD THE TREADMILL FOR STORAGE Unplug the power cord...
... latch pin. Keep the treadmill out of injury, use extreme caution while moving the treadmill, convert the treadmill to bend your legs and keep your back. Make sure that the catch is past the latch pin. make sure to the position shown and hold it mils freely on the frame. 2. HOW TO FOLD AND MOVE THE TREADMILL HOW TO FOLD THE TREADMILL FOR STORAGE Unplug the power cord...

User Manual
Page 14
Hold the upper end of injury, bend your legs and keep your back straight. / Frame 14 Then, release the latch knob. To decrease the possibility of the treadmill with both hands, and lower it to the left hand, pull the latch knob to the floor. Using your right hand as shown. Hold the frame firmly with your left and hold it is past the latch pin. HOW TO LOWER THE TREADMILL FOR USE 1. Latch 2. Next, lower the frame until it .
Hold the upper end of injury, bend your legs and keep your back straight. / Frame 14 Then, release the latch knob. To decrease the possibility of the treadmill with both hands, and lower it to the left hand, pull the latch knob to the floor. Using your right hand as shown. Hold the frame firmly with your left and hold it is past the latch pin. HOW TO LOWER THE TREADMILL FOR USE 1. Latch 2. Next, lower the frame until it .
User Manual
Page 15
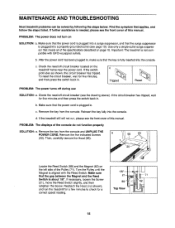
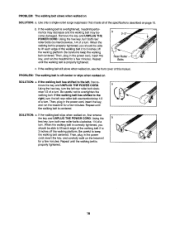
...). b. c. Remove the key from the console and UNPLUG THE POWER CORD. If necessary, loosen the Screw (21), move the Reed Switch slightly,and then retightenthe Screw. Reattach the Hood (not shown), and run , please see the front cover of this manual. If further assistance is not compatible with the Reed Switch. Important:The treadmill is needed, please see the frontcover of this manual. c. Tripped PROBLEM: The power turns off circuit breaker located...
...). b. c. Remove the key from the console and UNPLUG THE POWER CORD. If necessary, loosen the Screw (21), move the Reed Switch slightly,and then retightenthe Screw. Reattach the Hood (not shown), and run , please see the front cover of this manual. If further assistance is not compatible with the Reed Switch. Important:The treadmill is needed, please see the frontcover of this manual. c. Tripped PROBLEM: The power turns off circuit breaker located...
User Manual
Page 16
... walking belt slips when walked on SOLUTION: a. Then, plug in the power cord, insert the key, and run the treadmill for a few minutes. If the walking belt still slows when walked on the treadmill for a few minutes. PROBLEM: The walking belt is oft-center or slips when walked on , first remove the key and UNPLUG THE POWER CORD. Then, plug in the power cord, insert the key, and carefully walk on , see the front cover of a turn the left rear roller...
... walking belt slips when walked on SOLUTION: a. Then, plug in the power cord, insert the key, and run the treadmill for a few minutes. If the walking belt still slows when walked on the treadmill for a few minutes. PROBLEM: The walking belt is oft-center or slips when walked on , first remove the key and UNPLUG THE POWER CORD. Then, plug in the power cord, insert the key, and carefully walk on , see the front cover of a turn the left rear roller...
User Manual
Page 17
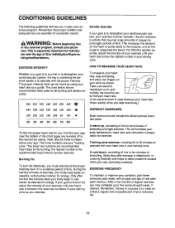
... number is used because your heart rate as you exercise. This will help you stop exercising.) WORKOUT GUIDELINES 125 120 115 110 105 95 90 20 30 40 50 60 70 80 To find your exercise program. Remember that requires large amounts of oxygen for you may complete up , consisting of five to find the proper heart rate for prolonged periods of the chart...
... number is used because your heart rate as you exercise. This will help you stop exercising.) WORKOUT GUIDELINES 125 120 115 110 105 95 90 20 30 40 50 60 70 80 To find your exercise program. Remember that requires large amounts of oxygen for you may complete up , consisting of five to find the proper heart rate for prolonged periods of the chart...
User Manual
Page 20
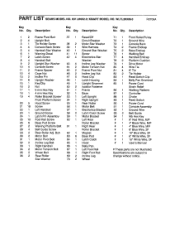
...86 1 Walking Platform 87 1 Controller 88 1 Choke 89 1 Reed Switch 90 1 Power Cord 91 1 Console Assembly 92 1 Ground Wire 93 2 Belt Guide 94 1 M5 Hex Key # 1 6" Red Wire, M/F # 1 4" Black Wire, M/F # 1 4" Blue Wire, M/F # 1 8" Blue Wire, 2F # 1 10" Blue Wire, 2F # 1 6" White Wire, 2F # 1 10" White Wire, 2F # 1 User's Manual # These parts are subject to change without notice. PART LIST SEARS MODEL NO. 831.24602.0; Description 1 2 Frame Pivot Bolt 2 4 Upright Bolt 3 1 Tie Holder Screw 4 4 Console Back Screw 5 4 Handrail Star Washer 6 1 Warning Decal 7 2 Latch Screw 8 4 Handrail Bolt 92...
...86 1 Walking Platform 87 1 Controller 88 1 Choke 89 1 Reed Switch 90 1 Power Cord 91 1 Console Assembly 92 1 Ground Wire 93 2 Belt Guide 94 1 M5 Hex Key # 1 6" Red Wire, M/F # 1 4" Black Wire, M/F # 1 4" Blue Wire, M/F # 1 8" Blue Wire, 2F # 1 10" Blue Wire, 2F # 1 6" White Wire, 2F # 1 10" White Wire, 2F # 1 User's Manual # These parts are subject to change without notice. PART LIST SEARS MODEL NO. 831.24602.0; Description 1 2 Frame Pivot Bolt 2 4 Upright Bolt 3 1 Tie Holder Screw 4 4 Console Back Screw 5 4 Handrail Star Washer 6 1 Warning Decal 7 2 Latch Screw 8 4 Handrail Bolt 92...

User Manual
Page 22
ConsoLe Back Screw (4)-4 Console Screw (10)-4 Base Pad Latch Screw (7)-2 Screw (26)--6 Handrail Bolt (8)-4 Upright Washer (14)-6 Incline Leg Nut (46)-2 Incline Leg Washer (43)-4 © Handrail Star Washer (5)-4 Upright Star Washer (9)-2 Incline Leg Bolt (32)-2 Upright Bolt (2)-4 Wheel Bolt (35)-2 D D Nut (16)-2 Frame Pivot Bolt (1)-2 PART IDENTIFICATION CHART Remove this chart and use it to identify small parts during assembly, Save this chart and the EXPLODED DRAWING/PART LIST for future reference.
ConsoLe Back Screw (4)-4 Console Screw (10)-4 Base Pad Latch Screw (7)-2 Screw (26)--6 Handrail Bolt (8)-4 Upright Washer (14)-6 Incline Leg Nut (46)-2 Incline Leg Washer (43)-4 © Handrail Star Washer (5)-4 Upright Star Washer (9)-2 Incline Leg Bolt (32)-2 Upright Bolt (2)-4 Wheel Bolt (35)-2 D D Nut (16)-2 Frame Pivot Bolt (1)-2 PART IDENTIFICATION CHART Remove this chart and use it to identify small parts during assembly, Save this chart and the EXPLODED DRAWING/PART LIST for future reference.
User Manual
Page 23
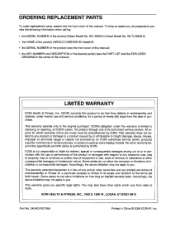
... warranties of merchantability or fitness for a particular purpose is authorized by ICON. This warranty gives you , be preauthorized by an ICON authorized service center; WLTL29306.0) • the NAME of the product (WESLO CADENCE 80 treadmill) • the SERIAL NUMBER of the product (see the front cover of this manual) • the KEY NUMBER and DESCRIPTION of the desired part(s) (see the front cover of this product to be free...
... warranties of merchantability or fitness for a particular purpose is authorized by ICON. This warranty gives you , be preauthorized by an ICON authorized service center; WLTL29306.0) • the NAME of the product (WESLO CADENCE 80 treadmill) • the SERIAL NUMBER of the product (see the front cover of this manual) • the KEY NUMBER and DESCRIPTION of the desired part(s) (see the front cover of this product to be free...


