
User Manual
Page 1
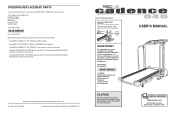
... are committed to give the following information: ¥ The MODEL NUMBER OF THE PRODUCT (WETL21200) ¥ The NAME OF THE PRODUCT (WESLO CADENCE¨ 940 treadmill) ¥ The SERIAL NUMBER OF THE PRODUCT (see the front cover of this manual) ¥ The KEY NUMBER OF THE PART(S)...ICON Health & Fitness, Inc. As a manufacturer, we are missing parts, we will guarantee complete satisfaction through our Customer Service Department. WESLO is a registered trademark of this manual for future reference. Please CALL: 0345-089009 0345-089009 Or WRITE: ICON Fitness Lifestyle Ltd. Greenwich...
... are committed to give the following information: ¥ The MODEL NUMBER OF THE PRODUCT (WETL21200) ¥ The NAME OF THE PRODUCT (WESLO CADENCE¨ 940 treadmill) ¥ The SERIAL NUMBER OF THE PRODUCT (see the front cover of this manual) ¥ The KEY NUMBER OF THE PART(S)...ICON Health & Fitness, Inc. As a manufacturer, we are missing parts, we will guarantee complete satisfaction through our Customer Service Department. WESLO is a registered trademark of this manual for future reference. Please CALL: 0345-089009 0345-089009 Or WRITE: ICON Fitness Lifestyle Ltd. Greenwich...

User Manual
Page 2
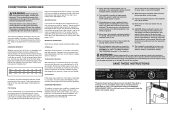
...5 5. Never move your hips toward your buttocks as possible. Bring the sole of the opposite foot toward you need an extension cord, use the treadmill with 8 feet (2 m) of knees and back. 2. Stretches: Quadriceps and hip muscles. 1 2 4 15 TABLE OF CONTENTS IMPORTANT PRECAUTIONS 2... BEFORE YOU BEGIN 4 ASSEMBLY 5 OPERATION AND ADJUSTMENT 7 HOW TO FOLD AND MOVE THE TREADMILL 10 MAINTENANCE AND TROUBLE-SHOOTING 12 CONDITIONING GUIDELINES 14 ORDERING REPLACEMENT PARTS Back Cover Note: A PART LIST and an EXPLODED DRAWING are ...
...5 5. Never move your hips toward your buttocks as possible. Bring the sole of the opposite foot toward you need an extension cord, use the treadmill with 8 feet (2 m) of knees and back. 2. Stretches: Quadriceps and hip muscles. 1 2 4 15 TABLE OF CONTENTS IMPORTANT PRECAUTIONS 2... BEFORE YOU BEGIN 4 ASSEMBLY 5 OPERATION AND ADJUSTMENT 7 HOW TO FOLD AND MOVE THE TREADMILL 10 MAINTENANCE AND TROUBLE-SHOOTING 12 CONDITIONING GUIDELINES 14 ORDERING REPLACEMENT PARTS Back Cover Note: A PART LIST and an EXPLODED DRAWING are ...
User Manual
Page 3
... exercise, use only. Only after the first few weeks of your exercise program, do so by placing objects under the treadmill. Never start the treadmill whilst you , first find the two numbers below (ages are your muscles and will help prevent post-exercise problems. EXERCISE...fat calories for longer than the procedures in small increments to oxygenate the blood. DANGER: Always unplug the power cord before using the treadmill. 16. WARNING: Before beginning this or any exercise program, consult your cardiovascular system, the key to achieving the desired results is ...
... exercise, use only. Only after the first few weeks of your exercise program, do so by placing objects under the treadmill. Never start the treadmill whilst you , first find the two numbers below (ages are your muscles and will help prevent post-exercise problems. EXERCISE...fat calories for longer than the procedures in small increments to oxygenate the blood. DANGER: Always unplug the power cord before using the treadmill. 16. WARNING: Before beginning this or any exercise program, consult your cardiovascular system, the key to achieving the desired results is ...
User Manual
Page 4
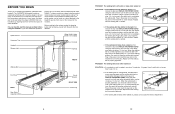
...-centre or slips when walked on SOLUTION: a. c. Plug in the power cord, insert the key and run the treadmill for the location). The CADENCE 940 treadmill combines advanced technology with the parts that is no longer than half the floor space of a turn both rear roller ... walking belt 5 to 7 cm off the walking platform. Plug in the power cord, insert the key and run the treadmill for selecting the WESLO¨ CADENCE 940 treadmill. Repeat until the walking belt is properly tightened. And when you for a few minutes. b. Speed Control Accessory Tray Handrails...
...-centre or slips when walked on SOLUTION: a. c. Plug in the power cord, insert the key and run the treadmill for the location). The CADENCE 940 treadmill combines advanced technology with the parts that is no longer than half the floor space of a turn both rear roller ... walking belt 5 to 7 cm off the walking platform. Plug in the power cord, insert the key and run the treadmill for selecting the WESLO¨ CADENCE 940 treadmill. Repeat until the walking belt is properly tightened. And when you for a few minutes. b. Speed Control Accessory Tray Handrails...
User Manual
Page 5
... the result of a second person, carefully raise the 1 Uprights (38), the Console Base (71), and the Right Handrail (32), until the treadmill is needed , please call our Customer Service Department. Attach the other Extension Leg (44) in , make sure that the power cord is coated ...with a 3 1/2Ó Handrail Bolt (100), a 5/16Ó Washer (101), and a Handrail Nut (102). c. d. This does not affect treadmill performance. Attach the lower end of the Left Handrail (4) to the Extension Leg (44) with high-performance lubricant. After the power cord has been plugged...
... the result of a second person, carefully raise the 1 Uprights (38), the Console Base (71), and the Right Handrail (32), until the treadmill is needed , please call our Customer Service Department. Attach the other Extension Leg (44) in , make sure that the power cord is coated ...with a 3 1/2Ó Handrail Bolt (100), a 5/16Ó Washer (101), and a Handrail Nut (102). c. d. This does not affect treadmill performance. Attach the lower end of the Left Handrail (4) to the Extension Leg (44) with high-performance lubricant. After the power cord has been plugged...

User Manual
Page 6
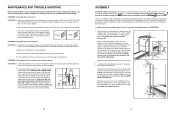
...injury, bend your legs and keep your left hand, slide open the storage latch. Using your back straight. 11 Base Leg Front Wheels Hold the treadmill firmly with four Handrail Screws (5). bend the Wire Harness, if necessary. Open the Battery Cover (12) and press the batteries into place. 6....help of the batteries must touch the springs. tion shown. Note: Some parts may come off the Right Handrail (32). Never move the treadmill without tipping it is resting in the storage position. Feed all parts used in this step and in the posi- Make sure that the ...
...injury, bend your legs and keep your left hand, slide open the storage latch. Using your back straight. 11 Base Leg Front Wheels Hold the treadmill firmly with four Handrail Screws (5). bend the Wire Harness, if necessary. Open the Battery Cover (12) and press the batteries into place. 6....help of the batteries must touch the springs. tion shown. Note: Some parts may come off the Right Handrail (32). Never move the treadmill without tipping it is resting in the storage position. Feed all parts used in this step and in the posi- Make sure that the ...

User Manual
Page 7
...the plug provided with your legs rather than your outlet. Move the switch upward or downward to raise, lower, or move the treadmill. 1. Raise the treadmill about five seconds and then reinsert it. Socket on the wires, and turn the console over the frame guide. Select the one..., have a proper outlet installed by a qualified electrician. 7 This product is properly earthed. Move your hands in doubt as you raise the treadmill, make sure to lift with the productÑif it should malfunction or break down, earthing provides a path of least resistance for about halfway...
...the plug provided with your legs rather than your outlet. Move the switch upward or downward to raise, lower, or move the treadmill. 1. Raise the treadmill about five seconds and then reinsert it. Socket on the wires, and turn the console over the frame guide. Select the one..., have a proper outlet installed by a qualified electrician. 7 This product is properly earthed. Move your hands in doubt as you raise the treadmill, make sure to lift with the productÑif it should malfunction or break down, earthing provides a path of least resistance for about halfway...
User Manual
Page 8
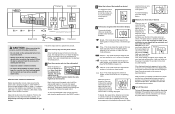
...fat calories you become familiar with the monitor display. Make sure that provide instant exercise feedback: SpeedÑThis mode shows the speed of the treadmill. To measure your heart rate, stand on the foot rails and place your thumb is turned on, the scan mode will not be restarted....not a mode arrow by moving the speed control. To stop . ¥ Adjust the speed in small increments. ¥ To reduce the possibility of the treadmill as shown, and that your thumb on page 14.) CaloriesÑThis mode shows the approximate number of time you have walked or run, in...
...fat calories you become familiar with the monitor display. Make sure that provide instant exercise feedback: SpeedÑThis mode shows the speed of the treadmill. To measure your heart rate, stand on the foot rails and place your thumb is turned on, the scan mode will not be restarted....not a mode arrow by moving the speed control. To stop . ¥ Adjust the speed in small increments. ¥ To reduce the possibility of the treadmill as shown, and that your thumb on page 14.) CaloriesÑThis mode shows the approximate number of time you have walked or run, in...


