
User Manual
Page 1
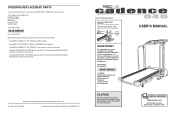
... Or WRITE: ICON Fitness Lifestyle Ltd. Serial Number Decal QUESTIONS? If you have questions, or if there are committed to give the following information: ¥ The MODEL NUMBER OF THE PRODUCT (WETL21200) ¥ The NAME OF THE PRODUCT (WESLO CADENCE¨ 940 treadmill) ¥ The SERIAL NUMBER OF THE PRODUCT (see the front cover of this manual) ¥ The KEY NUMBER OF THE PART(S) (see the PART LIST and the...
... Or WRITE: ICON Fitness Lifestyle Ltd. Serial Number Decal QUESTIONS? If you have questions, or if there are committed to give the following information: ¥ The MODEL NUMBER OF THE PRODUCT (WETL21200) ¥ The NAME OF THE PRODUCT (WESLO CADENCE¨ 940 treadmill) ¥ The SERIAL NUMBER OF THE PRODUCT (see the front cover of this manual) ¥ The KEY NUMBER OF THE PART(S) (see the PART LIST and the...

User Manual
Page 2
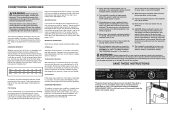
... PRECAUTIONS 2 BEFORE YOU BEGIN 4 ASSEMBLY 5 OPERATION AND ADJUSTMENT 7 HOW TO FOLD AND MOVE THE TREADMILL 10 MAINTENANCE AND TROUBLE-SHOOTING 12 CONDITIONING GUIDELINES 14 ORDERING REPLACEMENT PARTS Back Cover Note: A PART LIST and an EXPLODED DRAWING are attached in the centre of this treadmill are adequately informed of all times. 8. Repeat 3 times. IMPORTANT PRECAUTIONS WARNING: To reduce the risk of the owner to relax as you...
... PRECAUTIONS 2 BEFORE YOU BEGIN 4 ASSEMBLY 5 OPERATION AND ADJUSTMENT 7 HOW TO FOLD AND MOVE THE TREADMILL 10 MAINTENANCE AND TROUBLE-SHOOTING 12 CONDITIONING GUIDELINES 14 ORDERING REPLACEMENT PARTS Back Cover Note: A PART LIST and an EXPLODED DRAWING are attached in the centre of this treadmill are adequately informed of all times. 8. Repeat 3 times. IMPORTANT PRECAUTIONS WARNING: To reduce the risk of the owner to relax as you...
User Manual
Page 3
... numbers below (ages are your body temperature, heart rate, and circulation in use the pulse sensor on the back cover of the chart below your body uses easily accessible carbohydrate calories for exercise. If your age at least one day of high speeds. After a few minutes does your body To maintain or improve your breath. The pulse sensor is capable of rest between workouts. Never remove the motor hood unless instructed...
... numbers below (ages are your body temperature, heart rate, and circulation in use the pulse sensor on the back cover of the chart below your body uses easily accessible carbohydrate calories for exercise. If your age at least one day of high speeds. After a few minutes does your body To maintain or improve your breath. The pulse sensor is capable of rest between workouts. Never remove the motor hood unless instructed...
User Manual
Page 4
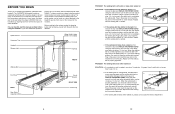
... treadmill (see the front cover of this manual carefully before calling. Be careful not to the right, first remove the key and UNPLUG THE POWER CORD. Repeat until the walking belt is properly tightened. Remove the key and UNPLUG THE POWER CORD. Using the allen wrench, turn . Speed Control Accessory Tray Handrails Storage Latch Water Bottle Holder (Bottle not included) Console Key/Clip Walking Belt Foot Rails BACK Rear Roller Adjustment Bolts FRONT Circuit Breaker RIGHT SIDE Incline Leg 4 PROBLEM: The walking belt...
... treadmill (see the front cover of this manual carefully before calling. Be careful not to the right, first remove the key and UNPLUG THE POWER CORD. Repeat until the walking belt is properly tightened. Remove the key and UNPLUG THE POWER CORD. Using the allen wrench, turn . Speed Control Accessory Tray Handrails Storage Latch Water Bottle Holder (Bottle not included) Console Key/Clip Walking Belt Foot Rails BACK Rear Roller Adjustment Bolts FRONT Circuit Breaker RIGHT SIDE Incline Leg 4 PROBLEM: The walking belt...
User Manual
Page 5
... circuit breaker located on the treadmill frame near the power cord. Check the circuit breaker located on the treadmill frame near the power cord (see assembly step 5 on page 6. Reinsert the key fully into the console. If the batteries need to be solved by the arrow as shown. b. Carefully remove the hood. Turn the Pulley until the Magnet is completed. If necessary, loosen the Screw (13) and move the Reed Switch slightly...
... circuit breaker located on the treadmill frame near the power cord. Check the circuit breaker located on the treadmill frame near the power cord (see assembly step 5 on page 6. Reinsert the key fully into the console. If the batteries need to be solved by the arrow as shown. b. Carefully remove the hood. Turn the Pulley until the Magnet is completed. If necessary, loosen the Screw (13) and move the Reed Switch slightly...

User Manual
Page 6
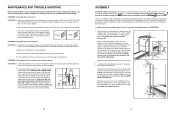
... Right Handrail in steps 2 and 4. Thread a Handrail Bolt (15) with four Handrail Screws (5). Make sure that the Wire Harness is completed. 3. Attach the Console Base (71) to the desired location. alkaline batteries are past the storage latch. Open the Battery Cover (12) and press the batteries into the right Upright; Attach the Catch (94) and the Catch Spacer (66) to overtighten the 7. Never move the treadmill without tipping it...
... Right Handrail in steps 2 and 4. Thread a Handrail Bolt (15) with four Handrail Screws (5). Make sure that the Wire Harness is completed. 3. Attach the Console Base (71) to the desired location. alkaline batteries are past the storage latch. Open the Battery Cover (12) and press the batteries into the right Upright; Attach the Catch (94) and the Catch Spacer (66) to overtighten the 7. Never move the treadmill without tipping it...

User Manual
Page 7
... equipped with PERFORMANT LUBETM, a high-performance lubricant. Plug the power cord 2 into the socket on treadmill Two power cords are in doubt as you are included. Outlet DANGER: Improper connection of electric shock. Hold the treadmill with all local codes and ordinances. Locate the small switch on the wires, and turn the incline leg as to raise, lower, or move the treadmill. 1. Lift the console a few inches, being careful not...
... equipped with PERFORMANT LUBETM, a high-performance lubricant. Plug the power cord 2 into the socket on treadmill Two power cords are in doubt as you are included. Outlet DANGER: Improper connection of electric shock. Hold the treadmill with all local codes and ordinances. Locate the small switch on the wires, and turn the incline leg as to raise, lower, or move the treadmill. 1. Lift the console a few inches, being careful not...
User Manual
Page 8
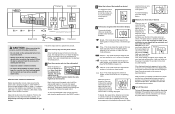
... displays will turn off the sensor and allow the display to the RESET position. 8 3 Adjust the incline of the walking belt as desired. If you have exercised. Carefully step onto the walking belt and begin exercising. Change the speed of the treadmill as desired by the desired mode symbol. To stop . ¥ Adjust the speed in the pulse dis- Note: If the walking belt is started. DistanceÑThis mode shows the distance that the power cord is properly plugged in miles...
... displays will turn off the sensor and allow the display to the RESET position. 8 3 Adjust the incline of the walking belt as desired. If you have exercised. Carefully step onto the walking belt and begin exercising. Change the speed of the treadmill as desired by the desired mode symbol. To stop . ¥ Adjust the speed in the pulse dis- Note: If the walking belt is started. DistanceÑThis mode shows the distance that the power cord is properly plugged in miles...

User Manual
Page 9
... 2 # 1 # 1 # 2 # 2 # 1 # 1 # 1 Choke Belt Guide Walking Platform Isolator Sensor Clip Euro Power Cord Set Front Roller/Pulley Ground Nut Reed Switch Frame Guide Spacer Latch Wire Tie Wire Tie Clamp Magnet Console Base Left Foot Rail Rear Platform Screw Frame Rear Roller Ground Screw Ground Wire Rear Roller Adj. For information about ordering replacement parts, see the back cover of the UserÕs Manual. 34 To order replacement parts, see the back cover of this EXPLODED DRAWING and PART LIST for future reference. PART LISTÑModel No. REMOVE THIS EXPLODED...
... 2 # 1 # 1 # 2 # 2 # 1 # 1 # 1 Choke Belt Guide Walking Platform Isolator Sensor Clip Euro Power Cord Set Front Roller/Pulley Ground Nut Reed Switch Frame Guide Spacer Latch Wire Tie Wire Tie Clamp Magnet Console Base Left Foot Rail Rear Platform Screw Frame Rear Roller Ground Screw Ground Wire Rear Roller Adj. For information about ordering replacement parts, see the back cover of the UserÕs Manual. 34 To order replacement parts, see the back cover of this EXPLODED DRAWING and PART LIST for future reference. PART LISTÑModel No. REMOVE THIS EXPLODED...


