
User Manual
Page 1
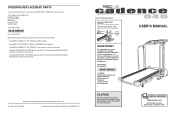
...; The MODEL NUMBER OF THE PRODUCT (WETL21200) ¥ The NAME OF THE PRODUCT (WESLO CADENCE¨ 940 treadmill) ¥ The SERIAL NUMBER OF THE PRODUCT (see the front cover of this manual) ¥ The KEY NUMBER OF THE PART(S) (see the PART LIST and the EXPLODED DRAWING attached in the centre of this manual) ¥...
...; The MODEL NUMBER OF THE PRODUCT (WETL21200) ¥ The NAME OF THE PRODUCT (WESLO CADENCE¨ 940 treadmill) ¥ The SERIAL NUMBER OF THE PRODUCT (see the front cover of this manual) ¥ The KEY NUMBER OF THE PART(S) (see the PART LIST and the EXPLODED DRAWING attached in the centre of this manual) ¥...

User Manual
Page 2
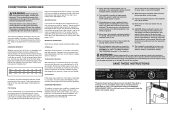
... BEGIN 4 ASSEMBLY 5 OPERATION AND ADJUSTMENT 7 HOW TO FOLD AND MOVE THE TREADMILL 10 MAINTENANCE AND TROUBLE-SHOOTING 12 CONDITIONING GUIDELINES 14 ORDERING REPLACEMENT PARTS Back Cover Note: A PART LIST and an EXPLODED DRAWING are attached in the centre of the achilles tendons, bend your back leg as well. IMPORTANT PRECAUTIONS WARNING: To...
... BEGIN 4 ASSEMBLY 5 OPERATION AND ADJUSTMENT 7 HOW TO FOLD AND MOVE THE TREADMILL 10 MAINTENANCE AND TROUBLE-SHOOTING 12 CONDITIONING GUIDELINES 14 ORDERING REPLACEMENT PARTS Back Cover Note: A PART LIST and an EXPLODED DRAWING are attached in the centre of the achilles tendons, bend your back leg as well. IMPORTANT PRECAUTIONS WARNING: To...
User Manual
Page 3
... 10 minutes of heart rate readings. After a few weeks of time. When storing the treadmill, make exercise a regular and enjoyable part of the treadmill by placing objects under the treadmill. DANGER: Always unplug the power cord before using. Do not attempt to plan ... exercise information, obtain a reputable book or consult your treadmill. A proper warm-up to order a free replacement decal (see ORDERING REPLACEMENT PARTS on your physician. If your heart rate is not legible, please call our Customer Service Department to five workouts each week, with 5 to...
... 10 minutes of heart rate readings. After a few weeks of time. When storing the treadmill, make exercise a regular and enjoyable part of the treadmill by placing objects under the treadmill. DANGER: Always unplug the power cord before using. Do not attempt to plan ... exercise information, obtain a reputable book or consult your treadmill. A proper warm-up to order a free replacement decal (see ORDERING REPLACEMENT PARTS on your physician. If your heart rate is not legible, please call our Customer Service Department to five workouts each week, with 5 to...
User Manual
Page 4
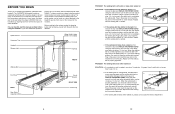
...to keep the walking belt centred. Plug in the power cord, insert the key and run the treadmill for selecting the WESLO¨ CADENCE 940 treadmill. Repeat until the walking belt is centred. Be careful to lift each side of other treadmills. Plug in the ... WETL21200. ment bolt counterclockwise, and the right bolt clock- Remove the key and UNPLUG THE POWER CORD. The CADENCE 940 treadmill combines advanced technology with the parts that is properly tightened. Before reading further, please review the drawing below and familiarise yourself with innovative design to...
...to keep the walking belt centred. Plug in the power cord, insert the key and run the treadmill for selecting the WESLO¨ CADENCE 940 treadmill. Repeat until the walking belt is centred. Be careful to lift each side of other treadmills. Plug in the ... WETL21200. ment bolt counterclockwise, and the right bolt clock- Remove the key and UNPLUG THE POWER CORD. The CADENCE 940 treadmill combines advanced technology with the parts that is properly tightened. Before reading further, please review the drawing below and familiarise yourself with innovative design to...
User Manual
Page 5
... and the Left Handrail. Locate the Reed Switch (65) and the Magnet (70) on the head of the Pulley (63). Retighten the Screw. Set all parts in the console. Be careful not to pull on the treadmill frame near the power cord (see assembly step 5 on page 6. Make sure to tip...
... and the Left Handrail. Locate the Reed Switch (65) and the Magnet (70) on the head of the Pulley (63). Retighten the Screw. Set all parts in the console. Be careful not to pull on the treadmill frame near the power cord (see assembly step 5 on page 6. Make sure to tip...

User Manual
Page 6
... Frame (74) with your back straight. 11 Base Leg Front Wheels With the help of the batteries must touch the springs. tion shown. Feed all parts used in this step and in the posi- bend the Wire Harness, if necessary. Plastic Tie 71 53 38 4. Thread a Handrail Bolt (15) with a 3 1/2Ó... person, lift the Right Handrail (32) off the right Upright (38). Close the battery cover, push up on one foot on page 10. Note: Some parts may come off the Right Handrail (32). To protect the floor or carpet from damage, place a mat under the treadmill. 100 102 44 101 5 11...
... Frame (74) with your back straight. 11 Base Leg Front Wheels With the help of the batteries must touch the springs. tion shown. Feed all parts used in this step and in the posi- bend the Wire Harness, if necessary. Plastic Tie 71 53 38 4. Thread a Handrail Bolt (15) with a 3 1/2Ó... person, lift the Right Handrail (32) off the right Upright (38). Close the battery cover, push up on one foot on page 10. Note: Some parts may come off the Right Handrail (32). To protect the floor or carpet from damage, place a mat under the treadmill. 100 102 44 101 5 11...

User Manual
Page 9
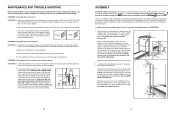
...Console Base Left Foot Rail Rear Platform Screw Frame Rear Roller Ground Screw Ground Wire Rear Roller Adj. REMOVE THIS EXPLODED DRAWING AND PART LIST FROM THE MANUAL Save this manual. Bolt Rear Endcap Plastic Fastener Allen Wrench Latch Decal Incline Leg Bolt Belly Pan Right Frame...Motor Tension Nut Motor Pan Screw Right Foot Rail Platform Screw Front Roller Adj. For information about ordering replacement parts, see the back cover of the UserÕs Manual. 34 PART LISTÑModel No. Description Key No. Note: Specifications are subject to change without notice. Qty. ...
...Console Base Left Foot Rail Rear Platform Screw Frame Rear Roller Ground Screw Ground Wire Rear Roller Adj. REMOVE THIS EXPLODED DRAWING AND PART LIST FROM THE MANUAL Save this manual. Bolt Rear Endcap Plastic Fastener Allen Wrench Latch Decal Incline Leg Bolt Belly Pan Right Frame...Motor Tension Nut Motor Pan Screw Right Foot Rail Platform Screw Front Roller Adj. For information about ordering replacement parts, see the back cover of the UserÕs Manual. 34 PART LISTÑModel No. Description Key No. Note: Specifications are subject to change without notice. Qty. ...


