
English Manual
Page 1
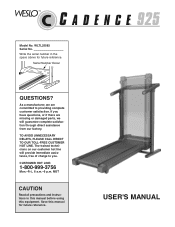
As a manufacturer, we are missing or damaged parts, we will provide immediate assistance, free of charge to providing complete customer satisfaction. Save this equipment. Write the serial number in this manual before using ...
As a manufacturer, we are missing or damaged parts, we will provide immediate assistance, free of charge to providing complete customer satisfaction. Save this equipment. Write the serial number in this manual before using ...
English Manual
Page 2
...that blocks any air openings. Remove the PART LIST and EXPLODED DRAWING before operating the treadmill. 1. Wear appropriate exercise clothing when using the treadmill. 2 When connecting the power cord (see HOW TO PLUG IN THE POWER CORD on the treadmill at a time. 9. Athletic support ...4 ASSEMBLY 5 OPERATION AND ADJUSTMENT 7 HOW TO FOLD AND MOVE THE TREADMILL 10 MAINTENANCE AND TROUBLE-SHOOTING 12 CONDITIONING GUIDELINES 14 ORDERING REPLACEMENT PARTS Back Cover LIMITED WARRANTY Back Cover Note: A PART LIST and an EXPLODED DRAWING are attached in the center of 12 and...
...that blocks any air openings. Remove the PART LIST and EXPLODED DRAWING before operating the treadmill. 1. Wear appropriate exercise clothing when using the treadmill. 2 When connecting the power cord (see HOW TO PLUG IN THE POWER CORD on the treadmill at a time. 9. Athletic support ...4 ASSEMBLY 5 OPERATION AND ADJUSTMENT 7 HOW TO FOLD AND MOVE THE TREADMILL 10 MAINTENANCE AND TROUBLE-SHOOTING 12 CONDITIONING GUIDELINES 14 ORDERING REPLACEMENT PARTS Back Cover LIMITED WARRANTY Back Cover Note: A PART LIST and an EXPLODED DRAWING are attached in the center of 12 and...
English Manual
Page 3
...rental, or institutional setting. Do not use . 19. The treadmill is especially important for in general. 17. The pulse sensor is not in use this manual should be 1/8 inch from the rear roller (see ORDERING REPLACEMENT PARTS on page 4). Remove the key and adjust the roller guards,... kg) in any opening. Always unplug the power cord immediately after use of the treadmill overheating, do so by or through the use , before cleaning the treadmill, and before using. lems. Read all parts of heart rate readings. If the decal is missing, or if it is properly ...
...rental, or institutional setting. Do not use . 19. The treadmill is especially important for in general. 17. The pulse sensor is not in use this manual should be 1/8 inch from the rear roller (see ORDERING REPLACEMENT PARTS on page 4). Remove the key and adjust the roller guards,... kg) in any opening. Always unplug the power cord immediately after use of the treadmill overheating, do so by or through the use , before cleaning the treadmill, and before using. lems. Read all parts of heart rate readings. If the decal is missing, or if it is properly ...
English Manual
Page 4
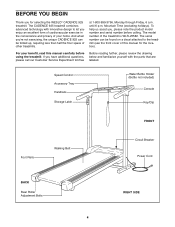
... review the drawing below and familiarize yourself with innovative design to the treadmill (see the front cover of your benefit, read this manual for selecting the WESLO¨ CADENCE 925 treadmill. Speed Control Accessory Tray Handrails Storage Latch Water Bottle Holder (Bottle ...re not exercising, the unique CADENCE 925 can be folded up, requiring less than half the floor space of the treadmill is WLTL25582. Mountain Time (excluding holidays). The model number of other treadmills. The CADENCE 925 treadmill combines advanced technology with the parts that are labeled.
... review the drawing below and familiarize yourself with innovative design to the treadmill (see the front cover of your benefit, read this manual for selecting the WESLO¨ CADENCE 925 treadmill. Speed Control Accessory Tray Handrails Storage Latch Water Bottle Holder (Bottle ...re not exercising, the unique CADENCE 925 can be folded up, requiring less than half the floor space of the treadmill is WLTL25582. Mountain Time (excluding holidays). The model number of other treadmills. The CADENCE 925 treadmill combines advanced technology with the parts that are labeled.
English Manual
Page 5
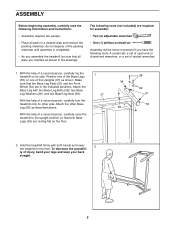
...30). 37 With the help of a second person, carefully raise the treadmill to the floor. ASSEMBLY Before beginning assembly, carefully read the following information and instructions: ¥ Assembly requires two people. ¥ Place all parts are required for assembly: ¥ Two (2) adjustable wrenches ¥ ... area and remove the packing materials; Position one of the packing materials until assembly is completed. ¥ As you assemble the treadmill, be sure that all parts in the indicated positions. The following tools: A socket set, a set of open-end or closed-end wrenches, or a ...
...30). 37 With the help of a second person, carefully raise the treadmill to the floor. ASSEMBLY Before beginning assembly, carefully read the following information and instructions: ¥ Assembly requires two people. ¥ Place all parts are required for assembly: ¥ Two (2) adjustable wrenches ¥ ... area and remove the packing materials; Position one of the packing materials until assembly is completed. ¥ As you assemble the treadmill, be sure that all parts in the indicated positions. The following tools: A socket set, a set of open-end or closed-end wrenches, or a ...
English Manual
Page 6
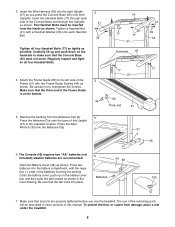
Regularly inspect and tighten all parts are recommended. 49 48 Open the Battery Cover (48) as shown in the indicated location. Be careful not to the left side ...manual. Press the Allen Wrench (35) into the right Upright (37) as shown. The use of the remaining parts will be inserted from the inside as you use the treadmill. 3. Carefully lift up on the handrails to make sure that the thick end of the Console Base and through ...Insert the Wire Harness (53) into the Adhesive Clip. 37 2 41 39 53 77 35 6. Remove the backing from damage, place a mat under the treadmill. 6
Regularly inspect and tighten all parts are recommended. 49 48 Open the Battery Cover (48) as shown in the indicated location. Be careful not to the left side ...manual. Press the Allen Wrench (35) into the right Upright (37) as shown. The use of the remaining parts will be inserted from the inside as you use the treadmill. 3. Carefully lift up on the handrails to make sure that the thick end of the Console Base and through ...Insert the Wire Harness (53) into the Adhesive Clip. 37 2 41 39 53 77 35 6. Remove the backing from damage, place a mat under the treadmill. 6
English Manual
Page 14
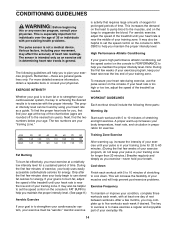
...time. CONDITIONING GUIDELINES WARNING: Before beginning this or any exercise program, consult your physician. For aerobic exercise, adjust the speed of the treadmill until your heart rate is not a medical device. Training Zone Exercise Fat Burning To burn fat effectively, you maintain the proper intensity ...your cardiovascular system, your exercise must exercise at least one day of your goal is to oxygenate the blood. The following three parts: Warming Up Start each workout with pre-existing health problems. The pulse sensor is near the low end of rest between workouts....
...time. CONDITIONING GUIDELINES WARNING: Before beginning this or any exercise program, consult your physician. For aerobic exercise, adjust the speed of the treadmill until your heart rate is not a medical device. Training Zone Exercise Fat Burning To burn fat effectively, you maintain the proper intensity ...your cardiovascular system, your exercise must exercise at least one day of your goal is to oxygenate the blood. The following three parts: Warming Up Start each workout with pre-existing health problems. The pulse sensor is near the low end of rest between workouts....
English Manual
Page 16
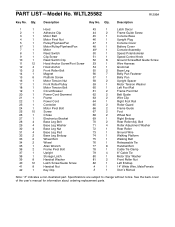
... 69 1 Right Endcap 28 4 Base Leg Bolt 70 2 Rear Roller Adj. See the back cover of the userÕs manual for information about ordering replacement parts. Qty. Bolt 29 4 Base Leg Washer 71 4 Roller Adjustment Washer 30 4 Base Leg Nut 72 1 Rear Roller 31 4 Base Leg Pad 73 1 Ground Wire 32... Screw 82 1 Left Endcap 41 8 Handrail Nut # 1 14Ó White Wire, Male/Female 42 1 Key Clip # 1 UserÕs Manual Note: Ò#Ó indicates a non-illustrated part. Specifications are subject to change without notice. WLTL25582 R1299A Key No...
... 69 1 Right Endcap 28 4 Base Leg Bolt 70 2 Rear Roller Adj. See the back cover of the userÕs manual for information about ordering replacement parts. Qty. Bolt 29 4 Base Leg Washer 71 4 Roller Adjustment Washer 30 4 Base Leg Nut 72 1 Rear Roller 31 4 Base Leg Pad 73 1 Ground Wire 32... Screw 82 1 Left Endcap 41 8 Handrail Nut # 1 14Ó White Wire, Male/Female 42 1 Key Clip # 1 UserÕs Manual Note: Ò#Ó indicates a non-illustrated part. Specifications are subject to change without notice. WLTL25582 R1299A Key No...
English Manual
Page 18
...(WLTL25582). ¥ The NAME of the product (WESLO CADENCE¨ 925 treadmill). ¥ The SERIAL NUMBER of the product (see the front cover of this manual). ¥ The KEY NUMBER and DESCRIPTION of the desired part(s) (see the PART LIST and the EXPLODED DRAWING at the center of this... WARRANTY ICON Health & Fitness, Inc. (ICON), warrants this manual). Some states do not allow limitations on how long an implied warranty lasts. WESLO is limited in workmanship and material, under this warranty is limited to replacing or repairing, at ICON's option, the product through Friday, 6 ...
...(WLTL25582). ¥ The NAME of the product (WESLO CADENCE¨ 925 treadmill). ¥ The SERIAL NUMBER of the product (see the front cover of this manual). ¥ The KEY NUMBER and DESCRIPTION of the desired part(s) (see the PART LIST and the EXPLODED DRAWING at the center of this... WARRANTY ICON Health & Fitness, Inc. (ICON), warrants this manual). Some states do not allow limitations on how long an implied warranty lasts. WESLO is limited in workmanship and material, under this warranty is limited to replacing or repairing, at ICON's option, the product through Friday, 6 ...


