
English Manual
Page 1
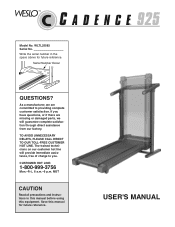
... are missing or damaged parts, we will provide immediate assistance, free of charge to providing complete customer satisfaction. Write the serial number in this manual before using this manual for future reference. The trained technicians on our customer hot line will guarantee complete satisfaction through direct assistance from our factory. TM Model No. Serial Number Decal QUESTIONS? WLTL25582 Serial No. If you have...
... are missing or damaged parts, we will provide immediate assistance, free of charge to providing complete customer satisfaction. Write the serial number in this manual before using this manual for future reference. The trained technicians on our customer hot line will guarantee complete satisfaction through direct assistance from our factory. TM Model No. Serial Number Decal QUESTIONS? WLTL25582 Serial No. If you have...
English Manual
Page 2
... less in this manual. Do not operate the treadmill if the power cord or plug is damaged, or if the treadmill is not working properly.) 14. Never use an extension cord. 12. Keep the treadmill indoors, away from heated surfaces. 13. Wear appropriate exercise clothing when using the treadmill. 2 Use only a UL-listed surge protector, rated at a time. 9. Never move the walking belt while the power is not working properly. (See...
... less in this manual. Do not operate the treadmill if the power cord or plug is damaged, or if the treadmill is not working properly.) 14. Never use an extension cord. 12. Keep the treadmill indoors, away from heated surfaces. 13. Wear appropriate exercise clothing when using the treadmill. 2 Use only a UL-listed surge protector, rated at a time. 9. Never move the walking belt while the power is not working properly. (See...
English Manual
Page 3
... -home use only. Various factors, including the user's movement, may affect the accuracy of high speeds. Inspect and tighten all instructions before performing the maintenance and adjustment procedures described in order to do not operate the treadmill continuously for in the location shown. 3 Never remove the motor hood unless instructed to raise, lower, or move the treadmill until it is not legible, please call our Customer Service Department...
... -home use only. Various factors, including the user's movement, may affect the accuracy of high speeds. Inspect and tighten all instructions before performing the maintenance and adjustment procedures described in order to do not operate the treadmill continuously for in the location shown. 3 Never remove the motor hood unless instructed to raise, lower, or move the treadmill until it is not legible, please call our Customer Service Department...
English Manual
Page 4
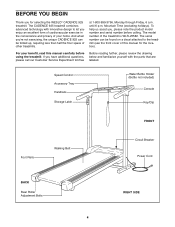
... Service Department toll-free Before reading further, please review the drawing below and familiarize yourself with the parts that are labeled. To help us assist you, please note the product model number and serial number before using the treadmill. The model number of the treadmill is WLTL25582. Speed Control Accessory Tray Handrails Storage Latch Water Bottle Holder (Bottle not included) Console Key/Clip FRONT Foot Rails Walking Belt Circuit Breaker Power Cord BACK Rear Roller Adjustment Bolts...
... Service Department toll-free Before reading further, please review the drawing below and familiarize yourself with the parts that are labeled. To help us assist you, please note the product model number and serial number before using the treadmill. The model number of the treadmill is WLTL25582. Speed Control Accessory Tray Handrails Storage Latch Water Bottle Holder (Bottle not included) Console Key/Clip FRONT Foot Rails Walking Belt Circuit Breaker Power Cord BACK Rear Roller Adjustment Bolts...
English Manual
Page 5
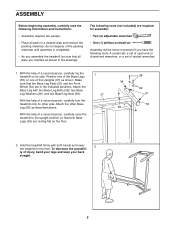
... the treadmill to the floor. Attach the Base Leg with both hands and lower 2 the treadmill to the upright position so that both Base Legs (55) are resting flat on one of the Base Legs (55) on the floor. 28 29 31 55 2. ASSEMBLY Before beginning assembly, carefully read the following tools (not included) are required for assembly: ¥ Two (2) adjustable wrenches...
... the treadmill to the floor. Attach the Base Leg with both hands and lower 2 the treadmill to the upright position so that both Base Legs (55) are resting flat on one of the Base Legs (55) on the floor. 28 29 31 55 2. ASSEMBLY Before beginning assembly, carefully read the following tools (not included) are required for assembly: ¥ Two (2) adjustable wrenches...
English Manual
Page 6
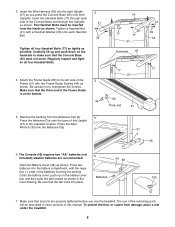
... and tighten all parts are recommended. 49 48 Open the Battery Cover (48) as shown. Be sure that the Console Base (45) does not move. Make sure that the thick end of the Upright (37) in the Batteries Tab inset drawing. Press two batteries into place. 7. Make sure that all four Handrail Bolts. 4. Remove the backing from damage, place a mat under the treadmill. 6 Insert...
... and tighten all parts are recommended. 49 48 Open the Battery Cover (48) as shown. Be sure that the Console Base (45) does not move. Make sure that the thick end of the Upright (37) in the Batteries Tab inset drawing. Press two batteries into place. 7. Make sure that all four Handrail Bolts. 4. Remove the backing from damage, place a mat under the treadmill. 6 Insert...
English Manual
Page 7
... like extending from other type of least resistance for use a surge protector (not Grounded Outlet Box Grounding Pin Treadmill Power Cord included) with grounding plug. not fit the outlet, have a proper outlet installed by sudden voltage changes in doubt as to reduce the Grounded Outlet Grounding Pin 2 Grounded Outlet Box Adapter Grounding Pin Grounding Plug Lug Metal Screw Surge Protector 7 Contact a qualified electrician to a permanent...
... like extending from other type of least resistance for use a surge protector (not Grounded Outlet Box Grounding Pin Treadmill Power Cord included) with grounding plug. not fit the outlet, have a proper outlet installed by sudden voltage changes in doubt as to reduce the Grounded Outlet Grounding Pin 2 Grounded Outlet Box Adapter Grounding Pin Grounding Plug Lug Metal Screw Surge Protector 7 Contact a qualified electrician to a permanent...
English Manual
Page 8
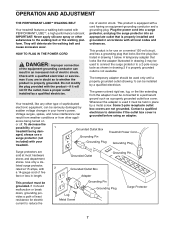
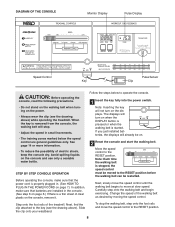
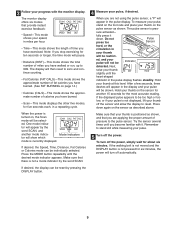
... the displays. Move the speed control to operate the console. 1 Insert the key fully into the power switch. Carefully step onto the walking belt and begin exercising. Next, find the clip attached to the key (see the drawing above ). Slide the clip onto your waistband. If you just installed batteries, the displays will not turn on when the DISPLAY button is pressed or when the walking belt is removed from the console, the walking belt will stop the walking belt, step...
... the displays. Move the speed control to operate the console. 1 Insert the key fully into the power switch. Carefully step onto the walking belt and begin exercising. Next, find the clip attached to the key (see the drawing above ). Slide the clip onto your waistband. If you just installed batteries, the displays will not turn on when the DISPLAY button is pressed or when the walking belt is removed from the console, the walking belt will stop the walking belt, step...
English Manual
Page 9
...- If desired, the Speed, Time, Distance, Fat Calories or Calories mode can be reset by pressing the DISPLAY button. 9 Press the MODE button repeatedly until the heart-shaped indicator in the pulse display. Make sure that provide instant exercise feedback: ¥ SpeedÑThis mode shows your speed, in your thumb will appear in a repeating cycle. Do not press too Pulse Sensor hard, or the circulation in miles per hour. ¥...
...- If desired, the Speed, Time, Distance, Fat Calories or Calories mode can be reset by pressing the DISPLAY button. 9 Press the MODE button repeatedly until the heart-shaped indicator in the pulse display. Make sure that provide instant exercise feedback: ¥ SpeedÑThis mode shows your speed, in your thumb will appear in a repeating cycle. Do not press too Pulse Sensor hard, or the circulation in miles per hour. ¥...
English Manual
Page 10
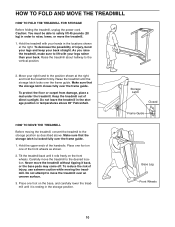
... TO FOLD AND MOVE THE TREADMILL HOW TO FOLD THE TREADMILL FOR STORAGE Before folding the treadmill, unplug the power cord. To reduce the risk of injury, use extreme caution while moving the treadmill, convert the treadmill to the position shown at the right. Storage Latch Closed Frame Guide Base Leg Front Wheels 10 Move your hands in temperatures above . Do not leave the treadmill in the storage position in the locations...
... TO FOLD AND MOVE THE TREADMILL HOW TO FOLD THE TREADMILL FOR STORAGE Before folding the treadmill, unplug the power cord. To reduce the risk of injury, use extreme caution while moving the treadmill, convert the treadmill to the position shown at the right. Storage Latch Closed Frame Guide Base Leg Front Wheels 10 Move your hands in temperatures above . Do not leave the treadmill in the storage position in the locations...
English Manual
Page 11
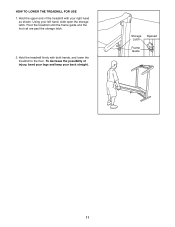
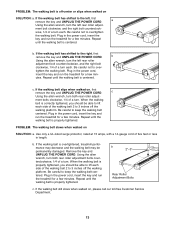
Using your back straight. HOW TO LOWER THE TREADMILL FOR USE 1. Hold the upper end of injury, bend your legs and keep your left hand, slide open the storage latch. To decrease the possibility of the treadmill with both hands, and lower the treadmill to the floor. Storage Opened Latch Frame Guide 11 Pivot the treadmill until the frame guide and the foot rail are past the storage latch. 2. Hold the treadmill firmly with your right hand as shown.
Using your back straight. HOW TO LOWER THE TREADMILL FOR USE 1. Hold the upper end of injury, bend your legs and keep your left hand, slide open the storage latch. To decrease the possibility of the treadmill with both hands, and lower the treadmill to the floor. Storage Opened Latch Frame Guide 11 Pivot the treadmill until the frame guide and the foot rail are past the storage latch. 2. Hold the treadmill firmly with your right hand as shown.
English Manual
Page 12
... plugged into the console. PROBLEM: The power does not turn on page 8. Remove the key from the hood. See step 1 on SOLUTION: a. Carefully remove the hood. Find the symptom that the power cord is needed, please call our Customer Service Department, toll-free. After the power cord has been plugged in length. See step 1 on the treadmill frame near the power cord (see assembly step 6 on the left side of drained batteries. Check the circuit breaker located...
... plugged into the console. PROBLEM: The power does not turn on page 8. Remove the key from the hood. See step 1 on SOLUTION: a. Carefully remove the hood. Find the symptom that the power cord is needed, please call our Customer Service Department, toll-free. After the power cord has been plugged in length. See step 1 on the treadmill frame near the power cord (see assembly step 6 on the left side of drained batteries. Check the circuit breaker located...
English Manual
Page 13
... overtighten the walking belt. Plug in length. c. Use only a UL-listed surge protector, rated at 15 amps, with a 14-gauge cord of five feet or less in the power cord, insert the key and run the treadmill for a few minutes. If the walking belt is correctly tightened, you should be able to the left rear roller adjust- b. PROBLEM: The walking belt slows when walked on , please call our toll-free Customer Service Department...
... overtighten the walking belt. Plug in length. c. Use only a UL-listed surge protector, rated at 15 amps, with a 14-gauge cord of five feet or less in the power cord, insert the key and run the treadmill for a few minutes. If the walking belt is correctly tightened, you should be able to the left rear roller adjust- b. PROBLEM: The walking belt slows when walked on , please call our toll-free Customer Service Department...
English Manual
Page 14
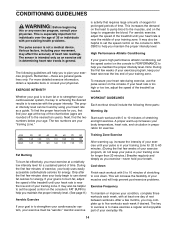
... life. 14 If your goal is in your training zone. This will increase the flexibility of your training zone for energy. The following three parts: Warming Up Start each workout with pre-existing health problems. The pulse sensor is high performance athletic conditioning, set the speed control on the lungs to use the pulse sensor on the console to PERFORMANCE to 10 minutes of your condition...
... life. 14 If your goal is in your training zone. This will increase the flexibility of your training zone for energy. The following three parts: Warming Up Start each workout with pre-existing health problems. The pulse sensor is high performance athletic conditioning, set the speed control on the lungs to use the pulse sensor on the console to PERFORMANCE to 10 minutes of your condition...
English Manual
Page 15
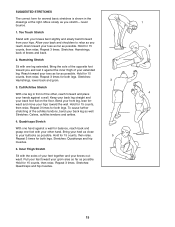
... both legs. Stretches: Hamstrings, lower back and groin. 3 3. Calf/Achilles Stretch With one hand against the inner thigh of your toes as far as possible. Hold for 15 counts, then relax. Hold for 15 counts, then relax. Keep your back leg straight and your buttocks as possible. Bend your front leg, lean forward and move...
... both legs. Stretches: Hamstrings, lower back and groin. 3 3. Calf/Achilles Stretch With one hand against the inner thigh of your toes as far as possible. Hold for 15 counts, then relax. Hold for 15 counts, then relax. Keep your back leg straight and your buttocks as possible. Bend your front leg, lean forward and move...
English Manual
Page 16
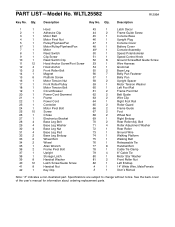
... 1 Hood 43 1 Latch Decal 2 1 Adhesive Clip 44 2 Frame Guide Screw 3 1 Motor Belt 45 1 Console Base 4 1 Motor Pivot Nut 46 1 Upright Plug 5 1 Pulley/Flywheel/Fan 47 1 Console Cover 6* 1 Motor/Pulley/Flywheel/Fan 48 1 Battery Cover 7 1 Motor 49* 1 Console Assembly 8 1 Reed Switch 50 1 Speed Potentiometer 9 1 Clip Screw 51 1 Speed Control Knob 10 1 Reed Switch Clip 52 6 Ground Screw/Belt Guide Screw 11 12 Hood Anchor Screw/Foot Screw 53 1 Wire Harness 12 4 Hood Anchor 54 1 Grommet 13 2 Front Roller Bolt 55 2 Base Leg 14...
... 1 Hood 43 1 Latch Decal 2 1 Adhesive Clip 44 2 Frame Guide Screw 3 1 Motor Belt 45 1 Console Base 4 1 Motor Pivot Nut 46 1 Upright Plug 5 1 Pulley/Flywheel/Fan 47 1 Console Cover 6* 1 Motor/Pulley/Flywheel/Fan 48 1 Battery Cover 7 1 Motor 49* 1 Console Assembly 8 1 Reed Switch 50 1 Speed Potentiometer 9 1 Clip Screw 51 1 Speed Control Knob 10 1 Reed Switch Clip 52 6 Ground Screw/Belt Guide Screw 11 12 Hood Anchor Screw/Foot Screw 53 1 Wire Harness 12 4 Hood Anchor 54 1 Grommet 13 2 Front Roller Bolt 55 2 Base Leg 14...
English Manual
Page 18
... the product (WESLO CADENCE¨ 925 treadmill). ¥ The SERIAL NUMBER of the product (see the front cover of this manual). ¥ The KEY NUMBER and DESCRIPTION of the desired part(s) (see the PART LIST and the EXPLODED DRAWING at 1-800-999-3756, Monday through one of ICON Health & Fitness, Inc. To help us assist you specific legal rights. WESLO is a registered trademark of its authorized service centers. Some...
... the product (WESLO CADENCE¨ 925 treadmill). ¥ The SERIAL NUMBER of the product (see the front cover of this manual). ¥ The KEY NUMBER and DESCRIPTION of the desired part(s) (see the PART LIST and the EXPLODED DRAWING at 1-800-999-3756, Monday through one of ICON Health & Fitness, Inc. To help us assist you specific legal rights. WESLO is a registered trademark of its authorized service centers. Some...


