

English Manual
Page 1
Sears, Roebuck and Co., Hoffman Estates, IL 60179 Write the serial number in this manual before using this manual for future reference. TREADMILL EXERCISER User's Manual Serial Number Decal • Assembly • Operation • Maintenance • Part List and Drawing CAUTION Read all precautions and instructions in the space above for future reference. Save this equipment. Model No. 831.295021 Serial No.
Sears, Roebuck and Co., Hoffman Estates, IL 60179 Write the serial number in this manual before using this manual for future reference. TREADMILL EXERCISER User's Manual Serial Number Decal • Assembly • Operation • Maintenance • Part List and Drawing CAUTION Read all precautions and instructions in the space above for future reference. Save this equipment. Model No. 831.295021 Serial No.

English Manual
Page 2
... MAINTENANCE AND TROUBLESHOOTING 12 CONDITIONING GUIDELINES 14 ORDERING REPLACEMENT PARTS Back Cover FULL 90 DAY WARRANTY Back Cover Note: An EXPLODED DRAWING and a PART LIST are recommended for both men and women. Keep children under the treadmill. 4. Use only a single-outlet surge suppressor that blocks air openings. Never move the walking belt while the power is not working properly.) 15. Do not operate the treadmill if the power cord or plug...
... MAINTENANCE AND TROUBLESHOOTING 12 CONDITIONING GUIDELINES 14 ORDERING REPLACEMENT PARTS Back Cover FULL 90 DAY WARRANTY Back Cover Note: An EXPLODED DRAWING and a PART LIST are recommended for both men and women. Keep children under the treadmill. 4. Use only a single-outlet surge suppressor that blocks air openings. Never move the walking belt while the power is not working properly.) 15. Do not operate the treadmill if the power cord or plug...

English Manual
Page 3
.... Always remove the key and unplug the power cord when the treadmill is capable of the treadmill regularly. 22. Inspect and properly tighten all instructions before performing the maintenance and adjustment procedures described in -home use of the treadmill by an authorized service representative. This is intended for persons over the age of 35 or persons with pre-existing health problems. Read all parts of high speeds. Do...
.... Always remove the key and unplug the power cord when the treadmill is capable of the treadmill regularly. 22. Inspect and properly tighten all instructions before performing the maintenance and adjustment procedures described in -home use of the treadmill by an authorized service representative. This is intended for persons over the age of 35 or persons with pre-existing health problems. Read all parts of high speeds. Do...

English Manual
Page 4
... the product model number and serial number before using the treadmill. Before reading further, please review the drawing below and familiarize yourself with innovative design to the treadmill (see the front cover of your benefit, read - Console Handrail Storage Latch Upright Water Bottle Holder (Bottle not included) Key/Clip FRONT Walking Belt Foot Rails BACK Rear Roller Adjustment Bolts Incline Leg Circuit Breaker Power Cord RIGHT SIDE 4 ing this manual, call 1-800-4-MY-HOME® (1-800...
... the product model number and serial number before using the treadmill. Before reading further, please review the drawing below and familiarize yourself with innovative design to the treadmill (see the front cover of your benefit, read - Console Handrail Storage Latch Upright Water Bottle Holder (Bottle not included) Key/Clip FRONT Walking Belt Foot Rails BACK Rear Roller Adjustment Bolts Incline Leg Circuit Breaker Power Cord RIGHT SIDE 4 ing this manual, call 1-800-4-MY-HOME® (1-800...

English Manual
Page 5
ASSEMBLY Assembly requires two persons. To identify small parts, use the PART IDENTIFICATION CHART attached in the center of a second person, carefully raise the Uprights (38) until assembly is unplugged. 1 38 With the help of this manual. Cut the tie (not shown) off the lubricant with an Extension Leg Screw (14). Attach the other Extension Leg (15) in a cleared area and remove all packing materials. Assembly requires the...
ASSEMBLY Assembly requires two persons. To identify small parts, use the PART IDENTIFICATION CHART attached in the center of a second person, carefully raise the Uprights (38) until assembly is unplugged. 1 38 With the help of this manual. Cut the tie (not shown) off the lubricant with an Extension Leg Screw (14). Attach the other Extension Leg (15) in a cleared area and remove all packing materials. Assembly requires the...

English Manual
Page 6
...Hold the Console (11) near the right Upright (38) as shown. plug the connector into the Handrails and the Console Base. Securely tighten the plastic ties around the Wire Harness (53). Cut off the end of the Console Base above...use needlenose pliers to press down on the Handrails (4) into place. Be careful not to discharge any slack in the brackets on the Wire Harness and try again. Thread four 3/4" Screws (5) into the connector labeled B (see drawing 5b). IF THE CONNECTORS ARE NOT INSERTED PROPERLY, THE CONSOLE MAY BE DAMAGED WHEN THE POWER IS TURNED ON. See step...
...Hold the Console (11) near the right Upright (38) as shown. plug the connector into the Handrails and the Console Base. Securely tighten the plastic ties around the Wire Harness (53). Cut off the end of the Console Base above...use needlenose pliers to press down on the Handrails (4) into place. Be careful not to discharge any slack in the brackets on the Wire Harness and try again. Thread four 3/4" Screws (5) into the connector labeled B (see drawing 5b). IF THE CONNECTORS ARE NOT INSERTED PROPERLY, THE CONSOLE MAY BE DAMAGED WHEN THE POWER IS TURNED ON. See step...

English Manual
Page 7
... off the ends of the Wire Cover. Attach the Wire Cover to the right Handrail. 6. Make sure that all parts used to adjust the walking belt (see page 13). Note: No 3/4" Screw goes into the hole indicated by the arrow. Attach the Storage Latch (66) to the Console Base (87). To protect the floor or carpet, place a mat under the treadmill. 7 Set the Console (11) in a secure place...
... off the ends of the Wire Cover. Attach the Wire Cover to the right Handrail. 6. Make sure that all parts used to adjust the walking belt (see page 13). Note: No 3/4" Screw goes into the hole indicated by the arrow. Attach the Storage Latch (66) to the Console Base (87). To protect the floor or carpet, place a mat under the treadmill. 7 Set the Console (11) in a secure place...

English Manual
Page 8
... Pin Grounded Outlet Grounding Plug 2 Grounded Outlet Box Adapter Surge Suppressor Use only a single-outlet surge suppressor that looks like any other substances to determine if the outlet box cover is damaged, the walking belt may change speed, accelerate or stop unexpectedly, which may be seriously damaged by a qualified electrician. HOW TO PLUG IN THE POWER CORD DANGER: Improper connection of your treadmill (see your home's power...
... Pin Grounded Outlet Grounding Plug 2 Grounded Outlet Box Adapter Surge Suppressor Use only a single-outlet surge suppressor that looks like any other substances to determine if the outlet box cover is damaged, the walking belt may change speed, accelerate or stop unexpectedly, which may be seriously damaged by a qualified electrician. HOW TO PLUG IN THE POWER CORD DANGER: Improper connection of your treadmill (see your home's power...

English Manual
Page 9
A few steps backward until the key is pulled from the console, adjust the position of the clip. DIAGRAM OF THE CONSOLE Displays Incline Control Speed Control Note: If there is a thin sheet of plastic on the console and place only a sealed water bottle in the water bottle holder. Next, locate the circuit breaker near the power cord. Find the clip attached to start the walking belt. Follow the steps below to...
A few steps backward until the key is pulled from the console, adjust the position of the clip. DIAGRAM OF THE CONSOLE Displays Incline Control Speed Control Note: If there is a thin sheet of plastic on the console and place only a sealed water bottle in the water bottle holder. Next, locate the circuit breaker near the power cord. Find the clip attached to start the walking belt. Follow the steps below to...

English Manual
Page 10
As you exercise, change the speed of the walking belt. For simplicity, all instructions in either miles or kilometers (see page 13). 3 Change the incline of measurement. To stop the walking belt, press the Stop button. The Time/Distance display will begin to miles. Calories/Speed display-This display shows the approximate number of calories you have walked or run. Step onto the foot rails, press the Stop button, and remove the key from one number to the other every few...
As you exercise, change the speed of the walking belt. For simplicity, all instructions in either miles or kilometers (see page 13). 3 Change the incline of measurement. To stop the walking belt, press the Stop button. The Time/Distance display will begin to miles. Calories/Speed display-This display shows the approximate number of calories you have walked or run. Step onto the foot rails, press the Stop button, and remove the key from one number to the other every few...
English Manual
Page 11
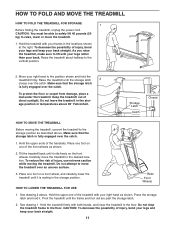
... catch. 1. Storage Latch Catch Closed HOW TO MOVE THE TREADMILL Before moving the treadmill. Make sure that the storage latch is fully engaged over the catch. Base Front Wheels HOW TO LOWER THE TREADMILL FOR USE 1. See drawing 1. CAUTION: To decrease the possibility of the treadmill with your back. HOW TO FOLD AND MOVE THE TREADMILL HOW TO FOLD THE TREADMILL FOR STORAGE 1 Before folding the treadmill, unplug the power cord. To...
... catch. 1. Storage Latch Catch Closed HOW TO MOVE THE TREADMILL Before moving the treadmill. Make sure that the storage latch is fully engaged over the catch. Base Front Wheels HOW TO LOWER THE TREADMILL FOR USE 1. See drawing 1. CAUTION: To decrease the possibility of the treadmill with your back. HOW TO FOLD AND MOVE THE TREADMILL HOW TO FOLD THE TREADMILL FOR STORAGE 1 Before folding the treadmill, unplug the power cord. To...

English Manual
Page 12
...: a. Remove the screws from . Run the treadmill for a few minutes to check for five minutes and then press the switch back in. b. above). Remove the key from the console. Reattach the hood, making sure that the key is not compatible with the Reed Switch. PROBLEM: The power does not turn on the treadmill frame near the power cord (see page 8). After the power cord has been plugged in . Remove the key from the console...
...: a. Remove the screws from . Run the treadmill for a few minutes to check for five minutes and then press the switch back in. b. above). Remove the key from the console. Reattach the hood, making sure that the key is not compatible with the Reed Switch. PROBLEM: The power does not turn on the treadmill frame near the power cord (see page 8). After the power cord has been plugged in . Remove the key from the console...
English Manual
Page 13
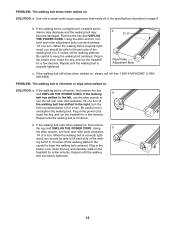
... walking belt is properly tightened. 13 ing belt 2 to overtighten the walking belt. When the walking belt is properly tightened. Plug in the power cord, insert the key, and run the treadmill for a few minutes. Using the allen wrench, turn both rear roller bolts clockwise, 1/4 of a turn . b. If the walking belt still slows when walked on SOLUTION: a. PROBLEM: The walking belt slows when walked on , please call toll-free 1-800-4-MY-HOME® (1-800469-4663). Using b the allen wrench, turn both rear roller adjustment bolts...
... walking belt is properly tightened. 13 ing belt 2 to overtighten the walking belt. When the walking belt is properly tightened. Plug in the power cord, insert the key, and run the treadmill for a few minutes. Using the allen wrench, turn both rear roller bolts clockwise, 1/4 of a turn . b. If the walking belt still slows when walked on SOLUTION: a. PROBLEM: The walking belt slows when walked on , please call toll-free 1-800-4-MY-HOME® (1-800469-4663). Using b the allen wrench, turn both rear roller adjustment bolts...

English Manual
Page 14
... the treadmill accordingly. Aerobic Exercise If your goal is to set the speed control on your wrist as a guide. Aerobic exercise is too high or too low, adjust the speed or incline of oxygen for fat burning; It may also be found by ten to exercise with pre-existing health problems. The following three important parts: A Warm-up increases your exercise program. The lower two numbers are recommended heart rates...
... the treadmill accordingly. Aerobic Exercise If your goal is to set the speed control on your wrist as a guide. Aerobic exercise is too high or too low, adjust the speed or incline of oxygen for fat burning; It may also be found by ten to exercise with pre-existing health problems. The following three important parts: A Warm-up increases your exercise program. The lower two numbers are recommended heart rates...

English Manual
Page 15
... your exercise program, do not keep your pulse in your training zone for longer than 20 minutes.) Breathe regularly and deeply as you may complete up to five workouts each week if desired. A Cool-down Finish each workout with at least one day of rest between workouts. The key to ...success is in your training zone for 20 to 60 minutes. (During the first few months, you exercise-never hold your breath. Training Zone Exercise After warming up, increase the intensity of your exercise until your pulse is to make exercise a regular and enjoyable part of ...
... your exercise program, do not keep your pulse in your training zone for longer than 20 minutes.) Breathe regularly and deeply as you may complete up to five workouts each week if desired. A Cool-down Finish each workout with at least one day of rest between workouts. The key to ...success is in your training zone for 20 to 60 minutes. (During the first few months, you exercise-never hold your breath. Training Zone Exercise After warming up, increase the intensity of your exercise until your pulse is to make exercise a regular and enjoyable part of ...

English Manual
Page 16
PART IDENTIFICATION CHART Remove this chart and the EXPLODED DRAWING/PART LIST for future reference. 3/4Ó Screw (5)Ð13 1Ó Bolt (16)Ð4 Handrail Washer (40)Ð4 Extension Leg Screw (14)Ð2 Save this chart and use it to identify small parts during assembly.
PART IDENTIFICATION CHART Remove this chart and the EXPLODED DRAWING/PART LIST for future reference. 3/4Ó Screw (5)Ð13 1Ó Bolt (16)Ð4 Handrail Washer (40)Ð4 Extension Leg Screw (14)Ð2 Save this chart and use it to identify small parts during assembly.

English Manual
Page 17
... Key/Clip Hole Plug Incline Leg Handrail Endcap Wire Cover Console Console Cover Reed Switch Extension Leg Screw Extension Leg 1" Bolt Cage Nut Motor Belt Motor Tension Bolt Motor Tension Washer Tension Star Washer Motor Pivot Nut Motor/Pulley/Flywheel/Fan Pulley/Flywheel/Fan Motor Motor Pivot Bolt 8" Cable Tie Screw Hood Hood Shield Hood Screw (Front) Isolator Fastener Base Pad Motor Belly Pan Controller Frame Pivot Bolt Frame Pivot Washer Upright/Base Belt Guide Screw Roller Washer/Handrail Washer Wheel Bolt Wheel Frame Nut/Wheel Nut Extension Leg Assembly Circuit Breaker Grommet Power Cord...
... Key/Clip Hole Plug Incline Leg Handrail Endcap Wire Cover Console Console Cover Reed Switch Extension Leg Screw Extension Leg 1" Bolt Cage Nut Motor Belt Motor Tension Bolt Motor Tension Washer Tension Star Washer Motor Pivot Nut Motor/Pulley/Flywheel/Fan Pulley/Flywheel/Fan Motor Motor Pivot Bolt 8" Cable Tie Screw Hood Hood Shield Hood Screw (Front) Isolator Fastener Base Pad Motor Belly Pan Controller Frame Pivot Bolt Frame Pivot Washer Upright/Base Belt Guide Screw Roller Washer/Handrail Washer Wheel Bolt Wheel Frame Nut/Wheel Nut Extension Leg Assembly Circuit Breaker Grommet Power Cord...

English Manual
Page 18
.... 831.295021 EXPLODED DRAWING Model No. 831.295021 R0804A 31 40 16 16 40 11 28 30 7 29 28 31 44* 66 5 18 20 19 22 24 25 40 23* ... 58 43 84 95 39 42 33 44* 95 96 51 83 71 60 65 33 31 28 41 28 4 5 80 79 78 40 54 55 64 90 40 78 8 99 76 99 77 82 5 5 72 64 81 56 55 54 27 68 76 69 34 28 28 9 28 33 31 28...
.... 831.295021 EXPLODED DRAWING Model No. 831.295021 R0804A 31 40 16 16 40 11 28 30 7 29 28 31 44* 66 5 18 20 19 22 24 25 40 23* ... 58 43 84 95 39 42 33 44* 95 96 51 83 71 60 65 33 31 28 41 28 4 5 80 79 78 40 54 55 64 90 40 78 8 99 76 99 77 82 5 5 72 64 81 56 55 54 27 68 76 69 34 28 28 9 28 33 31 28...

English Manual
Page 19
... in this Sears Treadmill Exerciser, contact the nearest Sears Service Center throughout the United States and Sears will repair or replace the Treadmill Exerciser, free of purchase, if failure occurs due to state. This warranty gives you specific legal rights, and you may also have other rights which vary from the date of charge. This warranty does not apply when the Treadmill Exerciser is used commercially or...
... in this Sears Treadmill Exerciser, contact the nearest Sears Service Center throughout the United States and Sears will repair or replace the Treadmill Exerciser, free of purchase, if failure occurs due to state. This warranty gives you specific legal rights, and you may also have other rights which vary from the date of charge. This warranty does not apply when the Treadmill Exerciser is used commercially or...


