

Uk Manual
Page 1
... Estate Revie Road Beeston Leeds, LS118JG UK email: [email protected] CAUTION Read all precautions and instructions in the space above for future reference. USER'S MANUAL Save this equipment. Serial Number Decal QUESTIONS? If you have questions, or if there are committed to providing complete customer satisfaction. WETL26805.1 Serial No. Write...
... Estate Revie Road Beeston Leeds, LS118JG UK email: [email protected] CAUTION Read all precautions and instructions in the space above for future reference. USER'S MANUAL Save this equipment. Serial Number Decal QUESTIONS? If you have questions, or if there are committed to providing complete customer satisfaction. WETL26805.1 Serial No. Write...

Uk Manual
Page 2
TABLE OF CONTENTS IMPORTANT PRECAUTIONS 3 BEFORE YOU BEGIN 5 ASSEMBLY 6 OPERATION AND ADJUSTMENT 10 HOW TO FOLD AND MOVE THE TREADMILL 15 TROUBLESHOOTING 17 CONDITIONING GUIDELINES 19 ORDERING REPLACEMENT PARTS Back Cover Note: A PART IDENTIFICATION CHART, an EXPLODED DRAWING, and a PART LIST are attached in the center of ICON IP, Inc. 2 WESLO is a registered trademark of this manual.
TABLE OF CONTENTS IMPORTANT PRECAUTIONS 3 BEFORE YOU BEGIN 5 ASSEMBLY 6 OPERATION AND ADJUSTMENT 10 HOW TO FOLD AND MOVE THE TREADMILL 15 TROUBLESHOOTING 17 CONDITIONING GUIDELINES 19 ORDERING REPLACEMENT PARTS Back Cover Note: A PART IDENTIFICATION CHART, an EXPLODED DRAWING, and a PART LIST are attached in the center of ICON IP, Inc. 2 WESLO is a registered trademark of this manual.

Uk Manual
Page 4
... or persons with pre-existing health problems. Read all parts of this manual and order a free replacement decal. Apply the decal in -home use of the treadmill regularly. 23. Do not use , before cleaning the treadmill, and before using. Note: The decals are not shown at actual ...do so by an authorized service representative only. 25. This treadmill is intended for persons over the age of this product. Servicing other than the procedures in any opening. WARNING: Before beginning this manual should be performed by an authorized service representative. Inspect and ...
... or persons with pre-existing health problems. Read all parts of this manual and order a free replacement decal. Apply the decal in -home use of the treadmill regularly. 23. Do not use , before cleaning the treadmill, and before using. Note: The decals are not shown at actual ...do so by an authorized service representative only. 25. This treadmill is intended for persons over the age of this product. Servicing other than the procedures in any opening. WARNING: Before beginning this manual should be performed by an authorized service representative. Inspect and ...

Uk Manual
Page 5
... to help us . or your home. The model number of this manual for selecting the new WESLO® CADENCE 700 treadmill. the parts that are labelled in the convenience and privacy of this manual carefully before contacting us assist you have questions after read this manual. BEFORE YOU BEGIN Thank you for the location). If you , please...
... to help us . or your home. The model number of this manual for selecting the new WESLO® CADENCE 700 treadmill. the parts that are labelled in the convenience and privacy of this manual carefully before contacting us assist you have questions after read this manual. BEFORE YOU BEGIN Thank you for the location). If you , please...
Uk Manual
Page 6
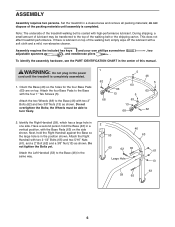
... (53) to the top of this manual. Orient the Base (46) so the holes for the four Base Pads (63) are on the side shown. Set the treadmill in the center of the walking belt or the shipping carton. This does not affect treadmill performance. Attach the four Base Pads to...the Wheels must be transferred to the Base (46) in one side. do not dispose of the treadmill walking belt is completely assembled. 1. DOWN DOWN Note: The underside of the packing materials until the treadmill is coated with the Base Pads (63) on top. RIGHT ASSEMBLY Assembly requires two persons. UP...
... (53) to the top of this manual. Orient the Base (46) so the holes for the four Base Pads (63) are on the side shown. Set the treadmill in the center of the walking belt or the shipping carton. This does not affect treadmill performance. Attach the four Base Pads to...the Wheels must be transferred to the Base (46) in one side. do not dispose of the treadmill walking belt is completely assembled. 1. DOWN DOWN Note: The underside of the packing materials until the treadmill is coated with the Base Pads (63) on top. RIGHT ASSEMBLY Assembly requires two persons. UP...
Uk Manual
Page 11
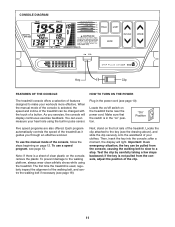
... belt to slow to the walking platform, always wear clean athletic shoes while using the built-in the "on the treadmill frame near the power cord. To use the manual mode of features designed to the key (see page 10). Locate the on/off switch on " position. EBPE3915 11... continuous exercise feedback. Important: In an emergency situation, the key can be pulled from the console, adjust the position of the treadmill as it guides you exercise, the console will light. As you through an effective workout. When the manual mode of the console is in pulse sensor.
... belt to slow to the walking platform, always wear clean athletic shoes while using the built-in the "on the treadmill frame near the power cord. To use the manual mode of features designed to the key (see page 10). Locate the on/off switch on " position. EBPE3915 11... continuous exercise feedback. Important: In an emergency situation, the key can be pulled from the console, adjust the position of the treadmill as it guides you exercise, the console will light. As you through an effective workout. When the manual mode of the console is in pulse sensor.
Uk Manual
Page 12
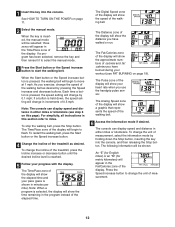
...selected, the display will appear in increments of the display. Note: The console can display speed and distance in the Fat/Calories zone of the treadmill as desired by 0.1 mph; The Distance zone of the display will appear in either miles or kilometers (see FAT BURNING on page 19). ...key into the console, and then releasing the Stop button. As you have burned during your workout (see step 6 on page 11. 2 Select the manual mode. Note: When a program is held down the Stop button, inserting the key into the console. The Time/Pace zone of measurement. 12 To ...
...selected, the display will appear in increments of the display. Note: The console can display speed and distance in the Fat/Calories zone of the treadmill as desired by 0.1 mph; The Distance zone of the display will appear in either miles or kilometers (see FAT BURNING on page 19). ...key into the console, and then releasing the Stop button. As you have burned during your workout (see step 6 on page 11. 2 Select the manual mode. Note: When a program is held down the Stop button, inserting the key into the console. The Time/Pace zone of measurement. 12 To ...

Uk Manual
Page 14
... press the Stop button. To stop . The walking belt will begin walking. One speed setting is too high or too low, you can manually override the setting by pressing the Speed buttons. Note: If the speed setting for the current period is programmed for each period. To restart ... display will automatically adjust to start the program. Each program is programmed for the upcoming period, the Digital Speed zone of the program ends, the treadmill will flash. To end the program, press the Stop button, remove the key, and then reinsert the key. 4 Follow your heart rate if desired...
... press the Stop button. To stop . The walking belt will begin walking. One speed setting is too high or too low, you can manually override the setting by pressing the Speed buttons. Note: If the speed setting for the current period is programmed for each period. To restart ... display will automatically adjust to start the program. Each program is programmed for the upcoming period, the Digital Speed zone of the program ends, the treadmill will flash. To end the program, press the Stop button, remove the key, and then reinsert the key. 4 Follow your heart rate if desired...

Uk Manual
Page 17
...circuit breaker located on the left side of this manual. above ). If the power cord is fully inserted into the console. Remove the key from the console and UNPLUG THE POWER CORD. e. If the treadmill still will not run the treadmill for a few minutes to check for five minutes... and then press the switch back in . PROBLEM: The displays of this manual. c. The switch must be solved by following the steps below....
...circuit breaker located on the left side of this manual. above ). If the power cord is fully inserted into the console. Remove the key from the console and UNPLUG THE POWER CORD. e. If the treadmill still will not run the treadmill for a few minutes to check for five minutes... and then press the switch back in . PROBLEM: The displays of this manual. c. The switch must be solved by following the steps below....

Uk Manual
Page 18
... b. Remove the key and UNPLUG THE POWER CORD. Be careful to keep the walking belt centered. Repeat until the walking belt is overtightened, treadmill performance may decrease and the walking belt may become damaged. If an extension cord is needed, use only a 3-conductor, 1mm2 (14-gauge...inches off the walking platform. tighten the walking belt. If the walking a belt has shifted to the left rear roller bolt clockwise 1/2 of this manual. Using the hex key, turn both rear roller bolts clockwise, 1/4 of the walking belt 2 to turn . If the walking belt is off ...
... b. Remove the key and UNPLUG THE POWER CORD. Be careful to keep the walking belt centered. Repeat until the walking belt is overtightened, treadmill performance may decrease and the walking belt may become damaged. If an extension cord is needed, use only a 3-conductor, 1mm2 (14-gauge...inches off the walking platform. tighten the walking belt. If the walking a belt has shifted to the left rear roller bolt clockwise 1/2 of this manual. Using the hex key, turn both rear roller bolts clockwise, 1/4 of the walking belt 2 to turn . If the walking belt is off ...

Uk Manual
Page 21
... # 1 8" White Wire, 2F # 1 8" Green/Yellow Wire, F/Ring # 1 10" Green/Yellow Wire, F/Ring # 1 10" White Wire, F/F # 1 User's Manual Note: "#" indicates a non-illustrated part. Description Key No. Specifications are subject to change without notice. WETL26805.1 R1105A Key No. Description Key No. Bolt 79 1 40... 1 Motor Belt Receptical Rear Roller Adj. Qty. Qty. Washer 78 2 39 1 Front Roller Adj. See the back cover of the user's manual for information about ordering replacement parts. PART LIST-Model No. Description 1 1 Motor Hood 41 1 2 14 3/4" Screw 42 1 3 18 3/4"...
... # 1 8" White Wire, 2F # 1 8" Green/Yellow Wire, F/Ring # 1 10" Green/Yellow Wire, F/Ring # 1 10" White Wire, F/F # 1 User's Manual Note: "#" indicates a non-illustrated part. Description Key No. Specifications are subject to change without notice. WETL26805.1 R1105A Key No. Description Key No. Bolt 79 1 40... 1 Motor Belt Receptical Rear Roller Adj. Qty. Qty. Washer 78 2 39 1 Front Roller Adj. See the back cover of the user's manual for information about ordering replacement parts. PART LIST-Model No. Description 1 1 Motor Hood 41 1 2 14 3/4" Screw 42 1 3 18 3/4"...

Uk Manual
Page 23
... following information: • the MODEL NUMBER of the product (WETL26805.1) • the NAME of the product (WESLO CADENCE 700 treadmill) • the SERIAL NUMBER of the product (see the front cover of this manual) • the KEY NUMBER and DESCRIPTION of the desired part(s) (see the PART LIST and the EXPLODED DRAWING... in the centre of this manual) Part No. 230018 R1105A Printed in Canada © 2005 ICON IP, Inc. ...
... following information: • the MODEL NUMBER of the product (WETL26805.1) • the NAME of the product (WESLO CADENCE 700 treadmill) • the SERIAL NUMBER of the product (see the front cover of this manual) • the KEY NUMBER and DESCRIPTION of the desired part(s) (see the PART LIST and the EXPLODED DRAWING... in the centre of this manual) Part No. 230018 R1105A Printed in Canada © 2005 ICON IP, Inc. ...

