
English Manual
Page 1
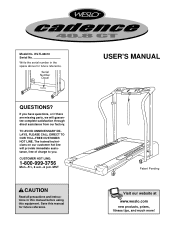
... missing parts, we will provide immediate assistance, free of charge to you. TO AVOID UNNECESSARY DELAYS, PLEASE CALL DIRECT TO OUR TOLL-FREE CUSTOMER HOT LINE. Save this equipment. USER'S MANUAL Patent Pending Visit our website at www.weslo.com new products, prizes, fitness tips, and much more! WLTL48410 Serial No. ® Model No. Write the serial number in this manual before using this manual...
... missing parts, we will provide immediate assistance, free of charge to you. TO AVOID UNNECESSARY DELAYS, PLEASE CALL DIRECT TO OUR TOLL-FREE CUSTOMER HOT LINE. Save this equipment. USER'S MANUAL Patent Pending Visit our website at www.weslo.com new products, prizes, fitness tips, and much more! WLTL48410 Serial No. ® Model No. Write the serial number in this manual before using this manual...
English Manual
Page 2
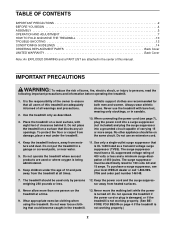
... the risk of this treadmill are adequately informed of carrying 15 or more than one person on the same circuit. TABLE OF CONTENTS IMPORTANT PRECAUTIONS 2 BEFORE YOU BEGIN 4 ASSEMBLY 5 OPERATION AND ADJUSTMENT 7 HOW TO FOLD AND MOVE THE TREADMILL 10 TROUBLE-SHOOTING 12 CONDITIONING GUIDELINES 14 ORDERING REPLACEMENT PARTS Back Cover LIMITED WARRANTY Back Cover Note: An EXPLODED DRAWING and a PART LIST are attached in the center...
... the risk of this treadmill are adequately informed of carrying 15 or more than one person on the same circuit. TABLE OF CONTENTS IMPORTANT PRECAUTIONS 2 BEFORE YOU BEGIN 4 ASSEMBLY 5 OPERATION AND ADJUSTMENT 7 HOW TO FOLD AND MOVE THE TREADMILL 10 TROUBLE-SHOOTING 12 CONDITIONING GUIDELINES 14 ORDERING REPLACEMENT PARTS Back Cover LIMITED WARRANTY Back Cover Note: An EXPLODED DRAWING and a PART LIST are attached in the center...
English Manual
Page 3
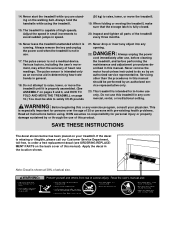
.... The pulse sensor is running. The pulse sensor is intended for in this or any exercise program, consult your treadmill. scribed in -home use only. This treadmill is intended only as an exercise aid in determining heart rate trends in use of actual size. ICON assumes no responsibility for persons over the age of this treadmill in the location shown. When folding or moving the treadmill, make sure that the storage latch is...
.... The pulse sensor is running. The pulse sensor is intended for in this or any exercise program, consult your treadmill. scribed in -home use only. This treadmill is intended only as an exercise aid in determining heart rate trends in use of actual size. ICON assumes no responsibility for persons over the age of this treadmill in the location shown. When folding or moving the treadmill, make sure that the storage latch is...
English Manual
Page 4
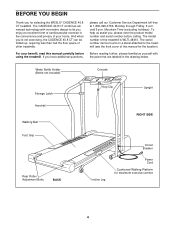
... included) Console Storage Latch Handrail Walking Belt Foot Grip Rear Roller Adjustment Bolts BACK Key/Clip Upright RIGHT SIDE Circuit Breaker Incline Leg Power Cord Cushioned Walking Platform for selecting the WESLO® CADENCE 40.8 CT treadmill. For your home. If you have additional questions, please call our Customer Service Department toll-free at 1-800-999-3756, Monday through Friday, 6 a.m. Mountain Time (excluding holidays). The model number of your benefit, read this manual for the location). To...
... included) Console Storage Latch Handrail Walking Belt Foot Grip Rear Roller Adjustment Bolts BACK Key/Clip Upright RIGHT SIDE Circuit Breaker Incline Leg Power Cord Cushioned Walking Platform for selecting the WESLO® CADENCE 40.8 CT treadmill. For your home. If you have additional questions, please call our Customer Service Department toll-free at 1-800-999-3756, Monday through Friday, 6 a.m. Mountain Time (excluding holidays). The model number of your benefit, read this manual for the location). To...
English Manual
Page 5
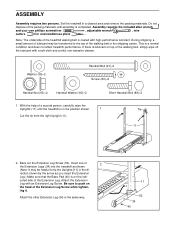
... Upright (11). Attach the other Extension Leg (34) in a cleared area and remove the packing materials. cated side of the Extension Leg Screw while tighten- Be sure to the top of a second person, carefully raise the Uprights (11) until assembly is on top of the treadmill walking belt is a normal condition and does not affect treadmill performance. Back out the Extension Leg Screw (53). Set the treadmill...
... Upright (11). Attach the other Extension Leg (34) in a cleared area and remove the packing materials. cated side of the Extension Leg Screw while tighten- Be sure to the top of a second person, carefully raise the Uprights (11) until assembly is on top of the treadmill walking belt is a normal condition and does not affect treadmill performance. Back out the Extension Leg Screw (53). Set the treadmill...
English Manual
Page 6
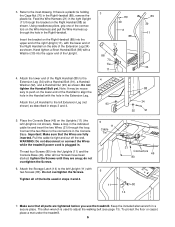
...: Do not disconnect or connect the Wires while the treadmill power cord is a plastic tie holding the Cage Nut (70) in . Tighten all of the Upright. 4. The allen wrench is not shown). Pull the cable tie tight and cut off the end. After all parts are tightened before you use the treadmill. Attach the Storage Latch (14) to the left Upright is used in a secure place. Keep...
...: Do not disconnect or connect the Wires while the treadmill power cord is a plastic tie holding the Cage Nut (70) in . Tighten all of the Upright. 4. The allen wrench is not shown). Pull the cable tie tight and cut off the end. After all parts are tightened before you use the treadmill. Attach the Storage Latch (14) to the left Upright is used in a secure place. Keep...
English Manual
Page 7
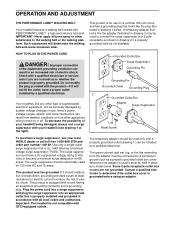
... resistance for 120 volts AC and 15 amps. This product is equipped with your local WESLO dealer or call toll-free 1-800-999-3756 and order part number 146148. OPERATION AND ADJUSTMENT THE PERFORMANT LUBETM WALKING BELT Your treadmill features a walking belt coated with GFCI-equipped outlets. This product is for use a surge suppressor with a cord having an equipment-grounding conductor and a grounding plug...
... resistance for 120 volts AC and 15 amps. This product is equipped with your local WESLO dealer or call toll-free 1-800-999-3756 and order part number 146148. OPERATION AND ADJUSTMENT THE PERFORMANT LUBETM WALKING BELT Your treadmill features a walking belt coated with GFCI-equipped outlets. This product is for use a surge suppressor with a cord having an equipment-grounding conductor and a grounding plug...

English Manual
Page 8
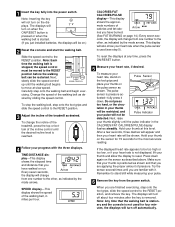
... 9 to operate the console. 8 Press the batteries into place. To install batteries, open the battery cover as needed. Find the clip attached to page 7.) Battery Cover Batteries Next, step onto the foot grips of electric shock, keep the console dry. Before operating the console, make sure that the tab locks into the battery compartment, with the negative (-) ends of your clothing. DIAGRAM OF THE CONSOLE Displays Incline Control Speed Control Key Clip Pulse Sensor CAUTION: Before operating...
... 9 to operate the console. 8 Press the batteries into place. To install batteries, open the battery cover as needed. Find the clip attached to page 7.) Battery Cover Batteries Next, step onto the foot grips of electric shock, keep the console dry. Before operating the console, make sure that the tab locks into the battery compartment, with the negative (-) ends of your clothing. DIAGRAM OF THE CONSOLE Displays Incline Control Speed Control Key Clip Pulse Sensor CAUTION: Before operating...
English Manual
Page 9
.... 3 Adjust the incline of calories and fat calo- The displays will change the incline of the treadmill, press the top or bottom of the incline control until you have burned. (See FAT BURNING on when the ON/RESET button is pressed or when the walking belt is stopped, the speed control must be moved to reset. 1 Insert the key fully into the power switch. TIME/DISTANCE dis- onds, the display will turn off automatically. The pulse sensor...
.... 3 Adjust the incline of calories and fat calo- The displays will change the incline of the treadmill, press the top or bottom of the incline control until you have burned. (See FAT BURNING on when the ON/RESET button is pressed or when the walking belt is stopped, the speed control must be moved to reset. 1 Insert the key fully into the power switch. TIME/DISTANCE dis- onds, the display will turn off automatically. The pulse sensor...

English Manual
Page 10
... move the treadmill to the storage position as shown. 2. HOW TO FOLD AND MOVE THE TREADMILL HOW TO FOLD THE TREADMILL FOR STORAGE Before folding the treadmill, unplug the power cord. Keep the treadmill out of injury, use extreme caution while moving the treadmill, convert the treadmill to the desired location. Place one foot on the front wheels. CAUTION: You must be able to lift with your back straight. Storage Latch...
... move the treadmill to the storage position as shown. 2. HOW TO FOLD AND MOVE THE TREADMILL HOW TO FOLD THE TREADMILL FOR STORAGE Before folding the treadmill, unplug the power cord. Keep the treadmill out of injury, use extreme caution while moving the treadmill, convert the treadmill to the desired location. Place one foot on the front wheels. CAUTION: You must be able to lift with your back straight. Storage Latch...

English Manual
Page 11
Hold the upper end of injury, bend your legs and keep your back straight. Storage Latch Unlatched Hold the treadmill firmly with your left thumb, press the storage latch and hold it. Using your right hand as shown. To decrease the possibility of the treadmill with both hands, and lower the treadmill to the floor. HOW TO LOWER THE TREADMILL FOR USE 1. Pivot the treadmill until the frame and foot rail are past the storage latch. 2. Do not drop the treadmill frame to the floor.
Hold the upper end of injury, bend your legs and keep your back straight. Storage Latch Unlatched Hold the treadmill firmly with your left thumb, press the storage latch and hold it. Using your right hand as shown. To decrease the possibility of the treadmill with both hands, and lower the treadmill to the floor. HOW TO LOWER THE TREADMILL FOR USE 1. Pivot the treadmill until the frame and foot rail are past the storage latch. 2. Do not drop the treadmill frame to the floor.
English Manual
Page 12
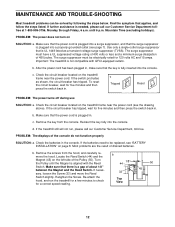
... suppressor is needed, please call our Customer Service Department, toll-free. If further assistance is plugged into the console. Remove the key from the hood, and carefully remove the hood. Check the batteries in . MAINTENANCE AND TROUBLE-SHOOTING Most treadmill problems can be electrically rated for five minutes and then press the switch back in the console. Turn the Pulley until 6 p.m. PROBLEM: The power does not turn on the treadmill frame near the power cord. The surge...
... suppressor is needed, please call our Customer Service Department, toll-free. If further assistance is plugged into the console. Remove the key from the hood, and carefully remove the hood. Check the batteries in . MAINTENANCE AND TROUBLE-SHOOTING Most treadmill problems can be electrically rated for five minutes and then press the switch back in the console. Turn the Pulley until 6 p.m. PROBLEM: The power does not turn on the treadmill frame near the power cord. The surge...

English Manual
Page 13
..., turn both rear roller adjustment bolts counterclockwise, 1/4 of a turn. When the walking belt is properly tightened. Repeat until the walking belt is correctly tight- The surge suppressor must have a UL suppressed voltage rating of 400 volts or less and a minimum surge dissipation of a turn . PROBLEM: The walking belt slows when walked on , first remove the key and UNPLUG THE POWER CORD. Plug in the power cord, insert the key and run the treadmill for a few minutes. a move...
..., turn both rear roller adjustment bolts counterclockwise, 1/4 of a turn. When the walking belt is properly tightened. Repeat until the walking belt is correctly tight- The surge suppressor must have a UL suppressed voltage rating of 400 volts or less and a minimum surge dissipation of a turn . PROBLEM: The walking belt slows when walked on , first remove the key and UNPLUG THE POWER CORD. Plug in the power cord, insert the key and run the treadmill for a few minutes. a move...
English Manual
Page 14
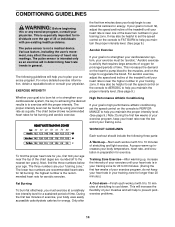
... of the treadmill until your heart rate is to strengthen your cardiovascular system, your training zone. Each workout should include the following guidelines will help you , first find your training zone. Training Zone Exercise-After warming up -Start each workout with pre-existing health problems. The pulse sensor is intended only as a guide. This will increase the flexibility of time. The following three parts: A Warm-up...
... of the treadmill until your heart rate is to strengthen your cardiovascular system, your training zone. Each workout should include the following guidelines will help you , first find your training zone. Training Zone Exercise-After warming up -Start each workout with pre-existing health problems. The pulse sensor is intended only as a guide. This will increase the flexibility of time. The following three parts: A Warm-up...

English Manual
Page 15
...leg. Repeat 3 times for each leg. Pull your feet toward your extended leg. Repeat 3 times. Hamstring Stretch Sit with one leg in front of your feet together and your everyday life. Repeat 3 times for each leg. Stretches: Hamstrings, lower...times. The key to five workouts each week if desired. Move slowly as possible. Allow your back and shoulders to make exercise a regular and enjoyable part of the opposite... hands against a wall. tween workouts. After a few months of your toes as far as possible. SUGGESTED STRETCHES The correct form for balance, reach back and ...
...leg. Repeat 3 times for each leg. Pull your feet toward your extended leg. Repeat 3 times. Hamstring Stretch Sit with one leg in front of your feet together and your everyday life. Repeat 3 times for each leg. Stretches: Hamstrings, lower...times. The key to five workouts each week if desired. Move slowly as possible. Allow your back and shoulders to make exercise a regular and enjoyable part of the opposite... hands against a wall. tween workouts. After a few months of your toes as far as possible. SUGGESTED STRETCHES The correct form for balance, reach back and ...

English Manual
Page 16
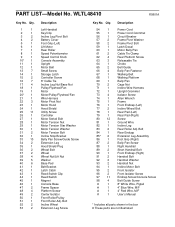
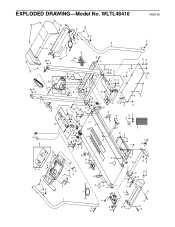
Note: Specifications are subject to change without notice. REMOVE THIS EXPLODED DRAWING AND PART LIST FROM THE MANUAL Save this EXPLODED DRAWING and PART LIST for future reference. For information about ordering replacement parts, see the back cover of the User's Manual. 34
Note: Specifications are subject to change without notice. REMOVE THIS EXPLODED DRAWING AND PART LIST FROM THE MANUAL Save this EXPLODED DRAWING and PART LIST for future reference. For information about ordering replacement parts, see the back cover of the User's Manual. 34
English Manual
Page 17
... Rear Roller Speed Potentiometer Speed Control Knob Console Assembly Upright Motor Belt Small Screw Storage Latch Controller Screw 8" Cable Tie Incline Leg Nut/Base Nut Pulley/Flywheel/Fan Motor Motor/Pulley/Flywheel/Fan Wire Harness Motor Pivot Nut Motor Hood Hood Shield Utility Screw Controller Motor Swivel Bolt Motor Tension Nut Motor Tension Star Washer Motor Tension Washer Motor Tension Bolt Incline Stop Bracket Belly Pan Screw/Guide Screw Extension Leg Hood Shield Plug Wheel Bolt Wheel Wheel Nut/Lift Nut Washer Base Pad Belt Bracket Latch Catch Reed Switch Clip Reed Switch Magnet Console...
... Rear Roller Speed Potentiometer Speed Control Knob Console Assembly Upright Motor Belt Small Screw Storage Latch Controller Screw 8" Cable Tie Incline Leg Nut/Base Nut Pulley/Flywheel/Fan Motor Motor/Pulley/Flywheel/Fan Wire Harness Motor Pivot Nut Motor Hood Hood Shield Utility Screw Controller Motor Swivel Bolt Motor Tension Nut Motor Tension Star Washer Motor Tension Washer Motor Tension Bolt Incline Stop Bracket Belly Pan Screw/Guide Screw Extension Leg Hood Shield Plug Wheel Bolt Wheel Wheel Nut/Lift Nut Washer Base Pad Belt Bracket Latch Catch Reed Switch Clip Reed Switch Magnet Console...
English Manual
Page 18
... 77 3 52 22 38 38 33 39 81 65 73 48 98 79 62 76 25 95 97 36 37 47 17 48 45 44 40 25 17 33 43 50 93 58 97 57 97 29 31 30 28 5 86 48 51 39 67... 33 98 68 17 47 22 25 41 72 25 93 48 95 13 65 98 34 73 49 69 64 17 37 40 98 40 36 25 53 40 98 85* 25 13 26 58 57 59 82 66 38 38 66 87 3 16 52 77 25 63 33 61 33 60...
... 77 3 52 22 38 38 33 39 81 65 73 48 98 79 62 76 25 95 97 36 37 47 17 48 45 44 40 25 17 33 43 50 93 58 97 57 97 29 31 30 28 5 86 48 51 39 67... 33 98 68 17 47 22 25 41 72 25 93 48 95 13 65 98 34 73 49 69 64 17 37 40 98 40 36 25 53 40 98 85* 25 13 26 58 57 59 82 66 38 38 66 87 3 16 52 77 25 63 33 61 33 60...
English Manual
Page 19
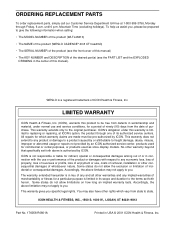
...-authorized by ICON. LIMITED WARRANTY ICON Health & Fitness, Inc. (ICON), warrants this product to be prepared to give the following information when calling: • The MODEL NUMBER of the product (WLTL48410) • The NAME of the product (WESLO CADENCE® 40.8 CT treadmill) • The SERIAL NUMBER of the product (see the front cover of this manual) • The KEY NUMBER and DESCRIPTION of the desired part(s) (see the PART LIST and the...
...-authorized by ICON. LIMITED WARRANTY ICON Health & Fitness, Inc. (ICON), warrants this product to be prepared to give the following information when calling: • The MODEL NUMBER of the product (WLTL48410) • The NAME of the product (WESLO CADENCE® 40.8 CT treadmill) • The SERIAL NUMBER of the product (see the front cover of this manual) • The KEY NUMBER and DESCRIPTION of the desired part(s) (see the PART LIST and the...


