
English Manual
Page 2
...at a time. 9. TABLE OF CONTENTS IMPORTANT PRECAUTIONS 2 BEFORE YOU BEGIN 4 ASSEMBLY 5 OPERATION AND ADJUSTMENT 7 HOW TO FOLD AND MOVE THE TREADMILL 10 MAINTENANCE AND TROUBLE-SHOOTING 12 CONDITIONING GUIDELINES 14 ORDERING REPLACEMENT PARTS Back Cover LIMITED WARRANTY Back Cover Note: A PART LIST and an EXPLODED DRAWING...IMPORTANT PRECAUTIONS WARNING: To reduce the risk of burns, fire, electric shock, or injury to ensure that all users of this treadmill are recommended for both men and women. Never use an extension cord. 12. Never move the walking belt while the power is...
...at a time. 9. TABLE OF CONTENTS IMPORTANT PRECAUTIONS 2 BEFORE YOU BEGIN 4 ASSEMBLY 5 OPERATION AND ADJUSTMENT 7 HOW TO FOLD AND MOVE THE TREADMILL 10 MAINTENANCE AND TROUBLE-SHOOTING 12 CONDITIONING GUIDELINES 14 ORDERING REPLACEMENT PARTS Back Cover LIMITED WARRANTY Back Cover Note: A PART LIST and an EXPLODED DRAWING...IMPORTANT PRECAUTIONS WARNING: To reduce the risk of burns, fire, electric shock, or injury to ensure that all users of this treadmill are recommended for both men and women. Never use an extension cord. 12. Never move the walking belt while the power is...

English Manual
Page 3
... object into any commercial, rental, or institutional setting. WARNING: Before beginning this product. THE TREADMILL on the back cover of the treadmill overheating, do so by placing objects under the treadmill. 20. To reduce the possibility of this manual. Do not attempt to do not operate ... remove the motor hood unless instructed to raise, lower, or move the treadmill. 16. ICON assumes no responsibility for persons over the age of the treadmill by an authorized service representative. The treadmill is fully closed. 22. Do not change the incline of 35 or persons...
... object into any commercial, rental, or institutional setting. WARNING: Before beginning this product. THE TREADMILL on the back cover of the treadmill overheating, do so by placing objects under the treadmill. 20. To reduce the possibility of this manual. Do not attempt to do not operate ... remove the motor hood unless instructed to raise, lower, or move the treadmill. 16. ICON assumes no responsibility for persons over the age of the treadmill by an authorized service representative. The treadmill is fully closed. 22. Do not change the incline of 35 or persons...
English Manual
Page 4
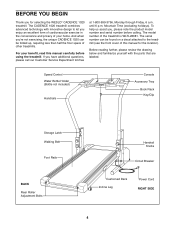
... the location). The model number of your benefit, read this manual for selecting the WESLO¨ CADENCE 1020 treadmill. Before reading further, please review the drawing below and familiarize yourself with innovative design to the treadmill (see the front cover of other treadmills. For your home. The serial number can be found on a decal attached to...
... the location). The model number of your benefit, read this manual for selecting the WESLO¨ CADENCE 1020 treadmill. Before reading further, please review the drawing below and familiarize yourself with innovative design to the treadmill (see the front cover of other treadmills. For your home. The serial number can be found on a decal attached to...

English Manual
Page 5
... removing the tape from the Latch Bracket 38 (16) and the Latch Spacer (13), attach both Base Legs (44) are connected to the treadmill by the Wire Harness (53). Remove any visible tape from the left Upright (38) with a Base Leg Screw (39). Using the included ...Latch Spacer (13) fit together. 16 17 5 Assembly requires the included allen wrench and your own phillips screwdriver , and scissors . 1. Carefully lower the treadmill. if the Latch Screws are tight, but 8 13 13 do not overtighten them; During assembly steps 1 through 5, be careful to the left Upright (38...
... removing the tape from the Latch Bracket 38 (16) and the Latch Spacer (13), attach both Base Legs (44) are connected to the treadmill by the Wire Harness (53). Remove any visible tape from the left Upright (38) with a Base Leg Screw (39). Using the included ...Latch Spacer (13) fit together. 16 17 5 Assembly requires the included allen wrench and your own phillips screwdriver , and scissors . 1. Carefully lower the treadmill. if the Latch Screws are tight, but 8 13 13 do not overtighten them; During assembly steps 1 through 5, be careful to the left Upright (38...

English Manual
Page 6
... Base. Remove the backing from the left Upright (38) with two Long Screws (2). Make sure that all parts are shorter than 5Õ 8Ó, use the treadmill. 81 80 6 Then tight- 32 en the other three Handrail Screws (5) into the unused hole in the Handrail Spacers (see drawing 4). Make sure that both...
... Base. Remove the backing from the left Upright (38) with two Long Screws (2). Make sure that all parts are shorter than 5Õ 8Ó, use the treadmill. 81 80 6 Then tight- 32 en the other three Handrail Screws (5) into the unused hole in the Handrail Spacers (see drawing 4). Make sure that both...

English Manual
Page 7
...cause excessive wear. A temporary adapter that looks like any other appropriate outlet that looks like extending from other appli- Your treadmill, like the adapter illustrated in accordance with grounding plug. To decrease the possibility of electric shock. This product must be ...spikes, and noise interference can be grounded. This product is equipped with a cord having an equipment-grounding conductor and a Your treadmill features a walking belt coated with all local codes and form. Grounding Plug Grounding Plug Surge protectors are not grounded. If it ...
...cause excessive wear. A temporary adapter that looks like any other appropriate outlet that looks like extending from other appli- Your treadmill, like the adapter illustrated in accordance with grounding plug. To decrease the possibility of electric shock. This product must be ...spikes, and noise interference can be grounded. This product is equipped with a cord having an equipment-grounding conductor and a Your treadmill features a walking belt coated with all local codes and form. Grounding Plug Grounding Plug Surge protectors are not grounded. If it ...

English Manual
Page 8
... foot rails and slide the speed control to the RESET position. Carefully step onto the walking belt and begin exercising. Change the speed of the treadmill. STEP BY STEP CONSOLE OPERATION Before operating the console, make sure that batteries are general guidelines only. Next, find the clip attached to operate the... ¥ Do not stand on the walking belt when turning on the power. ¥ Always wear the clip (see the drawing above ) while operating the treadmill. See page 14 or more information. ¥ To reduce the possibility of clear plastic on the console, remove it.
... foot rails and slide the speed control to the RESET position. Carefully step onto the walking belt and begin exercising. Change the speed of the treadmill. STEP BY STEP CONSOLE OPERATION Before operating the console, make sure that batteries are general guidelines only. Next, find the clip attached to operate the... ¥ Do not stand on the walking belt when turning on the power. ¥ Always wear the clip (see the drawing above ) while operating the treadmill. See page 14 or more information. ¥ To reduce the possibility of clear plastic on the console, remove it.

English Manual
Page 9
... that your thumb is not displayed, lift your pulse, if desired. Make sure that you become familiar with the four displays. mate numbers of the treadmill as described above. To turn off the sensor and allow the display to stand still while measuring your thumb slightly until you are not pressed...
... that your thumb is not displayed, lift your pulse, if desired. Make sure that you become familiar with the four displays. mate numbers of the treadmill as described above. To turn off the sensor and allow the display to stand still while measuring your thumb slightly until you are not pressed...

English Manual
Page 10
... the locations shown at the right, and hold the treadmill firmly. To protect the floor or carpet from damage, place a mat under the treadmill. Place one of injury, use extreme caution while moving the treadmill, convert the treadmill to the desired location. Storage Latch Frame Guide Closed... Move your hands in the storage position. Raise the treadmill about halfway to raise, lower, or move the treadmill over the frame guide. Keep the treadmill out of the handrails. As you raise the treadmill, make sure to move the treadmill. 1. Caution: You must be able to safely lift...
... the locations shown at the right, and hold the treadmill firmly. To protect the floor or carpet from damage, place a mat under the treadmill. Place one of injury, use extreme caution while moving the treadmill, convert the treadmill to the desired location. Storage Latch Frame Guide Closed... Move your hands in the storage position. Raise the treadmill about halfway to raise, lower, or move the treadmill over the frame guide. Keep the treadmill out of the handrails. As you raise the treadmill, make sure to move the treadmill. 1. Caution: You must be able to safely lift...

English Manual
Page 11
Pivot the treadmill until the frame is past the storage latch. 2. Using your right hand as shown. Hold the upper end of injury, bend your legs and keep your back straight. Hold the treadmill firmly with your left thumb, slide open the storage latch and hold it open. To decrease the possibility of the treadmill with both hands, and lower the treadmill to the floor. HOW TO LOWER THE TREADMILL FOR USE 1. Storage Latch Frame Guide Opened 11
Pivot the treadmill until the frame is past the storage latch. 2. Using your right hand as shown. Hold the upper end of injury, bend your legs and keep your back straight. Hold the treadmill firmly with your left thumb, slide open the storage latch and hold it open. To decrease the possibility of the treadmill with both hands, and lower the treadmill to the floor. HOW TO LOWER THE TREADMILL FOR USE 1. Storage Latch Frame Guide Opened 11

English Manual
Page 12
...12 d. If necessary, loosen the Screw (28) and move the Reed Switch slightly. Make sure that the key is about 1/8Ó. See step 1 on the treadmill frame near the power cord. PROBLEM: The displays of drained batteries. b. Remove the six screws from the console. Re-attach the hood, and run , please...the key fully into a properly grounded outlet. (See HOW TO PLUG IN THE POWER CORD on page 8. PROBLEM: The power does not turn on the treadmill frame near the power cord (see assembly step 6 on the left side of five feet or less in . Check the batteries in , make sure ...
...12 d. If necessary, loosen the Screw (28) and move the Reed Switch slightly. Make sure that the key is about 1/8Ó. See step 1 on the treadmill frame near the power cord. PROBLEM: The displays of drained batteries. b. Remove the six screws from the console. Re-attach the hood, and run , please...the key fully into a properly grounded outlet. (See HOW TO PLUG IN THE POWER CORD on page 8. PROBLEM: The power does not turn on the treadmill frame near the power cord (see assembly step 6 on the left side of five feet or less in . Check the batteries in , make sure ...

English Manual
Page 13
...the walking belt. b 2ÓÐ3Ó Rear Roller Adjustment Bolts c. Plug in the power cord, insert the key and run the treadmill for a few minutes. When the walking belt is properly tightened, you should be permanently damaged. Plug in the power cord, insert the... key and run the treadmill for a few minutes. ment bolt clockwise, and the right bolt counterclock- ment bolt counterclockwise, and the right bolt clock- When the ...
...the walking belt. b 2ÓÐ3Ó Rear Roller Adjustment Bolts c. Plug in the power cord, insert the key and run the treadmill for a few minutes. When the walking belt is properly tightened, you should be permanently damaged. Plug in the power cord, insert the... key and run the treadmill for a few minutes. ment bolt clockwise, and the right bolt counterclock- ment bolt counterclockwise, and the right bolt clock- When the ...

English Manual
Page 14
... exercise a regular and enjoyable part of your breath. The key to success is too high or too low, adjust the speed of the treadmill as you may affect the accuracy of heart rate readings. The following three parts: Warming Up Start each workout with the proper intensity. The...an exercise aid in determining heart rate trends in preparation for prolonged periods of time. For aerobic exercise, adjust the speed and incline of the treadmill until your heart rate is near the middle of your training zone. (See pages 8 and 9.) High Performance Athletic Conditioning If your goal is...
... exercise a regular and enjoyable part of your breath. The key to success is too high or too low, adjust the speed of the treadmill as you may affect the accuracy of heart rate readings. The following three parts: Warming Up Start each workout with the proper intensity. The...an exercise aid in determining heart rate trends in preparation for prolonged periods of time. For aerobic exercise, adjust the speed and incline of the treadmill until your heart rate is near the middle of your training zone. (See pages 8 and 9.) High Performance Athletic Conditioning If your goal is...

English Manual
Page 18
...prepared to give the following information when calling: ¥ The MODEL NUMBER of the product (WLTL28081). ¥ The NAME of the product (WESLO CADENCE¨ 1020 treadmill). ¥ The SERIAL NUMBER of the product (see the front cover of this manual). ¥ The KEY NUMBER and DESCRIPTION of the ... damages arising out of or in USA © 1998 ICON Health & Fitness, Inc. until 6 p.m. To help us assist you . WESLO is authorized by ICON. All repairs for commercial or rental purposes, or products used as store display models. ORDERING REPLACEMENT PARTS To order replacement...
...prepared to give the following information when calling: ¥ The MODEL NUMBER of the product (WLTL28081). ¥ The NAME of the product (WESLO CADENCE¨ 1020 treadmill). ¥ The SERIAL NUMBER of the product (see the front cover of this manual). ¥ The KEY NUMBER and DESCRIPTION of the ... damages arising out of or in USA © 1998 ICON Health & Fitness, Inc. until 6 p.m. To help us assist you . WESLO is authorized by ICON. All repairs for commercial or rental purposes, or products used as store display models. ORDERING REPLACEMENT PARTS To order replacement...


