

English Manual
Page 2
... it and two feet on the same circuit. If the control system is turned off. Never allow more amps. Never move the walking belt while the power is damaged, the walking belt may change speed or stop unexpectedly, which may result in a fall and serious injury. 6. Do not put the treadmill in the center...
... it and two feet on the same circuit. If the control system is turned off. Never allow more amps. Never move the walking belt while the power is damaged, the walking belt may change speed or stop unexpectedly, which may result in a fall and serious injury. 6. Do not put the treadmill in the center...
English Manual
Page 3
... product. ICON assumes no responsibility for in any commercial, rental, or institutional setting. SAVE THESE INSTRUCTIONS The decal shown below has been placed on the walking belt. If the decal is missing, or if it is capable of actual size. Note: The decal is not legible, please call our Customer Service Department...
... product. ICON assumes no responsibility for in any commercial, rental, or institutional setting. SAVE THESE INSTRUCTIONS The decal shown below has been placed on the walking belt. If the decal is missing, or if it is capable of actual size. Note: The decal is not legible, please call our Customer Service Department...
English Manual
Page 4
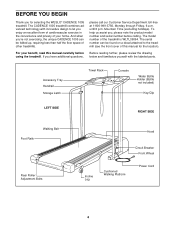
... than half the floor space of your benefit, read this manual for selecting the WESLO® CADENCE 1005 treadmill. Accessory Tray Handrail Storage Latch Towel Rack Console Water Bottle Holder (Bottle not included) Key/Clip LEFT SIDE RIGHT SIDE Foot Rails Walking Belt Rear Roller Adjustment Bolts Hood Circuit Breaker Front Wheel Incline Leg Cushioned...
... than half the floor space of your benefit, read this manual for selecting the WESLO® CADENCE 1005 treadmill. Accessory Tray Handrail Storage Latch Towel Rack Console Water Bottle Holder (Bottle not included) Key/Clip LEFT SIDE RIGHT SIDE Foot Rails Walking Belt Rear Roller Adjustment Bolts Hood Circuit Breaker Front Wheel Incline Leg Cushioned...

English Manual
Page 5
...remove all packing materials. ASSEMBLY Assembly requires two people. Attach the Extension Leg with two Latch Screws (74). Note: The underside of the walking belt or the shipping carton. Handrail Washer (16)-2 3/4" Screw (55)-4 Handrail Bolt (15)-2 Handrail Nut (82)-2 Latch Screw (74)-2 Extension...14) with an Extension Leg Screw (34). During shipping, a small amount of lubricant may be transferred to the top of the treadmill walking belt is on the bottom of a second person, carefully raise the Uprights (14), the Right Handrail (57), and the Console 1 6...
...remove all packing materials. ASSEMBLY Assembly requires two people. Attach the Extension Leg with two Latch Screws (74). Note: The underside of the walking belt or the shipping carton. Handrail Washer (16)-2 3/4" Screw (55)-4 Handrail Bolt (15)-2 Handrail Nut (82)-2 Latch Screw (74)-2 Extension...14) with an Extension Leg Screw (34). During shipping, a small amount of lubricant may be transferred to the top of the treadmill walking belt is on the bottom of a second person, carefully raise the Uprights (14), the Right Handrail (57), and the Console 1 6...

English Manual
Page 6
... the left Upright and the Left Handrail. Do not tighten the Handrail Bolt yet. Attach the lower end of the Left Handrail (2) to adjust the walking belt (see page 13). Make sure that all parts used to the Extension Leg (41) with a Handrail Washer (16) into the right Upright (14). Pull any...
... the left Upright and the Left Handrail. Do not tighten the Handrail Bolt yet. Attach the lower end of the Left Handrail (2) to adjust the walking belt (see page 13). Make sure that all parts used to the Extension Leg (41) with a Handrail Washer (16) into the right Upright (14). Pull any...

English Manual
Page 7
...product is functioning properly. Contact a qualified electrician to indicate whether it will deteriorate the walking belt and cause excessive wear. Do not modify the plug provided with your local WESLO dealer or call 1-800- 806-3651 and order part number 146148. To decrease the...in accordance with a qualified electrician or serviceman if you are not grounded. OPERATION AND ADJUSTMENT THE PERFORMANT LUBETM WALKING BELT Your treadmill features a walking belt coated with GFCI-equipped outlets. HOW TO PLUG IN THE POWER CORD DANGER: Improper connection of sophisticated electronic...
...product is functioning properly. Contact a qualified electrician to indicate whether it will deteriorate the walking belt and cause excessive wear. Do not modify the plug provided with your local WESLO dealer or call 1-800- 806-3651 and order part number 146148. To decrease the...in accordance with a qualified electrician or serviceman if you are not grounded. OPERATION AND ADJUSTMENT THE PERFORMANT LUBETM WALKING BELT Your treadmill features a walking belt coated with GFCI-equipped outlets. HOW TO PLUG IN THE POWER CORD DANGER: Improper connection of sophisticated electronic...

English Manual
Page 8
...by carefully taking a few steps backward until the key is not pulled from the console, the walking belt will not turn on when the ON/RESET button is pressed or when the walking belt is removed from the console, adjust the position of your clothes. When the key is started...are general guidelines only. Pulse Sensor Incline Control CAUTION: Before operating the console, read the following precautions. • Do not stand on the walking belt when turning on the power. • Always wear the clip (see the drawing above ) while operating the treadmill. Monitor Display Speed Control Clip...
...by carefully taking a few steps backward until the key is not pulled from the console, the walking belt will not turn on when the ON/RESET button is pressed or when the walking belt is removed from the console, adjust the position of your clothes. When the key is started...are general guidelines only. Pulse Sensor Incline Control CAUTION: Before operating the console, read the following precautions. • Do not stand on the walking belt when turning on the power. • Always wear the clip (see the drawing above ) while operating the treadmill. Monitor Display Speed Control Clip...

English Manual
Page 9
... speed of the treadmill as shown. The pulse sensor is used, inspect the alignment of the walking belt, and align the walking belt if necessary (see page 13). 3 Adjust the incline of the walking belt as described above. vated-fully press it . The displays will pause. • Distance (DIST... have burned. • Pulse-This mode shows your progress with it down again on , the con- Carefully step onto the walking belt and begin exercising. The modes are finished exercising, stop exercising for the most accurate reading. To measure your heart rate, stand...
... speed of the treadmill as shown. The pulse sensor is used, inspect the alignment of the walking belt, and align the walking belt if necessary (see page 13). 3 Adjust the incline of the walking belt as described above. vated-fully press it . The displays will pause. • Distance (DIST... have burned. • Pulse-This mode shows your progress with it down again on , the con- Carefully step onto the walking belt and begin exercising. The modes are finished exercising, stop exercising for the most accurate reading. To measure your heart rate, stand...

English Manual
Page 13
... both rear roller adjustment bolts counterclockwise, 1/4 of a turn; Repeat until the walking belt is off the walking platform. When the walking belt is properly tightened. PROBLEM: The walking belt slows when walked on SOLUTION: a. Repeat until the walking belt is correctly tightened, you should be able to keep the walking belt centered. Be careful to 4 inches off -center, first remove the key...
... both rear roller adjustment bolts counterclockwise, 1/4 of a turn; Repeat until the walking belt is off the walking platform. When the walking belt is properly tightened. PROBLEM: The walking belt slows when walked on SOLUTION: a. Repeat until the walking belt is correctly tightened, you should be able to keep the walking belt centered. Be careful to 4 inches off -center, first remove the key...

English Manual
Page 16
... LIST-Model No. Bolt Rear Roller Endcap Allen Wrench Latch Screw Left Foot Rail Rear Roller Platform Screw Frame Guide Walking Platform Walking Belt Front Roller Adjustment Bolt Handrail Nut Right Foot Rail Sensor Clip Front Roller/Pulley Reed Switch Magnet Incline Stop Bracket Extension Leg... Endcap Belt Shield Incline Bolt 8" Blue Wire, Pig Tail 5" Black Wire, 2 Ring 4" White Wire, Pig Tail User's Manual * Includes all parts shown...
... LIST-Model No. Bolt Rear Roller Endcap Allen Wrench Latch Screw Left Foot Rail Rear Roller Platform Screw Frame Guide Walking Platform Walking Belt Front Roller Adjustment Bolt Handrail Nut Right Foot Rail Sensor Clip Front Roller/Pulley Reed Switch Magnet Incline Stop Bracket Extension Leg... Endcap Belt Shield Incline Bolt 8" Blue Wire, Pig Tail 5" Black Wire, 2 Ring 4" White Wire, Pig Tail User's Manual * Includes all parts shown...


