

English Manual
Page 2
... clothes that could result in this treadmill are used by persons weighing more amps. Failure to use an extension cord. 11. Never move the walking belt while the power is not working properly. (See BEFORE YOU BEGIN on each side. Do not operate the treadmill if the power cord or plug... treadmill. If the control system is being administered. 9. Keep children under the treadmill. 4. The treadmill should be used or where oxygen is damaged, the walking belt may change speed or stop unexpectedly, which may result in a garage or covered patio, or near water. 5.
... clothes that could result in this treadmill are used by persons weighing more amps. Failure to use an extension cord. 11. Never move the walking belt while the power is not working properly. (See BEFORE YOU BEGIN on each side. Do not operate the treadmill if the power cord or plug... treadmill. If the control system is being administered. 9. Keep children under the treadmill. 4. The treadmill should be used or where oxygen is damaged, the walking belt may change speed or stop unexpectedly, which may result in a garage or covered patio, or near water. 5.
English Manual
Page 3
... affect the accuracy of this manual. scribed in this manual should be able to order a free replacement decal (see ORDERING REPLACEMENT PARTS on the walking belt. Inspect and properly tighten all instructions before performing the main- Apply the decal in -home use . 18. ICON assumes no responsibility for in the location...
... affect the accuracy of this manual. scribed in this manual should be able to order a free replacement decal (see ORDERING REPLACEMENT PARTS on the walking belt. Inspect and properly tighten all instructions before performing the main- Apply the decal in -home use . 18. ICON assumes no responsibility for in the location...
English Manual
Page 4
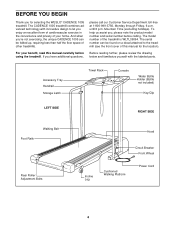
... Handrail Storage Latch Towel Rack Console Water Bottle Holder (Bottle not included) Key/Clip LEFT SIDE RIGHT SIDE Foot Rails Walking Belt Rear Roller Adjustment Bolts Hood Circuit Breaker Front Wheel Incline Leg Cushioned Walking Platform Power Cord 4 please call our Customer Service Department ...you enjoy an excellent form of cardiovascular exercise in the convenience and privacy of your benefit, read this manual for selecting the WESLO® CADENCE 1005 treadmill. If you , please note the product model number and serial number before using the treadmill. To help us assist ...
... Handrail Storage Latch Towel Rack Console Water Bottle Holder (Bottle not included) Key/Clip LEFT SIDE RIGHT SIDE Foot Rails Walking Belt Rear Roller Adjustment Bolts Hood Circuit Breaker Front Wheel Incline Leg Cushioned Walking Platform Power Cord 4 please call our Customer Service Department ...you enjoy an excellent form of cardiovascular exercise in the convenience and privacy of your benefit, read this manual for selecting the WESLO® CADENCE 1005 treadmill. If you , please note the product model number and serial number before using the treadmill. To help us assist ...

English Manual
Page 5
...Uprights [14] in assembly. do not overtighten the Screws. 12 26 57 14 14 34 41 36 14 74 5 Do not dispose of the walking belt or the shipping carton. This is completed. Handrail Washer (16)-2 3/4" Screw (55)-4 Handrail Bolt (15)-2 Handrail Nut (82)-2 Latch Screw (74)-2 ...person, carefully raise the Uprights (14), the Right Handrail (57), and the Console 1 6 Base (6) to pull on the bottom of the treadmill walking belt is on the Wire Harness (26). ASSEMBLY Assembly requires two people. Refer to the drawings below to the inset drawing. driver , two adjustable wrenches , ...
...Uprights [14] in assembly. do not overtighten the Screws. 12 26 57 14 14 34 41 36 14 74 5 Do not dispose of the walking belt or the shipping carton. This is completed. Handrail Washer (16)-2 3/4" Screw (55)-4 Handrail Bolt (15)-2 Handrail Nut (82)-2 Latch Screw (74)-2 ...person, carefully raise the Uprights (14), the Right Handrail (57), and the Console 1 6 Base (6) to pull on the bottom of the treadmill walking belt is on the Wire Harness (26). ASSEMBLY Assembly requires two people. Refer to the drawings below to the inset drawing. driver , two adjustable wrenches , ...

English Manual
Page 6
... and insert the folded Wire Harness into the Right Upright. Do not tighten the Handrail Bolt yet. Attach the Console Base (6) to adjust the walking belt (see page 13). Tighten all four Screws have been started, tighten the Screws until they are properly tightened before you use the treadmill. 3. Cut the...
... and insert the folded Wire Harness into the Right Upright. Do not tighten the Handrail Bolt yet. Attach the Console Base (6) to adjust the walking belt (see page 13). Tighten all four Screws have been started, tighten the Screws until they are properly tightened before you use the treadmill. 3. Cut the...

English Manual
Page 7
...from other substances to the control system of electric shock. Voltage surges, spikes, and noise interference can result in damage to the walking belt or the walking platform. pressor, see drawing 1 at the right). There must be seriously damaged by a qualified electrician. This product... whether it should be used it will deteriorate the walking belt and cause excessive wear. OPERATION AND ADJUSTMENT THE PERFORMANT LUBETM WALKING BELT Your treadmill features a walking belt coated with your treadmill (see your local WESLO dealer or call 1-800- 806-3651 and order part number...
...from other substances to the control system of electric shock. Voltage surges, spikes, and noise interference can result in damage to the walking belt or the walking platform. pressor, see drawing 1 at the right). There must be seriously damaged by a qualified electrician. This product... whether it should be used it will deteriorate the walking belt and cause excessive wear. OPERATION AND ADJUSTMENT THE PERFORMANT LUBETM WALKING BELT Your treadmill features a walking belt coated with your treadmill (see your local WESLO dealer or call 1-800- 806-3651 and order part number...

English Manual
Page 8
... electric shock, keep the console dry. Test the clip by carefully taking a few steps backward until the key is removed from the console, the walking belt will stop. • Adjust the speed in small increments. • The training zones marked around the speed control are recommended. Follow the steps below...key is a thin sheet Key of clear plastic on .) 8 The display will turn on when the ON/RESET button is pressed or when the walking belt is started. (If you just installed batteries, the display will not turn on the power. • Always wear the clip (see the drawing above...
... electric shock, keep the console dry. Test the clip by carefully taking a few steps backward until the key is removed from the console, the walking belt will stop. • Adjust the speed in small increments. • The training zones marked around the speed control are recommended. Follow the steps below...key is a thin sheet Key of clear plastic on .) 8 The display will turn on when the ON/RESET button is pressed or when the walking belt is started. (If you just installed batteries, the display will not turn on the power. • Always wear the clip (see the drawing above...

English Manual
Page 9
...the RESET position. A flashing mode indicator will automatically scan through several times until the heart- The modes are finished exercising, stop the walking belt, step onto the foot rails and turn off the sensor and allow the display to be shown. If desired, reset the display by turning... your progress with it down again on , the con- vated-fully press it . Remember to conserve the batteries any time that the walking belt is stopped and the ON/RESET button is not pressed for the most accurate reading. Note: The display will pause. • Distance (DIST...
...the RESET position. A flashing mode indicator will automatically scan through several times until the heart- The modes are finished exercising, stop the walking belt, step onto the foot rails and turn off the sensor and allow the display to be shown. If desired, reset the display by turning... your progress with it down again on , the con- vated-fully press it . Remember to conserve the batteries any time that the walking belt is stopped and the ON/RESET button is not pressed for the most accurate reading. Note: The display will pause. • Distance (DIST...

English Manual
Page 13
...to turn the left rear roller bolt clockwise 1/2 of a turn . Be careful not to 4 inches off the walking platform. When the walking belt is properly tightened, you should be able to lift each side of a turn ; Be careful to 4 inches off the walking platform. If the walking... when walked on page 7. Be careful to the right, turn the bolt counterclockwise 1/2 of the walking belt 3 to overtighten the walking belt. if the walking belt has shifted to keep the walking belt centered. Remove the key and UNPLUG THE POWER CORD. Using the allen wrench, turn both rear roller ...
...to turn the left rear roller bolt clockwise 1/2 of a turn . Be careful not to 4 inches off the walking platform. When the walking belt is properly tightened, you should be able to lift each side of a turn ; Be careful to 4 inches off the walking platform. If the walking... when walked on page 7. Be careful to the right, turn the bolt counterclockwise 1/2 of the walking belt 3 to overtighten the walking belt. if the walking belt has shifted to keep the walking belt centered. Remove the key and UNPLUG THE POWER CORD. Using the allen wrench, turn both rear roller ...

English Manual
Page 16
...72 1 73 1 74 2 75 1 76 1 77 4 78 1 79 1 80 1 81 1 82 2 83 1 84 1 85 1 86 1 87 1 88 1 89 2 90 1 91 2 # 1 # 1 # 1 # 1 Belt Guide Belly Pan Releasable Tie Cable Tie Clamp Motor Belly Pan 3/4" Screw 8" Wire Tie Right Handrail Incline Wire Harness 3 1/2" Handrail Bolt Extension Leg Assembly Right...Potentiometer Battery Cover Incline Motor Console Assembly Storage Latch 1/2" Screw Upright/Base Handrail Bolt Handrail Washer/Roller Washer Motor Belt Motor Swivel Nut Motor/Pulley/Flywheel/Fan Pulley/Flywheel/Fan Motor Motor Tension Bolt Motor Tension Washer Motor Tension Star...
...72 1 73 1 74 2 75 1 76 1 77 4 78 1 79 1 80 1 81 1 82 2 83 1 84 1 85 1 86 1 87 1 88 1 89 2 90 1 91 2 # 1 # 1 # 1 # 1 Belt Guide Belly Pan Releasable Tie Cable Tie Clamp Motor Belly Pan 3/4" Screw 8" Wire Tie Right Handrail Incline Wire Harness 3 1/2" Handrail Bolt Extension Leg Assembly Right...Potentiometer Battery Cover Incline Motor Console Assembly Storage Latch 1/2" Screw Upright/Base Handrail Bolt Handrail Washer/Roller Washer Motor Belt Motor Swivel Nut Motor/Pulley/Flywheel/Fan Pulley/Flywheel/Fan Motor Motor Tension Bolt Motor Tension Washer Motor Tension Star...


