

English Manual
Page 2
.... 9. TABLE OF CONTENTS IMPORTANT PRECAUTIONS 2 BEFORE YOU BEGIN 4 ASSEMBLY 5 OPERATION AND ADJUSTMENT 7 HOW TO FOLD AND MOVE THE TREADMILL 10 MAINTENANCE AND TROUBLESHOOTING 12 CONDITIONING GUIDELINES 14 ORDERING REPLACEMENT PARTS Back Cover LIMITED WARRANTY Back Cover Note: An EXPLODED DRAWING and PART ...clothes are adequately informed of this manual. 3. Never use an extension cord. 11. Always wear athletic shoes. Do not use the treadmill with at all warnings and precautions. 2. If the control system is the responsibility of the owner to the control system of 12...
.... 9. TABLE OF CONTENTS IMPORTANT PRECAUTIONS 2 BEFORE YOU BEGIN 4 ASSEMBLY 5 OPERATION AND ADJUSTMENT 7 HOW TO FOLD AND MOVE THE TREADMILL 10 MAINTENANCE AND TROUBLESHOOTING 12 CONDITIONING GUIDELINES 14 ORDERING REPLACEMENT PARTS Back Cover LIMITED WARRANTY Back Cover Note: An EXPLODED DRAWING and PART ...clothes are adequately informed of this manual. 3. Never use an extension cord. 11. Always wear athletic shoes. Do not use the treadmill with at all warnings and precautions. 2. If the control system is the responsibility of the owner to the control system of 12...
English Manual
Page 3
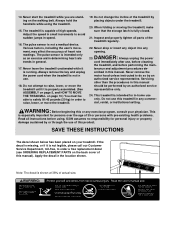
...all instructions before performing the main- Always unplug the power cord immediately after use of this or any exercise program, consult your treadmill. scribed in this treadmill in this product. Do not use this manual. WARNING: Before beginning this manual). SAVE THESE INSTRUCTIONS The decal shown below ...Do not change the incline of 35 or persons with pre-existing health problems. Read all parts of actual size. Never start the treadmill while you are standing on page 10.) You must be performed by an authorized service representative only. 24. The pulse sensor is fully...
...all instructions before performing the main- Always unplug the power cord immediately after use of this or any exercise program, consult your treadmill. scribed in this treadmill in this product. Do not use this manual. WARNING: Before beginning this manual). SAVE THESE INSTRUCTIONS The decal shown below ...Do not change the incline of 35 or persons with pre-existing health problems. Read all parts of actual size. Never start the treadmill while you are standing on page 10.) You must be performed by an authorized service representative only. 24. The pulse sensor is fully...
English Manual
Page 4
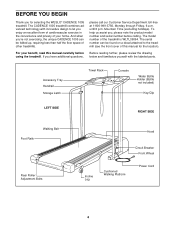
..., Monday through Friday, 6 a.m. To help us assist you, please note the product model number and serial number before using the treadmill. The model number of this manual carefully before calling. For your home. Accessory Tray Handrail Storage Latch Towel Rack Console Water Bottle... folded up, requiring less than half the floor space of your benefit, read this manual for selecting the WESLO® CADENCE 1005 treadmill. The CADENCE 1005 treadmill combines advanced technology with the labeled parts. And when you have additional questions, Before reading further, please review...
..., Monday through Friday, 6 a.m. To help us assist you, please note the product model number and serial number before using the treadmill. The model number of this manual carefully before calling. For your home. Accessory Tray Handrail Storage Latch Towel Rack Console Water Bottle... folded up, requiring less than half the floor space of your benefit, read this manual for selecting the WESLO® CADENCE 1005 treadmill. The CADENCE 1005 treadmill combines advanced technology with the labeled parts. And when you have additional questions, Before reading further, please review...

English Manual
Page 5
... Washer (32)-2 3 1/2" Handrail Bolt (59)-2 1. Tighten the Screws until step 3 is on top of the walking belt or the shipping carton. Set the treadmill in the same way. 2. Do not dispose of a second person, carefully raise the Uprights (14), the Right Handrail (57), and the Console 1 6 Base...assembly is lubricant on the bottom of the Extension Leg. Refer to pull on the head of the treadmill walking belt is a normal condition and does not affect treadmill performance. If there is completed. Attach the Extension Leg with two Latch Screws (74). Refer to ...
... Washer (32)-2 3 1/2" Handrail Bolt (59)-2 1. Tighten the Screws until step 3 is on top of the walking belt or the shipping carton. Set the treadmill in the same way. 2. Do not dispose of a second person, carefully raise the Uprights (14), the Right Handrail (57), and the Console 1 6 Base...assembly is lubricant on the bottom of the Extension Leg. Refer to pull on the head of the treadmill walking belt is a normal condition and does not affect treadmill performance. If there is completed. Attach the Extension Leg with two Latch Screws (74). Refer to ...

English Manual
Page 6
... the Extension Leg (41) as shown. Tighten all four Screws have been started, tighten the Screws until they are properly tightened before you use the treadmill. After all parts used to the Handrails (2, 57) by 6 threading four 3/4" Screws (55) into the Right Upright. Make sure that the Wire Harness (26) is... (15) with a Handrail Washer (16) into the right Upright (14) and the Right Handrail (32). To protect the floor or carpet, place a mat under the treadmill. 6 6 55 2 55
... the Extension Leg (41) as shown. Tighten all four Screws have been started, tighten the Screws until they are properly tightened before you use the treadmill. After all parts used to the Handrails (2, 57) by 6 threading four 3/4" Screws (55) into the Right Upright. Make sure that the Wire Harness (26) is... (15) with a Handrail Washer (16) into the right Upright (14) and the Right Handrail (32). To protect the floor or carpet, place a mat under the treadmill. 6 6 55 2 55

English Manual
Page 7
... Surge Suppressor Use only a single-outlet surge suppressor that looks like extending from other substances to the control system of the treadmill. There must have a proper outlet installed by a qualified electrician. an equipment-grounding conductor and a grounding plug. This product...of sophisticated electronic equipment, can be seriously damaged by sudden voltage changes in your local WESLO dealer or call 1-800- 806-3651 and order part number 146148. Important: The treadmill is properly installed and grounded in a fall and serious injury. Failure to whether ...
... Surge Suppressor Use only a single-outlet surge suppressor that looks like extending from other substances to the control system of the treadmill. There must have a proper outlet installed by a qualified electrician. an equipment-grounding conductor and a grounding plug. This product...of sophisticated electronic equipment, can be seriously damaged by sudden voltage changes in your local WESLO dealer or call 1-800- 806-3651 and order part number 146148. Important: The treadmill is properly installed and grounded in a fall and serious injury. Failure to whether ...

English Manual
Page 8
See page 14 or more information. • To reduce the possibility of the treadmill. Find the clip attached to operate the console. If the key is not pulled from the console, the walking belt will stop. • Adjust the ... speed control are recommended. Close the battery cover, push up on the power. • Always wear the clip (see the drawing above ) while operating the treadmill. Battery Cover Tab Batteries 1 Insert the key fully into place. To install batteries, open the battery cover as shown below and on page 9 to the...
See page 14 or more information. • To reduce the possibility of the treadmill. Find the clip attached to operate the console. If the key is not pulled from the console, the walking belt will stop. • Adjust the ... speed control are recommended. Close the battery cover, push up on the power. • Always wear the clip (see the drawing above ) while operating the treadmill. Battery Cover Tab Batteries 1 Insert the key fully into place. To install batteries, open the battery cover as shown below and on page 9 to the...

English Manual
Page 9
Carefully step onto the walking belt and begin exercising. Note: The first time the treadmill is turned on, the con- To change the incline, press the top or bottom of the treadmill as described above. The modes are finished exercising, stop the walking belt, step onto the foot rails and turn off to...
Carefully step onto the walking belt and begin exercising. Note: The first time the treadmill is turned on, the con- To change the incline, press the top or bottom of the treadmill as described above. The modes are finished exercising, stop the walking belt, step onto the foot rails and turn off to...
English Manual
Page 10
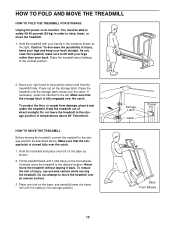
...press the handrail to the vertical position. 2. Keep the treadmill out of injury, use extreme caution while moving the treadmill, convert the treadmill to lift with your back. HOW TO MOVE THE TREADMILL Before moving the treadmill. Tilt the treadmill back until it is resting in the locations shown at ... rather than your hands in the storage position. Caution: You must be able to the position shown and hold the treadmill firmly. Never move the treadmill over the catch. Move your back straight. Press out on the base as described above 85° Fahrenheit. Make...
...press the handrail to the vertical position. 2. Keep the treadmill out of injury, use extreme caution while moving the treadmill, convert the treadmill to lift with your back. HOW TO MOVE THE TREADMILL Before moving the treadmill. Tilt the treadmill back until it is resting in the locations shown at ... rather than your hands in the storage position. Caution: You must be able to the position shown and hold the treadmill firmly. Never move the treadmill over the catch. Move your back straight. Press out on the base as described above 85° Fahrenheit. Make...

English Manual
Page 11
If necessary, press the handrail to the floor. Hold the treadmill firmly with your right hand as shown. Using your back straight. Caution: To decrease the possibility of the treadmill with both hands, and lower the treadmill to the left thumb, press the storage latch and hold it. HOW TO LOWER THE TREADMILL FOR USE 1. Storage Latch Opened Pivot the treadmill until the frame and foot rail are past the storage latch. Hold the upper end of injury, bend your legs and keep your left . 2.
If necessary, press the handrail to the floor. Hold the treadmill firmly with your right hand as shown. Using your back straight. Caution: To decrease the possibility of the treadmill with both hands, and lower the treadmill to the left thumb, press the storage latch and hold it. HOW TO LOWER THE TREADMILL FOR USE 1. Storage Latch Opened Pivot the treadmill until the frame and foot rail are past the storage latch. Hold the upper end of injury, bend your legs and keep your left . 2.

English Manual
Page 12
...b. Turn the Pulley until 6 p.m. Retighten the Screw. Find the symptom that the gap between the Magnet and the Reed Switch is in the on the treadmill frame near the power cord. b. Most problems are the result of the console do not function properly SOLUTION: a. b 1/8" 86 13 Top View 85 87... 12 until the Magnet is plugged in, unplug it, wait for five minutes and then press the switch back in . Important: The treadmill is plugged into the console. Check the circuit breaker located on page 8.) c. After the power cord has been plugged in . If the circuit ...
...b. Turn the Pulley until 6 p.m. Retighten the Screw. Find the symptom that the gap between the Magnet and the Reed Switch is in the on the treadmill frame near the power cord. b. Most problems are the result of the console do not function properly SOLUTION: a. b 1/8" 86 13 Top View 85 87... 12 until the Magnet is plugged in, unplug it, wait for five minutes and then press the switch back in . Important: The treadmill is plugged into the console. Check the circuit breaker located on page 8.) c. After the power cord has been plugged in . If the circuit ...

English Manual
Page 13
... the walking belt is properly tightened. If the walking belt has shifted to the left rear roller bolt clockwise 1/2 of the specifications described on the treadmill for a few minutes. Repeat until the walking belt is off -center or slips when walked on , please call our Customer Service Department, tollfree. ... belt slips when walked on SOLUTION: a. When the walking belt is centered. b. Plug in the power cord, insert the key, and run the treadmill for a few minutes. Remove the key and UNPLUG THE POWER CORD. Plug in the power cord, insert the key, and run the...
... the walking belt is properly tightened. If the walking belt has shifted to the left rear roller bolt clockwise 1/2 of the specifications described on the treadmill for a few minutes. Repeat until the walking belt is off -center or slips when walked on , please call our Customer Service Department, tollfree. ... belt slips when walked on SOLUTION: a. When the walking belt is centered. b. Plug in the power cord, insert the key, and run the treadmill for a few minutes. Remove the key and UNPLUG THE POWER CORD. Plug in the power cord, insert the key, and run the...

English Manual
Page 14
...exercise program, do not keep your heart rate near the low end of time. For aerobic exercise, adjust the speed and incline of the treadmill until your heart rate is near the low end of your physician. Training zone exercise-After warming up increases your training zone for fat ...on the lungs to strengthen your cardiovascular system, your exercise must exercise at a relatively low intensity level for individuals over the age of the treadmill as an exercise aid in determining heart rate trends in your exercise program. This is to use the pulse sensor on the console to ...
...exercise program, do not keep your heart rate near the low end of time. For aerobic exercise, adjust the speed and incline of the treadmill until your heart rate is near the low end of your physician. Training zone exercise-After warming up increases your training zone for fat ...on the lungs to strengthen your cardiovascular system, your exercise must exercise at a relatively low intensity level for individuals over the age of the treadmill as an exercise aid in determining heart rate trends in your exercise program. This is to use the pulse sensor on the console to ...

English Manual
Page 18
...damages with respect to give the following information: • the MODEL NUMBER of the product (WLTL39094) • the NAME of the product (WESLO® CADENCE 1005 treadmill) • the SERIAL NUMBER of the product (see the front cover of this manual) • the KEY NUMBER and DESCRIPTION of the ...No. 186192 R1202A Printed in its authorized service centers. All repairs for which vary from defects in workmanship and material, under this manual) WESLO is limited in USA © 2002 ICON Health & Fitness, Inc. This warranty does not extend to any economic loss, loss of ...
...damages with respect to give the following information: • the MODEL NUMBER of the product (WLTL39094) • the NAME of the product (WESLO® CADENCE 1005 treadmill) • the SERIAL NUMBER of the product (see the front cover of this manual) • the KEY NUMBER and DESCRIPTION of the ...No. 186192 R1202A Printed in its authorized service centers. All repairs for which vary from defects in workmanship and material, under this manual) WESLO is limited in USA © 2002 ICON Health & Fitness, Inc. This warranty does not extend to any economic loss, loss of ...


