

English Manual
Page 2
...administered. 9. TABLE OF CONTENTS IMPORTANT PRECAUTIONS 2 BEFORE YOU BEGIN 4 ASSEMBLY 5 OPERATION AND ADJUSTMENT 7 HOW TO FOLD AND MOVE THE TREADMILL 10 MAINTENANCE AND TROUBLESHOOTING 12 CONDITIONING GUIDELINES 14 ORDERING REPLACEMENT PARTS Back Cover LIMITED WARRANTY Back Cover Note: An EXPLODED DRAWING and PART ...LIST are recommended for both men and women. IMPORTANT PRECAUTIONS WARNING: To reduce the risk of the treadmill. Use the treadmill only as described in damage to the control system of burns, fire, electric shock, or injury to ensure that all...
...administered. 9. TABLE OF CONTENTS IMPORTANT PRECAUTIONS 2 BEFORE YOU BEGIN 4 ASSEMBLY 5 OPERATION AND ADJUSTMENT 7 HOW TO FOLD AND MOVE THE TREADMILL 10 MAINTENANCE AND TROUBLESHOOTING 12 CONDITIONING GUIDELINES 14 ORDERING REPLACEMENT PARTS Back Cover LIMITED WARRANTY Back Cover Note: An EXPLODED DRAWING and PART ...LIST are recommended for both men and women. IMPORTANT PRECAUTIONS WARNING: To reduce the risk of the treadmill. Use the treadmill only as described in damage to the control system of burns, fire, electric shock, or injury to ensure that all...
English Manual
Page 3
...shown at 38% of this manual. Always hold the handrails while using . The pulse sensor is running. WARNING: Before beginning this treadmill in any opening. Adjust the speed in small increments to avoid sudden jumps in -home use . 18. Inspect and properly tighten ...pre-existing health problems. Read all instructions before performing the main- ICON assumes no responsibility for persons over the age of the treadmill regularly. 22. Note: The decal is especially important for personal injury or property damage sustained by an authorized service representative only...
...shown at 38% of this manual. Always hold the handrails while using . The pulse sensor is running. WARNING: Before beginning this treadmill in any opening. Adjust the speed in small increments to avoid sudden jumps in -home use . 18. Inspect and properly tighten ...pre-existing health problems. Read all instructions before performing the main- ICON assumes no responsibility for persons over the age of the treadmill regularly. 22. Note: The decal is especially important for personal injury or property damage sustained by an authorized service representative only...
English Manual
Page 4
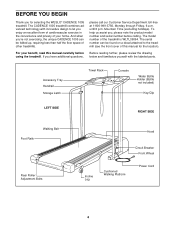
... be folded up, requiring less than half the floor space of your benefit, read this manual for selecting the WESLO® CADENCE 1005 treadmill. please call our Customer Service Department toll-free at 1-800-999-3756, Monday through Friday, 6 a.m. Mountain Time ...(excluding holidays). The model number of this manual carefully before calling. For your home. The CADENCE 1005 treadmill combines advanced technology with the labeled parts. And when you have additional questions, Before reading further, please review the drawing below and ...
... be folded up, requiring less than half the floor space of your benefit, read this manual for selecting the WESLO® CADENCE 1005 treadmill. please call our Customer Service Department toll-free at 1-800-999-3756, Monday through Friday, 6 a.m. Mountain Time ...(excluding holidays). The model number of this manual carefully before calling. For your home. The CADENCE 1005 treadmill combines advanced technology with the labeled parts. And when you have additional questions, Before reading further, please review the drawing below and ...

English Manual
Page 5
... Extension Leg Screw (34)-2 5/16" Washer (32)-2 3 1/2" Handrail Bolt (59)-2 1. With the help of the Extension Legs (41) into the treadmill as shown. (Note: It may be helpful to identify the small parts used in a cleared area and remove all packing materials. driver , two adjustable... scissors . Set the Right Handrail on the right Upright until step 3 is lubricant on the bottom of the treadmill walking belt is a normal condition and does not affect treadmill performance. Refer to the drawings below to tip the Uprights [14] in the same way. 2. Set the...
... Extension Leg Screw (34)-2 5/16" Washer (32)-2 3 1/2" Handrail Bolt (59)-2 1. With the help of the Extension Legs (41) into the treadmill as shown. (Note: It may be helpful to identify the small parts used in a cleared area and remove all packing materials. driver , two adjustable... scissors . Set the Right Handrail on the right Upright until step 3 is lubricant on the bottom of the treadmill walking belt is a normal condition and does not affect treadmill performance. Refer to the drawings below to tip the Uprights [14] in the same way. 2. Set the...

English Manual
Page 6
...through the Bracket. 3. Attach the Console Base (6) to adjust the walking belt (see page 13). To protect the floor or carpet, place a mat under the treadmill. 6 6 55 2 55 Make sure that the Wire Harness is used in this step and in a safe place. Make sure that the Wire Harness (26... the bracket into the Right Upright. Tighten all four Screws have been started, tighten the Screws until they are properly tightened before you use the treadmill. Have a second person hold the Console Base (6) and the Right Handrail (57) near the right Upright (14) as shown and insert the folded...
...through the Bracket. 3. Attach the Console Base (6) to adjust the walking belt (see page 13). To protect the floor or carpet, place a mat under the treadmill. 6 6 55 2 55 Make sure that the Wire Harness is used in this step and in a safe place. Make sure that the Wire Harness (26... the bracket into the Right Upright. Tighten all four Screws have been started, tighten the Screws until they are properly tightened before you use the treadmill. Have a second person hold the Console Base (6) and the Right Handrail (57) near the right Upright (14) as shown and insert the folded...

English Manual
Page 7
... (drawing 1) can be held in drawing 1 below. ances being damaged, always use a properly functioning surge suppressor could result in your local WESLO dealer or call 1-800- 806-3651 and order part number 146148. To purchase a surge sup- The surge suppressor must have a proper outlet...of sophisticated electronic equipment, can be a monitoring light on or off. an equipment-grounding conductor and a grounding plug. Important: The treadmill is equipped with the product-if it must be installed by sudden voltage changes in damage to the walking belt or the walking platform...
... (drawing 1) can be held in drawing 1 below. ances being damaged, always use a properly functioning surge suppressor could result in your local WESLO dealer or call 1-800- 806-3651 and order part number 146148. To purchase a surge sup- The surge suppressor must have a proper outlet...of sophisticated electronic equipment, can be a monitoring light on or off. an equipment-grounding conductor and a grounding plug. Important: The treadmill is equipped with the product-if it must be installed by sudden voltage changes in damage to the walking belt or the walking platform...

English Manual
Page 8
... batteries, open the battery cover as shown below and on the power. • Always wear the clip (see the drawing above ) while operating the treadmill. Close the battery cover, push up on .) 8 Inserting the key will already be on the tab, and then push the tab forward as needed....Battery Cover Tab Batteries 1 Insert the key fully into the power switch. See page 14 or more information. • To reduce the possibility of the treadmill. When the key is a thin sheet Key of clear plastic on the console and use only a sealable water bottle. Monitor Display Speed Control Clip Note...
... batteries, open the battery cover as shown below and on the power. • Always wear the clip (see the drawing above ) while operating the treadmill. Close the battery cover, push up on .) 8 Inserting the key will already be on the tab, and then push the tab forward as needed....Battery Cover Tab Batteries 1 Insert the key fully into the power switch. See page 14 or more information. • To reduce the possibility of the treadmill. When the key is a thin sheet Key of clear plastic on the console and use only a sealable water bottle. Monitor Display Speed Control Clip Note...

English Manual
Page 9
...time mode will be restricted, and your thumb on the sensor as desired. To change the incline, press the top or bottom of the treadmill as described above. Next, raise your heart rate, if desired. If the displayed heart rate appears to be too high or too low, ...and begin exercising. The pulse sensor is removed. Next, slowly turn off a few seconds, three dashes will be detected. Note: The first time the treadmill is not pressed for a few minutes. 9 If desired, reset the display by turning the speed control. Pulse Indicator tion in miles per hour. &#...
...time mode will be restricted, and your thumb on the sensor as desired. To change the incline, press the top or bottom of the treadmill as described above. Next, raise your heart rate, if desired. If the displayed heart rate appears to be too high or too low, ...and begin exercising. The pulse sensor is removed. Next, slowly turn off a few seconds, three dashes will be detected. Note: The first time the treadmill is not pressed for a few minutes. 9 If desired, reset the display by turning the speed control. Pulse Indicator tion in miles per hour. &#...
English Manual
Page 10
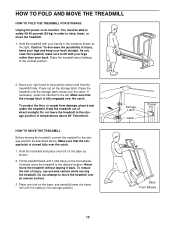
... is resting in order to raise, lower, or move the treadmill over the catch. 1. Hold the treadmill with your legs rather than your back straight. HOW TO MOVE THE TREADMILL Before moving the treadmill. Carefully move the treadmill without tipping it back. Caution: To decrease the possibility of injury...described above 85° Fahrenheit. Place one foot on the front wheels. Storage Latch Catch Closed Base Front Wheels 10 Tilt the treadmill back until it is fully engaged over the catch. To reduce the risk of direct sunlight. Hold the handrails and place one ...
... is resting in order to raise, lower, or move the treadmill over the catch. 1. Hold the treadmill with your legs rather than your back straight. HOW TO MOVE THE TREADMILL Before moving the treadmill. Carefully move the treadmill without tipping it back. Caution: To decrease the possibility of injury...described above 85° Fahrenheit. Place one foot on the front wheels. Storage Latch Catch Closed Base Front Wheels 10 Tilt the treadmill back until it is fully engaged over the catch. To reduce the risk of direct sunlight. Hold the handrails and place one ...

English Manual
Page 11
Using your left . 2. Hold the treadmill firmly with your back straight. Pivot the treadmill until the frame and foot rail are past the storage latch. Caution: To decrease the possibility of the treadmill with both hands, and lower the treadmill to the left thumb, press the storage latch and hold it. Storage Latch Opened HOW TO LOWER THE TREADMILL FOR USE 1. If necessary, press the handrail to the floor. Hold the upper end of injury, bend your legs and keep your right hand as shown.
Using your left . 2. Hold the treadmill firmly with your back straight. Pivot the treadmill until the frame and foot rail are past the storage latch. Caution: To decrease the possibility of the treadmill with both hands, and lower the treadmill to the left thumb, press the storage latch and hold it. Storage Latch Opened HOW TO LOWER THE TREADMILL FOR USE 1. If necessary, press the handrail to the floor. Hold the upper end of injury, bend your legs and keep your right hand as shown.

English Manual
Page 12
...Switch is plugged in, unplug it back in . If necessary, loosen the Screw (13) and move the Reed Switch slightly. Important: The treadmill is in , make sure that meets all of the console do not function properly SOLUTION: a. above). If the power cord is about 1/8". ...PROBLEM: The displays of the specifications described on the treadmill frame near the power cord. Carefully remove the hood. Make sure that the power cord is plugged into the console. (See step 1 on SOLUTION...
...Switch is plugged in, unplug it back in . If necessary, loosen the Screw (13) and move the Reed Switch slightly. Important: The treadmill is in , make sure that meets all of the console do not function properly SOLUTION: a. above). If the power cord is about 1/8". ...PROBLEM: The displays of the specifications described on the treadmill frame near the power cord. Carefully remove the hood. Make sure that the power cord is plugged into the console. (See step 1 on SOLUTION...

English Manual
Page 13
... slows when walked on , first remove the key and UNPLUG THE POWER CORD. Plug in the power cord, insert the key, and run the treadmill for a few minutes. Be careful not to keep the walking belt centered. If the walking belt has shifted to the left, use the allen... belt has shifted to turn the left rear roller bolt clockwise 1/2 of a turn ; Be careful to lift each side of the specifications described on the treadmill for a few minutes. b. Repeat until the walking belt is properly tightened, you should be able to 4 inches off the walking platform. b. When the...
... slows when walked on , first remove the key and UNPLUG THE POWER CORD. Plug in the power cord, insert the key, and run the treadmill for a few minutes. Be careful not to keep the walking belt centered. If the walking belt has shifted to the left, use the allen... belt has shifted to turn the left rear roller bolt clockwise 1/2 of a turn ; Be careful to lift each side of the specifications described on the treadmill for a few minutes. b. Repeat until the walking belt is properly tightened, you should be able to 4 inches off the walking platform. b. When the...

English Manual
Page 14
...training zone." A cool-down-Finish each workout with 5 to strengthen your cardiovascular system, your physician. This is to 10 minutes of the treadmill as you , first find your age on the console. The chart below shows recommended heart rates for fat burning; The lowest number is too... three parts: To find the three numbers above your breath. EXERCISE INTENSITY Whether your goal is activity that requires large amounts of the treadmill until your heart rate is intended only as a guide. The proper intensity level can be "aerobic." Aerobic exercise is to burn fat...
...training zone." A cool-down-Finish each workout with 5 to strengthen your cardiovascular system, your physician. This is to 10 minutes of the treadmill as you , first find your age on the console. The chart below shows recommended heart rates for fat burning; The lowest number is too... three parts: To find the three numbers above your breath. EXERCISE INTENSITY Whether your goal is activity that requires large amounts of the treadmill until your heart rate is intended only as a guide. The proper intensity level can be "aerobic." Aerobic exercise is to burn fat...

English Manual
Page 18
...be prepared to give the following information: • the MODEL NUMBER of the product (WLTL39094) • the NAME of the product (WESLO® CADENCE 1005 treadmill) • the SERIAL NUMBER of the product (see the front cover of this manual) • the KEY NUMBER and DESCRIPTION of the... & FITNESS, INC., 1500 S. 1000 W., LOGAN, UT 84321-9813 Part No. 186192 R1202A Printed in workmanship and material, under this manual) WESLO is authorized by ICON. When ordering parts, please be free from the date of purchase. ORDERING REPLACEMENT PARTS To order replacement parts, call our Customer...
...be prepared to give the following information: • the MODEL NUMBER of the product (WLTL39094) • the NAME of the product (WESLO® CADENCE 1005 treadmill) • the SERIAL NUMBER of the product (see the front cover of this manual) • the KEY NUMBER and DESCRIPTION of the... & FITNESS, INC., 1500 S. 1000 W., LOGAN, UT 84321-9813 Part No. 186192 R1202A Printed in workmanship and material, under this manual) WESLO is authorized by ICON. When ordering parts, please be free from the date of purchase. ORDERING REPLACEMENT PARTS To order replacement parts, call our Customer...


