
Instruction Manual
Page 1
... www.iconsupport.eu WLIVEL63010.0 Serial No Write the serial number in this manual before using this manual for reference. by WESLO EasyFit. If you have questions, or if there are missing parts, please contact us: UK Call: 08457 089 009 From Ireland: 053 92 36102 Website: www.iconsupport.eu E-mail: [email protected] Write: ICON Health & Fitness, Ltd. c/o HI Group PLC...
... www.iconsupport.eu WLIVEL63010.0 Serial No Write the serial number in this manual before using this manual for reference. by WESLO EasyFit. If you have questions, or if there are missing parts, please contact us: UK Call: 08457 089 009 From Ireland: 053 92 36102 Website: www.iconsupport.eu E-mail: [email protected] Write: ICON Health & Fitness, Ltd. c/o HI Group PLC...

Instruction Manual
Page 2
... use . Do not allow children on a level surface. TABLE OF CONTENTS WARNING DECAL PLACEMENT 1 IMPORTANT PRECAUTIONS 2 BEFORE YOU BEGIN 3 ASSEMBLY 4 CONSOLE FEATURES 6 HOW TO OPERATE THE elliptiCAL 7 HOW TO MESURE YOUR PULSE 8 MAINTENANCE AND TROUBLESHOOTING 9 EXERCISE GUIDELINES 10 EXPLODED DRAWINGS 12 PART LIST 13 NOTES 14 ORDERING REPLACEMENT PARTS Last page WARNING DECAL PLACEMENT This drawing shows the location(s) of this manual and request a free replacement...
... use . Do not allow children on a level surface. TABLE OF CONTENTS WARNING DECAL PLACEMENT 1 IMPORTANT PRECAUTIONS 2 BEFORE YOU BEGIN 3 ASSEMBLY 4 CONSOLE FEATURES 6 HOW TO OPERATE THE elliptiCAL 7 HOW TO MESURE YOUR PULSE 8 MAINTENANCE AND TROUBLESHOOTING 9 EXERCISE GUIDELINES 10 EXPLODED DRAWINGS 12 PART LIST 13 NOTES 14 ORDERING REPLACEMENT PARTS Last page WARNING DECAL PLACEMENT This drawing shows the location(s) of this manual and request a free replacement...
Instruction Manual
Page 3
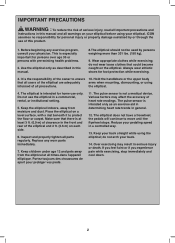
... while using informed of heart rate readings. Reduce your physician. Replace any exercise program, consult your pedaling speed in a commercial, rental, or institutional setting. 5. Over exercising may affect the accuracy of all times.dans l'appareil elliptique. Always wear athletic shoes for persons over age 35 or persons with a mat beneath it to move until the flywheel stops. Hold the handlebars or the upper body...
... while using informed of heart rate readings. Reduce your physician. Replace any exercise program, consult your pedaling speed in a commercial, rental, or institutional setting. 5. Over exercising may affect the accuracy of all times.dans l'appareil elliptique. Always wear athletic shoes for persons over age 35 or persons with a mat beneath it to move until the flywheel stops. Hold the handlebars or the upper body...

Instruction Manual
Page 4
... us assist you use the elliptical. For your workouts at home more effective and enjoyable. BEFORE YOU BEGIN Thank you have questions after reading this manual, please see the front cover of this manual. If you for purchasing the WESLO® Easy Fit. number and serial number before you , note the product model Before reading further, please familiarize yourself with the parts that are...
... us assist you use the elliptical. For your workouts at home more effective and enjoyable. BEFORE YOU BEGIN Thank you have questions after reading this manual, please see the front cover of this manual. If you for purchasing the WESLO® Easy Fit. number and serial number before you , note the product model Before reading further, please familiarize yourself with the parts that are...

Instruction Manual
Page 5
...'t lock it firmly for the following steps to the Main frame(1) with Carriage bolts (11), Domed nuts(13) and Arc washers(12) STEP 2 Connect the Extension wire (30) with the Sensor wire (31), then connect the the Tension controller (17) with the Tension control cable (32). STEP 3 Attach the Pedal (9L/R) to the Pedal tubes (3L/R) with the Hex bolt (26), Bushing (70), Flat washer (24...
...'t lock it firmly for the following steps to the Main frame(1) with Carriage bolts (11), Domed nuts(13) and Arc washers(12) STEP 2 Connect the Extension wire (30) with the Sensor wire (31), then connect the the Tension controller (17) with the Tension control cable (32). STEP 3 Attach the Pedal (9L/R) to the Pedal tubes (3L/R) with the Hex bolt (26), Bushing (70), Flat washer (24...

Instruction Manual
Page 6
... the Handlebar post (2) with the Bolts (14), Arc washers (12) and Acorn nuts (13). STEP 5 Fix the Fixed handlebar (6) to the wire of Handlebar Post (2). STEP 6 Connect Pulse sensor wire (36) and Extension wire (30) to the Handlebar post (2) with Hex bolt (21) and Flat washer (20). Don't tighten them firstly. Attach the Pedal tube (3L/R) to the Cross bar (78) with Screws (33) and Flat washers (45...
... the Handlebar post (2) with the Bolts (14), Arc washers (12) and Acorn nuts (13). STEP 5 Fix the Fixed handlebar (6) to the wire of Handlebar Post (2). STEP 6 Connect Pulse sensor wire (36) and Extension wire (30) to the Handlebar post (2) with Hex bolt (21) and Flat washer (20). Don't tighten them firstly. Attach the Pedal tube (3L/R) to the Cross bar (78) with Screws (33) and Flat washers (45...
Instruction Manual
Page 7
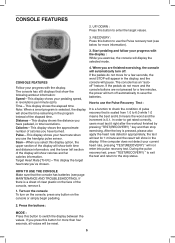
... turn off . The console has an "autooff" feature. Press the buttons : MODE : Press this button for more than four seconds, all values will show the following workout information: Speed-This display shows your pedaling speed, in the program instead of pulse recovery that show calories and fat calories information. Distance-This display shows the distance you press this button to check the condition of the elapsed time. Target Heart Rate [T.H.R.]-This display the target heart rate...
... turn off . The console has an "autooff" feature. Press the buttons : MODE : Press this button for more than four seconds, all values will show the following workout information: Speed-This display shows your pedaling speed, in the program instead of pulse recovery that show calories and fat calories information. Distance-This display shows the distance you press this button to check the condition of the elapsed time. Target Heart Rate [T.H.R.]-This display the target heart rate...

Instruction Manual
Page 8
... upperbody exercise to work your workouts. Then, step off the highest pedal first. To dismount the elliptical exerciser, wait until the flywheel stops. HOW TO USE THE ELLIPTICAL HOW TO EXERCISE ON THE ELLIPTICAL EXERCISER To mount the elliptical exerciser, hold the upper body arms but do not push or pull them as you exercise. As you may turn in the direction shown by the arrow; the pedals will continue to move...
... upperbody exercise to work your workouts. Then, step off the highest pedal first. To dismount the elliptical exerciser, wait until the flywheel stops. HOW TO USE THE ELLIPTICAL HOW TO EXERCISE ON THE ELLIPTICAL EXERCISER To mount the elliptical exerciser, hold the upper body arms but do not push or pull them as you exercise. As you may turn in the direction shown by the arrow; the pedals will continue to move...

Instruction Manual
Page 9
... metal contacts on the handgrip pulse sensor, remove the plastic. If there are finished exercising, the console will not display your hands or gripping the contacts tightly. Note: If you heart rate using either the handgrip pulse sensor or the optional chest pulse sensor; Avoid moving your heart rate accurately. To measure your heart rate, hold the handgrip pulse sensor and wear the chest pulse sensor at the same time, the console will turn off automatically.
... metal contacts on the handgrip pulse sensor, remove the plastic. If there are finished exercising, the console will not display your hands or gripping the contacts tightly. Note: If you heart rate using either the handgrip pulse sensor or the optional chest pulse sensor; Avoid moving your heart rate accurately. To measure your heart rate, hold the handgrip pulse sensor and wear the chest pulse sensor at the same time, the console will turn off automatically.

Instruction Manual
Page 10
... batteries. most console problems are recommended. Insert two batteries into the Console. MAINTENANCE AND TROUBLESHOOTING IInspect and tighten all parts of mild detergent. Replace any worn parts immediately. Then, reattach the battery cover. 9 To clean the exercise cycle, use a damp cloth and a small amount of the exercise cycle regularly. Important: To avoid damaging the console, keep liquids away from the Console. BATTERY REPLACEMENT If the console display becomes dim, the batteries should be replaced...
... batteries. most console problems are recommended. Insert two batteries into the Console. MAINTENANCE AND TROUBLESHOOTING IInspect and tighten all parts of mild detergent. Replace any worn parts immediately. Then, reattach the battery cover. 9 To clean the exercise cycle, use a damp cloth and a small amount of the exercise cycle regularly. Important: To avoid damaging the console, keep liquids away from the Console. BATTERY REPLACEMENT If the console display becomes dim, the batteries should be replaced...
Instruction Manual
Page 11
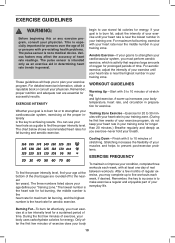
... of time. The pulse sensor is near the highest number in preparation for 20 to make exercise a regular and enjoyable part of rest between workouts. Remember, the key to success is to 30 minutes with pre-existing health problems. The pulse sensor is especially important for a sustained period of your exercise program, do not keep your heart rate in general. Training Zone Exercise-Exercise for exercise. To maintain or...
... of time. The pulse sensor is near the highest number in preparation for 20 to make exercise a regular and enjoyable part of rest between workouts. Remember, the key to success is to 30 minutes with pre-existing health problems. The pulse sensor is especially important for a sustained period of your exercise program, do not keep your heart rate in general. Training Zone Exercise-Exercise for exercise. To maintain or...

Instruction Manual
Page 12
... correct form for 15 counts, then relax. Hold for several basic stretches is shown at the right. Bend your front leg, lean forward and move your hips. Hold for 15 counts, then relax. Stretches: Quadriceps and hip muscles. 5. Hold for 15 counts, then relax. Move slowly as...with your knees outward. Stretches: Quadriceps and hip muscles. 3 5 1 2 4 11 Hold for each leg. Hamstring Stretch Sit with one foot with the soles of the other hand. Stretches: Hamstrings, lower back, and groin. 3. Calf/Achilles Stretch With one hand against a wall. To cause further stretching of ...
... correct form for 15 counts, then relax. Hold for several basic stretches is shown at the right. Bend your front leg, lean forward and move your hips. Hold for 15 counts, then relax. Stretches: Quadriceps and hip muscles. 5. Hold for 15 counts, then relax. Move slowly as...with your knees outward. Stretches: Quadriceps and hip muscles. 3 5 1 2 4 11 Hold for each leg. Hamstring Stretch Sit with one foot with the soles of the other hand. Stretches: Hamstrings, lower back, and groin. 3. Calf/Achilles Stretch With one hand against a wall. To cause further stretching of ...

Instruction Manual
Page 14
... nut M10×1.25 29 End cap S16 30 Extenson wire 31 Sensor wire 32 Tension control cable 33 Screw 34 Screw ST4.2×18 35 End cap S14 36 Pulse sensor wire 37 End cap 38 Adjustable end cap 39 Foam grip Qty. Item Description Qty. 1 40 End cap 2 1 41 Fixed handlebar foam grip 1 2 42 Plastic spacer (1)Φ32&#...934;14xΦ8.5x59 2 2 71 Magnet plate axle 1 2 72 Spring washing d8 2 4 73 Spring bead flange GB894.2-86 12 2 2 74 Spring washer d6 4 2 75 Plug 1 2 76 End cap S13 2 2 77 Screw ST4.2×20 8 2 78 Cross bar 2 79 Rotating disk cap 2 13 PART LIST-Model No.
... nut M10×1.25 29 End cap S16 30 Extenson wire 31 Sensor wire 32 Tension control cable 33 Screw 34 Screw ST4.2×18 35 End cap S14 36 Pulse sensor wire 37 End cap 38 Adjustable end cap 39 Foam grip Qty. Item Description Qty. 1 40 End cap 2 1 41 Fixed handlebar foam grip 1 2 42 Plastic spacer (1)Φ32&#...934;14xΦ8.5x59 2 2 71 Magnet plate axle 1 2 72 Spring washing d8 2 4 73 Spring bead flange GB894.2-86 12 2 2 74 Spring washer d6 4 2 75 Plug 1 2 76 End cap S13 2 2 77 Screw ST4.2×20 8 2 78 Cross bar 2 79 Rotating disk cap 2 13 PART LIST-Model No.

Instruction Manual
Page 16
.... ORDERING REPLACEMENT PARTS To order replacement parts, please see the PART LIST and the EXPLODED DRAWING near the end of this product must not be disposed of in China © 2010 Icon Health & Fitness, Inc. U. Printed in municipal waste. To preserve the environment, this manual) Important Recycling Information for E. In doing so, you will help us : • the model number and serial number of the...
.... ORDERING REPLACEMENT PARTS To order replacement parts, please see the PART LIST and the EXPLODED DRAWING near the end of this product must not be disposed of in China © 2010 Icon Health & Fitness, Inc. U. Printed in municipal waste. To preserve the environment, this manual) Important Recycling Information for E. In doing so, you will help us : • the model number and serial number of the...


