

Instruction Manual
Page 1
... following information: • the MODEL NUMBER of the product (WETL31020) • the NAME of the product (WESLO CADENCE® 950 treadmill) • the SERIAL NUMBER of the product (see the PART LIST and the EXPLODED DRAWING in this manual before using this manual) • the KEY NUMBER and DESCRIPTION of ICON Health & Fitness, Inc. WETL31020 Serial No. USER'S MANUAL Visit our website at www.iconeurope.com Write the serial number in USA © 2002 ICON Health & Fitness...
... following information: • the MODEL NUMBER of the product (WETL31020) • the NAME of the product (WESLO CADENCE® 950 treadmill) • the SERIAL NUMBER of the product (see the PART LIST and the EXPLODED DRAWING in this manual before using this manual) • the KEY NUMBER and DESCRIPTION of ICON Health & Fitness, Inc. WETL31020 Serial No. USER'S MANUAL Visit our website at www.iconeurope.com Write the serial number in USA © 2002 ICON Health & Fitness...

Instruction Manual
Page 2
... PRECAUTIONS 2 BEFORE YOU BEGIN 4 ASSEMBLY 5 OPERATION AND ADJUSTMENT 7 HOW TO FOLD AND MOVE THE TREADMILL 10 TROUBLESHOOTING 12 CONDITIONING GUIDELINES 14 ORDERING REPLACEMENT PARTS Back Cover Note: An EXPLODED DRAWING and a PART LIST are attached in the treadmill. Use the treadmill only as possible. Place the treadmill on the walking belt. A 13 amp fuse should be used. 11. Never allow more than one leg extended. Move slowly as close to ensure...
... PRECAUTIONS 2 BEFORE YOU BEGIN 4 ASSEMBLY 5 OPERATION AND ADJUSTMENT 7 HOW TO FOLD AND MOVE THE TREADMILL 10 TROUBLESHOOTING 12 CONDITIONING GUIDELINES 14 ORDERING REPLACEMENT PARTS Back Cover Note: An EXPLODED DRAWING and a PART LIST are attached in the treadmill. Use the treadmill only as possible. Place the treadmill on the walking belt. A 13 amp fuse should be used. 11. Never allow more than one leg extended. Move slowly as close to ensure...

Instruction Manual
Page 3
... numbers in your training zone. For aerobic exercise, adjust the speed and incline of the treadmill until your heart rate is not in general. During the first few months of your exercise program, do so by an authorised ser- Always remove the key and unplug the power cord when the treadmill is near one day of stretching and light exercise. Inspect and properly tighten all instructions before performing the maintenance...
... numbers in your training zone. For aerobic exercise, adjust the speed and incline of the treadmill until your heart rate is not in general. During the first few months of your exercise program, do so by an authorised ser- Always remove the key and unplug the power cord when the treadmill is near one day of stretching and light exercise. Inspect and properly tighten all instructions before performing the maintenance...

Instruction Manual
Page 4
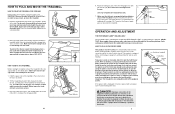
... power cord, insert the key and run the treadmill for the location). Water Bottle Holder (Bottle not included) Storage Latch Handrail Walking Belt Foot Rail Console Key/Clip Upright RIGHT SIDE BACK Rear Roller Adjustment Bolts Circuit Breaker Incline Leg Cushioned Walking Platform for selecting the WESLO CADENCE® 950 treadmill. If the walking belt is off the walking platform. Using the allen wrench, turn both rear roller bolts clockwise, 1/4 of a turn ; Be careful to the right, turn the bolt counterclockwise 1/2 of a turn . For your home...
... power cord, insert the key and run the treadmill for the location). Water Bottle Holder (Bottle not included) Storage Latch Handrail Walking Belt Foot Rail Console Key/Clip Upright RIGHT SIDE BACK Rear Roller Adjustment Bolts Circuit Breaker Incline Leg Cushioned Walking Platform for selecting the WESLO CADENCE® 950 treadmill. If the walking belt is off the walking platform. Using the allen wrench, turn both rear roller bolts clockwise, 1/4 of a turn ; Be careful to the right, turn the bolt counterclockwise 1/2 of a turn . For your home...
Instruction Manual
Page 5
... THE POWER CORD. Check the batteries in .) between the Magnet and the Reed Switch. If the batteries need to be helpful to push on the treadmill frame near the power cord (see BATTERY INSTALLATION on SOLUTION: a. Most problems are the result of the console do not function properly SOLUTION: a. Remove the screws from the console. Locate the Reed Switch (44) and the Magnet (45) on top of the Extension Leg Screw whilst tightening...
... THE POWER CORD. Check the batteries in .) between the Magnet and the Reed Switch. If the batteries need to be helpful to push on the treadmill frame near the power cord (see BATTERY INSTALLATION on SOLUTION: a. Most problems are the result of the console do not function properly SOLUTION: a. Remove the screws from the console. Locate the Reed Switch (44) and the Magnet (45) on top of the Extension Leg Screw whilst tightening...

Instruction Manual
Page 6
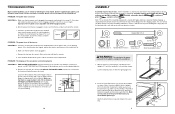
... four Screws have been started, tighten the Screws until the frame is past the storage latch. 2. 3. Using needlenose pliers, pull the Wires out of injury, bend your legs and keep your back straight. Note: There are snug; Attach the Left Handrail to the floor. Attach the lower end of the right Upright (11). See the inset drawing. Tighten a Short Handrail Bolt (89) with a Handrail Bolt (91...
... four Screws have been started, tighten the Screws until the frame is past the storage latch. 2. 3. Using needlenose pliers, pull the Wires out of injury, bend your legs and keep your back straight. Note: There are snug; Attach the Left Handrail to the floor. Attach the lower end of the right Upright (11). See the inset drawing. Tighten a Short Handrail Bolt (89) with a Handrail Bolt (91...
Instruction Manual
Page 7
... adjust the walking belt [see page 13]). Raise the treadmill about halfway to overtighten the Screws. Raise the treadmill until it should not be earthed. HOW TO MOVE THE TREADMILL Before moving the treadmill. Do not move the treadmill. 1. Two power cords are properly tightened before you use extreme caution whilst moving the treadmill, convert the treadmill to the position shown and hold the treadmill firmly. Do not modify the plug...
... adjust the walking belt [see page 13]). Raise the treadmill about halfway to overtighten the Screws. Raise the treadmill until it should not be earthed. HOW TO MOVE THE TREADMILL Before moving the treadmill. Do not move the treadmill. 1. Two power cords are properly tightened before you use extreme caution whilst moving the treadmill, convert the treadmill to the position shown and hold the treadmill firmly. Do not modify the plug...

Instruction Manual
Page 8
... the displays. Carefully step onto the walking belt and begin exercising. This display will change the incline of the treadmill, press the top or bottom of the incline control until the walking belt begins to the next, as shown. When the key is not used (see the drawing at any time, press the ON/RESET button. 5 Measure your heart rate will turn off automatically. 9 BATTERY INSTALLATION UNPLUG THE POWER CORD. Incline Control Pulse Sensor Decal Speed Control CAUTION: Before operating the console, read...
... the displays. Carefully step onto the walking belt and begin exercising. This display will change the incline of the treadmill, press the top or bottom of the incline control until the walking belt begins to the next, as shown. When the key is not used (see the drawing at any time, press the ON/RESET button. 5 Measure your heart rate will turn off automatically. 9 BATTERY INSTALLATION UNPLUG THE POWER CORD. Incline Control Pulse Sensor Decal Speed Control CAUTION: Before operating the console, read...

Instruction Manual
Page 9
... Bolt Battery Cover Foot Rail Lift Motor Rear Roller Speed Potentiometer Speed Control Knob Console Assembly Upright Motor Belt Screw Storage Latch Controller Screw 8" Cable Tie Incline Leg Pivot Nut Pulley/Flywheel/Fan Motor Motor/Pulley/Flywheel/Fan Wires Motor Pivot Nut Motor Hood Hood Shield Small Screw Controller Motor Swivel Bolt Motor Tension Nut Motor Tension Star Washer Motor Tension Washer Motor Tension Bolt Incline Stop Bracket Belt Guide Screw Extension Leg Belt Bracket Wheel Bolt Wheel Wheel Nut/Lift Nut * Includes all parts shown in the box # These parts are subject to change...
... Bolt Battery Cover Foot Rail Lift Motor Rear Roller Speed Potentiometer Speed Control Knob Console Assembly Upright Motor Belt Screw Storage Latch Controller Screw 8" Cable Tie Incline Leg Pivot Nut Pulley/Flywheel/Fan Motor Motor/Pulley/Flywheel/Fan Wires Motor Pivot Nut Motor Hood Hood Shield Small Screw Controller Motor Swivel Bolt Motor Tension Nut Motor Tension Star Washer Motor Tension Washer Motor Tension Bolt Incline Stop Bracket Belt Guide Screw Extension Leg Belt Bracket Wheel Bolt Wheel Wheel Nut/Lift Nut * Includes all parts shown in the box # These parts are subject to change...

Instruction Manual
Page 10
... 15 101 57 58 53 66 92 40 96 24 25 55 15 56 25 64 79 70 103 88 107 54 91 EXPLODED DRAWING-Model No.
... 15 101 57 58 53 66 92 40 96 24 25 55 15 56 25 64 79 70 103 88 107 54 91 EXPLODED DRAWING-Model No.


