
Uk Manual
Page 1
... Customer Service Department. Please CALL: 0345-089009 Or WRITE: ICON Fitness Lifestyle Ltd. WESY60400 Serial No. Model No. As a manufacturer, we are missing or damaged parts, we will guarantee you have questions, or find that there are committed to providing complete customer satisfaction.
... Customer Service Department. Please CALL: 0345-089009 Or WRITE: ICON Fitness Lifestyle Ltd. WESY60400 Serial No. Model No. As a manufacturer, we are missing or damaged parts, we will guarantee you have questions, or find that there are committed to providing complete customer satisfaction.
Uk Manual
Page 2
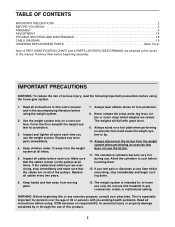
...two years. 7. The weight system is especially important for in-home use of this user's manual and in any worn parts immediately. 4. The resistance cylinders become very hot during use this treadmill in the accompanying literature before using. ICON assumes ... PRECAUTIONS 2 BEFORE YOU BEGIN 3 ASSEMBLY 4 ADJUSTMENT 15 TROUBLE-SHOOTING AND MAINTENANCE 18 CABLE DIAGRAM 19 ORDERING REPLACEMENT PARTS Back Cover Note: A PART IDENTIFICATION CHART and a PARTS LIST/EXPLODED DRAWING are attached at the centre of this or any exercise program, consult your physician. Remove them...
...two years. 7. The weight system is especially important for in-home use of this user's manual and in any worn parts immediately. 4. The resistance cylinders become very hot during use this treadmill in the accompanying literature before using. ICON assumes ... PRECAUTIONS 2 BEFORE YOU BEGIN 3 ASSEMBLY 4 ADJUSTMENT 15 TROUBLE-SHOOTING AND MAINTENANCE 18 CABLE DIAGRAM 19 ORDERING REPLACEMENT PARTS Back Cover Note: A PART IDENTIFICATION CHART and a PARTS LIST/EXPLODED DRAWING are attached at the centre of this or any exercise program, consult your physician. Remove them...
Uk Manual
Page 3
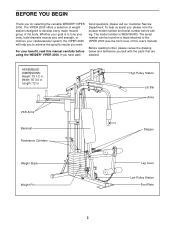
If you , please note the product model number and serial number before using the WEIDER® VIPER 2000. To help you for selecting the versatile WEIDER® VIPER 2000. ASSEMBLED DIMENSIONS: Height: 75 1/2 in . High Pulley Station Lat Bar Arms VKR Arms Backrest Resistance Cylinders Stepper Weight ...'s manual). Before reading further, please review the drawing below and familiarise yourself with the parts that are labelled. Width: 55 3/4 in . Length: 72 in. BEFORE YOU BEGIN Thank you to the VIPER 2000 (see the front cover of the body. The serial number can be found on ...
If you , please note the product model number and serial number before using the WEIDER® VIPER 2000. To help you for selecting the versatile WEIDER® VIPER 2000. ASSEMBLED DIMENSIONS: Height: 75 1/2 in . High Pulley Station Lat Bar Arms VKR Arms Backrest Resistance Cylinders Stepper Weight ...'s manual). Before reading further, please review the drawing below and familiarise yourself with the parts that are labelled. Width: 55 3/4 in . Length: 72 in. BEFORE YOU BEGIN Thank you to the VIPER 2000 (see the front cover of the body. The serial number can be found on ...
Uk Manual
Page 4
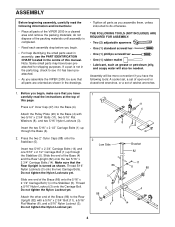
... of open-end or closed-end wrenches, or a set of ratchet wrenches. 1. If a part is not in the parts bag, check to see if it has been preattached. • As you assemble the VIPER 2000, be sure that all parts as you assemble them, unless instructed to the Rear Upright (82) with two 5/16... , make sure that the Rear Upright is completed. • Read each assembly step before you have the following information and instructions: • Place all parts of the VIPER 2000 in the centre of this page. Do not tighten the Nylon Locknut yet. 1 20 11 4 38 1 27 2 Low Side Bracket 82 86 3 3 5...
... of open-end or closed-end wrenches, or a set of ratchet wrenches. 1. If a part is not in the parts bag, check to see if it has been preattached. • As you assemble the VIPER 2000, be sure that all parts as you assemble them, unless instructed to the Rear Upright (82) with two 5/16... , make sure that the Rear Upright is completed. • Read each assembly step before you have the following information and instructions: • Place all parts of the VIPER 2000 in the centre of this page. Do not tighten the Nylon Locknut yet. 1 20 11 4 38 1 27 2 Low Side Bracket 82 86 3 3 5...
Uk Manual
Page 9
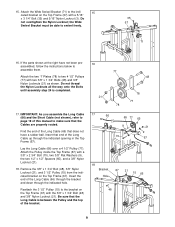
... (67). Insert the end of the Long Cable (66) that the Long Cable is completed. 16 21 77 48 78 77 78 17. If the parts shown at the right have a rubber ball. 15.
... (67). Insert the end of the Long Cable (66) that the Long Cable is completed. 16 21 77 48 78 77 78 17. If the parts shown at the right have a rubber ball. 15.
Uk Manual
Page 13
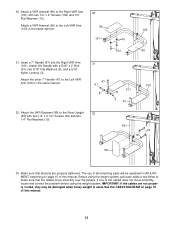
.... Insert a 7" Handle (47) into the Right VKR Arm 31 (101). Before using the weight system. Attach a VKR Armrest (99) to make sure that all remaining parts will be damaged when heavy weight is used. IMPORTANT: If the cables are properly tightened. See the CABLE DIAGRAM on page 15 of this manual...
.... Insert a 7" Handle (47) into the Right VKR Arm 31 (101). Before using the weight system. Attach a VKR Armrest (99) to make sure that all remaining parts will be damaged when heavy weight is used. IMPORTANT: If the cables are properly tightened. See the CABLE DIAGRAM on page 15 of this manual...
Uk Manual
Page 15
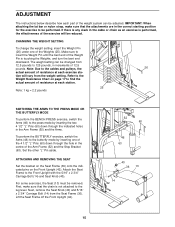
... SEAT Set the bracket on the Seat Frame (36) onto the indicated pins on page 17 to find the actual amount of resistance at each part of 12.5 pounds. Next, remove the Seat Knob (40) and 5/16" x 2 3/4" Carriage Bolt (14) from 12.5 pounds to 125 pounds, in the correct starting position...
... SEAT Set the bracket on the Seat Frame (36) onto the indicated pins on page 17 to find the actual amount of resistance at each part of 12.5 pounds. Next, remove the Seat Knob (40) and 5/16" x 2 3/4" Carriage Bolt (14) from 12.5 pounds to 125 pounds, in the correct starting position...
Uk Manual
Page 18
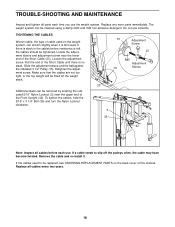
...cables need to slip off the weight stack. The weight system can be replaced, see ORDERING REPLACEMENT PARTS on the weight system, can be tightened. Do not use solvents. Replace any worn parts immediately. If there is slack in the cables before each time you use the weight system. ...cable and re-install it is first used on the back cover of the Front Upright (42). TROUBLE-SHOOTING AND MAINTENANCE Inspect and tighten all parts each use. Locate the adjustment sleeve and adjustment screw near the upper end of this manual. If a cable tends to be cleaned using a...
...cables need to slip off the weight stack. The weight system can be replaced, see ORDERING REPLACEMENT PARTS on the weight system, can be tightened. Do not use solvents. Replace any worn parts immediately. If there is slack in the cables before each time you use the weight system. ...cable and re-install it is first used on the back cover of the Front Upright (42). TROUBLE-SHOOTING AND MAINTENANCE Inspect and tighten all parts each use. Locate the adjustment sleeve and adjustment screw near the upper end of this manual. If a cable tends to be cleaned using a...
Uk Manual
Page 20
office, or write: ICON Fitness Lifestyle Ltd. ORDERING REPLACEMENT PARTS If you , please be prepared to give the following information: • The MODEL NUMBER of the product (WESY60400). • The NAME of the product (WEIDER® VIPER 2000). • The SERIAL NUMBER of the product (see the front ...cover of this manual). • The KEY NUMBER and DESCRIPTION of the desired part(s) (see the PART LIST/EXPLODED DRAWING attached at the centre of ICON Health ...
office, or write: ICON Fitness Lifestyle Ltd. ORDERING REPLACEMENT PARTS If you , please be prepared to give the following information: • The MODEL NUMBER of the product (WESY60400). • The NAME of the product (WEIDER® VIPER 2000). • The SERIAL NUMBER of the product (see the front ...cover of this manual). • The KEY NUMBER and DESCRIPTION of the desired part(s) (see the PART LIST/EXPLODED DRAWING attached at the centre of ICON Health ...
Uk Manual
Page 21
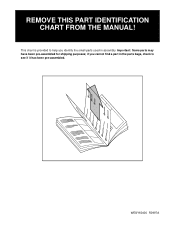
if you identify the small parts used in the parts bags, check to see if it has been pre-assembled. WESY60400 R0997A This chart is provided to help you cannot find a part in assembly. REMOVE THIS PART IDENTIFICATION CHART FROM THE MANUAL! Important: Some parts may have been pre-assembled for shipping purposes;
if you identify the small parts used in the parts bags, check to see if it has been pre-assembled. WESY60400 R0997A This chart is provided to help you cannot find a part in assembly. REMOVE THIS PART IDENTIFICATION CHART FROM THE MANUAL! Important: Some parts may have been pre-assembled for shipping purposes;

Uk Manual
Page 25
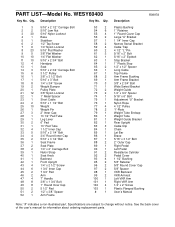
REMOVE THIS PART LIST/EXPLODED DRAWING FROM THE MANUAL! 81
REMOVE THIS PART LIST/EXPLODED DRAWING FROM THE MANUAL! 81
Uk Manual
Page 26
... 5/8" Retainer 5/8" Round Cover Cap 5/8" Spacer VKR Backrest VKR Armrest Left VKR Arm Right VKR Arm 1/4" x 2" Screw Plastic Flanged Bushing User's Manual Note: "#" indicates a non-illustrated part. Qty. WESY60400 Key No. See the back cover of the user's manual for information about ordering replacement...
... 5/8" Retainer 5/8" Round Cover Cap 5/8" Spacer VKR Backrest VKR Armrest Left VKR Arm Right VKR Arm 1/4" x 2" Screw Plastic Flanged Bushing User's Manual Note: "#" indicates a non-illustrated part. Qty. WESY60400 Key No. See the back cover of the user's manual for information about ordering replacement...


