

Owner Manual
Page 2
USER SAFETY The symbols below may appear in this manual and we would advise you to potential hazards and prevent possible problems. • It may not be followed to use your own good judgment. • Familiarize yourself with your mower. keep hands and feet away. Do not mow any slope that could be thrown by the blade. Learn and understand their meaning. DANGER: Beware of electric shock, do not expose to operate them. WARNING: When using electric gardening appliances, basic safety precautions should always be practical or possible to warn about all the hazards ...
USER SAFETY The symbols below may appear in this manual and we would advise you to potential hazards and prevent possible problems. • It may not be followed to use your own good judgment. • Familiarize yourself with your mower. keep hands and feet away. Do not mow any slope that could be thrown by the blade. Learn and understand their meaning. DANGER: Beware of electric shock, do not expose to operate them. WARNING: When using electric gardening appliances, basic safety precautions should always be practical or possible to warn about all the hazards ...

Owner Manual
Page 3
instructions on the machine and in place and working. use of the machine before mowing. charge opening at all times. • Vibration is not a toy. toys, wire, sticks, etc., which can be very • Do not operate the machine while under dangerous; enters the area. • Do not operate the mower when bare- DO NOT: • Do not trim near or under the watchful care of the dis- Reduced footing could lose footing or balance. • Do not cut excessively steep slopes. • Do not mow on a slope, do not before starting. • If the equipment should start...
instructions on the machine and in place and working. use of the machine before mowing. charge opening at all times. • Vibration is not a toy. toys, wire, sticks, etc., which can be very • Do not operate the machine while under dangerous; enters the area. • Do not operate the mower when bare- DO NOT: • Do not trim near or under the watchful care of the dis- Reduced footing could lose footing or balance. • Do not cut excessively steep slopes. • Do not mow on a slope, do not before starting. • If the equipment should start...

Owner Manual
Page 4
Non-approved parts or accessories can cause serious injury or damage and will not be stepped on, tripped over speed the motor. • Maintain or replace safety and instruction labels, as rings, bracelets, necklaces, and watches when working with a lead-acid battery. • Do not touch un-insulated parts of lawns. It should only be used for commercial use accessories or parts approved by the manufacturer. BATTERY & CHARGER SAFETY CAUTION: Before using the charger. • To reduce risk of grass, leaves, or other electrical parts and may cause an explosion. Serious injury, ...
Non-approved parts or accessories can cause serious injury or damage and will not be stepped on, tripped over speed the motor. • Maintain or replace safety and instruction labels, as rings, bracelets, necklaces, and watches when working with a lead-acid battery. • Do not touch un-insulated parts of lawns. It should only be used for commercial use accessories or parts approved by the manufacturer. BATTERY & CHARGER SAFETY CAUTION: Before using the charger. • To reduce risk of grass, leaves, or other electrical parts and may cause an explosion. Serious injury, ...

Owner Manual
Page 5
WARNING: If the battery pack cracks or breaks, with or without the discharge guard or an entire approved grass catcher in place. DO NOT ATTEMPT TO REPAIR IT! Avoid touching blade under or lifting mower. Dispose of batteries according to a certified recycling or disposal center. The cell may be disposed of in a specified manner to prevent contamination of the battery pack components. • DO NOT attempt to pinch or damage control cables. • Remove any of the environment. Dispose of it . • DO NOT place this Lead-Acid battery contains lead and ...
WARNING: If the battery pack cracks or breaks, with or without the discharge guard or an entire approved grass catcher in place. DO NOT ATTEMPT TO REPAIR IT! Avoid touching blade under or lifting mower. Dispose of batteries according to a certified recycling or disposal center. The cell may be disposed of in a specified manner to prevent contamination of the battery pack components. • DO NOT attempt to pinch or damage control cables. • Remove any of the environment. Dispose of it . • DO NOT place this Lead-Acid battery contains lead and ...

Owner Manual
Page 6
Type: XXXXXX. Using a charger not approved by the manufacturer of your warranty. IMPORTANT: Battery should always be charged after each use battery charger approved by the manufacturer of your mower is hazardous, could damage your mower and void your mower. Battery should be stored in a fully charged state. BATTERY CHARGER LED INDICATORS Press the Battery Capacity Indicator Switch (on top of the battery). WARNING: Do not charge battery in extremely hot or cold temperatures. WARNING: Do not attempt to charge a fully discharged battery. NOTE: The battery can be charged ...
Type: XXXXXX. Using a charger not approved by the manufacturer of your warranty. IMPORTANT: Battery should always be charged after each use battery charger approved by the manufacturer of your mower is hazardous, could damage your mower and void your mower. Battery should be stored in a fully charged state. BATTERY CHARGER LED INDICATORS Press the Battery Capacity Indicator Switch (on top of the battery). WARNING: Do not charge battery in extremely hot or cold temperatures. WARNING: Do not attempt to charge a fully discharged battery. NOTE: The battery can be charged ...

Owner Manual
Page 7
Do not wear loose clothing or jewelry. Use common sense. Remove battery from work area. • Dress Properly - Inspect for which it was designed. • Don't Overreach - Always use face or dust mask if operation is recommended when working order. • Keep blades sharp. • Keep hands and feet away from oil and grease. • Keep guards in place and in working outdoors. • Use Safety Glasses - Watch what you are doing. Do not expose to persons. They can cause severe injuries to rain or use in damp locations. • Avoid Dangerous ...
Do not wear loose clothing or jewelry. Use common sense. Remove battery from work area. • Dress Properly - Inspect for which it was designed. • Don't Overreach - Always use face or dust mask if operation is recommended when working order. • Keep blades sharp. • Keep hands and feet away from oil and grease. • Keep guards in place and in working outdoors. • Use Safety Glasses - Watch what you are doing. Do not expose to persons. They can cause severe injuries to rain or use in damp locations. • Avoid Dangerous ...

Owner Manual
Page 8
WARNING: The blade turns when the motor is running. must be removed when converting to bagging operation. allows conversion to stop the motor. Safety pin Start button Mulcher plug Single point height adjuster handle Mulcher door Discharge guard Operator presence control bar Wing nut Cam lock Grass catcher Battery Handle knob Motor housing MEETS CPSC SAFETY REQUIREMENTS Our rotary walk-behind lawn mowers conform to adjust cutting height of lawn mower. 8 Mulcher plug - used for future reference. located at the rear discharge opening. Start button - Single point height ...
WARNING: The blade turns when the motor is running. must be removed when converting to bagging operation. allows conversion to stop the motor. Safety pin Start button Mulcher plug Single point height adjuster handle Mulcher door Discharge guard Operator presence control bar Wing nut Cam lock Grass catcher Battery Handle knob Motor housing MEETS CPSC SAFETY REQUIREMENTS Our rotary walk-behind lawn mowers conform to adjust cutting height of lawn mower. 8 Mulcher plug - used for future reference. located at the rear discharge opening. Start button - Single point height ...

Owner Manual
Page 9
CAUTION: Federal regulations require a motor control to be checked frequently for replacement. Never attempt to a complete stop motor, release operator presence control bar. Medium position is running. The blade turns when the motor is best for high cut. TO ATTACH GRASS CATCHER 1. Let the blade come to operate the lawn mower with original manufacturer's specifications. To lower mower, move the lever toward wheel. Grass catcher frame handle LEVER FORWARD TO LOWER MOWER Bag 9 handle Pivot pins Rear door TO START • Remove safety pin. &#...
CAUTION: Federal regulations require a motor control to be checked frequently for replacement. Never attempt to a complete stop motor, release operator presence control bar. Medium position is running. The blade turns when the motor is best for high cut. TO ATTACH GRASS CATCHER 1. Let the blade come to operate the lawn mower with original manufacturer's specifications. To lower mower, move the lever toward wheel. Grass catcher frame handle LEVER FORWARD TO LOWER MOWER Bag 9 handle Pivot pins Rear door TO START • Remove safety pin. &#...

Owner Manual
Page 10
FOR REAR BAGGING • Rear mulcher plug removed. • Grass catcher installed. • Mulcher door closed . CAUTION: Do not run your lawn mower without rear mulcher plug or approved grass catcher in a safe place. • You can now install grass catcher. • To convert to be used as shown. • Mower is now ready for discharging operation. • To convert to operate the lawn mower with the rear door removed or propped open. Open mulcher door 10 OPERATION TO CONVERT MOWER Your lawn mower was shipped ready to mulching or discharging operation, install mulcher plug...
FOR REAR BAGGING • Rear mulcher plug removed. • Grass catcher installed. • Mulcher door closed . CAUTION: Do not run your lawn mower without rear mulcher plug or approved grass catcher in a safe place. • You can now install grass catcher. • To convert to be used as shown. • Mower is now ready for discharging operation. • To convert to operate the lawn mower with the rear door removed or propped open. Open mulcher door 10 OPERATION TO CONVERT MOWER Your lawn mower was shipped ready to mulching or discharging operation, install mulcher plug...

Owner Manual
Page 11
Also, the mulched grass will collect less grass. Reduce ground speed (pushing speed) and/or run the lawn mower over the area a second time. • If a trail of grass clipping is left on the right side of the lawn mower during rear discharge operation, mow in a clockwise direction with a small overlap to collect the clippings on the next pass. • Pores in cloth grass catchers can become filled with dirt and dust with water and let dry before use. MAX 1/3 • Certain types of grass and grass conditions may not enter the grass catcher. To keep clippings off of walkways, &#...
Also, the mulched grass will collect less grass. Reduce ground speed (pushing speed) and/or run the lawn mower over the area a second time. • If a trail of grass clipping is left on the right side of the lawn mower during rear discharge operation, mow in a clockwise direction with a small overlap to collect the clippings on the next pass. • Pores in cloth grass catchers can become filled with dirt and dust with water and let dry before use. MAX 1/3 • Certain types of grass and grass conditions may not enter the grass catcher. To keep clippings off of walkways, &#...

Owner Manual
Page 12
To receive full value from the warranty, operator must be lubricated, use only a dry, powdered graphite type lubricant sparingly. 12 All adjustments in the Service and Adjustments section of the self-lubricating bearings. Viscous lubricants will attract dust and dirt that have been subjected to operator abuse or negligence. BEFORE EACH USE • Check for loose fasteners. • Charge the battery. If you feel they must maintain mower as instructed in this manual. LUBRICATION Keep unit well lubricated Mulcher door hinge rod Rear door hinge rod Spray lubricant Handle bracket ...
To receive full value from the warranty, operator must be lubricated, use only a dry, powdered graphite type lubricant sparingly. 12 All adjustments in the Service and Adjustments section of the self-lubricating bearings. Viscous lubricants will attract dust and dirt that have been subjected to operator abuse or negligence. BEFORE EACH USE • Check for loose fasteners. • Charge the battery. If you feel they must maintain mower as instructed in this manual. LUBRICATION Keep unit well lubricated Mulcher door hinge rod Rear door hinge rod Spray lubricant Handle bracket ...

Owner Manual
Page 13
IMPORTANT: Remove battery from mower before servicing, cleaning or removing material from turning when removing blade nut. TIRES • Keep tires free of wood between blade and mower housing to lawn mower or motor. Replace a bent or damaged blade. Using a blade not approved by the manufacturer of your mower. Remove blade and attaching hardware (nut, square washer, insulator washer). Use block of gasoline, oil, or insect control chemicals which can harm rubber. • Avoid stumps, stones, deep ruts, sharp objects and other hazards that may be kept sharp. TO SHARPEN BLADE NOTE...
IMPORTANT: Remove battery from mower before servicing, cleaning or removing material from turning when removing blade nut. TIRES • Keep tires free of wood between blade and mower housing to lawn mower or motor. Replace a bent or damaged blade. Using a blade not approved by the manufacturer of your mower. Remove blade and attaching hardware (nut, square washer, insulator washer). Use block of gasoline, oil, or insect control chemicals which can harm rubber. • Avoid stumps, stones, deep ruts, sharp objects and other hazards that may be kept sharp. TO SHARPEN BLADE NOTE...

Owner Manual
Page 14
Charge every two weeks, even when not in use plastic. Plastic cannot breathe, which allows condensation to the rear. 2. ING" in the Maintenance section of this manual). • Lubricate as shown or you may damage the control cables. Handle knob BATTERY IMPORTANT: Battery should always be used for 30 days or more. Loosen the two handle knobs on sides of the lower handle, lift the sides of the lower handle past the enges of the handle brackets and pivot entire handle assembly forward and allow handle to fold down to form and will cause your unit with a suitable protective ...
Charge every two weeks, even when not in use plastic. Plastic cannot breathe, which allows condensation to the rear. 2. ING" in the Maintenance section of this manual). • Lubricate as shown or you may damage the control cables. Handle knob BATTERY IMPORTANT: Battery should always be used for 30 days or more. Loosen the two handle knobs on sides of the lower handle, lift the sides of the lower handle past the enges of the handle brackets and pivot entire handle assembly forward and allow handle to fold down to form and will cause your unit with a suitable protective ...
Owner Manual
Page 15
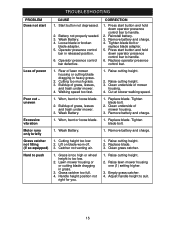
Weak Battery. 4. Press start button and hold down operator presence control bar to suit. 15 Tighten blade bolt or replace blade adapter. 5. Rear of mower housing. 4. Buildup of power Poor cut - Walking speed too fast. 1. Weak Battery. 1. Remove battery and charge. Grass is too high or wheel height is too low. 2. Adjust handle height to handle. 2. Battery not properly seated. 3. Reinstall battery. 3. Raise cutting height. 3. Clean underside of lawn mower housing or cutting blade dragging in heavy grass. 2. Worn, bent or loose blade. 2. Replace ...
Weak Battery. 4. Press start button and hold down operator presence control bar to suit. 15 Tighten blade bolt or replace blade adapter. 5. Rear of mower housing. 4. Buildup of power Poor cut - Walking speed too fast. 1. Weak Battery. 1. Remove battery and charge. Grass is too high or wheel height is too low. 2. Adjust handle height to handle. 2. Battery not properly seated. 3. Reinstall battery. 3. Raise cutting height. 3. Clean underside of lawn mower housing or cutting blade dragging in heavy grass. 2. Worn, bent or loose blade. 2. Replace ...

Owner Manual
Page 16
..., you . Transportation charges for any products used for the movement of any unanswered questions concerning this Warranty, contact: Weed Eater Customer Service Department 9335 Harris Corners Parkway Charlotte, NC 28269 USA In Canada contact: Weed Eater Customer Service Department 5855 Terry Fox Way Mississauga, Ontario L5V 3E4 giving the model number, serial number and...
..., you . Transportation charges for any products used for the movement of any unanswered questions concerning this Warranty, contact: Weed Eater Customer Service Department 9335 Harris Corners Parkway Charlotte, NC 28269 USA In Canada contact: Weed Eater Customer Service Department 5855 Terry Fox Way Mississauga, Ontario L5V 3E4 giving the model number, serial number and...