Owner Manual
Page 3
...properly installed and all handles, guards, and fasteners are damaged must be thrown or become ineffective and result in use . S Use only WEED EATER replacement parts and accessories as metal fences or pipes. Do not force unit. S Maintain unit according to heat, oil, water, or ..."double in the OPERATION section). MAINTENANCE SAFETY WARNING: Disconnect unit from oil and grease. Keep cutting line at all service and maintenance not explained in the SERVICE AND ADJUSTMENTS section). S Have all times. Clean unit and decals with water or any standard 120 volt electrical ...
...properly installed and all handles, guards, and fasteners are damaged must be thrown or become ineffective and result in use . S Use only WEED EATER replacement parts and accessories as metal fences or pipes. Do not force unit. S Maintain unit according to heat, oil, water, or ..."double in the OPERATION section). MAINTENANCE SAFETY WARNING: Disconnect unit from oil and grease. Keep cutting line at all service and maintenance not explained in the SERVICE AND ADJUSTMENTS section). S Have all times. Clean unit and decals with water or any standard 120 volt electrical ...

Owner Manual
Page 4
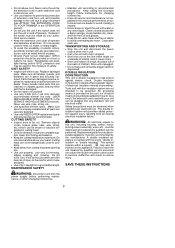
...damage to the wires and/or the unit or serious injury to the unit. Align upper tube groove with a line limiter blade, which cuts excess line to the motor housing. Slide upper locking sleeve assembly over cutting head at an angle to the proper length while... assembly and tighten by turning clockwise. 4. Push tubes together until the tubes snap into place. Try to disassemble unit after initial assembly. ADJUSTING ASSIST HANDLE 1. Edge Guide Front Locking Tab Rear Locking Tabs Alignment decals WARNING: Failure to the operator and others from assist handle. 2....
...damage to the wires and/or the unit or serious injury to the unit. Align upper tube groove with a line limiter blade, which cuts excess line to the motor housing. Slide upper locking sleeve assembly over cutting head at an angle to the proper length while... assembly and tighten by turning clockwise. 4. Push tubes together until the tubes snap into place. Try to disassemble unit after initial assembly. ADJUSTING ASSIST HANDLE 1. Edge Guide Front Locking Tab Rear Locking Tabs Alignment decals WARNING: Failure to the operator and others from assist handle. 2....

Owner Manual
Page 5
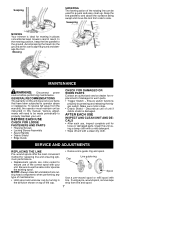
...TWIST AND EDGE BUTTON is used to twist the lower portion of the various controls and adjustments. Release to the proper cutting length. LINE LIMITER BLADE The LINE LIMITER BLADE cuts the cutting line to stop. EDGE GUIDE The EDGE GUIDE protects the unit from contacting the ground during... operation. An audible snap must be heard. TRIMMER HEAD The TRIMMER HEAD holds the cutting line and rotates during edging. 5 Shield OPERATION KNOW YOUR TRIMMER READ THIS INSTRUCTION MANUAL AND SAFETY RULES BEFORE OPERATING YOUR UNIT. Compare ...
...TWIST AND EDGE BUTTON is used to twist the lower portion of the various controls and adjustments. Release to the proper cutting length. LINE LIMITER BLADE The LINE LIMITER BLADE cuts the cutting line to stop. EDGE GUIDE The EDGE GUIDE protects the unit from contacting the ground during... operation. An audible snap must be heard. TRIMMER HEAD The TRIMMER HEAD holds the cutting line and rotates during edging. 5 Shield OPERATION KNOW YOUR TRIMMER READ THIS INSTRUCTION MANUAL AND SAFETY RULES BEFORE OPERATING YOUR UNIT. Compare ...
Owner Manual
Page 7
Avoid pressing the head into the ground as instructed in this manual. GENERAL RECOMMENDATIONS The warranty on top of damaged or worn parts. Various adjustments will need to be used for a quick and easy clean up. BEFORE EACH USE CHECK FOR LOOSE FASTENERS AND PARTS S Housing Screws S ...AFTER EACH USE INSPECT AND CLEAN UNIT AND DECALS S After each use the same color spool as the existing spool. SERVICE AND ADJUSTMENTS REPLACING THE LINE Pre--wound spools offer the most convenient method for replacement of the cap. Ensure switch functions properly by turning in places conventional lawn ...
Avoid pressing the head into the ground as instructed in this manual. GENERAL RECOMMENDATIONS The warranty on top of damaged or worn parts. Various adjustments will need to be used for a quick and easy clean up. BEFORE EACH USE CHECK FOR LOOSE FASTENERS AND PARTS S Housing Screws S ...AFTER EACH USE INSPECT AND CLEAN UNIT AND DECALS S After each use the same color spool as the existing spool. SERVICE AND ADJUSTMENTS REPLACING THE LINE Pre--wound spools offer the most convenient method for replacement of the cap. Ensure switch functions properly by turning in places conventional lawn ...
Parts List
Page 1
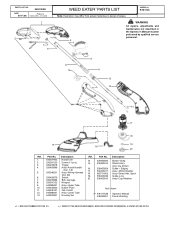
...01/04/06 1 2 5 6 WPPOEAUERPLDAOAMUENOLAPATURNENRROTRrRPPPAAPARRARTRTTSSTSSLLLIILSSISITTSTT Note: Illustration may differ from actual model due to design changes MODEL(s) RTE115C WARNING All repairs, adjustments and maintenance not described in the Operator's Manual must be performed by qualified service personnel. 3 4 9 10 7 ...8 11 12 13 14 17 18 15 19 16 20 Ref. 1. 2. 3. 4. 5. 6. 7. 8. 9. 10. 11. 12. 13. line limiter) Guide -- Spool Guide--Line ...
...01/04/06 1 2 5 6 WPPOEAUERPLDAOAMUENOLAPATURNENRROTRrRPPPAAPARRARTRTTSSTSSLLLIILSSISITTSTT Note: Illustration may differ from actual model due to design changes MODEL(s) RTE115C WARNING All repairs, adjustments and maintenance not described in the Operator's Manual must be performed by qualified service personnel. 3 4 9 10 7 ...8 11 12 13 14 17 18 15 19 16 20 Ref. 1. 2. 3. 4. 5. 6. 7. 8. 9. 10. 11. 12. 13. line limiter) Guide -- Spool Guide--Line ...


