User Manual
Page 1
User's Manual Ultimate Amazement Park PlaysetTM © 2015 VTech Printed in China 91-002921-013
User's Manual Ultimate Amazement Park PlaysetTM © 2015 VTech Printed in China 91-002921-013
User Manual
Page 3
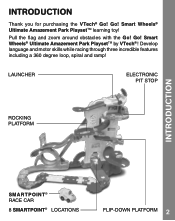
INTRODUCTION Thank you for purchasing the VTech® Go! Go! Pull the flag and zoom around obstacles with the Go! Smart Wheels® Ultimate Amazement Park PlaysetTM learning toy! Smart Wheels® Ultimate Amazement Park PlaysetTM by VTech® ! Develop language and motor skills while racing through three incredible features including a 360 degree loop, spiral and ramp! launcher electronic pit stop rocking platform INTRODUCTION SMARTPOINT® RACE CAR 8 SMARTPOINT® LOCATIONS flip-down platform 2 Go!
INTRODUCTION Thank you for purchasing the VTech® Go! Go! Pull the flag and zoom around obstacles with the Go! Smart Wheels® Ultimate Amazement Park PlaysetTM learning toy! Smart Wheels® Ultimate Amazement Park PlaysetTM by VTech® ! Develop language and motor skills while racing through three incredible features including a 360 degree loop, spiral and ramp! launcher electronic pit stop rocking platform INTRODUCTION SMARTPOINT® RACE CAR 8 SMARTPOINT® LOCATIONS flip-down platform 2 Go!

User Manual
Page 4
INCLUDED IN THIS PACKAGE INCLUDED IN THIS PACKAGE One SmartPoint® race car One SmartPoint® electronic pit stop One SmartPoint® tower base Two tower pieces One SmartPoint® launcher Two C-shaped tracks Two spiral tracks with One SmartPoint® SmartPoint® platform loop base Two long straight tracks Two ramp tracks One semicircular loop track 3
INCLUDED IN THIS PACKAGE INCLUDED IN THIS PACKAGE One SmartPoint® race car One SmartPoint® electronic pit stop One SmartPoint® tower base Two tower pieces One SmartPoint® launcher Two C-shaped tracks Two spiral tracks with One SmartPoint® SmartPoint® platform loop base Two long straight tracks Two ramp tracks One semicircular loop track 3

User Manual
Page 5
One base support One rocking platform One flip-down SmartPoint® platform One mini ramp track One short curved track One short straight track INCLUDED IN THIS PACKAGE One small track support One flag piece One start sign One gate One flipping board 10 screws Two adjustable track pieces Two 1/4 straight track Two 1/4 straight track, female Two 60-degree track, male One 90-degree track, female Two 3/4 straight track One 1/4 straight track, male One 60-degree track, female One cross track One 90-degree track, male Two label sheets One user's manual 4
One base support One rocking platform One flip-down SmartPoint® platform One mini ramp track One short curved track One short straight track INCLUDED IN THIS PACKAGE One small track support One flag piece One start sign One gate One flipping board 10 screws Two adjustable track pieces Two 1/4 straight track Two 1/4 straight track, female Two 60-degree track, male One 90-degree track, female Two 3/4 straight track One 1/4 straight track, male One 60-degree track, female One cross track One 90-degree track, male Two label sheets One user's manual 4

User Manual
Page 6
... user's manual as tape, plastic sheets, packaging locks and tags are not part of this toy, and should be discarded for maximum performance.) 4. For your child's safety, do not let your child's safety. GETTING STARTED GETTING STARTED BATTERY INSTALLATION - RACE CAR 1. Make sure the unit is fully assembled. Locate the battery cover on the bottom of new alkaline batteries is recommended for your child play with the toy...
... user's manual as tape, plastic sheets, packaging locks and tags are not part of this toy, and should be discarded for maximum performance.) 4. For your child's safety, do not let your child's safety. GETTING STARTED GETTING STARTED BATTERY INSTALLATION - RACE CAR 1. Make sure the unit is fully assembled. Locate the battery cover on the bottom of new alkaline batteries is recommended for your child play with the toy...

User Manual
Page 7
...; Remove batteries during long periods of non-use. • Do not dispose of batteries in fire. • Do not charge non-rechargeable batteries. • Remove rechargeable batteries from the toy before charging (if removable). • Rechargeable batteries are only to be charged under adult supervision. 6 Install 2 new "AAA" (AM-4/LR03) batteries following the diagram inside the battery box. (The use of the electronic pit stop. BATTERY NOTICE BATTERY INSTALLATION - Replace the battery cover...
...; Remove batteries during long periods of non-use. • Do not dispose of batteries in fire. • Do not charge non-rechargeable batteries. • Remove rechargeable batteries from the toy before charging (if removable). • Rechargeable batteries are only to be charged under adult supervision. 6 Install 2 new "AAA" (AM-4/LR03) batteries following the diagram inside the battery box. (The use of the electronic pit stop. BATTERY NOTICE BATTERY INSTALLATION - Replace the battery cover...
User Manual
Page 8
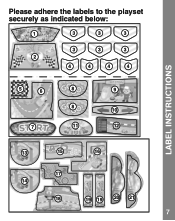
LABEL INSTRUCTIONS Please adhere the labels to the playset securely as indicated below: 1 3 3 3 3 3 3 2 4 4 4 4 5 6 8 9 8 10 7 11 12 13 15 16 17 14 18 19 19 20 21 7
LABEL INSTRUCTIONS Please adhere the labels to the playset securely as indicated below: 1 3 3 3 3 3 3 2 4 4 4 4 5 6 8 9 8 10 7 11 12 13 15 16 17 14 18 19 19 20 21 7
User Manual
Page 10
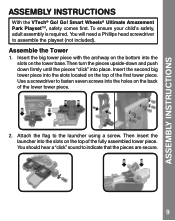
Smart Wheels® Ultimate Amazement Park PlaysetTM, safety comes first. You will need a Phillips head screwdriver to indicate that the pieces are secure. 9 ASSEMBLY INSTRUCTIONS ASSEMBLY INSTRUCTIONS With the VTech® Go! Insert the second big tower piece into the slots located on the tower base. You should hear a "click" sound to assemble the playset (not included). Go! To ensure your child's safety, adult assembly is required. Insert the big...
Smart Wheels® Ultimate Amazement Park PlaysetTM, safety comes first. You will need a Phillips head screwdriver to indicate that the pieces are secure. 9 ASSEMBLY INSTRUCTIONS ASSEMBLY INSTRUCTIONS With the VTech® Go! Insert the second big tower piece into the slots located on the tower base. You should hear a "click" sound to assemble the playset (not included). Go! To ensure your child's safety, adult assembly is required. Insert the big...

User Manual
Page 11
... as shown until you hear them "click" into place. Place the loop track base on the top tower piece and connect it snaps into place. ASSEMBLY INSTRUCTIONS 2. Once connected, insert the notch that is located on the small track support piece. Assemble the Spiral Course 1. Then...Use the base support to the notch on the bottom of the shorter C-shaped track until you hear them "click" into the hole that is located at the base of the loop track base as shown. Assemble the 360 Degree Loop Course 1. The fully assembled long track should be attached to connect...
... as shown until you hear them "click" into place. Place the loop track base on the top tower piece and connect it snaps into place. ASSEMBLY INSTRUCTIONS 2. Once connected, insert the notch that is located on the small track support piece. Assemble the Spiral Course 1. Then...Use the base support to the notch on the bottom of the shorter C-shaped track until you hear them "click" into the hole that is located at the base of the loop track base as shown. Assemble the 360 Degree Loop Course 1. The fully assembled long track should be attached to connect...

User Manual
Page 12
... the loop track. Position the notch located on the bottom of the ramp. 11 Assemble the Ramp Course Insert the long curved track with a SmartPoint® is on the track. Use a screwdriver to the end of this curved track into the holes on top. After...assembled spiral into place. 4. Assemble the spiral track by joining the two spiral track pieces together making sure the piece with two circular holes into the slot on the bottom tower piece and the short straight track until you hear them "click" into the holes located on the left side of the tower base. ASSEMBLY INSTRUCTIONS...
... the loop track. Position the notch located on the bottom of the ramp. 11 Assemble the Ramp Course Insert the long curved track with a SmartPoint® is on the track. Use a screwdriver to the end of this curved track into the holes on top. After...assembled spiral into place. 4. Assemble the spiral track by joining the two spiral track pieces together making sure the piece with two circular holes into the slot on the bottom tower piece and the short straight track until you hear them "click" into the holes located on the left side of the tower base. ASSEMBLY INSTRUCTIONS...
User Manual
Page 13
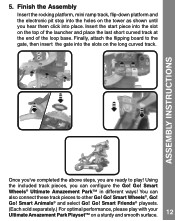
... are ready to play with your Ultimate Amazement Park Playset™ on the long curved track. Go! Smart Wheels®, Go! Finally, attach the flipping board to other Go! Go! Insert the start piece into the slot on the tower as shown until you hear them click into place. Smart Animals® and select Go! ASSEMBLY INSTRUCTIONS Once you've completed the above steps, you can also connect these track pieces...
... are ready to play with your Ultimate Amazement Park Playset™ on the long curved track. Go! Smart Wheels®, Go! Finally, attach the flipping board to other Go! Go! Insert the start piece into the slot on the tower as shown until you hear them click into place. Smart Animals® and select Go! ASSEMBLY INSTRUCTIONS Once you've completed the above steps, you can also connect these track pieces...

User Manual
Page 14
... SWITCH to the OFF ( ) position. 2. RACE CAR PRODUCT FEATURES - AUTOMATIC SHUT-OFF To preserve battery life, the race car included with normal play. 13 Smart Wheels® Ultimate Amazement Park PlaysetTM will automatically power-down after approximately 60 seconds without input.The unit can be turned on again to the ON ( ) position. To turn the vehicle off and on again by pressing the light-up driver button...
... SWITCH to the OFF ( ) position. 2. RACE CAR PRODUCT FEATURES - AUTOMATIC SHUT-OFF To preserve battery life, the race car included with normal play. 13 Smart Wheels® Ultimate Amazement Park PlaysetTM will automatically power-down after approximately 60 seconds without input.The unit can be turned on again to the ON ( ) position. To turn the vehicle off and on again by pressing the light-up driver button...

User Manual
Page 15
.../OFF SWITCH to hear race car sounds, songs and phrases. Go! Press the LIGHT-UP DRIVER BUTTON to turn the unit ON. The light will flash with the sounds. 4. The race car even interacts with the sounds. 3. The light will flash with other Go! Go! You will flash with the sounds. The light will hear race car sounds, a song and a phrase. RACE CAR 2. While the melody is playing, push the race car again to add in fun sounds on top of the playset's eight...
.../OFF SWITCH to hear race car sounds, songs and phrases. Go! Press the LIGHT-UP DRIVER BUTTON to turn the unit ON. The light will flash with the sounds. 4. The race car even interacts with the sounds. 3. The light will flash with other Go! Go! You will flash with the sounds. The light will hear race car sounds, a song and a phrase. RACE CAR 2. While the melody is playing, push the race car again to add in fun sounds on top of the playset's eight...

User Manual
Page 16
... unit ON, slide the ON/ OFF/ VOLUME CONTROL SWITCH to the low volume ( ) or high volume ( ) position. Slide the MODE SELECTOR SWITCH to the OFF ( ) position. 2. ON/OFF/VOLUME CONTROL SWITCH To turn the unit OFF, slide the ON/OFF/VOLUME CONTROL SWITCH to choose a mode of play . 3. MODE SELECTOR SWITCH The electronic pit stop has two modes of play : Play Mode and Music Mode. The unit can be re-activated by playing with any button or switch on the electronic pit stop will automatically power...
... unit ON, slide the ON/ OFF/ VOLUME CONTROL SWITCH to the low volume ( ) or high volume ( ) position. Slide the MODE SELECTOR SWITCH to the OFF ( ) position. 2. ON/OFF/VOLUME CONTROL SWITCH To turn the unit OFF, slide the ON/OFF/VOLUME CONTROL SWITCH to choose a mode of play . 3. MODE SELECTOR SWITCH The electronic pit stop has two modes of play : Play Mode and Music Mode. The unit can be re-activated by playing with any button or switch on the electronic pit stop will automatically power...

User Manual
Page 17
... the gas pump to turn the unit ON. S l i d e t h e O N / O F F / V O L U M E CONTROL SWITCH to either volume setting to learn colors, names and the functions of play melodies. You will flash with any of the music. 16 In Music Mode, press the wrench button or the tire button to add in fun sound effects on the selected mode. While listening to play sing-along songs and melodies, play with the sounds. 3. ELECTRONIC PIT STOP ACTIVITIES - Electronic Pit Stop 1. Wiggle the gas pump...
... the gas pump to turn the unit ON. S l i d e t h e O N / O F F / V O L U M E CONTROL SWITCH to either volume setting to learn colors, names and the functions of play melodies. You will flash with any of the music. 16 In Music Mode, press the wrench button or the tire button to add in fun sound effects on the selected mode. While listening to play sing-along songs and melodies, play with the sounds. 3. ELECTRONIC PIT STOP ACTIVITIES - Electronic Pit Stop 1. Wiggle the gas pump...

User Manual
Page 18
... Me 14. Mary Had a Little Lamb SONG LYRICS SONG 1 Start your engines! Ready, get set, go into sleep mode. If there is no input, the unit will hear a sound effect and a reminder to the Ball Game 12. Pop! Humpty Dumpty 6. Alphabet Song 9. Don't be reactivated by playing with any button or switch on the Flying Trapeze 13. The unit can be slow! 17 ELECTRONIC PIT STOP 5. After another 10 seconds of...
... Me 14. Mary Had a Little Lamb SONG LYRICS SONG 1 Start your engines! Ready, get set, go into sleep mode. If there is no input, the unit will hear a sound effect and a reminder to the Ball Game 12. Pop! Humpty Dumpty 6. Alphabet Song 9. Don't be reactivated by playing with any button or switch on the Flying Trapeze 13. The unit can be slow! 17 ELECTRONIC PIT STOP 5. After another 10 seconds of...
User Manual
Page 19
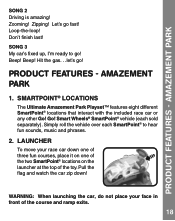
...; LOCATIONS The Ultimate Amazement Park Playset™ features eight different SmartPoint® locations that interact with the included race car or any other Go! AMAZEMENT PARK SONG 2 Driving is amazing! Zooming! Loop-the-loop! WARNING: When launching the car, do not place your race car down ! PRODUCT FEATURES - Don't finish last! Amazement Park 1. Beep! Go! Smart Wheels® SmartPoint® vehicle (each SmartPoint® to go! Let's go ! LAUNCHER To...
...; LOCATIONS The Ultimate Amazement Park Playset™ features eight different SmartPoint® locations that interact with the included race car or any other Go! AMAZEMENT PARK SONG 2 Driving is amazing! Zooming! Loop-the-loop! WARNING: When launching the car, do not place your race car down ! PRODUCT FEATURES - Don't finish last! Amazement Park 1. Beep! Go! Smart Wheels® SmartPoint® vehicle (each SmartPoint® to go! Let's go ! LAUNCHER To...
User Manual
Page 20
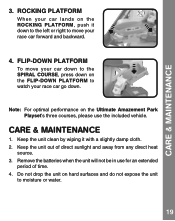
... the Ultimate Amazement Park Playset's three courses, please use for an extended period of direct sunlight and away from any direct heat source. 3. CARE & MAINTENANCE 1. Keep the unit clean by wiping it down . Note: For optimal performance on the FLIP-DOWN PLATFORM to watch your race car forward and backward. 4. Keep the unit out of time. 4. CARE & MAINTENANCE 3. Remove the batteries when the unit...
... the Ultimate Amazement Park Playset's three courses, please use for an extended period of direct sunlight and away from any direct heat source. 3. CARE & MAINTENANCE 1. Keep the unit clean by wiping it down . Note: For optimal performance on the FLIP-DOWN PLATFORM to watch your race car forward and backward. 4. Keep the unit out of time. 4. CARE & MAINTENANCE 3. Remove the batteries when the unit...
User Manual
Page 21
... ensure the accuracy of the information, which forms the value of new batteries. or 1-877-352-8697 in Canada. or 1-877-352-8697 in Canada, and a service representative will be ready to help you might have. Interrupt the power supply by a responsibility that you . TROUBLESHOOTING TROUBLESHOOTING If for some reason the program/activity stops working or malfunctions, please follow these steps: 1.
... ensure the accuracy of the information, which forms the value of new batteries. or 1-877-352-8697 in Canada. or 1-877-352-8697 in Canada, and a service representative will be ready to help you might have. Interrupt the power supply by a responsibility that you . TROUBLESHOOTING TROUBLESHOOTING If for some reason the program/activity stops working or malfunctions, please follow these steps: 1.

User Manual
Page 22
... by turning the equipment off and on, the user is encouraged to try to correct the interference by the party responsible for help. If this equipment does cause harmful interference to radio or television reception, which the receiver is no guarantee that to which can radiate radio frequency energy and, if not installed and used...
... by turning the equipment off and on, the user is encouraged to try to correct the interference by the party responsible for help. If this equipment does cause harmful interference to radio or television reception, which the receiver is no guarantee that to which can radiate radio frequency energy and, if not installed and used...

