
User Manual
Page 1
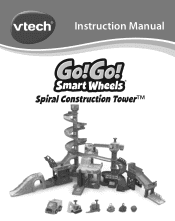
Instruction Manual Spiral Construction Tower™
Instruction Manual Spiral Construction Tower™
User Manual
Page 2
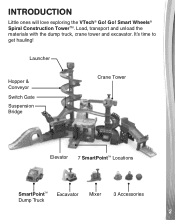
INTRODUCTION Little ones will love exploring the VTech® Go! It's time to get hauling! Load, transport and unload the materials with the dump truck, crane tower and excavator. Launcher Hopper & Conveyor Switch Gate Suspension Bridge Crane Tower Elevator 7 SmartPointTM Locations SmartPointTM Dump Truck Excavator Mixer 3 Accessories 2 Smart Wheels® Spiral Construction TowerTM. Go!
INTRODUCTION Little ones will love exploring the VTech® Go! It's time to get hauling! Load, transport and unload the materials with the dump truck, crane tower and excavator. Launcher Hopper & Conveyor Switch Gate Suspension Bridge Crane Tower Elevator 7 SmartPointTM Locations SmartPointTM Dump Truck Excavator Mixer 3 Accessories 2 Smart Wheels® Spiral Construction TowerTM. Go!

User Manual
Page 3
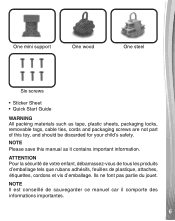
INCLUDED IN THE PACKAGE One SmartPointTM One Dump Truck excavator One mixer One rock Six tracks (A,B,C,D,E,F) One sign Two spiral track supports Two tower supports One SmartPointTM bridge One track switcher One SmartPointTM One ground floor platform base 3
INCLUDED IN THE PACKAGE One SmartPointTM One Dump Truck excavator One mixer One rock Six tracks (A,B,C,D,E,F) One sign Two spiral track supports Two tower supports One SmartPointTM bridge One track switcher One SmartPointTM One ground floor platform base 3
User Manual
Page 6
Ils ne font pas partie du jouet. NOTE Please save this toy, and should be discarded for your child's safety. NOTE Il est conseillé de sauvegarder ce manuel car il comporte des informations importantes. 6 ATTENTION Pour la sécurité de votre enfant,..., cordons et vis d'emballage. One mini support One wood One steel Six screws • Sticker Sheet • Quick Start Guide WARNING All packing materials such as tape, plastic sheets, packaging locks, removable tags, cable ties, cords and packaging screws are not part of this manual as it contains important information.
Ils ne font pas partie du jouet. NOTE Please save this toy, and should be discarded for your child's safety. NOTE Il est conseillé de sauvegarder ce manuel car il comporte des informations importantes. 6 ATTENTION Pour la sécurité de votre enfant,..., cordons et vis d'emballage. One mini support One wood One steel Six screws • Sticker Sheet • Quick Start Guide WARNING All packing materials such as tape, plastic sheets, packaging locks, removable tags, cable ties, cords and packaging screws are not part of this manual as it contains important information.

User Manual
Page 7
Removing the Packaging Locks: Turn the packaging locks anticlockwise several times. Pull out the packaging locks and discard. 7 Adult assembly required. CAUTION This package contains small screws. For your child's safety, do not let your child play with the toy until it is fully assembled. If there are no locks inside the package, disregard this message.
Removing the Packaging Locks: Turn the packaging locks anticlockwise several times. Pull out the packaging locks and discard. 7 Adult assembly required. CAUTION This package contains small screws. For your child's safety, do not let your child play with the toy until it is fully assembled. If there are no locks inside the package, disregard this message.

User Manual
Page 8
... Dump Truck, use a screwdriver to loosen the screw and then open the battery cover. 3. Make sure the unit is turned OFF. 2. Remove old batteries by pulling up on the bottom of each battery. 4. Install 2 new AAA (AM-4/LR03) batteries following the diagram inside the battery box. (For best performance, alkaline batteries or fully charged Ni-MH rechargeable batteries are to secure. MPORTANT: BATTERY INFORMATION • Insert batteries with the...
... Dump Truck, use a screwdriver to loosen the screw and then open the battery cover. 3. Make sure the unit is turned OFF. 2. Remove old batteries by pulling up on the bottom of each battery. 4. Install 2 new AAA (AM-4/LR03) batteries following the diagram inside the battery box. (For best performance, alkaline batteries or fully charged Ni-MH rechargeable batteries are to secure. MPORTANT: BATTERY INFORMATION • Insert batteries with the...

User Manual
Page 12
B: Attach Track A to the Tower Support. 12 Smart Spiral Construction Tower™, safety comes first. Assemble the 3-loop spiral track components following the steps below: A: Insert one Spiral Support into the Spiral Track Base, then attach the other Spiral Support. attach the Sign to the Spiral Support; ASSEMBLY INSTRUCTIONS With the Go! Make sure you hear a clicking sound to secure. Tighten it with two screws to confirm they are firmly connected. Go! To ensure your child's safety, adult assembly is required. 1. attach Track B to Track A, attach Track C to Track B;
B: Attach Track A to the Tower Support. 12 Smart Spiral Construction Tower™, safety comes first. Assemble the 3-loop spiral track components following the steps below: A: Insert one Spiral Support into the Spiral Track Base, then attach the other Spiral Support. attach the Sign to the Spiral Support; ASSEMBLY INSTRUCTIONS With the Go! Make sure you hear a clicking sound to secure. Tighten it with two screws to confirm they are firmly connected. Go! To ensure your child's safety, adult assembly is required. 1. attach Track B to Track A, attach Track C to Track B;

User Manual
Page 13
Connect two Bridge Supports to the Bridge Floor, insert the Bridge Floor into the SmartPoint® Bridge. B. Attach two Bridge Rails to the Mud Track. 2. Attach two Bridge Supports to the Bridge Base. Attach the Small Track to the Bridge Base. Assemble the bridge components following the steps below: A. Connect the SmartPoint® Mountain to the Mud Track. 13 C.
Connect two Bridge Supports to the Bridge Floor, insert the Bridge Floor into the SmartPoint® Bridge. B. Attach two Bridge Rails to the Mud Track. 2. Attach two Bridge Supports to the Bridge Base. Attach the Small Track to the Bridge Base. Assemble the bridge components following the steps below: A. Connect the SmartPoint® Mountain to the Mud Track. 13 C.

User Manual
Page 14
3. Insert two small Elevator Supports, the Elevator Wall and the Elevator Support into the SmartPoint® Parking Base. Attach the SmartPoint® Platform to the Elevator Cover. 14 C. B. Insert the Elevator Cover to the Elevator Wall, then connect the SmartPoint® Elevator to the three Elevator Supports and the Elevator Wall. A. Assemble the elevator components following the steps below.
3. Insert two small Elevator Supports, the Elevator Wall and the Elevator Support into the SmartPoint® Parking Base. Attach the SmartPoint® Platform to the Elevator Cover. 14 C. B. Insert the Elevator Cover to the Elevator Wall, then connect the SmartPoint® Elevator to the three Elevator Supports and the Elevator Wall. A. Assemble the elevator components following the steps below.

User Manual
Page 15
B. Tighten the Tower Support into the Crane. Assemble the crane and track components following the steps below: A. Insert the Tower Support into the Tower Base with two screws. 4. Secure it with two screws to secure. Insert two Tower Brackets into the Tower Support. 15
B. Tighten the Tower Support into the Crane. Assemble the crane and track components following the steps below: A. Insert the Tower Support into the Tower Base with two screws. 4. Secure it with two screws to secure. Insert two Tower Brackets into the Tower Support. 15
User Manual
Page 16
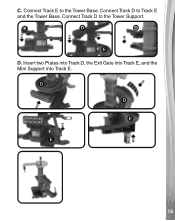
Connect Track D to the Tower Support. Connect Track D to Track E and the Tower Base. D. C. Insert two Plates into Track D, the Exit Gate into Track E, and the Mini Support into Track E. 16 Connect Track E to the Tower Base.
Connect Track D to the Tower Support. Connect Track D to Track E and the Tower Base. D. C. Insert two Plates into Track D, the Exit Gate into Track E, and the Mini Support into Track E. 16 Connect Track E to the Tower Base.
User Manual
Page 18
Insert the Conveyor Support into the Conveyor Belt, the SmartPoint® Loading Location into the Conveyor Support, and the Exit Gate into Track F. 18 Connect Track F to the 3-loop spiral tower, connect the bridge part to Track F, insert the Spiral Track Base into the Bridge Support, and insert the L-shape Plate Plates into Conveyor Belt. 6. Insert the Switch Gate into Track F. Assemble and attach the construction tower components following the steps as below: A. B.
Insert the Conveyor Support into the Conveyor Belt, the SmartPoint® Loading Location into the Conveyor Support, and the Exit Gate into Track F. 18 Connect Track F to the 3-loop spiral tower, connect the bridge part to Track F, insert the Spiral Track Base into the Bridge Support, and insert the L-shape Plate Plates into Conveyor Belt. 6. Insert the Switch Gate into Track F. Assemble and attach the construction tower components following the steps as below: A. B.

User Manual
Page 19
Attach the SmartPoint® Platform to the SmartPoint® Parking Base. Insert the SmartPoint® Parking Base into the Conveyor Support. 19 Attach the Tower Base to Track F. Insert the Conveyor Bracket into the Tower Bracket, and insert Track E into the Spiral Track Base. Connect Track F and Track D. C. D. B.
Attach the SmartPoint® Platform to the SmartPoint® Parking Base. Insert the SmartPoint® Parking Base into the Conveyor Support. 19 Attach the Tower Base to Track F. Insert the Conveyor Bracket into the Tower Bracket, and insert Track E into the Spiral Track Base. Connect Track F and Track D. C. D. B.
User Manual
Page 20
On/Off Switch To turn the unit Off, slide the On/Off Switch to the On ( ) position. You can also connect the construction tower to play! To turn the unit On, slide the On/Off Switch to the Off ( ) position. 20 PRODUCT FEATURES 1. Go! Smart Wheels® track sets (each sold separately). Once you've completed the above steps, you are ready to other Go!
On/Off Switch To turn the unit Off, slide the On/Off Switch to the On ( ) position. You can also connect the construction tower to play! To turn the unit On, slide the On/Off Switch to the Off ( ) position. 20 PRODUCT FEATURES 1. Go! Smart Wheels® track sets (each sold separately). Once you've completed the above steps, you are ready to other Go!
User Manual
Page 21
... while playing, we suggest changing the batteries. Smart Wheels® Dump Truck will flash with sounds. 2. If the unit powers down after approximately 60 seconds without input.The unit can be turned on again by pressing the light up Button to add fun sounds on again to hear fun sounds and phrases. The windshield light will flash with sounds. 21 Note: This product is playing, continue pushing the Dump Truck to hear fun phrases, songs, sounds...
... while playing, we suggest changing the batteries. Smart Wheels® Dump Truck will flash with sounds. 2. If the unit powers down after approximately 60 seconds without input.The unit can be turned on again by pressing the light up Button to add fun sounds on again to hear fun sounds and phrases. The windshield light will flash with sounds. 21 Note: This product is playing, continue pushing the Dump Truck to hear fun phrases, songs, sounds...

User Manual
Page 22
... trigger fun sounds, songs or phrases. 2. Smart Wheels ® playsets (other Go! Raise and lower the Truck Bed to load and transport. 22 The windshield light will flash with other playsets sold separately) on one of the seven SmartPoint® locations to hear fun sounds, short tunes and phrases. 3. Place the Dump Truck or any SmartPoint® vehicle (each sold separately). .ACTIVITIES Construction Tower...
... trigger fun sounds, songs or phrases. 2. Smart Wheels ® playsets (other Go! Raise and lower the Truck Bed to load and transport. 22 The windshield light will flash with other playsets sold separately) on one of the seven SmartPoint® locations to hear fun sounds, short tunes and phrases. 3. Place the Dump Truck or any SmartPoint® vehicle (each sold separately). .ACTIVITIES Construction Tower...

User Manual
Page 25
...Hey, Diddle Diddle 6. Smart Wheels! Go!) Song 4 I can clean and tidy, I 'm a Go! Man on the Flying Trapeze 5. Go! Smart Wheels! Go! MELODY LIST 1. Teddy Bear's Picnic 2. On Top of Old Smokey SONG Song 1 Load the rocks and hit the road, To and fro and then unload Song 2 I'm haulin' and... all in my truck bed, Then dump it! Go!) Fill me up and dump me out, Let's Go! That's the best. 25 Go! The Bear Went Over the Mountain 3. Dump Truck Haulin' everywhere (Go! and see (Go! Load it all the piles right where they belong Song 3 Go! 11. P u t t h e D ...
...Hey, Diddle Diddle 6. Smart Wheels! Go!) Song 4 I can clean and tidy, I 'm a Go! Man on the Flying Trapeze 5. Go! Smart Wheels! Go! MELODY LIST 1. Teddy Bear's Picnic 2. On Top of Old Smokey SONG Song 1 Load the rocks and hit the road, To and fro and then unload Song 2 I'm haulin' and... all in my truck bed, Then dump it! Go!) Fill me up and dump me out, Let's Go! That's the best. 25 Go! The Bear Went Over the Mountain 3. Dump Truck Haulin' everywhere (Go! and see (Go! Load it all the piles right where they belong Song 3 Go! 11. P u t t h e D ...

User Manual
Page 26
... under the Customer Support link. A service representative will not be in the U.S. Let the unit stand for you to know that we stand behind our products and encourage you to help you might have. If the unit still does not work, install a new set of direct sunlight and away from any problems and/or suggestions you . 26 Keep the unit out of batteries. We make every effort...
... under the Customer Support link. A service representative will not be in the U.S. Let the unit stand for you to know that we stand behind our products and encourage you to help you might have. If the unit still does not work, install a new set of direct sunlight and away from any problems and/or suggestions you . 26 Keep the unit out of batteries. We make every effort...

User Manual
Page 27
...used in a residential installation. This equipment generates, uses and can be determined by turning the equipment off and on, the user is encouraged to try to correct the interference by the party responsible for help 27 If this equipment does cause harmful interference to radio or television reception, which the receiver is no guarantee that to Part... a particular installation. However, there is connected • Consult the dealer or an experienced radio/TV technician for compliance could void the user's authority to radio communications. CAUTION Changes or modifications ...
...used in a residential installation. This equipment generates, uses and can be determined by turning the equipment off and on, the user is encouraged to try to correct the interference by the party responsible for help 27 If this equipment does cause harmful interference to radio or television reception, which the receiver is no guarantee that to Part... a particular installation. However, there is connected • Consult the dealer or an experienced radio/TV technician for compliance could void the user's authority to radio communications. CAUTION Changes or modifications ...

User Manual
Page 28
CAN ICES-003(B)/NMB-003(B) 28 47 CFR § 2.1077 Compliance Information 5433 Spiral Construction Tower™ L.L.C THIS DEVICE COMPLIES WITH PART 15 OF THE FCC RULES. OPERATION IS SUBJECT TO THE FOLLOWING TWO CONDITIONS: (1) THIS DEVICE MAY NOT CAUSE HARMFUL INTERFERENCE, AND (2) THIS DEVICE MUST ACCEPT ANY INTERFERENCE RECEIVED, INCLUDING INTERFERENCE THAT MAY CAUSE UNDESIRED OPERATION.
CAN ICES-003(B)/NMB-003(B) 28 47 CFR § 2.1077 Compliance Information 5433 Spiral Construction Tower™ L.L.C THIS DEVICE COMPLIES WITH PART 15 OF THE FCC RULES. OPERATION IS SUBJECT TO THE FOLLOWING TWO CONDITIONS: (1) THIS DEVICE MAY NOT CAUSE HARMFUL INTERFERENCE, AND (2) THIS DEVICE MUST ACCEPT ANY INTERFERENCE RECEIVED, INCLUDING INTERFERENCE THAT MAY CAUSE UNDESIRED OPERATION.

