User Manual
Page 1
Parent's Guide Save the Day Fire Station™ 91-003367-001
Parent's Guide Save the Day Fire Station™ 91-003367-001
User Manual
Page 2
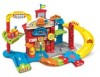
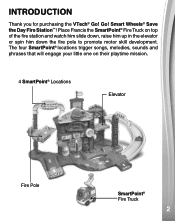
The four SmartPoint® locations trigger songs, melodies, sounds and phrases that will engage your little one on top of the fire station and watch him slide down, raise him up in the elevator or spin him down the fire pole to promote motor skill development. Place Francis the SmartPoint® Fire Truck on their playtime mission. 4 SmartPoint® Locations Elevator Fire Pole SmartPoint® Fire Truck 22 Smart Wheels® Save the Day Fire Station™! Go! INTRODUCTION Thank you for purchasing the VTech® Go!
The four SmartPoint® locations trigger songs, melodies, sounds and phrases that will engage your little one on top of the fire station and watch him slide down, raise him up in the elevator or spin him down the fire pole to promote motor skill development. Place Francis the SmartPoint® Fire Truck on their playtime mission. 4 SmartPoint® Locations Elevator Fire Pole SmartPoint® Fire Truck 22 Smart Wheels® Save the Day Fire Station™! Go! INTRODUCTION Thank you for purchasing the VTech® Go!
User Manual
Page 3
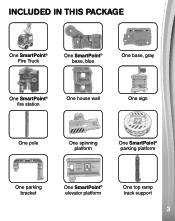
INCLUDED IN THIS PACKAGE One SmartPoint® Fire Truck One SmartPoint® base, blue One base, gray One SmartPoint® fire station One house wall One sign One pole One spinning platform One SmartPoint® parking platform One parking bracket One SmartPoint® elevator platform One top ramp track support 33
INCLUDED IN THIS PACKAGE One SmartPoint® Fire Truck One SmartPoint® base, blue One base, gray One SmartPoint® fire station One house wall One sign One pole One spinning platform One SmartPoint® parking platform One parking bracket One SmartPoint® elevator platform One top ramp track support 33

User Manual
Page 4
One top ramp track One bottom ramp track Two fire plates One bottom ramp track support One cross track Two 1/4 straight tracks One 90-degree track, male User's Manual Fire Station TM © 2017 VTech Printed in China 91-003367-000 UK One parent's guide Two end tracks, male One label sheet One fire piece 44
One top ramp track One bottom ramp track Two fire plates One bottom ramp track support One cross track Two 1/4 straight tracks One 90-degree track, male User's Manual Fire Station TM © 2017 VTech Printed in China 91-003367-000 UK One parent's guide Two end tracks, male One label sheet One fire piece 44

User Manual
Page 5
.... Unlock the packaging locks: Turn the packaging locks counterclockwise several times. Locate the battery cover on the bottom of new alkaline batteries is turned OFF. 2. NOTE: Please keep this parent's guide as tape, plastic sheets, packaging locks, removable tags, cable ties and packaging screws are not part of this toy, and should be discarded for maximum performance.) 4. Replace the battery cover and tighten the screw...
.... Unlock the packaging locks: Turn the packaging locks counterclockwise several times. Locate the battery cover on the bottom of new alkaline batteries is turned OFF. 2. NOTE: Please keep this parent's guide as tape, plastic sheets, packaging locks, removable tags, cable ties and packaging screws are not part of this toy, and should be discarded for maximum performance.) 4. Replace the battery cover and tighten the screw...

User Manual
Page 6
...; Remove exhausted batteries from the toy before charging (if removable). • Rechargeable batteries are only to be charged under adult supervision. 66 BATTERY NOTICE • Use new alkaline batteries for maximum performance. • Use only batteries of the same or equivalent type as recommended. • Do not mix different types of batteries in fire. • Do not charge non-rechargeable batteries. • Remove rechargeable batteries from the toy. • Remove batteries...
...; Remove exhausted batteries from the toy before charging (if removable). • Rechargeable batteries are only to be charged under adult supervision. 66 BATTERY NOTICE • Use new alkaline batteries for maximum performance. • Use only batteries of the same or equivalent type as recommended. • Do not mix different types of batteries in fire. • Do not charge non-rechargeable batteries. • Remove rechargeable batteries from the toy. • Remove batteries...
User Manual
Page 9
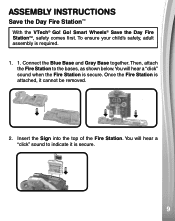
Then, attach the Fire Station to indicate it cannot be removed. 2. Once the Fire Station is attached, it is secure. 99 To ensure your child's safety, adult assembly is secure. You will hear a "click" sound to the bases, as shown below.You will hear a "click" sound when the Fire Station is required. 1. 1. Connect the Blue Base and Gray Base together. Go! Smart Wheels® Save the Day Fire StationTM, safety comes first. Insert the Sign into the top of the Fire Station. ASSEMBLY INSTRUCTIONS Save the Day Fire Station™ With the VTech® Go!
Then, attach the Fire Station to indicate it cannot be removed. 2. Once the Fire Station is attached, it is secure. 99 To ensure your child's safety, adult assembly is secure. You will hear a "click" sound to the bases, as shown below.You will hear a "click" sound when the Fire Station is required. 1. 1. Connect the Blue Base and Gray Base together. Go! Smart Wheels® Save the Day Fire StationTM, safety comes first. Insert the Sign into the top of the Fire Station. ASSEMBLY INSTRUCTIONS Save the Day Fire Station™ With the VTech® Go!
User Manual
Page 10
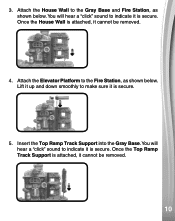
Attach the House Wall to the Fire Station, as shown below . Once the House Wall is secure. Attach the Elevator Platform to the Gray Base and Fire Station, as shown below . Once the Top Ramp Track Support is attached, it is attached, it cannot be removed. 1100 Lift it up and down smoothly to indicate it cannot be removed. 4. You will hear a "click" sound to indicate it is secure. Insert the Top Ramp Track Support into the Gray Base.You will hear a "click" sound to make sure it is secure. 5. 3.
Attach the House Wall to the Fire Station, as shown below . Once the House Wall is secure. Attach the Elevator Platform to the Gray Base and Fire Station, as shown below . Once the Top Ramp Track Support is attached, it is attached, it cannot be removed. 1100 Lift it up and down smoothly to indicate it cannot be removed. 4. You will hear a "click" sound to indicate it is secure. Insert the Top Ramp Track Support into the Gray Base.You will hear a "click" sound to make sure it is secure. 5. 3.
User Manual
Page 11
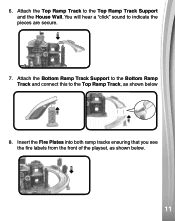
6. Attach the Top Ramp Track to indicate the pieces are secure. 7. Insert the Fire Plates into both ramp tracks ensuring that you see the fire labels from the front of the playset, as shown below . 1111 Attach the Bottom Ramp Track Support to the Bottom Ramp Track and connect this to the Top Ramp Track, as shown below 8. You will hear a "click" sound to the Top Ramp Track Support and the House Wall.
6. Attach the Top Ramp Track to indicate the pieces are secure. 7. Insert the Fire Plates into both ramp tracks ensuring that you see the fire labels from the front of the playset, as shown below . 1111 Attach the Bottom Ramp Track Support to the Bottom Ramp Track and connect this to the Top Ramp Track, as shown below 8. You will hear a "click" sound to the Top Ramp Track Support and the House Wall.
User Manual
Page 12
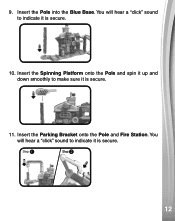
9. Insert the Spinning Platform onto the Pole and spin it up and down smoothly to make sure it is secure. 10. You will hear a "click" sound to indicate it is secure. 1122 Insert the Pole into the Blue Base. You will hear a "click" sound to indicate it is secure. 11. Insert the Parking Bracket onto the Pole and Fire Station.
9. Insert the Spinning Platform onto the Pole and spin it up and down smoothly to make sure it is secure. 10. You will hear a "click" sound to indicate it is secure. 1122 Insert the Pole into the Blue Base. You will hear a "click" sound to indicate it is secure. 11. Insert the Parking Bracket onto the Pole and Fire Station.
User Manual
Page 13
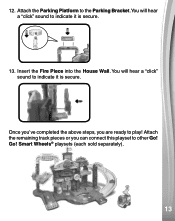
Insert the Fire Piece into the House Wall. You will hear a "click" sound to play! Attach the remaining track pieces or you are ready to indicate it is secure. 13. Go! Attach the Parking Platform to the Parking Bracket.You will hear a "click" sound to other Go! Smart Wheels® playsets (each sold separately). 1133 Once you've completed the above steps, you can connect this playset to indicate it is secure. 12.
Insert the Fire Piece into the House Wall. You will hear a "click" sound to play! Attach the remaining track pieces or you are ready to indicate it is secure. 13. Go! Attach the Parking Platform to the Parking Bracket.You will hear a "click" sound to other Go! Smart Wheels® playsets (each sold separately). 1133 Once you've completed the above steps, you can connect this playset to indicate it is secure. 12.
User Manual
Page 14
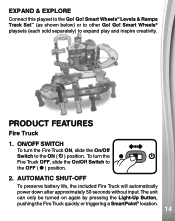
... included Fire Truck will automatically power down after approximately 50 seconds without input. The unit can only be turned on again by pressing the Light-Up Button, pushing the Fire Truck quickly or triggering a SmartPoint® location. 1144 EXPAND & EXPLORE Connect this playset to expand play and inspire creativity. Go! Go! To turn the Fire Truck ON, slide the On/Off Switch to other Go! Smart Wheels®...
... included Fire Truck will automatically power down after approximately 50 seconds without input. The unit can only be turned on again by pressing the Light-Up Button, pushing the Fire Truck quickly or triggering a SmartPoint® location. 1144 EXPAND & EXPLORE Connect this playset to expand play and inspire creativity. Go! Go! To turn the Fire Truck ON, slide the On/Off Switch to other Go! Smart Wheels®...
User Manual
Page 15
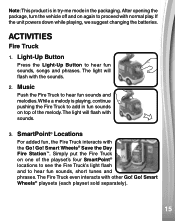
... Fire Truck even interacts with normal play. Light-Up Button Press the Light-Up Button to hear fun sounds and melodies. The light will flash with the Go! If the unit powers down while playing, we suggest changing the batteries. Go! ACTIVITIES Fire Truck 1. Simply put the Fire Truck on top of the playset's four SmartPoint® locations to see the Fire Truck's light flash and to hear fun sounds, short tunes and phrases. Smart Wheels® Save the Day Fire Station™. Music Push...
... Fire Truck even interacts with normal play. Light-Up Button Press the Light-Up Button to hear fun sounds and melodies. The light will flash with the Go! If the unit powers down while playing, we suggest changing the batteries. Go! ACTIVITIES Fire Truck 1. Simply put the Fire Truck on top of the playset's four SmartPoint® locations to see the Fire Truck's light flash and to hear fun sounds, short tunes and phrases. Smart Wheels® Save the Day Fire Station™. Music Push...
User Manual
Page 16
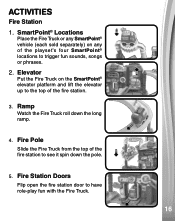
... the playset's four SmartPoint® locations to trigger fun sounds, songs or phrases. 2. Fire Station Doors Flip open the fire station door to see it spin down the long ramp. 4. Fire Pole Slide the Fire Truck from the top of the fire station. 3. Ramp Watch the Fire Truck roll down the pole. 5. Elevator Put the Fire Truck on any SmartPoint® vehicle (each sold...
... the playset's four SmartPoint® locations to trigger fun sounds, songs or phrases. 2. Fire Station Doors Flip open the fire station door to see it spin down the long ramp. 4. Fire Pole Slide the Fire Truck from the top of the fire station. 3. Ramp Watch the Fire Truck roll down the pole. 5. Elevator Put the Fire Truck on any SmartPoint® vehicle (each sold...

User Manual
Page 17
I 'm a fire truck, A big red fire truck. My siren sings, Get to the fire to moisture or water. 1177 Remove the batteries when the unit will not be in need. Chicken Reel 4. The Daring Young Man on hard surfaces and do not expose the unit to help those in use for a call ! Keep the unit out of direct sunlight and away from harm, My job...
I 'm a fire truck, A big red fire truck. My siren sings, Get to the fire to moisture or water. 1177 Remove the batteries when the unit will not be in need. Chicken Reel 4. The Daring Young Man on hard surfaces and do not expose the unit to help those in use for a call ! Keep the unit out of direct sunlight and away from harm, My job...
User Manual
Page 18
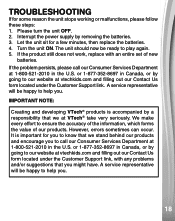
...-2010 in the U.S. Please turn the unit OFF. 2. IMPORTANT NOTE: Creating and developing VTech® products is important for you to help you . However, errors sometimes can occur. If the problem persists, please call our Consumer Services Department at VTech® take very seriously. TROUBLESHOOTING If for a few minutes, then replace the batteries. 4. Interrupt the power supply by going to our website at...
...-2010 in the U.S. Please turn the unit OFF. 2. IMPORTANT NOTE: Creating and developing VTech® products is important for you to help you . However, errors sometimes can occur. If the problem persists, please call our Consumer Services Department at VTech® take very seriously. TROUBLESHOOTING If for a few minutes, then replace the batteries. 4. Interrupt the power supply by going to our website at...
User Manual
Page 19
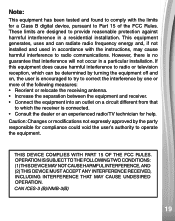
..., if not installed and used in a residential installation. Caution: Changes or modifications not expressly approved by one or more of the FCC Rules. However, there is connected. • Consult the dealer or an experienced radio/TV technician for compliance could void the user's authority to provide reasonable protection against harmful interference in accordance with the instructions, may...
..., if not installed and used in a residential installation. Caution: Changes or modifications not expressly approved by one or more of the FCC Rules. However, there is connected. • Consult the dealer or an experienced radio/TV technician for compliance could void the user's authority to provide reasonable protection against harmful interference in accordance with the instructions, may...

User Manual
Page 21
Visit our website for more information about our products, downloads, resources and more. vtechkids.com
Visit our website for more information about our products, downloads, resources and more. vtechkids.com

