
User Manual
Page 1
User's Manual Chicken Coop Playset © 2014 VTech Printed in China 91-002993-000 US CA
User's Manual Chicken Coop Playset © 2014 VTech Printed in China 91-002993-000 US CA

User Manual
Page 3
... connect this playset to other Go! Go! Launch the chicken and rocking chick down the slide. Smart Animals™ Chicken Coop Playset! Go! Go! Learn about animals, colors and more with the SmartPoint® chicken. TURNING SUN/MOON CHICKEN COOP LAUNCHER CHICKEN ROCKING CHICK Introduction FOOD PLATFORM ROCKING NEST SLIDE TWO SMARTPOINT® 3 LOCATIONS Explore the Go! Smart Wheels® playsets (each sold separately). Smart Animals™ Chicken Coop Playset by VTech®. For added fun, you for purchasing the VTech® Go! Smart Animals...
... connect this playset to other Go! Go! Launch the chicken and rocking chick down the slide. Smart Animals™ Chicken Coop Playset! Go! Go! Learn about animals, colors and more with the SmartPoint® chicken. TURNING SUN/MOON CHICKEN COOP LAUNCHER CHICKEN ROCKING CHICK Introduction FOOD PLATFORM ROCKING NEST SLIDE TWO SMARTPOINT® 3 LOCATIONS Explore the Go! Smart Wheels® playsets (each sold separately). Smart Animals™ Chicken Coop Playset by VTech®. For added fun, you for purchasing the VTech® Go! Smart Animals...
User Manual
Page 4
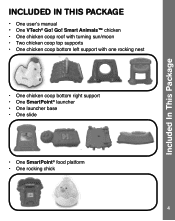
Included In This Package INCLUDED IN THIS PACKAGE • One user's manual • One VTech® Go! Smart Animals™ chicken • One chicken coop roof with turning sun/moon • Two chicken coop top supports • One chicken coop bottom left support with one rocking nest • One chicken coop bottom right support • One SmartPoint® launcher • One launcher base • One slide • One SmartPoint® food platform • One rocking chick 4 Go!
Included In This Package INCLUDED IN THIS PACKAGE • One user's manual • One VTech® Go! Smart Animals™ chicken • One chicken coop roof with turning sun/moon • Two chicken coop top supports • One chicken coop bottom left support with one rocking nest • One chicken coop bottom right support • One SmartPoint® launcher • One launcher base • One slide • One SmartPoint® food platform • One rocking chick 4 Go!
User Manual
Page 5
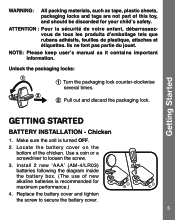
...times. Locate the battery cover on the bottom of this toy, and should be discarded for maximum performance.) 4. Replace the battery cover and tighten the screw to loosen the screw. 3. Ils ne font pas partie du jouet. Install 2 new 'AAA' (AM-4/LR03) batteries following the diagram inside the battery box. (The use of new alkaline batteries is turned OFF. 2. Pull...it contains important information. NOTE: Please keep user's manual as tape, plastic sheets, packaging locks and tags are not part of the chicken. Make sure the unit is recommended for your child's safety.
...times. Locate the battery cover on the bottom of this toy, and should be discarded for maximum performance.) 4. Replace the battery cover and tighten the screw to loosen the screw. 3. Ils ne font pas partie du jouet. Install 2 new 'AAA' (AM-4/LR03) batteries following the diagram inside the battery box. (The use of new alkaline batteries is turned OFF. 2. Pull...it contains important information. NOTE: Please keep user's manual as tape, plastic sheets, packaging locks and tags are not part of the chicken. Make sure the unit is recommended for your child's safety.
User Manual
Page 6
... new and used batteries. • Do not use damaged batteries. • Insert batteries with the correct polarity. • Do not short-circuit the battery terminals. • Remove exhausted batteries from the toy. • Remove batteries during long periods of non-use. • Do not dispose of batteries in fire. • Do not charge non-rechargeable batteries. • Remove rechargeable batteries from the toy before charging (if removable). • Rechargeable batteries...
... new and used batteries. • Do not use damaged batteries. • Insert batteries with the correct polarity. • Do not short-circuit the battery terminals. • Remove exhausted batteries from the toy. • Remove batteries during long periods of non-use. • Do not dispose of batteries in fire. • Do not charge non-rechargeable batteries. • Remove rechargeable batteries from the toy before charging (if removable). • Rechargeable batteries...

User Manual
Page 7
... P/N:92-007329-000-100 Size:178X71mm 4 2 ASSEMBLY INSTRUCTIONS With the VTech® Go! Go! You will hear a "click" sound to indicate the launcher is connected to the chicken coop bottom supports, it cannot be detached. 7 Smart Animals™ Chicken Coop Playset, safety comes first. Once the launcher base is secure. 2. Attach the SmartPoint® launcher to the chicken coop bottom left and right supports. To ensure your child's safety, adult...
... P/N:92-007329-000-100 Size:178X71mm 4 2 ASSEMBLY INSTRUCTIONS With the VTech® Go! Go! You will hear a "click" sound to indicate the launcher is connected to the chicken coop bottom supports, it cannot be detached. 7 Smart Animals™ Chicken Coop Playset, safety comes first. Once the launcher base is secure. 2. Attach the SmartPoint® launcher to the chicken coop bottom left and right supports. To ensure your child's safety, adult...

User Manual
Page 8
You will hear a "click" sound to the launcher. Assembly Instructions 3. Insert the two chicken coop top supports into the roof. 4. Attach the slide to indicate the slide is secure. 6. Place the chicken coop on top of the launcher. 5. Attach the SmartPoint® food platform to the left or right supports as shown. 8
You will hear a "click" sound to the launcher. Assembly Instructions 3. Insert the two chicken coop top supports into the roof. 4. Attach the slide to indicate the slide is secure. 6. Place the chicken coop on top of the launcher. 5. Attach the SmartPoint® food platform to the left or right supports as shown. 8
User Manual
Page 9
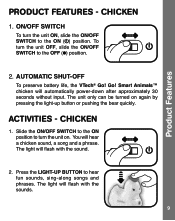
... after approximately 30 seconds without input. The light will flash with the sound. 2. The light will flash with the sounds. 9 ON/OFF SWITCH To turn the unit ON, slide the ON/OFF SWITCH to hear fun sounds, sing-along songs and phrases. Smart Animals™ chicken will hear a chicken sound, a song and a phrase. \ Product Features PRODUCT FEATURES - CHICKEN 1. AUTOMATIC SHUT-OFF To preserve battery life, the VTech® Go! Go! ACTIVITIES - Press the LIGHT-UP BUTTON to the ON ( ) position.
... after approximately 30 seconds without input. The light will flash with the sound. 2. The light will flash with the sounds. 9 ON/OFF SWITCH To turn the unit ON, slide the ON/OFF SWITCH to hear fun sounds, sing-along songs and phrases. Smart Animals™ chicken will hear a chicken sound, a song and a phrase. \ Product Features PRODUCT FEATURES - CHICKEN 1. AUTOMATIC SHUT-OFF To preserve battery life, the VTech® Go! Go! ACTIVITIES - Press the LIGHT-UP BUTTON to the ON ( ) position.
User Manual
Page 10
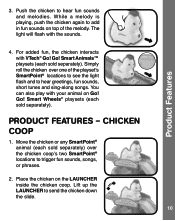
... is playing, push the chicken again to add in fun sounds on the LAUNCHER inside the chicken coop. Go! Go! \ Product Features 3. Simply roll the chicken over the chicken coop's two SmartPoint® locations to hear greetings, fun sounds, short tunes and sing-along songs. Move the chicken or any SmartPoint® animal (each sold separately). The light will flash with the sounds. 4. PRODUCT FEATURES - Place the chicken on top of the playset...
... is playing, push the chicken again to add in fun sounds on the LAUNCHER inside the chicken coop. Go! Go! \ Product Features 3. Simply roll the chicken over the chicken coop's two SmartPoint® locations to hear greetings, fun sounds, short tunes and sing-along songs. Move the chicken or any SmartPoint® animal (each sold separately). The light will flash with the sounds. 4. PRODUCT FEATURES - Place the chicken on top of the playset...

User Manual
Page 11
Do not drop the unit on the SmartPoint® food platform to moisture or water. 11 Keep the unit clean by wiping it with a slightly damp cloth. 2. Keep the unit out of time. 4. Remove the batteries when the unit will not be in use for day and night play. CARE & MAINTENANCE 1. Place the chicken on hard surfaces and do not expose the unit to trigger a fun response. 4 Place the rocking chick inside the rocking nest. 5 Turn the sun/moon for an extended period of direct sunlight and away from any direct heat. 3. Care & Maintenance 3.
Do not drop the unit on the SmartPoint® food platform to moisture or water. 11 Keep the unit clean by wiping it with a slightly damp cloth. 2. Keep the unit out of time. 4. Remove the batteries when the unit will not be in use for day and night play. CARE & MAINTENANCE 1. Place the chicken on hard surfaces and do not expose the unit to trigger a fun response. 4 Place the rocking chick inside the rocking nest. 5 Turn the sun/moon for an extended period of direct sunlight and away from any direct heat. 3. Care & Maintenance 3.
User Manual
Page 12
... by removing the batteries. 3. Troubleshooting TROUBLESHOOTING If for a Class B digital device, pursuant to Part 15 of the FCC Rules. IMPORTANT NOTE: Creating and developing Infant Learning products is important for a few minutes, then replace the batteries. 4. Turn the unit ON. or 1-877-352-8697 in the U.S. However, errors sometimes can occur. NOTE: This equipment has been tested and found to comply with a new set...
... by removing the batteries. 3. Troubleshooting TROUBLESHOOTING If for a Class B digital device, pursuant to Part 15 of the FCC Rules. IMPORTANT NOTE: Creating and developing Infant Learning products is important for a few minutes, then replace the batteries. 4. Turn the unit ON. or 1-877-352-8697 in the U.S. However, errors sometimes can occur. NOTE: This equipment has been tested and found to comply with a new set...

User Manual
Page 13
... and, if not installed and used in a particular installation. CAN ICES-3 (B)/NMB-3(B) Caution: Changes or modifications not expressly approved by one or more of the following measures: • Reorient or relocate the receiving antenna. • Increase the separation between the equipment and receiver. • Connect the equipment into an outlet on , the user is connected. • Consult...
... and, if not installed and used in a particular installation. CAN ICES-3 (B)/NMB-3(B) Caution: Changes or modifications not expressly approved by one or more of the following measures: • Reorient or relocate the receiving antenna. • Increase the separation between the equipment and receiver. • Connect the equipment into an outlet on , the user is connected. • Consult...

