Quick Start Guide
Page 8
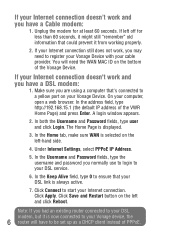
...work and you may need the WAN MAC ID on the bottom of the VWR Home Page) and press Enter. If your Internet connection still does not ...a Cable modem: 1. Click Connect to ensure that your Vonage Device. A login window appears. 2. The Home Page is now connected to a yellow port on your DSL link is selected on the left -hand side. 4. Unplug...and Password fields, type the username and password you had an existing router connected to your DSL modem, but it might still "remember" old information that 's connected to your Vonage device, the 6 router will need to register your Vonage ...
...work and you may need the WAN MAC ID on the bottom of the VWR Home Page) and press Enter. If your Internet connection still does not ...a Cable modem: 1. Click Connect to ensure that your Vonage Device. A login window appears. 2. The Home Page is now connected to a yellow port on your DSL link is selected on the left -hand side. 4. Unplug...and Password fields, type the username and password you had an existing router connected to your DSL modem, but it might still "remember" old information that 's connected to your Vonage device, the 6 router will need to register your Vonage ...

Quick Start Guide
Page 14
Get real-time information on your username and password into the customer login area. Your Vonage® Web Account To go to your web account: Visit the Vonage website and enter your monthly billing statement. 12 You can make changes to a wide range of services in the Features section. • Voicemail - Visit the Account section to make changes to your personal and credit card information. • Features - Check and manage your fingertips. • Account - Your Vonage Dashboard gives you everything you need at your Voicemail account. • Billing -
Get real-time information on your username and password into the customer login area. Your Vonage® Web Account To go to your web account: Visit the Vonage website and enter your monthly billing statement. 12 You can make changes to a wide range of services in the Features section. • Voicemail - Visit the Account section to make changes to your personal and credit card information. • Features - Check and manage your fingertips. • Account - Your Vonage Dashboard gives you everything you need at your Voicemail account. • Billing -
User Manual
Page 3
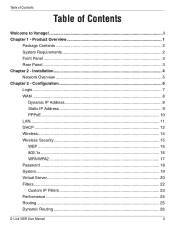
Table of Contents Table of Contents Welcome to Vonage! ...I Chapter 1 - Configuration 6 Login...7 WAN ...8 Dynamic IP Address 8 Static IP Address 9 PPPoE ...10 LAN...11 DHCP ...12 Wireless...14 Wireless Security 15 WEP ...15 802.1x...16 WPA/WPA2 17 Password ...18 System...19 Virtual Server...20 Filters...22 Custom IP Filters 23 Performance ...24 Routing ...25 Dynamic Routing 26 D-Link VWR User Manual II Installation 4 Network Overview 5 Chapter 3 - Product Overview 1 Package Contents 2 System Requirements 2 Front Panel ...3 Rear Panel...3 Chapter 2 -
Table of Contents Table of Contents Welcome to Vonage! ...I Chapter 1 - Configuration 6 Login...7 WAN ...8 Dynamic IP Address 8 Static IP Address 9 PPPoE ...10 LAN...11 DHCP ...12 Wireless...14 Wireless Security 15 WEP ...15 802.1x...16 WPA/WPA2 17 Password ...18 System...19 Virtual Server...20 Filters...22 Custom IP Filters 23 Performance ...24 Routing ...25 Dynamic Routing 26 D-Link VWR User Manual II Installation 4 Network Overview 5 Chapter 3 - Product Overview 1 Package Contents 2 System Requirements 2 Front Panel ...3 Rear Panel...3 Chapter 2 -
User Manual
Page 11
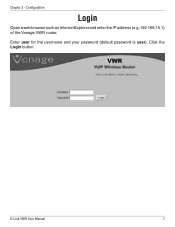
D-Link VWR User Manual 7 Chapter 3 - Enter user for the username and your password (default password is user). Configuration Login Open a web browser such as Internet Explorer and enter the IP address (e.g.192.168.15.1) of the Vonage VWR router. Click the Login button.
D-Link VWR User Manual 7 Chapter 3 - Enter user for the username and your password (default password is user). Configuration Login Open a web browser such as Internet Explorer and enter the IP address (e.g.192.168.15.1) of the Vonage VWR router. Click the Login button.
User Manual
Page 14
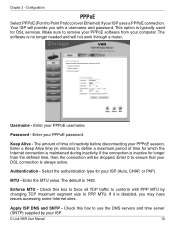
... connection is always active. If it is 1492. Check this box to force all TCP traffic to conform with a username and password. Enter 0 to use the DNS servers and time server (SNTP) supplied by changing TCP maximum segment size to define a ...PPPoE username. Keep Alive - Authentication - Your ISP will not work through a router. Password - Make sure to Point Protocol over Ethernet) if your PPPoE password. Username - Enter your computer. Enter a Keep Alive time (in minutes) to PPP MTU. Enforce MTU - Apply ISP DNS and SNTP - D-Link VWR User Manual 10
... connection is always active. If it is 1492. Check this box to force all TCP traffic to conform with a username and password. Enter 0 to use the DNS servers and time server (SNTP) supplied by changing TCP maximum segment size to define a ...PPPoE username. Keep Alive - Authentication - Your ISP will not work through a router. Password - Make sure to Point Protocol over Ethernet) if your PPPoE password. Username - Enter your computer. Enter a Keep Alive time (in minutes) to PPP MTU. Enforce MTU - Apply ISP DNS and SNTP - D-Link VWR User Manual 10
User Manual
Page 22
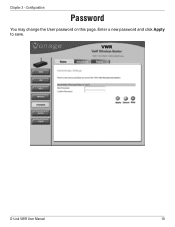
D-Link VWR User Manual 18 Chapter 3 - Enter a new password and click Apply to save. Configuration Password You may change the User password on this page.
D-Link VWR User Manual 18 Chapter 3 - Enter a new password and click Apply to save. Configuration Password You may change the User password on this page.
User Manual
Page 30
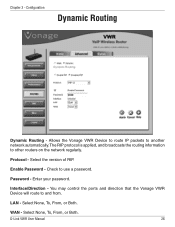
.... D-Link VWR User Manual 26 Enter your password. WAN - You may control the ports and direction that the Vonage VWR Device will route to use a password. Enable Password - Interface/Direction - Check to and from. Allows the Vonage VWR Device to route IP packets to another network automatically.The RIP protocol is applied, and broadcasts the routing information to other routers...
.... D-Link VWR User Manual 26 Enter your password. WAN - You may control the ports and direction that the Vonage VWR Device will route to use a password. Enable Password - Interface/Direction - Check to and from. Allows the Vonage VWR Device to route IP packets to another network automatically.The RIP protocol is applied, and broadcasts the routing information to other routers...
User Manual
Page 34
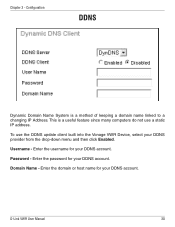
D-Link VWR User Manual 30 To use a static IP address. Username - Enter the password for your DDNS account. Chapter 3 - Domain Name - Enter the domain or host name for your DDNS provider from the drop-down menu and then click Enabled. Password - Enter the username for your DDNS account. Configuration DDNS Dynamic Domain Name System is a useful feature since many computers do not use the DDNS update client built into the Vonage VWR Device, select your DDNS account. This is a method of keeping a domain name linked to a changing IP Address.
D-Link VWR User Manual 30 To use a static IP address. Username - Enter the password for your DDNS account. Chapter 3 - Domain Name - Enter the domain or host name for your DDNS provider from the drop-down menu and then click Enabled. Password - Enter the username for your DDNS account. Configuration DDNS Dynamic Domain Name System is a useful feature since many computers do not use the DDNS update client built into the Vonage VWR Device, select your DDNS account. This is a method of keeping a domain name linked to a changing IP Address.

