User Manual
Page 2
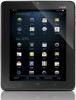
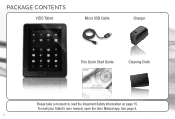
See page 8. 1 To read the Important Safety Information on page 15. PACKAGE CONTENTS VIZIO Tablet Micro USB Cable Charger This Quick Start Guide Cleaning Cloth Please take a moment to read your Tablet's user manual, open the User Manual app.
See page 8. 1 To read the Important Safety Information on page 15. PACKAGE CONTENTS VIZIO Tablet Micro USB Cable Charger This Quick Start Guide Cleaning Cloth Please take a moment to read your Tablet's user manual, open the User Manual app.
User Manual
Page 3
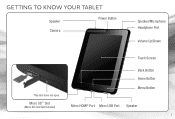
GETTING TO KNOW YOUR TABLET Speaker Power Button Camera Speaker/Microphone Headphone Port Volume Up/Down Touch Screen Back Button Home Button Menu Button This side does not open. Micro SD™ Slot (Micro SD Card Not Included) Micro HDMI® Port Micro USB Port Speaker 2
GETTING TO KNOW YOUR TABLET Speaker Power Button Camera Speaker/Microphone Headphone Port Volume Up/Down Touch Screen Back Button Home Button Menu Button This side does not open. Micro SD™ Slot (Micro SD Card Not Included) Micro HDMI® Port Micro USB Port Speaker 2
User Manual
Page 4
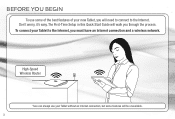
The First-Time Setup in this Quick Start Guide will be unavailable. 3 High-Speed Wireless Router Yvou can always use some features will walk you through the process. To connect your new Tablet, you will need to connect to the Internet, you must have an Internet connection and a wireless network. Don't worry, it's easy. BEFORE YOU BEGIN To use your Tablet without an Internet connection, but some of the best features of your Tablet to the Internet.
The First-Time Setup in this Quick Start Guide will be unavailable. 3 High-Speed Wireless Router Yvou can always use some features will walk you through the process. To connect your new Tablet, you will need to connect to the Internet, you must have an Internet connection and a wireless network. Don't worry, it's easy. BEFORE YOU BEGIN To use your Tablet without an Internet connection, but some of the best features of your Tablet to the Internet.
User Manual
Page 5
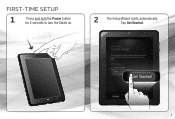
Tap Get Started. 4 FIRST-TIME SETUP 1 Press and hold the Power button for 2 seconds to turn the Tablet on. 2 The Setup Wizard starts automatically.
Tap Get Started. 4 FIRST-TIME SETUP 1 Press and hold the Power button for 2 seconds to turn the Tablet on. 2 The Setup Wizard starts automatically.

User Manual
Page 6
Tap Next. 5 Slide your preferred language, then touch Next. 4 Read about the basics. 3 Tap your fingertip up and down the screen to scroll.
Tap Next. 5 Slide your preferred language, then touch Next. 4 Read about the basics. 3 Tap your fingertip up and down the screen to scroll.
User Manual
Page 7
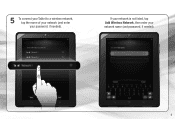
If your network is not listed, tap Add Wireless Network, then enter your password, if needed ). 6 5 To connect your Tablet to a wireless network, tap the name of your network (and enter your network name (and password, if needed ).
If your network is not listed, tap Add Wireless Network, then enter your password, if needed ). 6 5 To connect your Tablet to a wireless network, tap the name of your network (and enter your network name (and password, if needed ).

User Manual
Page 8
If you want to go to the next step, tap Skip. 7 Enter your Tablet, then tap Next. 7 6 Tap Add Account to register your First Name, Last Name, and Email Address to create or log into a Google or Gmail account.
If you want to go to the next step, tap Skip. 7 Enter your Tablet, then tap Next. 7 6 Tap Add Account to register your First Name, Last Name, and Email Address to create or log into a Google or Gmail account.
User Manual
Page 9
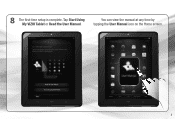
8 The first-time setup is complete. Tap Start Using My VIZIO Tablet or Read the User Manual. You can view the manual at any time by tapping the User Manual icon on the Home screen. 8
8 The first-time setup is complete. Tap Start Using My VIZIO Tablet or Read the User Manual. You can view the manual at any time by tapping the User Manual icon on the Home screen. 8
User Manual
Page 10
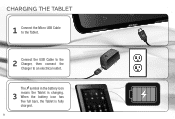
The symbol in the battery icon means the Tablet is charging. 3 When the battery icon has five full bars, the Tablet is fully charged. 9 CHARGING THE TABLET 1 Connect the Micro USB Cable to the Tablet. 2 Connect the USB Cable to the Charger, then connect the Charger to an electrical outlet.
The symbol in the battery icon means the Tablet is charging. 3 When the battery icon has five full bars, the Tablet is fully charged. 9 CHARGING THE TABLET 1 Connect the Micro USB Cable to the Tablet. 2 Connect the USB Cable to the Charger, then connect the Charger to an electrical outlet.

User Manual
Page 11
This is not being used. To wake the Tablet, press the Power button. Unlock the Tablet by sliding your fingertip from one side of the screen to put the Tablet in sleep mode. The Lock screen will turn off automatically after 5 minutes if it is called sleep mode. You can also press the Power button to the other. 10 SLEEP MODE AND UNLOCKING THE TABLET The Tablet screen will be displayed.
This is not being used. To wake the Tablet, press the Power button. Unlock the Tablet by sliding your fingertip from one side of the screen to put the Tablet in sleep mode. The Lock screen will turn off automatically after 5 minutes if it is called sleep mode. You can also press the Power button to the other. 10 SLEEP MODE AND UNLOCKING THE TABLET The Tablet screen will be displayed.
User Manual
Page 12
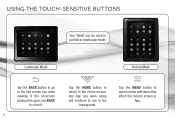
USING THE TOUCH-SENSITIVE BUTTONS Your Tablet can be used in the background. Tap the MENU button to the Home screen. If the on-screen keyboard is open, use BACK to close it. 11 Tap the HOME button to return to open a menu with items that affect the current screen or App. Landscape Mode Portrait Mode Tap the BACK button to go to run in portrait or landscape mode. Any App you were using will continue to the last screen you were viewing.
USING THE TOUCH-SENSITIVE BUTTONS Your Tablet can be used in the background. Tap the MENU button to the Home screen. If the on-screen keyboard is open, use BACK to close it. 11 Tap the HOME button to return to open a menu with items that affect the current screen or App. Landscape Mode Portrait Mode Tap the BACK button to go to run in portrait or landscape mode. Any App you were using will continue to the last screen you were viewing.
User Manual
Page 13
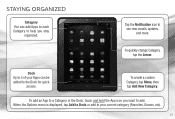
To add an App to a Category or the Dock, touch and hold the App icon you stay organized. When the Options menu is displayed, tap Add to Dock or add to your Apps can add Apps to each Category to help you want to add. STAYING ORGANIZED Category You can be added to the Dock for quick access. Dock Up to see new emails, updates, and more. To create a custom Category, tap Menu, then tap Add New Category. Tap the Notification icon to 5 of your current category (Favorites, Games, etc). 12 To quickly change Category, tap the Arrow.
To add an App to a Category or the Dock, touch and hold the App icon you stay organized. When the Options menu is displayed, tap Add to Dock or add to your Apps can add Apps to each Category to help you want to add. STAYING ORGANIZED Category You can be added to the Dock for quick access. Dock Up to see new emails, updates, and more. To create a custom Category, tap Menu, then tap Add New Category. Tap the Notification icon to 5 of your current category (Favorites, Games, etc). 12 To quickly change Category, tap the Arrow.
User Manual
Page 14
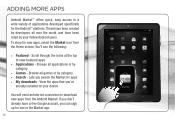
... Market icon from the Android Market. ADDING MORE APPS Android Market™ offers quick, easy access to view featured apps • Applications - If you can sign up for apps • My downloads - View the apps that you search the Market for one in the Market app. 13 Browse all games or by your device You will need an Internet connection to download new apps from the Home screen.
... Market icon from the Android Market. ADDING MORE APPS Android Market™ offers quick, easy access to view featured apps • Applications - If you can sign up for apps • My downloads - View the apps that you search the Market for one in the Market app. 13 Browse all games or by your device You will need an Internet connection to download new apps from the Home screen.
User Manual
Page 15
... factory default settings? Open the Browser app, then press the Menu button. Tap Settings > Privacy > Factory data reset. Select an image from your Tablet's internal storage, including your collection. The image you are currently viewing. Tap the Bookmark icon in the upper right corner. Your current bookmarks will erase all data from your Google account, system settings, app settings, and downloaded apps. 14 Your Web page is erased. Use the on the Lock screen, tap Settings > Personalize > Lock Screen...
... factory default settings? Open the Browser app, then press the Menu button. Tap Settings > Privacy > Factory data reset. Select an image from your Tablet's internal storage, including your collection. The image you are currently viewing. Tap the Bookmark icon in the upper right corner. Your current bookmarks will erase all data from your Google account, system settings, app settings, and downloaded apps. 14 Your Web page is erased. Use the on the Lock screen, tap Settings > Personalize > Lock Screen...
User Manual
Page 16
... explosive atmosphere turn down the volume. Take breaks often and if you continue to block out surrounding noise. • If you are to damage your Tablet. Stop using your Tablet, NEVER type or read the User Manual available directly through an application in some places. Do not remove, install, or charge batteries to flashing lights such as pressing keys or typing, may contain glass parts. If you...
... explosive atmosphere turn down the volume. Take breaks often and if you continue to block out surrounding noise. • If you are to damage your Tablet. Stop using your Tablet, NEVER type or read the User Manual available directly through an application in some places. Do not remove, install, or charge batteries to flashing lights such as pressing keys or typing, may contain glass parts. If you...
User Manual
Page 17
... devices should observe the following precautions: • When your Tablet is ON, always keep it with the Specific Absorption Rates (SAR) limits set by the FCC visit www.vizio.com. CARE & MAINTENANCE Do not use volatile solvents to clean this product properly, according to do so. To clean product, gently wipe it more information about using it . BATTERY USE & CHARGING...
... devices should observe the following precautions: • When your Tablet is ON, always keep it with the Specific Absorption Rates (SAR) limits set by the FCC visit www.vizio.com. CARE & MAINTENANCE Do not use volatile solvents to clean this product properly, according to do so. To clean product, gently wipe it more information about using it . BATTERY USE & CHARGING...
User Manual
Page 18
... technician for help to www.VIZIO.com/support. 2. If this device must not be co-located or operating in a residential installation. Live Online Chat Support The easiest way to which can be determined by the party responsible for intended operation as possible from that may cause undesired operation. One of operation: Monday - Sunday: 8 am to 4pm (PST) Phone, Fax, Email, and Web Support Phone: Fax: Email: Web...
... technician for help to www.VIZIO.com/support. 2. If this device must not be co-located or operating in a residential installation. Live Online Chat Support The easiest way to which can be determined by the party responsible for intended operation as possible from that may cause undesired operation. One of operation: Monday - Sunday: 8 am to 4pm (PST) Phone, Fax, Email, and Web Support Phone: Fax: Email: Web...
User Manual
Page 19
... PARTS AND LABOR Covers units purchased as installation and set-up issues or any type of Service Defective Products must utilize either repair or replace the Product at its sole option and discretion. If a Product covered by this warranty is determined to be defective within the warranty period. Limitations and Exclusions VIZIO's one year limited warranty does not cover Products sold "AS IS", "FACTORY...
... PARTS AND LABOR Covers units purchased as installation and set-up issues or any type of Service Defective Products must utilize either repair or replace the Product at its sole option and discretion. If a Product covered by this warranty is determined to be defective within the warranty period. Limitations and Exclusions VIZIO's one year limited warranty does not cover Products sold "AS IS", "FACTORY...


