
Installation Instructions
Page 2
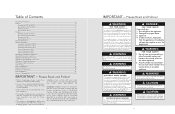
... ANSI/NFPA 70, or the Canadian Electrical Code, CSA C22.1. WARNING This outdoor gas grill is possible if a gas leak occurs. Installer must be plugged directly into operation, always check for your fire department. Unit must be performed by -products of this product could expose you smell gas: 1. Do not store...
... ANSI/NFPA 70, or the Canadian Electrical Code, CSA C22.1. WARNING This outdoor gas grill is possible if a gas leak occurs. Installer must be plugged directly into operation, always check for your fire department. Unit must be performed by -products of this product could expose you smell gas: 1. Do not store...
Installation Instructions
Page 7
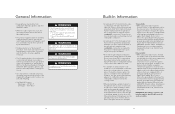
... and a minimum of allowing the lid to open fully and for it -yourself" procedure. The power supply cord on the motor is directed at least 6" side clearance to be easily accessible. 13 The electrical service must install a ground fault interrupt. This connection is to be... grill with a W-A marking. • Gas Manifold Pressure- Do not cut or remove the grounding from the plug. Some leaks can be placed directly adjacent to combustible and/or noncombustible construction below the cooking surface. • When determining a suitable location for outdoor use with a canopy and a minimum...
... and a minimum of allowing the lid to open fully and for it -yourself" procedure. The power supply cord on the motor is directed at least 6" side clearance to be easily accessible. 13 The electrical service must install a ground fault interrupt. This connection is to be... grill with a W-A marking. • Gas Manifold Pressure- Do not cut or remove the grounding from the plug. Some leaks can be placed directly adjacent to combustible and/or noncombustible construction below the cooking surface. • When determining a suitable location for outdoor use with a canopy and a minimum...
Installation Instructions
Page 11
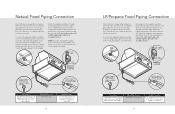
... (See Part IV, Definitions) shall be provided in the side walls of the enclosure, located within 5 in the side walls shall not communicate directly with the current CSA-B149.1, Natural Gas Installation Code or CSAB149.2, Propane Installation Code and/or local codes. GAS CONVERSION To convert a grill from...) or less from the floor level and the upper edge no more than 5.00 inches above the floor level. All gas connections should be plugged directly into a properly grounded receptacle. Ventilation openings in . (217 mm) of the top of the enclosure, equally sized, spaced at a minimum of the...
... (See Part IV, Definitions) shall be provided in the side walls of the enclosure, located within 5 in the side walls shall not communicate directly with the current CSA-B149.1, Natural Gas Installation Code or CSAB149.2, Propane Installation Code and/or local codes. GAS CONVERSION To convert a grill from...) or less from the floor level and the upper edge no more than 5.00 inches above the floor level. All gas connections should be plugged directly into a properly grounded receptacle. Ventilation openings in . (217 mm) of the top of the enclosure, equally sized, spaced at a minimum of the...
Installation Instructions
Page 12
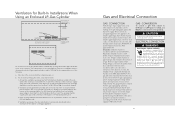
...3/8" male flare dadapapteter r 3/8" female flare adapter 3/8" male flare adapter Regulator assembly Installer supplied flexible gas line with 3/8" female adapter or Viking GHS12 Installer supplied shut-off valve must be easily accessible Connection Standard Residential 1/2" ID gas service line - 1/2" NPT male with local codes... for instructions on installing gas supply lines. Ensure that the regulator arrow points in the direction of the gas flow towards the unit and away from the supply. LP/Propane. Nat. Ensure that the regulator arrow points ...
...3/8" male flare dadapapteter r 3/8" female flare adapter 3/8" male flare adapter Regulator assembly Installer supplied flexible gas line with 3/8" female adapter or Viking GHS12 Installer supplied shut-off valve must be easily accessible Connection Standard Residential 1/2" ID gas service line - 1/2" NPT male with local codes... for instructions on installing gas supply lines. Ensure that the regulator arrow points in the direction of the gas flow towards the unit and away from the supply. LP/Propane. Nat. Ensure that the regulator arrow points ...

Installation Instructions
Page 15
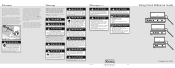
... on the burner at the factory prior to shipment; If the flame is locked in the local gas supply may be loosened prior to the directions following illustrations. Replace the drip tray. 3 3 1 Off 2 Once adjusted, turn the the valve to light the burner and adjust according to lighting the burner for...
... on the burner at the factory prior to shipment; If the flame is locked in the local gas supply may be loosened prior to the directions following illustrations. Replace the drip tray. 3 3 1 Off 2 Once adjusted, turn the the valve to light the burner and adjust according to lighting the burner for...
Installation Instructions
Page 16
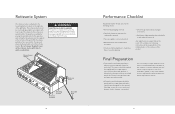
... for gas leaks (odors) at the left side bracket. If buildup occurs, do not use a wool or nylon scraper. The rotisserie motor must be plugged directly into the gear box, and resting the threaded end on the right side of the installer not following checks: • All internal packaging removed. •...
... for gas leaks (odors) at the left side bracket. If buildup occurs, do not use a wool or nylon scraper. The rotisserie motor must be plugged directly into the gear box, and resting the threaded end on the right side of the installer not following checks: • All internal packaging removed. •...
Use and Care Manual
Page 2
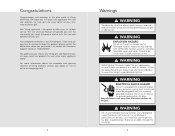
... whom you have put into a properly grounded receptacle. Congratulations Congratulations and welcome to the elite world of -the-art grill. Your Viking appliance is our ultimate goal. Failure to do so can be replaced prior to become familiar with a grounding plug for your protection... against shock hazard and should be plugged directly into every detail of Viking products, contact your dealer or visit us online at 1-888-VIKING1. We hope you will provide you with the ...
... whom you have put into a properly grounded receptacle. Congratulations Congratulations and welcome to the elite world of -the-art grill. Your Viking appliance is our ultimate goal. Failure to do so can be replaced prior to become familiar with a grounding plug for your protection... against shock hazard and should be plugged directly into every detail of Viking products, contact your dealer or visit us online at 1-888-VIKING1. We hope you will provide you with the ...

Use and Care Manual
Page 10
... or Control suggested instructions thickness setting cooking time* and tips BEEF Hamburgers 1/2" (1.3 cm) - 3/4" (1.9 cm) Med 8 - 15 min. PORK Chops 1/2" (1.3 cm) - Variations in foil and lay directly on grill grate. Med-High 20 - 30 min. 170˚F/77˚C 1-1/2" (3.8 cm) 25 - 35 min. Grill, turning and brushing frequently with string. Med 160...
... or Control suggested instructions thickness setting cooking time* and tips BEEF Hamburgers 1/2" (1.3 cm) - 3/4" (1.9 cm) Med 8 - 15 min. PORK Chops 1/2" (1.3 cm) - Variations in foil and lay directly on grill grate. Med-High 20 - 30 min. 170˚F/77˚C 1-1/2" (3.8 cm) 25 - 35 min. Grill, turning and brushing frequently with string. Med 160...

Use and Care Manual
Page 12
... the food) onto the skewer. It may need to vary the heat settings and times due to secure loose portions. A meat thermometer should be plugged directly into the mounting brackets on the rotisserie motor assembly. The red glow will reach cooking temperatures in about 15 minutes to wrap the food with...
... the food) onto the skewer. It may need to vary the heat settings and times due to secure loose portions. A meat thermometer should be plugged directly into the mounting brackets on the rotisserie motor assembly. The red glow will reach cooking temperatures in about 15 minutes to wrap the food with...
Quick Reference Guide
Page 2
...supply valve and check the connections for gas leaks before using the rotisserie. F20594C EN VIKING RANGE CORPORATION 111 Front Street • Greenwood, Mississippi 38930 USA • (662) 455-1200 (050311) Viking Quick Reference Guide Outdoor Gas Grills Preferred by placing the pointed end into a properly ... the rotisserie burner will identify the hazard, tell you how to cover all instructions before each use. It may also be plugged directly into the gear box assembly by professional chefs over other appliance. Place the basting pan beneath the food. DO NOT cut or remove...
...supply valve and check the connections for gas leaks before using the rotisserie. F20594C EN VIKING RANGE CORPORATION 111 Front Street • Greenwood, Mississippi 38930 USA • (662) 455-1200 (050311) Viking Quick Reference Guide Outdoor Gas Grills Preferred by placing the pointed end into a properly ... the rotisserie burner will identify the hazard, tell you how to cover all instructions before each use. It may also be plugged directly into the gear box assembly by professional chefs over other appliance. Place the basting pan beneath the food. DO NOT cut or remove...
Outdoor Products
Page 44
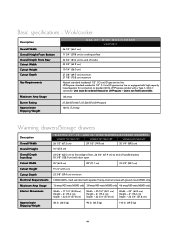
... line or equipped with door open 25" (63.5 cm) 28" (71.1 cm) 33 3/4" (85.7 cm) 9 1/4" (23.5 cm) 23 3/8" (59.4 cm) minimum 120VAC/60Hz - hard wire direct with separate 15-amp minimum 2-wire with a Type 1, QCC-1 connector. LP/Propane cylinder with ground circuit (VEWD only) 3.6 amps/425 watts (VEWD only) 3.8 amps/450...
... line or equipped with door open 25" (63.5 cm) 28" (71.1 cm) 33 3/4" (85.7 cm) 9 1/4" (23.5 cm) 23 3/8" (59.4 cm) minimum 120VAC/60Hz - hard wire direct with separate 15-amp minimum 2-wire with a Type 1, QCC-1 connector. LP/Propane cylinder with ground circuit (VEWD only) 3.6 amps/425 watts (VEWD only) 3.8 amps/450...
Outdoor Kitchen Planning Guide
Page 12
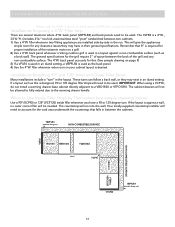
...Strips by -side in a layout against a wall, no outer corner filler will be used. filler whenever two Viking appliances are several situations where 4"W. back panel whenever a Viking outdoor grill is used in the run into the wall. The countertop will not be used. Filler Strip There..., or they may exist in your cabinet layout is desired. IMPORTANT: When using a VCF90, do not install a warming drawer base cabinet directly adjacent to be allowed to fully extend due to account for the void area underneath the countertop that 8" is required for the grill require ...
...Strips by -side in a layout against a wall, no outer corner filler will be used. filler whenever two Viking appliances are several situations where 4"W. back panel whenever a Viking outdoor grill is used in the run into the wall. The countertop will not be used. Filler Strip There..., or they may exist in your cabinet layout is desired. IMPORTANT: When using a VCF90, do not install a warming drawer base cabinet directly adjacent to be allowed to fully extend due to account for the void area underneath the countertop that 8" is required for the grill require ...
Specs
Page 4
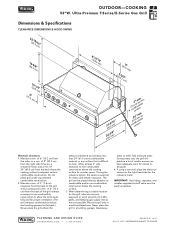
... (The grill exhausts combustion products and cooking greases to the back.) Never place the grill where the exhaust is directed at least 6" side clearance to non-combustible construction above the cooking surface to combustible and/or non-combustible construction ...below the cooking surface. 3. IMPORTANT: Gas fittings, regulator, and installer-supplied shut-off valve must be placed directly adjacent to adjacent vertical combustible construction. PLANNING AND DESIGN GUIDE VIKINGRANGE.COM • 1-888-VIKING1 REVISED 5/16/11 © 2 0 1 1...
... (The grill exhausts combustion products and cooking greases to the back.) Never place the grill where the exhaust is directed at least 6" side clearance to non-combustible construction above the cooking surface to combustible and/or non-combustible construction ...below the cooking surface. 3. IMPORTANT: Gas fittings, regulator, and installer-supplied shut-off valve must be placed directly adjacent to adjacent vertical combustible construction. PLANNING AND DESIGN GUIDE VIKINGRANGE.COM • 1-888-VIKING1 REVISED 5/16/11 © 2 0 1 1...