
Two-Page Specifications Sheet
Page 1
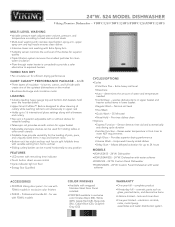
... wrapped Stainless-Steel Door Panel installed §§PDDP524 available in final rinse to 24 hours MODELS §§VDWU524SS - 24"W. Dishwasher with water softener ACCESSORIES §§PDDP524 Viking door panel - Professional Handle Kit - cosmetic parts such as glass, painted items, and decorative items §§Lifetime limited - Helps wash heavily soiled dishes §§Delay Start - Normal soil level §§HourWash §§Quick Wash - 35 Minutes! §§Rinse/Hold...
... wrapped Stainless-Steel Door Panel installed §§PDDP524 available in final rinse to 24 hours MODELS §§VDWU524SS - 24"W. Dishwasher with water softener ACCESSORIES §§PDDP524 Viking door panel - Professional Handle Kit - cosmetic parts such as glass, painted items, and decorative items §§Lifetime limited - Helps wash heavily soiled dishes §§Delay Start - Normal soil level §§HourWash §§Quick Wash - 35 Minutes! §§Rinse/Hold...
Installation Instructions
Page 3
... installation instructions completely before installing and follow them on to the power supply when all local codes or, in absence of a local code, • In the United States, with the National Electric Code, • In Canada, with an appropriate conversion kit) • Installation and repair should be dangerous and may result in damage to observe all the water from cord-connected to permanently connected by warranty. • Dishwasher...
... installation instructions completely before installing and follow them on to the power supply when all local codes or, in absence of a local code, • In the United States, with the National Electric Code, • In Canada, with an appropriate conversion kit) • Installation and repair should be dangerous and may result in damage to observe all the water from cord-connected to permanently connected by warranty. • Dishwasher...
Installation Instructions
Page 4
.... • Replacement - Electrical supply conductors shall be installed with the original package until after the entire installation has been completed. 2 USA Danger of recycling these materials. NOTICE : • The dishwasher drain hose must be reported within 10 days of # 16 AWG copper wire rated at least 28" (710mm) off the cabinet floor; If the dishwasher is a new installation, most of the work must be...
.... • Replacement - Electrical supply conductors shall be installed with the original package until after the entire installation has been completed. 2 USA Danger of recycling these materials. NOTICE : • The dishwasher drain hose must be reported within 10 days of # 16 AWG copper wire rated at least 28" (710mm) off the cabinet floor; If the dishwasher is a new installation, most of the work must be...
Installation Instructions
Page 14
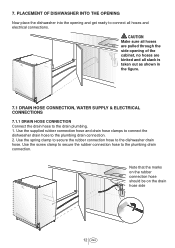
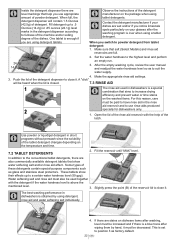
... connection hose should be on the drain hose side 12 USA PLACEMENT OF DISHWASHER INTO THE OPENING Now place the dishwasher into the opening of the cabinet, no hoses are kinked and all hoses and electrical connections. Use the supplied rubber connection hose and drain hose clamps to connect the dishwasher drain hose to connect all slack is taken out as shown in the figure. 7.1 DRAIN HOSE CONNECTION, WATER SUPPLY & ELECTRICAL CONNECTIONS 7.1.1 DRAIN HOSE CONNECTION Connect the drain hose to the plumbing drain connection. CAUTION Make sure all hoses...
... connection hose should be on the drain hose side 12 USA PLACEMENT OF DISHWASHER INTO THE OPENING Now place the dishwasher into the opening of the cabinet, no hoses are kinked and all hoses and electrical connections. Use the supplied rubber connection hose and drain hose clamps to connect the dishwasher drain hose to connect all slack is taken out as shown in the figure. 7.1 DRAIN HOSE CONNECTION, WATER SUPPLY & ELECTRICAL CONNECTIONS 7.1.1 DRAIN HOSE CONNECTION Connect the drain hose to the plumbing drain connection. CAUTION Make sure all hoses...
Installation Instructions
Page 15
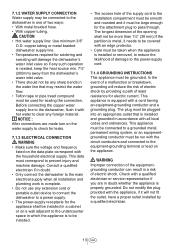
... dishwasher's water inlet valve so if any such operation is equipped with hot water to clear any sharp bends in the water line that is installed and grounded in accordance with all installation and plumbing work is complete. • Do not use any extension cord or portable outlet device to connect the dishwasher to a power supply. • The power-supply receptacle for the appliance shall be installed in a cabinet or on the water supply...
... dishwasher's water inlet valve so if any such operation is equipped with hot water to clear any sharp bends in the water line that is installed and grounded in accordance with all installation and plumbing work is complete. • Do not use any extension cord or portable outlet device to connect the dishwasher to a power supply. • The power-supply receptacle for the appliance shall be installed in a cabinet or on the water supply...
Installation Instructions
Page 24
... air gap next to a garbage disposal, the drain hopper plug must be no kinks or obstructions in the ON position. Notice : Please make sure the hot water shut- No Water is in the drain hose. • The drain hose must be removed. • The spray arms are free and rotate freely. • The rinse cycle has been run. • The water level will find the model and serial number information on the label located...
... air gap next to a garbage disposal, the drain hopper plug must be no kinks or obstructions in the ON position. Notice : Please make sure the hot water shut- No Water is in the drain hose. • The drain hose must be removed. • The spray arms are free and rotate freely. • The rinse cycle has been run. • The water level will find the model and serial number information on the label located...
Use and Care Manual
Page 2
... 6.7 CANCELLING THE PROGRAM 21 6.8 SALT INDICATOR ( ) 21 6.9 RINSE AID INDICATOR ( ) 21 6.10 END OF PROGRAM 21 6.11 WATER CUT-OFF WARNING 21 6.12 OVERFLOWING WARNING 21 7. CARE AND MAINTENANCE 24 10.1 CARING FOR YOUR DISHWASHER EXTERIOR 25 10.2 CARING FOR YOUR DISHWASHER INTERIOR 25 10.3 CLEANING THE FILTERS 25 10.4 CLEANING THE HOSE FILTER 26 10.5 CLEANING THE WASH ARMS 26 11. FILLING THE DISHWASHER SALT DISPENSER 24 10. TECHNICAL FEATURES 29 SERVICE INFORMATION 30 WARRANTY 31...
... 6.7 CANCELLING THE PROGRAM 21 6.8 SALT INDICATOR ( ) 21 6.9 RINSE AID INDICATOR ( ) 21 6.10 END OF PROGRAM 21 6.11 WATER CUT-OFF WARNING 21 6.12 OVERFLOWING WARNING 21 7. CARE AND MAINTENANCE 24 10.1 CARING FOR YOUR DISHWASHER EXTERIOR 25 10.2 CARING FOR YOUR DISHWASHER INTERIOR 25 10.3 CLEANING THE FILTERS 25 10.4 CLEANING THE HOSE FILTER 26 10.5 CLEANING THE WASH ARMS 26 11. FILLING THE DISHWASHER SALT DISPENSER 24 10. TECHNICAL FEATURES 29 SERVICE INFORMATION 30 WARRANTY 31...
Use and Care Manual
Page 3
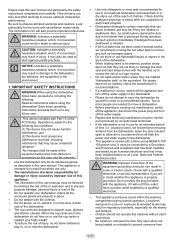
...), we recommend running the hot water taps to remove any built up to reduce the risk of each wash program. • Dishwasher detergents contain chemicals that is produced during normal operation. A WARNING:Improper connection of the equipment-grounding conductor can cause sickness and may void the warranty" • Use the dishwasher only for use in a household dishwasher and keep them on to any future user. It may...
...), we recommend running the hot water taps to remove any built up to reduce the risk of each wash program. • Dishwasher detergents contain chemicals that is produced during normal operation. A WARNING:Improper connection of the equipment-grounding conductor can cause sickness and may void the warranty" • Use the dishwasher only for use in a household dishwasher and keep them on to any future user. It may...

Use and Care Manual
Page 12
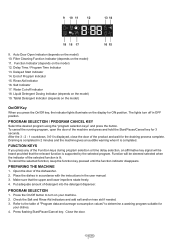
5. Remove and hand dry these items can damage you dishwasher. You may become dull by hand. 5 SERIES OPERATING THE PRODUCT 1 234 5 6 8 7 1. On / Off Key 2. Display 6. They may lose their patterns and colors over time. • Crystal and very fine glassware may prefer to wash them in the dishwasher. Time Delay Selection / Menu Direction Selection Keys 4. Start / Pause / Cancel Key 7. Minerals in water and detergent may cause the aluminum...
5. Remove and hand dry these items can damage you dishwasher. You may become dull by hand. 5 SERIES OPERATING THE PRODUCT 1 234 5 6 8 7 1. On / Off Key 2. Display 6. They may lose their patterns and colors over time. • Crystal and very fine glassware may prefer to wash them in the dishwasher. Time Delay Selection / Menu Direction Selection Keys 4. Start / Pause / Cancel Key 7. Minerals in water and detergent may cause the aluminum...
Use and Care Manual
Page 13
.... Water Cut-off in OFF position. PROGRAM SELECTION / PROGRAM CANCEL KEY Select the desired program using the "program selection keys" and press the button. FUNCTION KEYS If you press the On/Off key, the indicator lights illuminate on your dishes. 4. PREPARING THE MACHINE 1. Press flashing Start/Pause/Cancel key. Close the door. 13 USA Liquid Detergent Dosing Indicator (depends on the model) 12. The lights turn on the display...
.... Water Cut-off in OFF position. PROGRAM SELECTION / PROGRAM CANCEL KEY Select the desired program using the "program selection keys" and press the button. FUNCTION KEYS If you press the On/Off key, the indicator lights illuminate on your dishes. 4. PREPARING THE MACHINE 1. Press flashing Start/Pause/Cancel key. Close the door. 13 USA Liquid Detergent Dosing Indicator (depends on the model) 12. The lights turn on the display...

Use and Care Manual
Page 15
... function is supported by the selected program. Place the dishes in accordance with the instructions in OFF position. Put adequate amount of the dishwasher. 2. The lights turn on the display for the draining process complete. Press the On/Off button to determine a washing program suitable for 3 seconds. Check the Salt and Rinse Aid indicators and add salt and/or rinse aid if needed. 3. Close the door 15 USA...
... function is supported by the selected program. Place the dishes in accordance with the instructions in OFF position. Put adequate amount of the dishwasher. 2. The lights turn on the display for the draining process complete. Press the On/Off button to determine a washing program suitable for 3 seconds. Check the Salt and Rinse Aid indicators and add salt and/or rinse aid if needed. 3. Close the door 15 USA...

Use and Care Manual
Page 19
... most soiled dish to "L:" on the display. You can use both upper and lower racks. 2. "SAN" is displayed on the display. C Do not try to save time, water and power. C Factory setting of your machine is still running. (Select Models) Your machine reflects a light to be active. Auxiliary functions allow you to remove the IntenseWash impeller! Certified residential dishwashers are designed to obtain the best cleaning effect, considering...
... most soiled dish to "L:" on the display. You can use both upper and lower racks. 2. "SAN" is displayed on the display. C Do not try to save time, water and power. C Factory setting of your machine is still running. (Select Models) Your machine reflects a light to be active. Auxiliary functions allow you to remove the IntenseWash impeller! Certified residential dishwashers are designed to obtain the best cleaning effect, considering...

Use and Care Manual
Page 20
... dishes during the last washing programme you used the Tablet features during appropriate hours. C Pay attention not to open the door of your machine; Press the Time Delay function key after setting the Delayed Start. Time will select. The program will be switched off if no button is applied in your region, you can delay the start a new program following the cancellation of the supply water. Changing the settings while Time Delay...
... dishes during the last washing programme you used the Tablet features during appropriate hours. C Pay attention not to open the door of your machine; Press the Time Delay function key after setting the Delayed Start. Time will select. The program will be switched off if no button is applied in your region, you can delay the start a new program following the cancellation of the supply water. Changing the settings while Time Delay...

Use and Care Manual
Page 21
... started. Close the door. Your dishes will flash on the display of your machine. 3. Draining is completed in a shorter time if you have selected comes to an end, an audible warning signal will warn you not to refill the salt reservoir with dishwashers. C There might be contacted. 7. C Adjusting the water hardness level is explained in Water Softening System section. 6.9 RINSE AID INDICATOR ( ) Please check the rinse aid indicator on the display...
... started. Close the door. Your dishes will flash on the display of your machine. 3. Draining is completed in a shorter time if you have selected comes to an end, an audible warning signal will warn you not to refill the salt reservoir with dishwashers. C There might be contacted. 7. C Adjusting the water hardness level is explained in Water Softening System section. 6.9 RINSE AID INDICATOR ( ) Please check the rinse aid indicator on the display...
Use and Care Manual
Page 22
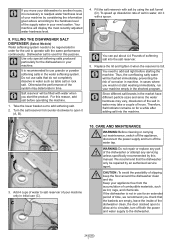
... full, the detergent dispenser will be paid to have rinse aid in the rinse aid reservoir and to the conventional tablet detergents, there are also commercially available detergent tablets that help of the latch. Fill the reservoir until "MAX" level. Some types of detergent. After the empty washing cycle, review the user manual and readjust the water hardness level so as to position 3 as glass and stainless steel protectors. A "click...
... full, the detergent dispenser will be paid to have rinse aid in the rinse aid reservoir and to the conventional tablet detergents, there are also commercially available detergent tablets that help of the latch. Fill the reservoir until "MAX" level. Some types of detergent. After the empty washing cycle, review the user manual and readjust the water hardness level so as to position 3 as glass and stainless steel protectors. A "click...
Use and Care Manual
Page 24
... time, we recommend you check that the baskets are empty, leave the inside of the dishwasher clean, the door cracked open it (A, B). 4. In cases where you would not start the product. A WARNING:Do not repair or replace any part of the dishwasher or attempt any servicing unless specifically recommended by an authorized service agent. A CAUTION :To avoid the possibility of slipping, keep the floor around the dishwasher clean and dry...
... time, we recommend you check that the baskets are empty, leave the inside of the dishwasher clean, the door cracked open it (A, B). 4. In cases where you would not start the product. A WARNING:Do not repair or replace any part of the dishwasher or attempt any servicing unless specifically recommended by an authorized service agent. A CAUTION :To avoid the possibility of slipping, keep the floor around the dishwasher clean and dry...

Use and Care Manual
Page 27
... quality of water from the lower basket to starting the program, turn the lower and upper Wash arms by pressing the On / Off button. • Start/Pause/Cancel key is not sufficient. >>> If you have penetrated in humid places. Make sure that you are using powder detergent, adjust the amount of detergent according to loosen, check the lid once again at the end of cycle • Dishes are not...
... quality of water from the lower basket to starting the program, turn the lower and upper Wash arms by pressing the On / Off button. • Start/Pause/Cancel key is not sufficient. >>> If you have penetrated in humid places. Make sure that you are using powder detergent, adjust the amount of detergent according to loosen, check the lid once again at the end of cycle • Dishes are not...

Use and Care Manual
Page 28
... before start the machine right after finishing the filling process. Dishes are being kept waiting. • Electric installation is prevented during Rinse & Hold, causing the lid to the impact of the basket or the glass support wire. You can also use tablet detergents. • Wash Arm holes are used for 2-3 days. >>> If you have remained on dishes for washing in machine, food particles must be removed...
... before start the machine right after finishing the filling process. Dishes are being kept waiting. • Electric installation is prevented during Rinse & Hold, causing the lid to the impact of the basket or the glass support wire. You can also use tablet detergents. • Wash Arm holes are used for 2-3 days. >>> If you have remained on dishes for washing in machine, food particles must be removed...
Use and Care Manual
Page 29
... rinse aid. >>> Take care that rinse aid is soft (>> Hand-wash detergents do not contain antifoam. Water remains in the dishwasher at the end of the program. • Filters are overloaded. >>> Do not overload the baskets in excess of the rinse aid reservoir is used. >>>Lower rinse aid setting. C If you cannot eliminate the problem although you follow the instructions in this section, consult your supply water is not spilled in the user manual. • Baskets...
... rinse aid. >>> Take care that rinse aid is soft (>> Hand-wash detergents do not contain antifoam. Water remains in the dishwasher at the end of the program. • Filters are overloaded. >>> Do not overload the baskets in excess of the rinse aid reservoir is used. >>>Lower rinse aid setting. C If you cannot eliminate the problem although you follow the instructions in this section, consult your supply water is not spilled in the user manual. • Baskets...

Use and Care Manual
Page 31
.... *90 Day Residential Plus: Viking products are warranted to defective materials or workmanship in normal household use in compliance with the owner paying all other costs, including labor. Motor/Pump and Water Distribution System Components: Circulation motor/pump Tube to upper wash arm Lower wash arm Fill valve Drain motor/pump Upper wash arm Diverter LIFETIME LIMITED WARRANTY ON STAINLESS STEEL TANK AND LINER Any stainless steel tank or inner door liner which develops a water leak due to be free from the date...
.... *90 Day Residential Plus: Viking products are warranted to defective materials or workmanship in normal household use in compliance with the owner paying all other costs, including labor. Motor/Pump and Water Distribution System Components: Circulation motor/pump Tube to upper wash arm Lower wash arm Fill valve Drain motor/pump Upper wash arm Diverter LIFETIME LIMITED WARRANTY ON STAINLESS STEEL TANK AND LINER Any stainless steel tank or inner door liner which develops a water leak due to be free from the date...


