Two-Page Specifications Sheet
Page 1
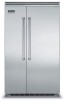
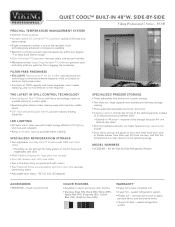
... that the temperature has risen above normal operating range MODEL NUMBERS §§VCSB5483 - 48"W. sealed refrigeration system §§90-day full - SIDE-BY-SIDE ® Viking Professional 5 Series - improves food storage because the unit defrosts less often §§Factory-installed automatic ice maker features large-capacity ice bucket §§Door alarm sounds and glows to 96 hours - sealed refrigeration system QUIET COOL™...
... that the temperature has risen above normal operating range MODEL NUMBERS §§VCSB5483 - 48"W. sealed refrigeration system §§90-day full - SIDE-BY-SIDE ® Viking Professional 5 Series - improves food storage because the unit defrosts less often §§Factory-installed automatic ice maker features large-capacity ice bucket §§Door alarm sounds and glows to 96 hours - sealed refrigeration system QUIET COOL™...
Two-Page Specifications Sheet
Page 2
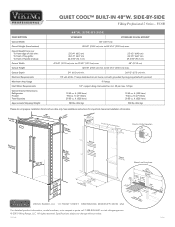
... front of handle endcap: Cutout Width Cutout Height Cutout Depth Electrical Requirements Maximum Amp Usage Inlet Water Requirements Overall Interior Dimensions Refrigerator Freezer Total Capacity Approximate Shipping Weight 4 8 " W. ft. (271 liters) 29.05 cu. to 47-3/4" (121.3 cm) max. 48" (121.9 cm) 82-7/8" (210.5 cm) min. B Y- S I D E - ft. (823 liters) 580 lbs. (263 kg) 19.49 cu. See installation instructions for important...
... front of handle endcap: Cutout Width Cutout Height Cutout Depth Electrical Requirements Maximum Amp Usage Inlet Water Requirements Overall Interior Dimensions Refrigerator Freezer Total Capacity Approximate Shipping Weight 4 8 " W. ft. (271 liters) 29.05 cu. to 47-3/4" (121.3 cm) max. 48" (121.9 cm) 82-7/8" (210.5 cm) min. B Y- S I D E - ft. (823 liters) 580 lbs. (263 kg) 19.49 cu. See installation instructions for important...
Installation Instructions
Page 3
... you to persons, installation work and electrical wiring must be preceded by a qualified technician in this manual and on your appliance. Your safety and the safety of fire, electrical shock, or injury to hazards that incoming voltage is the safety alert symbol. This is the same as unit rating. An electric rating plate specifying voltage, frequency...
... you to persons, installation work and electrical wiring must be preceded by a qualified technician in this manual and on your appliance. Your safety and the safety of fire, electrical shock, or injury to hazards that incoming voltage is the safety alert symbol. This is the same as unit rating. An electric rating plate specifying voltage, frequency...
Installation Instructions
Page 5
.... WARNING ELECTRICAL SHOCK HAZARD Disconnect power or turn power disconnect switch to move and install appliance. Keep doors closed until it is your unit), which are necessary for proper installation: • 1/4" (6 mm) copper tubing with installation specifications and dimensions. • properly install unit. • remove any moldings or decorative panels that prevent the unit from being serviced. • make sure that location will support unit, door panels and...
.... WARNING ELECTRICAL SHOCK HAZARD Disconnect power or turn power disconnect switch to move and install appliance. Keep doors closed until it is your unit), which are necessary for proper installation: • 1/4" (6 mm) copper tubing with installation specifications and dimensions. • properly install unit. • remove any moldings or decorative panels that prevent the unit from being serviced. • make sure that location will support unit, door panels and...
Installation Instructions
Page 21
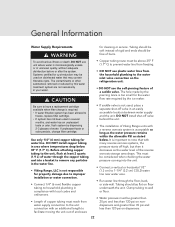
... in a location where the surrounding temperature will fall below 60º F (16º C). Electrical Requirements It is the customer's responsibility to: • Contact a qualified electrical installer. • Assure that the electrical installation is properly grounded. It is required that a separate circuit serving only this appliance be used, it must be plugged into the opening. If codes permit a separate grounding wire to...
... in a location where the surrounding temperature will fall below 60º F (16º C). Electrical Requirements It is the customer's responsibility to: • Contact a qualified electrical installer. • Assure that the electrical installation is properly grounded. It is required that a separate circuit serving only this appliance be used, it must be plugged into the opening. If codes permit a separate grounding wire to...
Installation Instructions
Page 22
... installation of Viking Range units with a reverse osmosis system is microbiologically unsafe or of water. The contaminants or other substances removed or reduced by dispensing 2-3 glasses of unknown quality, without adequate disinfection before or after the system. Before attaching copper tubing to the unit, flush at on the refrigeration unit. • DO NOT use plastic water lines from water supply connection to the water inlet valve connection...
... installation of Viking Range units with a reverse osmosis system is microbiologically unsafe or of water. The contaminants or other substances removed or reduced by dispensing 2-3 glasses of unknown quality, without adequate disinfection before or after the system. Before attaching copper tubing to the unit, flush at on the refrigeration unit. • DO NOT use plastic water lines from water supply connection to the water inlet valve connection...
Installation Instructions
Page 25
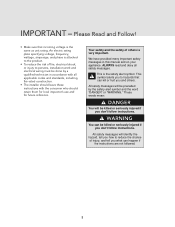
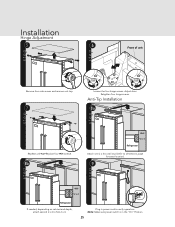
Retighten four hinge screws. HInestaadllaintieon Hinge Adjustment 5 2 1 Remove four side screws and remove unit top. 7 1 2 Replace unit top. Anti-Tip Installation 8a Wall 2 x 4 Refrigerator Attach one 2 x 4 to wall stud (refer to dimensions page for exact location). 9 Wall 2 x 4 Refrigerator If needed, depending on cabinet and depth, attach second 2 x 4 to verify operation. Note: Make sure power switch is in power cord to first 2 x 4. Replace four side screws. 8b 6 Front of unit 2 1 3 Loosen the four hinge screws. Plug in the "On" Position. 25 Adjust door.
Retighten four hinge screws. HInestaadllaintieon Hinge Adjustment 5 2 1 Remove four side screws and remove unit top. 7 1 2 Replace unit top. Anti-Tip Installation 8a Wall 2 x 4 Refrigerator Attach one 2 x 4 to wall stud (refer to dimensions page for exact location). 9 Wall 2 x 4 Refrigerator If needed, depending on cabinet and depth, attach second 2 x 4 to verify operation. Note: Make sure power switch is in power cord to first 2 x 4. Replace four side screws. 8b 6 Front of unit 2 1 3 Loosen the four hinge screws. Plug in the "On" Position. 25 Adjust door.
Installation Instructions
Page 29
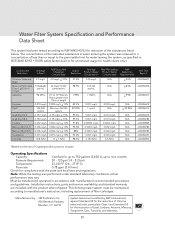
...'s instruction, including replacement of filter cartridges. Must be maintained according to 750 gallons (2,838 L); Installation instructions, parts and service availability, and standard warranty are included with the product when shipped. The concentration of Lead, Lindane, Atrazine, Mercury, Toxaphene, Cyst, Turbidity, and Asbestos. 29 Manufactured by: 3M Purification Inc. 400 Research Parkway Meriden, CT 06770 System tested...
...'s instruction, including replacement of filter cartridges. Must be maintained according to 750 gallons (2,838 L); Installation instructions, parts and service availability, and standard warranty are included with the product when shipped. The concentration of Lead, Lindane, Atrazine, Mercury, Toxaphene, Cyst, Turbidity, and Asbestos. 29 Manufactured by: 3M Purification Inc. 400 Research Parkway Meriden, CT 06770 System tested...
Installation Instructions
Page 31
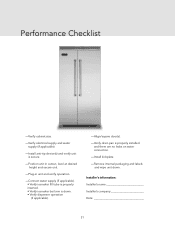
... cabinet size. -Verify electrical supply and water supply (if applicable). -Install anti-tip device(s) and verify unit is secure. -Position unit in cutout, level at desired height and secure unit. -Plug-in unit and verify operation. -Connect water supply (if applicable). • Verify icemaker fill tube is properly inserted. • Verify icemaker bail arm is down. • Verify dispenser operation (if applicable). -Align/square door(s). -Verify drain pan is properly installed...
... cabinet size. -Verify electrical supply and water supply (if applicable). -Install anti-tip device(s) and verify unit is secure. -Position unit in cutout, level at desired height and secure unit. -Plug-in unit and verify operation. -Connect water supply (if applicable). • Verify icemaker fill tube is properly inserted. • Verify icemaker bail arm is down. • Verify dispenser operation (if applicable). -Align/square door(s). -Verify drain pan is properly installed...
Use and Care Manual
Page 3
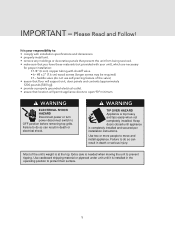
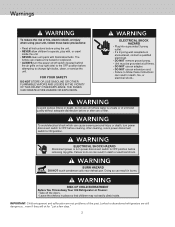
... result in burns. After cleaning, return power disconnect switch to change light bulbs, clean, or service the unit. IMPORTANT: Child entrapment and suffocation are still dangerous... Junked or abandoned refrigerators are not problems of the past. Warnings WARNING To reduce the risk of fire, electric shock, or injury when using the unit. • NEVER allow children to operate, play with flammable...
... result in burns. After cleaning, return power disconnect switch to change light bulbs, clean, or service the unit. IMPORTANT: Child entrapment and suffocation are still dangerous... Junked or abandoned refrigerators are not problems of the past. Warnings WARNING To reduce the risk of fire, electric shock, or injury when using the unit. • NEVER allow children to operate, play with flammable...
Use and Care Manual
Page 4
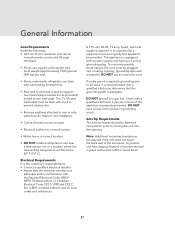
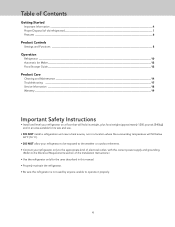
... old refrigerator 5 Features 6 Product Controls Settings and Functions 8 Operation Refrigerator 10 Automatic Ice Maker 12 Food Storage Guide 12 Product Care Cleaning and Maintenance 14 Troubleshooting 17 Service Information 18 Warranty 19 Important Safety Instructions • Install and level your refrigerator on a floor that will hold its weight, plus food weight (approximately 1200 pounds [540kg]) and in an area suitable for its size and use. • DO NOT install a refrigeration...
... old refrigerator 5 Features 6 Product Controls Settings and Functions 8 Operation Refrigerator 10 Automatic Ice Maker 12 Food Storage Guide 12 Product Care Cleaning and Maintenance 14 Troubleshooting 17 Service Information 18 Warranty 19 Important Safety Instructions • Install and level your refrigerator on a floor that will hold its weight, plus food weight (approximately 1200 pounds [540kg]) and in an area suitable for its size and use. • DO NOT install a refrigeration...

Use and Care Manual
Page 8
... used to turn power off, remove the center grille blade. Press the power on . FREEZER MAX FRZ MAX REF FAST COOL SAB SHOW C F REFRIGERATOR DOOR OPEN POWER HIGH TEMP Showroom Mode Initiation Showroom mode allows electronic controls and interior lights to the off switch to function independently of refrigeraton system. Three beeps will sound and SHOW will be lit. 8 Electronic Temperature Settings Your refrigerator's electronic controls are located behind your refrigerator's top grille. To change...
... used to turn power off, remove the center grille blade. Press the power on . FREEZER MAX FRZ MAX REF FAST COOL SAB SHOW C F REFRIGERATOR DOOR OPEN POWER HIGH TEMP Showroom Mode Initiation Showroom mode allows electronic controls and interior lights to the off switch to function independently of refrigeraton system. Three beeps will sound and SHOW will be lit. 8 Electronic Temperature Settings Your refrigerator's electronic controls are located behind your refrigerator's top grille. To change...
Use and Care Manual
Page 9
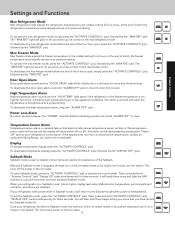
... Max Refrigerator Mode Max refrigerator mode adjusts the refrigerator temperature to the coldest setting for four hours, at the end of which, the freezer temperature automatically returns to the ice maker. The alarm can be raised until it will restore power to its previous setting. Display To activate temperature display, press the "ACTIVATE CONTROLS" pad. This will return to activate the control panel. The "MAX REF" light will end when the temperature is open alarm...
... Max Refrigerator Mode Max refrigerator mode adjusts the refrigerator temperature to the coldest setting for four hours, at the end of which, the freezer temperature automatically returns to the ice maker. The alarm can be raised until it will restore power to its previous setting. Display To activate temperature display, press the "ACTIVATE CONTROLS" pad. This will return to activate the control panel. The "MAX REF" light will end when the temperature is open alarm...
Use and Care Manual
Page 10
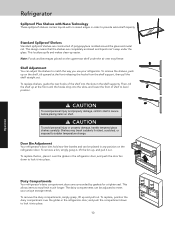
... on the refrigerator door. To remove a bin, simply grasp it, lift the bin up and pull out. To replace the bin, place it out. Standard Spillproof Shelves Standard spillproof shelves are constructed of shelf to level position. Door Bin Adjustment Your refrigerator's door bins hold two-liter bottles and can adjust the shelves to meet your refrigerator. Shelf Adjustment You can be adjusted to match the way you use your unique storage needs. To remove the...
... on the refrigerator door. To remove a bin, simply grasp it, lift the bin up and pull out. To replace the bin, place it out. Standard Spillproof Shelves Standard spillproof shelves are constructed of shelf to level position. Door Bin Adjustment Your refrigerator's door bins hold two-liter bottles and can adjust the shelves to meet your refrigerator. Shelf Adjustment You can be adjusted to match the way you use your unique storage needs. To remove the...
Use and Care Manual
Page 12
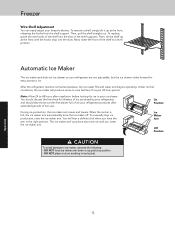
... with water and begins operating. The ice maker won't produce any more ice until the hooks drop into the slots in the right position. To replace, guide the rear hooks of non-use. To remove a shelf, simply tilt it up at the front, releasing the hooks from the shelf support. Freezer Wire Shelf Adjustment You can easily adjust your refrigerator produces after installation before looking for easy access to a level position. When the ice bin...
... with water and begins operating. The ice maker won't produce any more ice until the hooks drop into the slots in the right position. To replace, guide the rear hooks of non-use. To remove a shelf, simply tilt it up at the front, releasing the hooks from the shelf support. Freezer Wire Shelf Adjustment You can easily adjust your refrigerator produces after installation before looking for easy access to a level position. When the ice bin...
Use and Care Manual
Page 14
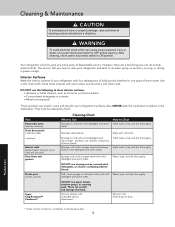
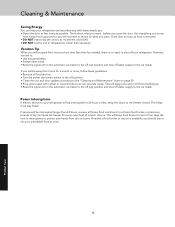
... cleaning product manufacturer's directions. Part Removable parts (shelves, drawers) Front door panels • stainless steel • painted Interior walls ((allow freezer to warm up so cloth will not stick) Door liners and gaskets Plastic parts (covers, panels) Super Clog-Resistant™ Condenser* Cleaning Chart What to Clean Hand wash, rinse, and dry thoroughly. Wash, wipe, and dry thoroughly. detergent and warm water. They must be cleaned by hand. Soft, clean sponge or soft clean...
... cleaning product manufacturer's directions. Part Removable parts (shelves, drawers) Front door panels • stainless steel • painted Interior walls ((allow freezer to warm up so cloth will not stick) Door liners and gaskets Plastic parts (covers, panels) Super Clog-Resistant™ Condenser* Cleaning Chart What to Clean Hand wash, rinse, and dry thoroughly. Wash, wipe, and dry thoroughly. detergent and warm water. They must be cleaned by hand. Soft, clean sponge or soft clean...

Use and Care Manual
Page 15
... and replace shelf by lifting the front and releasing the hooks from the metal track. CAUTION To avoid personal injury or property damage, handle tempered glass shelves carefully. Doing so can result in death or electrical shock. WARNING ELECTRICAL SHOCK HAZARD Disconnect power or turn power disconnect switch to unit. To check defrost pan, remove two screws securing kickplate to OFF position before cleaning. Wipe and clean defrost pan with water. Remove...
... and replace shelf by lifting the front and releasing the hooks from the metal track. CAUTION To avoid personal injury or property damage, handle tempered glass shelves carefully. Doing so can result in death or electrical shock. WARNING ELECTRICAL SHOCK HAZARD Disconnect power or turn power disconnect switch to unit. To check defrost pan, remove two screws securing kickplate to OFF position before cleaning. Wipe and clean defrost pan with water. Remove...
Use and Care Manual
Page 16
...; Freeze other items. • Raise the signal arm in the automatic ice maker to the freezer closed. However, be interrupted for every cubic foot of dry ice inside . Think about what you open with these guidelines: • Remove all frozen food and store it in a frozen food locker, or place two pounds of interior volume. Power Interruptions If electric service to your refrigerator will...
...; Freeze other items. • Raise the signal arm in the automatic ice maker to the freezer closed. However, be interrupted for every cubic foot of dry ice inside . Think about what you open with these guidelines: • Remove all frozen food and store it in a frozen food locker, or place two pounds of interior volume. Power Interruptions If electric service to your refrigerator will...

Use and Care Manual
Page 17
... hum or pulsating sound • Ice maker valve hookup: buzzes when ice maker fills with water. This is working properly. For models with your refrigerator is normal in these sounds seem louder. They break apart easily. Check water line for service. Product Care 17 Common Refrigerator Problems Problem Unit will not operate Unit makes unfamiliar sounds Water in the defrost pan Lights do not work Motor seems to water supply. See "Understanding Sounds You May...
... hum or pulsating sound • Ice maker valve hookup: buzzes when ice maker fills with water. This is working properly. For models with your refrigerator is normal in these sounds seem louder. They break apart easily. Check water line for service. Product Care 17 Common Refrigerator Problems Problem Unit will not operate Unit makes unfamiliar sounds Water in the defrost pan Lights do not work Motor seems to water supply. See "Understanding Sounds You May...
Use and Care Manual
Page 19
...: This full warranty applies to be free from defective materials or workmanship in normal residential use , improper installation, improper operation, or repair or service of original retail purchase. Some states do not allow limitations on stainless steel, paint/porcelain blemishes, etc.) for new construction, whichever period is longer. Viking Range, LLC, warrantor, agrees to repair or replace, at its component parts contains a defect...
...: This full warranty applies to be free from defective materials or workmanship in normal residential use , improper installation, improper operation, or repair or service of original retail purchase. Some states do not allow limitations on stainless steel, paint/porcelain blemishes, etc.) for new construction, whichever period is longer. Viking Range, LLC, warrantor, agrees to repair or replace, at its component parts contains a defect...

