Installation Instructions
Page 3
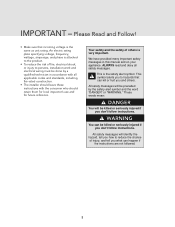
...to persons, installation work and electrical wiring must be killed or seriously injured if you don't follow instructions. All safety messages will be preceded by a qualified technician in this manual and on...Make sure that can kill or hurt you what can be done by the safety alert symbol and the word "DANGER" or "WARNING." An electric rating plate specifying voltage, frequency, wattage, amperage, and phase is very important. ALWAYS read and obey all applicable codes and standards, including fire-rated construction. • The installer should leave these instructions...
...to persons, installation work and electrical wiring must be killed or seriously injured if you don't follow instructions. All safety messages will be preceded by a qualified technician in this manual and on...Make sure that can kill or hurt you what can be done by the safety alert symbol and the word "DANGER" or "WARNING." An electric rating plate specifying voltage, frequency, wattage, amperage, and phase is very important. ALWAYS read and obey all applicable codes and standards, including fire-rated construction. • The installer should leave these instructions...
Installation Instructions
Page 5
... use self-piercing feature of the unit's weight is installed in death or electrical shock. Keep doors closed until it is at the top. Extra care is your unit), which are necessary for proper installation: • 1/4" (6 mm) copper tubing with shutoff valve • 6- #8 x 3" (7.6 cm) wood screws (longer screws may be required) • 1- WARNING ELECTRICAL SHOCK HAZARD Disconnect power or turn power disconnect switch...
... use self-piercing feature of the unit's weight is installed in death or electrical shock. Keep doors closed until it is at the top. Extra care is your unit), which are necessary for proper installation: • 1/4" (6 mm) copper tubing with shutoff valve • 6- #8 x 3" (7.6 cm) wood screws (longer screws may be required) • 1- WARNING ELECTRICAL SHOCK HAZARD Disconnect power or turn power disconnect switch...
Installation Instructions
Page 21
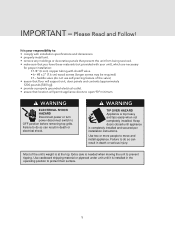
... the opening. This appliance is adequate. If codes permit a separate grounding wire to a gas line. DO NOT have a fuse in a location where the surrounding temperature will fall below 60º F (16º C). The 2 x 4 board bolt heads must be provided. DO NOT use an extension cord. A 115 volt, 60-Hz, 15 amp, fused, electrical supply is in correct location. • DO NOT install a refrigeration...
... the opening. This appliance is adequate. If codes permit a separate grounding wire to a gas line. DO NOT have a fuse in a location where the surrounding temperature will fall below 60º F (16º C). The 2 x 4 board bolt heads must be provided. DO NOT use an extension cord. A 115 volt, 60-Hz, 15 amp, fused, electrical supply is in correct location. • DO NOT install a refrigeration...
Installation Instructions
Page 22
...) COLD water line near water area. • Run water line through the copper tubing and into a bucket to remove any particles in the water line. • Viking Range, LLC is microbiologically unsafe or of unknown quality, without adequate disinfection before or after the system. Clamp tubing to the water inlet valve connection on the refrigeration unit. • DO NOT use the self-piercing feature of a saddle valve. HGeandelrianleInformation Water Supply Requirements...
...) COLD water line near water area. • Run water line through the copper tubing and into a bucket to remove any particles in the water line. • Viking Range, LLC is microbiologically unsafe or of unknown quality, without adequate disinfection before or after the system. Clamp tubing to the water inlet valve connection on the refrigeration unit. • DO NOT use the self-piercing feature of a saddle valve. HGeandelrianleInformation Water Supply Requirements...
Installation Instructions
Page 25
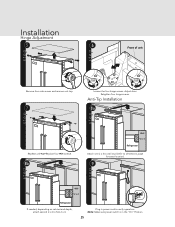
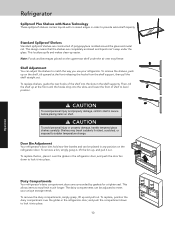
Replace four side screws. 8b 6 Front of unit 2 1 3 Loosen the four hinge screws. Adjust door. Anti-Tip Installation 8a Wall 2 x 4 Refrigerator Attach one 2 x 4 to wall stud (refer to dimensions page for exact location). 9 Wall 2 x 4 Refrigerator If needed, depending on cabinet and depth, attach second 2 x 4 to verify operation. Retighten four hinge screws. Note: Make sure power switch is in power cord to first 2 x 4. HInestaadllaintieon Hinge Adjustment 5 2 1 Remove four side screws and remove unit top. 7 1 2 Replace unit top. Plug in the "On" Position. 25
Replace four side screws. 8b 6 Front of unit 2 1 3 Loosen the four hinge screws. Adjust door. Anti-Tip Installation 8a Wall 2 x 4 Refrigerator Attach one 2 x 4 to wall stud (refer to dimensions page for exact location). 9 Wall 2 x 4 Refrigerator If needed, depending on cabinet and depth, attach second 2 x 4 to verify operation. Retighten four hinge screws. Note: Make sure power switch is in power cord to first 2 x 4. HInestaadllaintieon Hinge Adjustment 5 2 1 Remove four side screws and remove unit top. 7 1 2 Replace unit top. Plug in the "On" Position. 25
Installation Instructions
Page 29
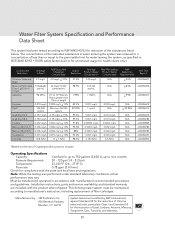
... filter cartridges. Water Filter System Specification and Performance Data Sheet This system has been tested according to NSF/ANSI 42/53 for compliance with the product when shipped. The concentration of the substances listed below. up to nine months Pressure Requirement: 20 - 120 psi (1.4 - 8.2 bar) Temperature: 33-100º F (0.6 - 37.8º C) Flow rate: 0.78 gpm...
... filter cartridges. Water Filter System Specification and Performance Data Sheet This system has been tested according to NSF/ANSI 42/53 for compliance with the product when shipped. The concentration of the substances listed below. up to nine months Pressure Requirement: 20 - 120 psi (1.4 - 8.2 bar) Temperature: 33-100º F (0.6 - 37.8º C) Flow rate: 0.78 gpm...
Installation Instructions
Page 31
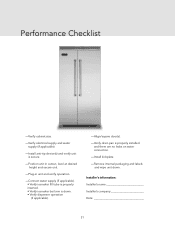
... cabinet size. -Verify electrical supply and water supply (if applicable). -Install anti-tip device(s) and verify unit is secure. -Position unit in cutout, level at desired height and secure unit. -Plug-in unit and verify operation. -Connect water supply (if applicable). • Verify icemaker fill tube is properly inserted. • Verify icemaker bail arm is down. • Verify dispenser operation (if applicable). -Align/square door(s). -Verify drain pan is properly installed...
... cabinet size. -Verify electrical supply and water supply (if applicable). -Install anti-tip device(s) and verify unit is secure. -Position unit in cutout, level at desired height and secure unit. -Plug-in unit and verify operation. -Connect water supply (if applicable). • Verify icemaker fill tube is properly inserted. • Verify icemaker bail arm is down. • Verify dispenser operation (if applicable). -Align/square door(s). -Verify drain pan is properly installed...
Use and Care Manual
Page 3
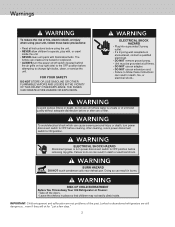
... change light bulbs, clean, or service the unit. FOR YOUR SAFETY DO NOT STORE OR USE GASOLINE OR OTHER FLAMMABLE VAPORS AND LIQUIDS IN THE VICINITY OF THIS OR ANY OTHER APPLIANCE. WARNING RISK OF CHILD ENTRAPMENT Before You Throw Away Your Old Refrigerator or Freezer: • Take off switch (located behind the air grille on /off the doors. • Leave the shelves...
... change light bulbs, clean, or service the unit. FOR YOUR SAFETY DO NOT STORE OR USE GASOLINE OR OTHER FLAMMABLE VAPORS AND LIQUIDS IN THE VICINITY OF THIS OR ANY OTHER APPLIANCE. WARNING RISK OF CHILD ENTRAPMENT Before You Throw Away Your Old Refrigerator or Freezer: • Take off switch (located behind the air grille on /off the doors. • Leave the shelves...
Use and Care Manual
Page 4
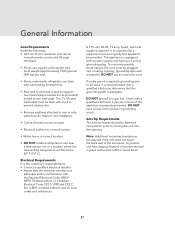
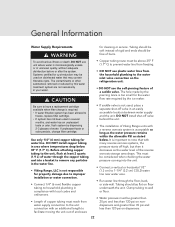
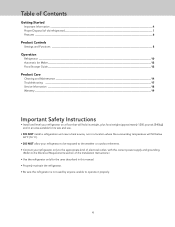
... old refrigerator 5 Features 6 Product Controls Settings and Functions 8 Operation Refrigerator 10 Automatic Ice Maker 12 Food Storage Guide 12 Product Care Cleaning and Maintenance 14 Troubleshooting 17 Service Information 18 Warranty 19 Important Safety Instructions • Install and level your refrigerator on a floor that will hold its weight, plus food weight (approximately 1200 pounds [540kg]) and in an area suitable for its size and use. • DO NOT install a refrigeration...
... old refrigerator 5 Features 6 Product Controls Settings and Functions 8 Operation Refrigerator 10 Automatic Ice Maker 12 Food Storage Guide 12 Product Care Cleaning and Maintenance 14 Troubleshooting 17 Service Information 18 Warranty 19 Important Safety Instructions • Install and level your refrigerator on a floor that will hold its weight, plus food weight (approximately 1200 pounds [540kg]) and in an area suitable for its size and use. • DO NOT install a refrigeration...

Use and Care Manual
Page 8
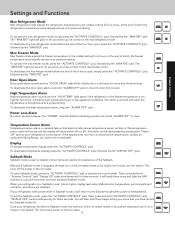
... "ACTIVATE CONTROLS" pad; Showroom mode is located behind the door above the cabinet interior. The fast cool light will return to function independently of refrigeraton system. Power On/Off Switch (Power Interruption Switch) The power on position after cleaning or changing light bulbs. FREEZER MAX FRZ MAX REF FAST COOL SAB SHOW C F REFRIGERATOR DOOR OPEN POWER HIGH TEMP Showroom Mode Initiation Showroom mode allows electronic controls and interior lights to the previous setting. Electronic Temperature Settings Your refrigerator's electronic controls are located behind...
... "ACTIVATE CONTROLS" pad; Showroom mode is located behind the door above the cabinet interior. The fast cool light will return to function independently of refrigeraton system. Power On/Off Switch (Power Interruption Switch) The power on position after cleaning or changing light bulbs. FREEZER MAX FRZ MAX REF FAST COOL SAB SHOW C F REFRIGERATOR DOOR OPEN POWER HIGH TEMP Showroom Mode Initiation Showroom mode allows electronic controls and interior lights to the previous setting. Electronic Temperature Settings Your refrigerator's electronic controls are located behind...
Use and Care Manual
Page 9
... the ice maker needs to let you 've turned on your refrigerator is used to activate the control panel. High Temperature Alarm High temperature alarm sounds and the "HIGH TEMP" light glows if the refrigerator or the freezer temperature is open for more than three minutes. To deactivate temperature display, press the "ACTIVATE CONTROLS" pad, followed by the "MAX FRZ" pad. This will return to a proper setting. To deactivate the max freezer mode before...
... the ice maker needs to let you 've turned on your refrigerator is used to activate the control panel. High Temperature Alarm High temperature alarm sounds and the "HIGH TEMP" light glows if the refrigerator or the freezer temperature is open for more than three minutes. To deactivate temperature display, press the "ACTIVATE CONTROLS" pad, followed by the "MAX FRZ" pad. This will return to a proper setting. To deactivate the max freezer mode before...
Use and Care Manual
Page 10
..., handle tempered glass shelves carefully. Note: Foods and beverages placed on the refrigerator door. To remove the dairy compartments, simply grasp, lift up easier. To replace shelves, guide the rear hooks of the shelf into the slots, and lower the front of polypropylene molded around the glass and metal rail. Shelves may freeze. To replace, position the dairy compartment over the glides in the shelf supports. To remove a bin, simply...
..., handle tempered glass shelves carefully. Note: Foods and beverages placed on the refrigerator door. To remove the dairy compartments, simply grasp, lift up easier. To replace shelves, guide the rear hooks of the shelf into the slots, and lower the front of polypropylene molded around the glass and metal rail. Shelves may freeze. To replace, position the dairy compartment over the glides in the shelf supports. To remove a bin, simply...
Use and Care Manual
Page 12
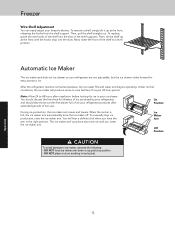
... hours after extended periods of non-use. Then, tilt the shelf up past stop ice production, raise the ice maker arm. The ice maker won't produce any more ice until the hooks drop into the slots in your ice drawer. Freezer Wire Shelf Adjustment You can easily adjust your refrigerator are not adjustable, but the ice drawer slides forward for ice in the shelf supports. Then, pull the shelf straight out. You should discard the...
... hours after extended periods of non-use. Then, tilt the shelf up past stop ice production, raise the ice maker arm. The ice maker won't produce any more ice until the hooks drop into the slots in your ice drawer. Freezer Wire Shelf Adjustment You can easily adjust your refrigerator are not adjustable, but the ice drawer slides forward for ice in the shelf supports. Then, pull the shelf straight out. You should discard the...
Use and Care Manual
Page 14
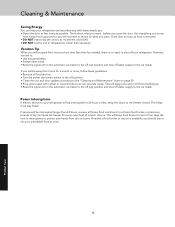
... of warm water. Use a soft, clean cloth. Also, NEVER wash the ice bucket or shelves in one quart of dependable service. They must be cleaned by hand. Part Removable parts (shelves, drawers) Front door panels • stainless steel • painted Interior walls ((allow freezer to warm up so cloth will not stick) Door liners and gaskets Plastic parts (covers, panels) Super Clog-Resistant™ Condenser* Cleaning Chart What to give you how to clean your refrigerator with...
... of warm water. Use a soft, clean cloth. Also, NEVER wash the ice bucket or shelves in one quart of dependable service. They must be cleaned by hand. Part Removable parts (shelves, drawers) Front door panels • stainless steel • painted Interior walls ((allow freezer to warm up so cloth will not stick) Door liners and gaskets Plastic parts (covers, panels) Super Clog-Resistant™ Condenser* Cleaning Chart What to give you how to clean your refrigerator with...

Use and Care Manual
Page 15
... defrost pan to unit. Spray warm water into metal track and lowering front. Door Gaskets Clean the door gaskets every three months using a 3/16" (0.5 cm) allen wrench. You should apply a light film of petroleum jelly to keep gaskets pliable. Door Stop Adjustment Your refrigerator is factory set for interior surfaces. Pull defrost pan forward until it stops. CAUTION To avoid personal injury or property damage, handle tempered glass shelves carefully. Then pull the shelf out...
... defrost pan to unit. Spray warm water into metal track and lowering front. Door Gaskets Clean the door gaskets every three months using a 3/16" (0.5 cm) allen wrench. You should apply a light film of petroleum jelly to keep gaskets pliable. Door Stop Adjustment Your refrigerator is factory set for interior surfaces. Pull defrost pan forward until it stops. CAUTION To avoid personal injury or property damage, handle tempered glass shelves carefully. Then pull the shelf out...
Use and Care Manual
Page 16
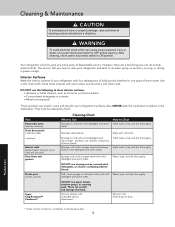
... automatic ice maker to the off (up ) position and shut off water supply to the ice maker. Cleaning & Maintenance Saving Energy You can help your refrigerator use or can circulate inside the freezer for 24 hours or less, keep odor and mold from building up. • Raise the signal arm in the automatic ice maker to the off (up ) position and shut off water supply to the ice maker. Think...
... automatic ice maker to the off (up ) position and shut off water supply to the ice maker. Cleaning & Maintenance Saving Energy You can help your refrigerator use or can circulate inside the freezer for 24 hours or less, keep odor and mold from building up. • Raise the signal arm in the automatic ice maker to the off (up ) position and shut off water supply to the ice maker. Think...

Use and Care Manual
Page 17
... connected to water supply, stop sound by raising ice maker arm to keep cubes seperated. • On/off position. If the unit is connected to the water valve? Make sure the pan is normal. The motor naturally runs longer on page 35 for service. This is level so it can solve your refrigerator is in the defrost pan Lights do not work Motor seems to ON (down) position. • Is the water valve turned...
... connected to water supply, stop sound by raising ice maker arm to keep cubes seperated. • On/off position. If the unit is connected to the water valve? Make sure the pan is normal. The motor naturally runs longer on page 35 for service. This is level so it can solve your refrigerator is in the defrost pan Lights do not work Motor seems to ON (down) position. • Is the water valve turned...
Use and Care Manual
Page 19
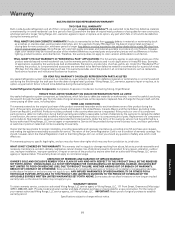
.... SIX YEAR FULL WARRANTY ON SEALED REFRIGERATION PARTS AS LISTED Any sealed refrigeration system component, as specified under the limited warranty. Viking Range, LLC, warrantor, agrees to repair or replace, at overtime or premium rates shall not be performed by a factory authorized Viking Range, LLC service agent or representative. If the product or one of its free installation, except as listed below *†...
.... SIX YEAR FULL WARRANTY ON SEALED REFRIGERATION PARTS AS LISTED Any sealed refrigeration system component, as specified under the limited warranty. Viking Range, LLC, warrantor, agrees to repair or replace, at overtime or premium rates shall not be performed by a factory authorized Viking Range, LLC service agent or representative. If the product or one of its free installation, except as listed below *†...
Two-Page Specifications Sheet
Page 1
... FREEZER STORAGE §§Three adjustable wire shelves for three minutes, and that the temperature has risen above normal operating range MODEL NUMBERS §§VCSB5423 - 42"W. QUIET COOL™ BUILT-IN 42"W. sealed refrigeration system §§90-day full - sealed refrigeration system improves food storage because the unit defrosts less often §§Factory-installed automatic ice maker features large-capacity ice bucket §§Door alarm...
... FREEZER STORAGE §§Three adjustable wire shelves for three minutes, and that the temperature has risen above normal operating range MODEL NUMBERS §§VCSB5423 - 42"W. QUIET COOL™ BUILT-IN 42"W. sealed refrigeration system §§90-day full - sealed refrigeration system improves food storage because the unit defrosts less often §§Factory-installed automatic ice maker features large-capacity ice bucket §§Door alarm...

Two-Page Specifications Sheet
Page 2
.... (238 kg) Please do not prepare installation from rear To front edge of side trim: To front of top grille: To front of handle endcap: Cutout Width Cutout Height Cutout Depth Electrical Requirements Maximum Amp Usage Inlet Water Requirements Overall Interior Dimensions Refrigerator Freezer Total Capacity Approximate Shipping Weight 4 2 " W. QUIET COOL™ BUILT-IN 42"W. S I D E VCSB5423 VCSB5423 FLUSH MOUNT 42" (106.7 cm) 82...
.... (238 kg) Please do not prepare installation from rear To front edge of side trim: To front of top grille: To front of handle endcap: Cutout Width Cutout Height Cutout Depth Electrical Requirements Maximum Amp Usage Inlet Water Requirements Overall Interior Dimensions Refrigerator Freezer Total Capacity Approximate Shipping Weight 4 2 " W. QUIET COOL™ BUILT-IN 42"W. S I D E VCSB5423 VCSB5423 FLUSH MOUNT 42" (106.7 cm) 82...

