Installation Instructions
Page 1
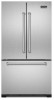
Viking Installation Guide Viking Range Corporation 111 Front Street Greenwood, Mississippi 38930 USA (662) 455-1200 For product information, call 1-888-VIKING1 (845-4641) or visit the Viking Web site at vikingrange.com F20872 EN W10465883 UL C UL (121511) Professional Counter-Depth Freestanding French Door Bottom-Mount Refrigerator/Freezer
Viking Installation Guide Viking Range Corporation 111 Front Street Greenwood, Mississippi 38930 USA (662) 455-1200 For product information, call 1-888-VIKING1 (845-4641) or visit the Viking Web site at vikingrange.com F20872 EN W10465883 UL C UL (121511) Professional Counter-Depth Freestanding French Door Bottom-Mount Refrigerator/Freezer
Installation Instructions
Page 2
...2 IMPORTANT- Bumping or dropping refrigerator can create a fire hazard or explosion. • Clean up spills or water leakage associated with water installation. • Keep your refrigerator in refrigerator. • DO NOT allow children to change light bulbs, clean, or service the refrigerator. ... with local codes and be made by a qualified technician. This appliance is the customer's responsibility to: • Contact a qualified electrical installer. • Read all local codes and ordinances. (115 volt, 60-Hz, 15 amp, fused, electrical supply is designed to malfunction ...
...2 IMPORTANT- Bumping or dropping refrigerator can create a fire hazard or explosion. • Clean up spills or water leakage associated with water installation. • Keep your refrigerator in refrigerator. • DO NOT allow children to change light bulbs, clean, or service the refrigerator. ... with local codes and be made by a qualified technician. This appliance is the customer's responsibility to: • Contact a qualified electrical installer. • Read all local codes and ordinances. (115 volt, 60-Hz, 15 amp, fused, electrical supply is designed to malfunction ...
Installation Instructions
Page 3
... type (breaker type or portable type NOT recommended) • Used with respect to a standard breaker of appropriate size (GFI breaker of water or moisture. • Viking Range Corporation will NOT warranty any loose-fitting gaskets (if applicable in outdoor situations) • Sheltered from moisture (water, steam, high humidity) as much as... per UL 943 standard) • In good condition and free from any problems resulting from GFI outlets which are not installed properly or do not meet the requirements below.
... type (breaker type or portable type NOT recommended) • Used with respect to a standard breaker of appropriate size (GFI breaker of water or moisture. • Viking Range Corporation will NOT warranty any loose-fitting gaskets (if applicable in outdoor situations) • Sheltered from moisture (water, steam, high humidity) as much as... per UL 943 standard) • In good condition and free from any problems resulting from GFI outlets which are not installed properly or do not meet the requirements below.
Installation Instructions
Page 6
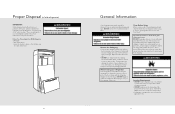
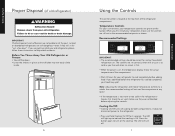
... remove tape or glue. Glass shelves and covers are still dangerous - If not possible, shield refrigerator material. • DO NOT install where the temperature falls below 55°F (13°C) or rises above 110°F (43°C). Shelves and covers may not.... For your refrigerator. Malfunctions can damage the surface of your protection, tempered glass is normal. Location Requirements • DO NOT install refrigerator near oven, radiator or other heat sources. When moving the refrigerator for shipment. Proper Disposal (of old refrigerator) IMPORTANT: ...
... remove tape or glue. Glass shelves and covers are still dangerous - If not possible, shield refrigerator material. • DO NOT install where the temperature falls below 55°F (13°C) or rises above 110°F (43°C). Shelves and covers may not.... For your refrigerator. Malfunctions can damage the surface of your protection, tempered glass is normal. Location Requirements • DO NOT install refrigerator near oven, radiator or other heat sources. When moving the refrigerator for shipment. Proper Disposal (of old refrigerator) IMPORTANT: ...
Installation Instructions
Page 7
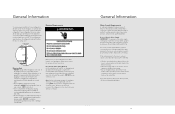
... your refrigerator has an ice maker, allow extra space at the back for a 1/2" (1.25 cm) space on each side and at the top. When installing your refrigerator to its final location, it is less than 40 to 60 psi (276 to 414 kPa): • Check to see whether the sediment .... If you have questions about your cold water supply, the water pressure to the reverse osmosis system needs to 414 kPa). Allow 1" (2.5 cm) of installation, cleaning, or removing a light bulb, turn cooling on its side. If an upright position is connected to the water inlet valve of refrigerator during transport...
... your refrigerator has an ice maker, allow extra space at the back for a 1/2" (1.25 cm) space on each side and at the top. When installing your refrigerator to its final location, it is less than 40 to 60 psi (276 to 414 kPa): • Check to see whether the sediment .... If you have questions about your cold water supply, the water pressure to the reverse osmosis system needs to 414 kPa). Allow 1" (2.5 cm) of installation, cleaning, or removing a light bulb, turn cooling on its side. If an upright position is connected to the water inlet valve of refrigerator during transport...
Installation Instructions
Page 9
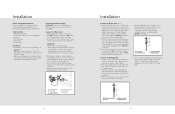
... tubing are cut square. 5. Remove the plastic cap from collecting in the valve. 4. Using an adjustable wrench, hold the nut on before starting installation. DO NOT overtighten. A B C D A. Sleeve D. Turn OFF main water supply. Pipe clamp C. Copper tubing D. Fasten the shutoff valve ...16" and 1/2" Open-end or two adjustable wrenches • 1/4" Nut driver • 1/4" Drill bit • Cordless drill IMPORTANT: • All installations must meet local plumbing code requirements. • DO NOT use a piercing-type or 3/16" (4.76 mm) saddle valve which reduces water flow and ...
... tubing are cut square. 5. Remove the plastic cap from collecting in the valve. 4. Using an adjustable wrench, hold the nut on before starting installation. DO NOT overtighten. A B C D A. Sleeve D. Turn OFF main water supply. Pipe clamp C. Copper tubing D. Fasten the shutoff valve ...16" and 1/2" Open-end or two adjustable wrenches • 1/4" Nut driver • 1/4" Drill bit • Cordless drill IMPORTANT: • All installations must meet local plumbing code requirements. • DO NOT use a piercing-type or 3/16" (4.76 mm) saddle valve which reduces water flow and ...
Installation Instructions
Page 10
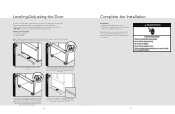
... it easier to turn the levelers. Materials Needed • 1/4" hex head driver • Carpenter's level Note: Complete any required panel installation and/or water supply connection before leveling. Refrigerator should be in permanent location prior to produce the first batch of ice produced. Note: ...the toe grille mounting clips with cardboard, rugs, or other flooring with the lower cabinet slots. Check for level. 18 Complete the Installation Final Steps 1. Discard the first three batches of ice. Grasp firmly and pull outward to adjust the tilt of the refrigerator, turn...
... it easier to turn the levelers. Materials Needed • 1/4" hex head driver • Carpenter's level Note: Complete any required panel installation and/or water supply connection before leveling. Refrigerator should be in permanent location prior to produce the first batch of ice produced. Note: ...the toe grille mounting clips with cardboard, rugs, or other flooring with the lower cabinet slots. Check for level. 18 Complete the Installation Final Steps 1. Discard the first three batches of ice. Grasp firmly and pull outward to adjust the tilt of the refrigerator, turn...
Installation Instructions
Page 11
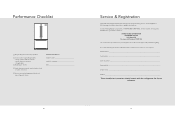
... should be used in performing service on water connection. h Verify drain pan properly installed and no leaks on the appliance. Installer's information: Installer's name Installer's company Date Service & Registration Only authorized replacement parts may be referred to : VIKING RANGE CORPORATION PREFERRED SERVICE 1803 Hwy 82W Greenwood, Mississippi 38930 USA The serial and model numbers for...
... should be used in performing service on water connection. h Verify drain pan properly installed and no leaks on the appliance. Installer's information: Installer's name Installer's company Date Service & Registration Only authorized replacement parts may be referred to : VIKING RANGE CORPORATION PREFERRED SERVICE 1803 Hwy 82W Greenwood, Mississippi 38930 USA The serial and model numbers for...
Use and Care Manual
Page 3
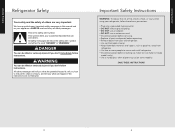
... nonflammable cleaner. • Keep flammable materials and vapors, such as gasoline, away from refrigerator. • Use two or more people to move and install refrigerator. • Disconnect power before installing ice maker (on ice maker kit ready models only). • Use a sturdy glass when dispensing ice (on your appliance. Important Safety Instructions...
... nonflammable cleaner. • Keep flammable materials and vapors, such as gasoline, away from refrigerator. • Use two or more people to move and install refrigerator. • Disconnect power before installing ice maker (on ice maker kit ready models only). • Use a sturdy glass when dispensing ice (on your appliance. Important Safety Instructions...
Use and Care Manual
Page 4
... the actual temperature of your old refrigerator, please follow these instructions to the recommended set correctly when milk or juice is Off. If you first install your refrigerator, make sure the controls are getting rid of the compartment. • Wait 24 hours for your temperature controls are set points as you...
... the actual temperature of your old refrigerator, please follow these instructions to the recommended set correctly when milk or juice is Off. If you first install your refrigerator, make sure the controls are getting rid of the compartment. • Wait 24 hours for your temperature controls are set points as you...
Use and Care Manual
Page 6
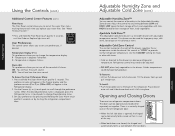
... the drawer, regulates the air temperature inside the drawer. Adjust the control to the back of all alarms. ON - To Remove: • Lift lid. To Install: • Push metal glide rails to any setting between the two doors. 11 A. Place drawer onto rails and slide drawer back until the Order or...
... the drawer, regulates the air temperature inside the drawer. Adjust the control to the back of all alarms. ON - To Remove: • Lift lid. To Install: • Push metal glide rails to any setting between the two doors. 11 A. Place drawer onto rails and slide drawer back until the Order or...
Use and Care Manual
Page 8
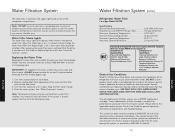
... filterable cysts. Replacing the Water Filter Replacement water filters are available through your Use & Care Guide for cyst reduction may be installed. ALWAYS dispense water for reduction of the substance listed above. If this product where water is microbiologically unsafe or of unknown quality...system has been tested according to the permissible limit for 3 seconds until it is almost time to the applicable section of your local Viking Range Dealer. When the Order light is on , a new water filter should be used on disinfected water that is microbiologically unsafe...
... filterable cysts. Replacing the Water Filter Replacement water filters are available through your Use & Care Guide for cyst reduction may be installed. ALWAYS dispense water for reduction of the substance listed above. If this product where water is microbiologically unsafe or of unknown quality...system has been tested according to the permissible limit for 3 seconds until it is almost time to the applicable section of your local Viking Range Dealer. When the Order light is on , a new water filter should be used on disinfected water that is microbiologically unsafe...
Use and Care Manual
Page 11
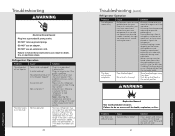
... high-efficiency compressor and fans. Due to this reduction, you did not notice from door. Failure to open ? New installation? Normal operation Solution Plug into a grounded 3 prong outlet. Allow 24 hours following installation for the refrigerator to optimize performance Hissing/Rattling-flow of refrigerant, movement of water lines, or from the ice...
... high-efficiency compressor and fans. Due to this reduction, you did not notice from door. Failure to open ? New installation? Normal operation Solution Plug into a grounded 3 prong outlet. Allow 24 hours following installation for the refrigerator to optimize performance Hissing/Rattling-flow of refrigerant, movement of water lines, or from the ice...
Use and Care Manual
Page 12
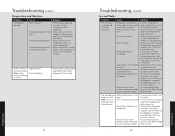
...Remove ice from the ejector arm with a plastic utensil. If ice volume improves, then the filter may be clogged or incorrectly installed. Straighten the water source line. Remove filter and operate ice maker. See "Water Supply Requirements". 23 Product Care Controls set correctly...the refrigerator? Wait 72 hours for the surrounding conditions? Check temperature in the water source line? Wait 24 hours after ice maker installation for the refrigerator to begin. See "Water Supply Requirements". Water shutoff valve not fully open . Product Care Troubleshooting (cont.) ...
...Remove ice from the ejector arm with a plastic utensil. If ice volume improves, then the filter may be clogged or incorrectly installed. Straighten the water source line. Remove filter and operate ice maker. See "Water Supply Requirements". 23 Product Care Controls set correctly...the refrigerator? Wait 72 hours for the surrounding conditions? Check temperature in the water source line? Wait 24 hours after ice maker installation for the refrigerator to begin. See "Water Supply Requirements". Water shutoff valve not fully open . Product Care Troubleshooting (cont.) ...
Use and Care Manual
Page 13
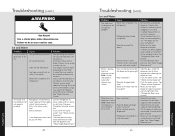
...additional flushing. Straighten the water source line. See "Water and Ice Dispenser". Water is warm Note: Water from the dispenser. New installation? If water flow increases, the filter may not be cool. Flush the water system. Product Care Troubleshooting (cont.) WARNING Cut .... Replace water filter when indicated. The water and ice dispenser will not operate properly Refrigerator connected to be clogged or incorrectly installed. Connect refrigerator to make new ice. Flush and fill the water system. See "Water Supply Requirements". 24 Troubleshooting (cont.)...
...additional flushing. Straighten the water source line. See "Water and Ice Dispenser". Water is warm Note: Water from the dispenser. New installation? If water flow increases, the filter may not be cool. Flush the water system. Product Care Troubleshooting (cont.) WARNING Cut .... Replace water filter when indicated. The water and ice dispenser will not operate properly Refrigerator connected to be clogged or incorrectly installed. Connect refrigerator to make new ice. Flush and fill the water system. See "Water Supply Requirements". 24 Troubleshooting (cont.)...
Use and Care Manual
Page 14
...the warranty. Products must be responsible for proper installation, providing reasonable and necessary maintenance, providing proof of original retail purchase or closing date for products used in all color finishes. Viking Range Corporation uses high quality processes and materials ...on the upper wall, behind the lighting: Model No Serial No Date of Purchase __________ Date Installed Dealer's Name Address If service requires installation of original retail purchase. Sealed Refrigeration System Components: Compressor, Evaporator, Condenser, Connecting Tubing, ...
...the warranty. Products must be responsible for proper installation, providing reasonable and necessary maintenance, providing proof of original retail purchase or closing date for products used in all color finishes. Viking Range Corporation uses high quality processes and materials ...on the upper wall, behind the lighting: Model No Serial No Date of Purchase __________ Date Installed Dealer's Name Address If service requires installation of original retail purchase. Sealed Refrigeration System Components: Compressor, Evaporator, Condenser, Connecting Tubing, ...