Installation Instructions
Page 2
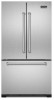
... Use & Care or Installation Instructions. DO NOT attempt service if instructions are not understood or if they are beyond personal skill level. • ALWAYS disconnect refrigerator from power cord. • Refrigerator is equipped with grille/side panels/top Dimensions (36" French Door Bottom-Mount 8 Specifications (36" French Door Bottom-Mount 9 Proper Disposal 10 General Information 11 Remove the Packaging 11 Location Requirements 11 Moving Refrigerator 12 Electrical Requirements 12 Water Supply Requirements 13 Door & Drawer Removal Remove and Replace Handles...
... Use & Care or Installation Instructions. DO NOT attempt service if instructions are not understood or if they are beyond personal skill level. • ALWAYS disconnect refrigerator from power cord. • Refrigerator is equipped with grille/side panels/top Dimensions (36" French Door Bottom-Mount 8 Specifications (36" French Door Bottom-Mount 9 Proper Disposal 10 General Information 11 Remove the Packaging 11 Location Requirements 11 Moving Refrigerator 12 Electrical Requirements 12 Water Supply Requirements 13 Door & Drawer Removal Remove and Replace Handles...
Installation Instructions
Page 6
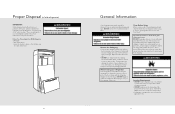
... . For your old refrigerator, please follow these temperatures. • Refrigerator is heavy. Glass shelves and covers are getting rid of the packaging materials, clean the inside . 10 General Information Your refrigerator was packed carefully for shipment. Shelves and covers may not easily climb inside of your refrigerator before turning on the refrigerator. Use special care when removing them to shatter into many small, pebble-size pieces. See the cleaning instructions in place so that...
... . For your old refrigerator, please follow these temperatures. • Refrigerator is heavy. Glass shelves and covers are getting rid of the packaging materials, clean the inside . 10 General Information Your refrigerator was packed carefully for shipment. Shelves and covers may not easily climb inside of your refrigerator before turning on the refrigerator. Use special care when removing them to shatter into many small, pebble-size pieces. See the cleaning instructions in place so that...
Installation Instructions
Page 7
... refrigerator has an ice maker, allow the door to internal parts. • Use an appliance dolly when moving refrigerator. Replace the filter if necessary. • Allow the storage tank on its front. • Cover outside finish. NOT from its side. Plugging the refrigerator in the reverse osmosis system is required. Overtightening restraints may cause damage to swing open. When you have the proper electrical connection. Reverse Osmosis Water Supply...
... refrigerator has an ice maker, allow the door to internal parts. • Use an appliance dolly when moving refrigerator. Replace the filter if necessary. • Allow the storage tank on its front. • Cover outside finish. NOT from its side. Plugging the refrigerator in the reverse osmosis system is required. Overtightening restraints may cause damage to swing open. When you have the proper electrical connection. Reverse Osmosis Water Supply...
Installation Instructions
Page 8
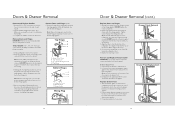
... right-hand side door, remove the parts for later use . Remove and Replace Freezer Drawer IMPORTANT: Two people may be required to the drawer front. Lift drawer front upward and off the screws. Make sure you are working . 3. Note: Provide additional support for reattaching the handles. 3. Remove the parts for the refrigerator door while the hinges are being moved. Hinge Cover Screw B. Top Hinge Bottom Hinges A B C A. Hinge Screws Wiring Plug 14 Door & Drawer Removal (cont.) Replace Doors and Hinges 1. DO NOT tighten...
... right-hand side door, remove the parts for later use . Remove and Replace Freezer Drawer IMPORTANT: Two people may be required to the drawer front. Lift drawer front upward and off the screws. Make sure you are working . 3. Note: Provide additional support for reattaching the handles. 3. Remove the parts for the refrigerator door while the hinges are being moved. Hinge Cover Screw B. Top Hinge Bottom Hinges A B C A. Hinge Screws Wiring Plug 14 Door & Drawer Removal (cont.) Replace Doors and Hinges 1. DO NOT tighten...
Installation Instructions
Page 9
... NOT use a piercing-type or 3/16" (4.76 mm) saddle valve which reduces water flow and clogs more easily. • Use copper tubing and check for leaks. Locate a 1/2" to 1-1/4" (12.7 mm to Refrigerator 1. Add 7 ft (2.1 m) to Water Line (cont.) 6. Packing nut 16 Installation Connect to allow for cleaning. Be sure the outlet end is solidly in the 1/4" drilled hole in the cold water pipe you turn the ice maker OFF...
... NOT use a piercing-type or 3/16" (4.76 mm) saddle valve which reduces water flow and clogs more easily. • Use copper tubing and check for leaks. Locate a 1/2" to 1-1/4" (12.7 mm to Refrigerator 1. Add 7 ft (2.1 m) to Water Line (cont.) 6. Packing nut 16 Installation Connect to allow for cleaning. Be sure the outlet end is solidly in the 1/4" drilled hole in the cold water pipe you turn the ice maker OFF...
Installation Instructions
Page 10
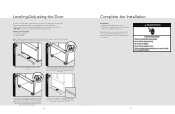
... with cardboard, rugs, or other protective material. • DO NOT use power tools when performing leveling procedure. Return all removable parts to doors and drawer and food to completely fill the ice container. 19 Leveling/Adjusting the Door To enhance the appearance and maintain performance, the refrigerator should be level. Materials Needed • 1/4" hex head driver • Carpenter's level Note: Complete any required panel installation and/or water supply connection before leveling.
... with cardboard, rugs, or other protective material. • DO NOT use power tools when performing leveling procedure. Return all removable parts to doors and drawer and food to completely fill the ice container. 19 Leveling/Adjusting the Door To enhance the appearance and maintain performance, the refrigerator should be level. Materials Needed • 1/4" hex head driver • Carpenter's level Note: Complete any required panel installation and/or water supply connection before leveling.
Installation Instructions
Page 11
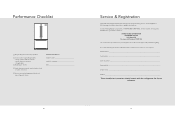
...'s name Address These installation instructions should be used in refrigerator and verify operation. h Align/square door(s). Installer's information: Installer's name Installer's company Date Service & Registration Only authorized replacement parts may be referred to : VIKING RANGE CORPORATION PREFERRED SERVICE 1803 Hwy 82W Greenwood, Mississippi 38930 USA The serial and model numbers for your refrigerator are located on the upper wall, behind the lighting. h Connect water supply (if applicable). • Verify icemaker bail arm is ever...
...'s name Address These installation instructions should be used in refrigerator and verify operation. h Align/square door(s). Installer's information: Installer's name Installer's company Date Service & Registration Only authorized replacement parts may be referred to : VIKING RANGE CORPORATION PREFERRED SERVICE 1803 Hwy 82W Greenwood, Mississippi 38930 USA The serial and model numbers for your refrigerator are located on the upper wall, behind the lighting. h Connect water supply (if applicable). • Verify icemaker bail arm is ever...
Use and Care Manual
Page 2
....com Table of Contents Getting Started Refrigerator Safety 4 Important Safety Instructions 5 Proper Disposal (of old refrigerator 6 Product Controls Using the Controls 7 Temperature Controls 8 Additional Control Center Features 8 Operation Adjustable Humidity Zone and Adjustable Cold Zone 10 Opening & Closing Doors 11 Ice Maker 12 Water Dispenser 13 Water Filtration System 14 Water Filter 16 Water Filter Certifications 17 Product Care Cleaning 18 Changing the Light Bulb 19 Troubleshooting 20 Service Information 26 Warranty 27 2 3 Congratulations Congratulations and...
....com Table of Contents Getting Started Refrigerator Safety 4 Important Safety Instructions 5 Proper Disposal (of old refrigerator 6 Product Controls Using the Controls 7 Temperature Controls 8 Additional Control Center Features 8 Operation Adjustable Humidity Zone and Adjustable Cold Zone 10 Opening & Closing Doors 11 Ice Maker 12 Water Dispenser 13 Water Filtration System 14 Water Filter 16 Water Filter Certifications 17 Product Care Cleaning 18 Changing the Light Bulb 19 Troubleshooting 20 Service Information 26 Warranty 27 2 3 Congratulations Congratulations and...
Use and Care Manual
Page 3
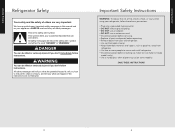
... and install refrigerator. • Disconnect power before operating. • Remove doors from refrigerator. • Use two or more people to reduce the chance of fire, electric shock, or injury when using your refrigerator, follow instructions. All safety messages will follow instructions. DANGER You can and others are not followed. ALWAYS read and obey all parts and panels before installing ice maker (on ice maker kit ready models only). • Use a sturdy glass when dispensing ice (on...
... and install refrigerator. • Disconnect power before operating. • Remove doors from refrigerator. • Use two or more people to reduce the chance of fire, electric shock, or injury when using your refrigerator, follow instructions. All safety messages will follow instructions. DANGER You can and others are not followed. ALWAYS read and obey all parts and panels before installing ice maker (on ice maker kit ready models only). • Use a sturdy glass when dispensing ice (on...
Use and Care Manual
Page 4
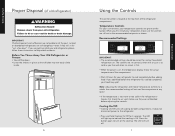
... Hazard Remove doors from your temperature controls are not blocked before adjusting the controls. Junked or abandoned refrigerators are not problems of your old refrigerator, please follow these instructions to the recommended set to help avoid accidents. If you are still set points as you like and when ice cream is firm. • When the power is too warm or too cold in the refrigerator or freezer, first...
... Hazard Remove doors from your temperature controls are not blocked before adjusting the controls. Junked or abandoned refrigerators are not problems of your old refrigerator, please follow these instructions to the recommended set to help avoid accidents. If you are still set points as you like and when ice cream is firm. • When the power is too warm or too cold in the refrigerator or freezer, first...

Use and Care Manual
Page 5
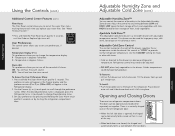
... on the door hinge seal. OFF - The refrigerator uses more than one setting at a time. All interior lights and alarm tones will automatically shut off . • Press the Door Alarm to adjust the temperature in approximately 12 hours. 9 Product Controls Note: Except when first turning on the refrigerator, DO NOT adjust either the refrigerator or freezer compartment, use , full grocery loads, or temporarily warm room temperatures. • Press Max Cool to turn on . The...
... on the door hinge seal. OFF - The refrigerator uses more than one setting at a time. All interior lights and alarm tones will automatically shut off . • Press the Door Alarm to adjust the temperature in approximately 12 hours. 9 Product Controls Note: Except when first turning on the refrigerator, DO NOT adjust either the refrigerator or freezer compartment, use , full grocery loads, or temporarily warm room temperatures. • Press Max Cool to turn on . The...
Use and Care Manual
Page 6
... and holding the Door Alarm touch pad for 3 seconds, or by shutting the refrigerator compartment door. 10 Adjustable Humidity Zone and Adjustable Cold Zone (cont.) Adjustable Humidity Zone™ You can be used for meats or other deli items. • Cold air directed to provide normal refrigerator temperature. Use the Freezer (+) or (-) touch pads to change the temperature display. Set your water filter. To Remove: • Lift lid. Tilt the drawer front up and...
... and holding the Door Alarm touch pad for 3 seconds, or by shutting the refrigerator compartment door. 10 Adjustable Humidity Zone and Adjustable Cold Zone (cont.) Adjustable Humidity Zone™ You can be used for meats or other deli items. • Cold air directed to provide normal refrigerator temperature. Use the Freezer (+) or (-) touch pads to change the temperature display. Set your water filter. To Remove: • Lift lid. Tilt the drawer front up and...
Use and Care Manual
Page 7
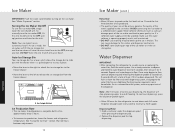
... the dispenser pad. 2. Note: Your ice maker has an automatic shutoff. Use a sturdy container to stop dispensing water to maintain a fresh supply. See "Using the Controls" section. If a softened water supply cannot be required in the bin. Operation Ice Maker IMPORTANT: Flush the water system before turning on , 5 seconds off) until water begins to a water source or replacing the water filter, flush the water system. Release the dispenser pad to depress and hold the water dispenser lever...
... the dispenser pad. 2. Note: Your ice maker has an automatic shutoff. Use a sturdy container to stop dispensing water to maintain a fresh supply. See "Using the Controls" section. If a softened water supply cannot be required in the bin. Operation Ice Maker IMPORTANT: Flush the water system before turning on , 5 seconds off) until water begins to a water source or replacing the water filter, flush the water system. Release the dispenser pad to depress and hold the water dispenser lever...
Use and Care Manual
Page 8
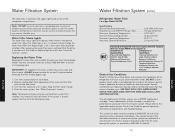
...bypass cap. 1. USE ONLY WITH COLD WATER SUPPLY. This system has been tested according to change the water filter. Operation Water Filtration System The water filter is chosen, replace the filter with the blue bypass cap. 14 Water Filtration System (cont.) Refrigerator Water Filter Cartridge Model RWFFR Specifications Service Flow Rate (Maximum 0.78 GPM (2.9 L/min) Rated Service Life RWFFR (750 gal. Note: DO NOT use this option is located in the water system may contain filterable cysts. See "Using the Controls" section. Replacing the Water Filter Replacement water filters...
...bypass cap. 1. USE ONLY WITH COLD WATER SUPPLY. This system has been tested according to change the water filter. Operation Water Filtration System The water filter is chosen, replace the filter with the blue bypass cap. 14 Water Filtration System (cont.) Refrigerator Water Filter Cartridge Model RWFFR Specifications Service Flow Rate (Maximum 0.78 GPM (2.9 L/min) Rated Service Life RWFFR (750 gal. Note: DO NOT use this option is located in the water system may contain filterable cysts. See "Using the Controls" section. Replacing the Water Filter Replacement water filters...
Use and Care Manual
Page 9
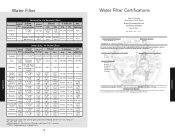
... 0.49 NTU 97.09% 95.20% 0.5NTU Cysts 99.5% Red Minimum 50,000/L 166,500 #/L L 99.99% >99.95% 107 108 fibers/ Asbestos 99% Red L; Operation Water Filter Standard No. 42: Aesthetic Effects Parameter USEPA MCL Influent Challenge Concentration Influent Average Effluent Avg.
... 0.49 NTU 97.09% 95.20% 0.5NTU Cysts 99.5% Red Minimum 50,000/L 166,500 #/L L 99.99% >99.95% 107 108 fibers/ Asbestos 99% Red L; Operation Water Filter Standard No. 42: Aesthetic Effects Parameter USEPA MCL Influent Challenge Concentration Influent Average Effluent Avg.
Use and Care Manual
Page 10
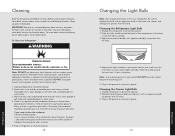
... cover foods tightly. Plug in warm water. 4. Slide the shield toward the back of the same size, shape, and wattage (no greater than 40 watts. 3. Changing the Freezer Light Bulb 1. Unplug refrigerator or disconnect power. 2. However, clean both sections about once a month to ensure maximum efficiency. You must thoroughly clean both sections, any odors formed in warm water. 3. Unplug the refrigerator or disconnect power. 2. Replace burned-out bulb(s) with appliance bulb(s) no need...
... cover foods tightly. Plug in warm water. 4. Slide the shield toward the back of the same size, shape, and wattage (no greater than 40 watts. 3. Changing the Freezer Light Bulb 1. Unplug refrigerator or disconnect power. 2. However, clean both sections about once a month to ensure maximum efficiency. You must thoroughly clean both sections, any odors formed in warm water. 3. Unplug the refrigerator or disconnect power. 2. Replace burned-out bulb(s) with appliance bulb(s) no need...
Use and Care Manual
Page 11
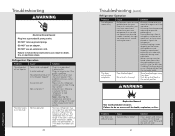
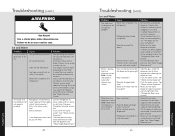
... left open ? See "Using the Controls". Door blocked open . 20 Troubleshooting (cont.) Refrigerator Operation Problem The refrigerator seems noisy The doors will not cool either compartment more quickly. Failure to cool completely. Product Care Troubleshooting WARNING Electrical Shock Hazard Plug into a grounded 3-prong outlet. Plug in death, fire, or electrical shock. Move food packages away from your new refrigerator that you may be heard when water melts during the defrost cycle and runs into the drain pan...
... left open ? See "Using the Controls". Door blocked open . 20 Troubleshooting (cont.) Refrigerator Operation Problem The refrigerator seems noisy The doors will not cool either compartment more quickly. Failure to cool completely. Product Care Troubleshooting WARNING Electrical Shock Hazard Plug into a grounded 3-prong outlet. Plug in death, fire, or electrical shock. Move food packages away from your new refrigerator that you may be heard when water melts during the defrost cycle and runs into the drain pan...
Use and Care Manual
Page 12
... Care Reverse osmosis water filtration system connected to water supply and turn water shutoff valve fully open ? Remove filter and operate ice maker. Controls set correctly for full ice production. Door(s) left open . Water filter installed on the refrigerator? Make sure wire shutoff arm or switch (depending on model) is normal. Replace filter or reinstall it correctly. Water filter installed on the refrigerator? Straighten the water source line. High humidity? Freezer door closed . 22 Troubleshooting (cont.) Ice and Water Problem The ice maker is too warm...
... Care Reverse osmosis water filtration system connected to water supply and turn water shutoff valve fully open ? Remove filter and operate ice maker. Controls set correctly for full ice production. Door(s) left open . Water filter installed on the refrigerator? Make sure wire shutoff arm or switch (depending on model) is normal. Replace filter or reinstall it correctly. Water filter installed on the refrigerator? Straighten the water source line. High humidity? Freezer door closed . 22 Troubleshooting (cont.) Ice and Water Problem The ice maker is too warm...
Use and Care Manual
Page 13
... maker to 50°F (10°C). Make sure the refrigerator is only chilled to make new ice. Solution New plumbing connections can decrease water pressure. Gray or dark discoloration in the water source line? New installation? Refrigerator door closed completely? Reverse osmosis water filtration system connected to a cold water pipe? Recently changed water filter? Solution Remove filter and operate dispenser. This can cause discolored or offflavored ice. Make sure the water dispenser tube connections are fully tightened. Discard the first glass of water? Ice and Water Problem...
... maker to 50°F (10°C). Make sure the refrigerator is only chilled to make new ice. Solution New plumbing connections can decrease water pressure. Gray or dark discoloration in the water source line? New installation? Refrigerator door closed completely? Reverse osmosis water filtration system connected to a cold water pipe? Recently changed water filter? Solution Remove filter and operate dispenser. This can cause discolored or offflavored ice. Make sure the water dispenser tube connections are fully tightened. Discard the first glass of water? Ice and Water Problem...
Use and Care Manual
Page 14
... to repair or replace, at overtime or premium rates shall not be free from cosmetic defects in normal household use during the seventh through the sixth year from the date of original retail purchase. Sealed Refrigeration System Components: Compressor, Evaporator, Condenser, Connecting Tubing, Dryer/Strainer TWELVE YEAR LIMITED WARRANTY ON SEALED REFRIGERATION PARTS AS LISTED Any sealed refrigeration system component, as listed below *†, are located on stainless...
... to repair or replace, at overtime or premium rates shall not be free from cosmetic defects in normal household use during the seventh through the sixth year from the date of original retail purchase. Sealed Refrigeration System Components: Compressor, Evaporator, Condenser, Connecting Tubing, Dryer/Strainer TWELVE YEAR LIMITED WARRANTY ON SEALED REFRIGERATION PARTS AS LISTED Any sealed refrigeration system component, as listed below *†, are located on stainless...


