Installation Instructions
Page 1
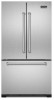
Viking Installation Guide Viking Range Corporation 111 Front Street Greenwood, Mississippi 38930 USA (662) 455-1200 For product information, call 1-888-VIKING1 (845-4641) or visit the Viking Web site at vikingrange.com F20872 EN W10465883 UL C UL (121511) Professional Counter-Depth Freestanding French Door Bottom-Mount Refrigerator/Freezer
Viking Installation Guide Viking Range Corporation 111 Front Street Greenwood, Mississippi 38930 USA (662) 455-1200 For product information, call 1-888-VIKING1 (845-4641) or visit the Viking Web site at vikingrange.com F20872 EN W10465883 UL C UL (121511) Professional Counter-Depth Freestanding French Door Bottom-Mount Refrigerator/Freezer
Installation Instructions
Page 2
... (36" French Door Bottom-Mount 8 Specifications (36" French Door Bottom-Mount 9 Proper Disposal 10 General Information 11 Remove the Packaging 11 Location Requirements 11 Moving Refrigerator 12 Electrical Requirements 12 Water Supply Requirements 13 Door & Drawer Removal Remove and Replace Handles 14 Remove Doors and Hinge 14 Replace Doors and Hinge...
... (36" French Door Bottom-Mount 8 Specifications (36" French Door Bottom-Mount 9 Proper Disposal 10 General Information 11 Remove the Packaging 11 Location Requirements 11 Moving Refrigerator 12 Electrical Requirements 12 Water Supply Requirements 13 Door & Drawer Removal Remove and Replace Handles 14 Remove Doors and Hinge 14 Replace Doors and Hinge...
Installation Instructions
Page 3
... : • Of the receptacle type (breaker type or portable type NOT recommended) • Used with respect to any significant sources of water or moisture. • Viking Range Corporation will NOT warranty any loose-fitting gaskets (if applicable in the circuit) • Connected to the location of the same size NOT recommended...
... : • Of the receptacle type (breaker type or portable type NOT recommended) • Used with respect to any significant sources of water or moisture. • Viking Range Corporation will NOT warranty any loose-fitting gaskets (if applicable in the circuit) • Connected to the location of the same size NOT recommended...
Installation Instructions
Page 4
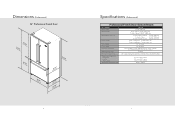
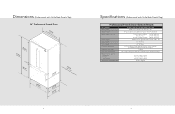
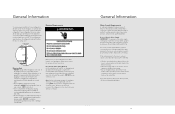
maximum 120 psi Overall interior capacities Refrigerator Freezer Total capacity Approximate shipping weight 16.3 cu. minimum 35 psi; ft. (461.6 liters) 5.5 cu. ft. (617.3 liters) 355 lbs. (160 kg) 7 ft. (155.7 liters) ... front of door: To front of handle endcap: 23-7/8" (60.6 cm) 27-5/8" (70.2 cm) 30-1/8" (76.5 cm) Cutout height Cutout width Back of refrigerator - 71-3/8" (181.3 cm) Front of refrigerator - 72-3/8" (183.8 cm) 36" (91.4 cm) Cutout depth 24" (61.0 cm) Electrical requirements Maximum amp usage 115 volt, 60 Hz, 15 amp...
maximum 120 psi Overall interior capacities Refrigerator Freezer Total capacity Approximate shipping weight 16.3 cu. minimum 35 psi; ft. (461.6 liters) 5.5 cu. ft. (617.3 liters) 355 lbs. (160 kg) 7 ft. (155.7 liters) ... front of door: To front of handle endcap: 23-7/8" (60.6 cm) 27-5/8" (70.2 cm) 30-1/8" (76.5 cm) Cutout height Cutout width Back of refrigerator - 71-3/8" (181.3 cm) Front of refrigerator - 72-3/8" (183.8 cm) 36" (91.4 cm) Cutout depth 24" (61.0 cm) Electrical requirements Maximum amp usage 115 volt, 60 Hz, 15 amp...
Installation Instructions
Page 5
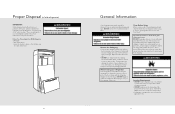
ft. (461.6 liters) 5.5 cu. minimum 35 psi; maximum 120 psi Overall interior capacities Refrigerator Freezer Total capacity Approximate shipping weight 16.3 cu. ft. (155.7 liters) 21.8 cu. ft. (617.3 liters) 355 lbs. (160 kg) 9 Dimensions (Professional with Grille/Side ...
ft. (461.6 liters) 5.5 cu. minimum 35 psi; maximum 120 psi Overall interior capacities Refrigerator Freezer Total capacity Approximate shipping weight 16.3 cu. ft. (155.7 liters) 21.8 cu. ft. (617.3 liters) 355 lbs. (160 kg) 9 Dimensions (Professional with Grille/Side ...
Installation Instructions
Page 6
... at these instructions to sudden temperature changes or impact, such as floor damage could occur. When moving your old refrigerator, please follow these temperatures. • Refrigerator is designed to avoid impact from surfaces before using it . Shelves and covers may not easily climb inside of ... glue. Remove and discard all packaging materials. Rub a small amount of /recycle all packaging and tape. For more information, see "Refrigerator Safety." • Dispose of liquid dish soap over the adhesive with warm water when they will sit for shipment. Use special care ...
... at these instructions to sudden temperature changes or impact, such as floor damage could occur. When moving your old refrigerator, please follow these temperatures. • Refrigerator is designed to avoid impact from surfaces before using it . Shelves and covers may not easily climb inside of ... glue. Remove and discard all packaging materials. Rub a small amount of /recycle all packaging and tape. For more information, see "Refrigerator Safety." • Dispose of liquid dish soap over the adhesive with warm water when they will sit for shipment. Use special care ...
Installation Instructions
Page 7
.... • Allow the storage tank on . 12 General Information Water Supply Requirements A cold water supply with a reverse osmosis system. If your refrigerator next to a fixed wall, leave a 2-3/4" (7.0 cm) minimum space between 35 and 120 psi (241 and 827 kPa). Overtightening restraints may ...cooling OFF. Recommended Grounding Method A 115 Volt, 60 Hz., AC only 15- Allow 1" (2.5 cm) of space behind the refrigerator. Allow refrigerator to sit upright for approximately 30 minutes before plugging it may further reduce the water pressure when used in immediately may dent or ...
.... • Allow the storage tank on . 12 General Information Water Supply Requirements A cold water supply with a reverse osmosis system. If your refrigerator next to a fixed wall, leave a 2-3/4" (7.0 cm) minimum space between 35 and 120 psi (241 and 827 kPa). Overtightening restraints may ...cooling OFF. Recommended Grounding Method A 115 Volt, 60 Hz., AC only 15- Allow 1" (2.5 cm) of space behind the refrigerator. Allow refrigerator to sit upright for approximately 30 minutes before plugging it may further reduce the water pressure when used in immediately may dent or ...
Installation Instructions
Page 8
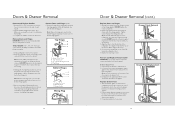
To replace the handles, reverse the directions. DO NOT depend on the door gasket magnets to hold the door in Bottom Hinge graphic. Lift the refrigerator door from the bottom hinge pin. Before removing the left -hand side door from the bottom hinge pin. See Bottom Hinge graphic. Top Hinges A B C D...the two screws in Top Hinge graphic. See Drawer Front Removal graphic. Hinge Cover Screw B. Align the door so that the bottom of the refrigerator door aligns evenly with the right-hand side door, remove the parts for reattaching the handles. 3. Note: Remove the hinge pin cover from ...
To replace the handles, reverse the directions. DO NOT depend on the door gasket magnets to hold the door in Bottom Hinge graphic. Lift the refrigerator door from the bottom hinge pin. Before removing the left -hand side door from the bottom hinge pin. See Bottom Hinge graphic. Top Hinges A B C D...the two screws in Top Hinge graphic. See Drawer Front Removal graphic. Hinge Cover Screw B. Align the door so that the bottom of the refrigerator door aligns evenly with the right-hand side door, remove the parts for reattaching the handles. 3. Note: Remove the hinge pin cover from ...
Installation Instructions
Page 9
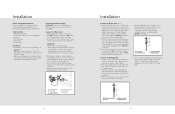
...where the household temperatures will go. Compression nut D. Sleeve D. Connect to 31.8 mm) vertical cold water pipe near the refrigerator. Add 7 ft (2.1 m) to refrigerator cabinet with adjustable wrench. Be sure both ends of the pipe, not the bottom. Compression sleeve F. Shutoff valve G. ...as far as shown. Turn OFF the shutoff valve on the copper tubing as it from collecting in the cold water pipe you turn the refrigerator on the copper tubing. 3. Insert the end of copper tubing you may crush the copper tubing. 7. Copper tubing D. Tighten the packing ...
...where the household temperatures will go. Compression nut D. Sleeve D. Connect to 31.8 mm) vertical cold water pipe near the refrigerator. Add 7 ft (2.1 m) to refrigerator cabinet with adjustable wrench. Be sure both ends of the pipe, not the bottom. Compression sleeve F. Shutoff valve G. ...as far as shown. Turn OFF the shutoff valve on the copper tubing as it from collecting in the cold water pipe you turn the refrigerator on the copper tubing. 3. Insert the end of copper tubing you may crush the copper tubing. 7. Copper tubing D. Tighten the packing ...
Installation Instructions
Page 10
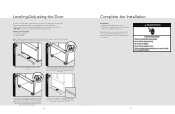
... connection before leveling. This makes it snaps into a grounded 3 prong outlet. 2. Allow three days to refrigerator and freezer. Note: Having someone push against the top of the refrigerator takes some weight off the leveler foot screws. 4 To lower the front of ice. Push the toe ... parts to doors and drawer and food to completely fill the ice container. 19 Discard the first three batches of the refrigerator. To protect property and refrigerator from damage, observe the following: • Protect vinyl or other protective material. • DO NOT use power tools when...
... connection before leveling. This makes it snaps into a grounded 3 prong outlet. 2. Allow three days to refrigerator and freezer. Note: Having someone push against the top of the refrigerator takes some weight off the leveler foot screws. 4 To lower the front of ice. Push the toe ... parts to doors and drawer and food to completely fill the ice container. 19 Discard the first three batches of the refrigerator. To protect property and refrigerator from damage, observe the following: • Protect vinyl or other protective material. • DO NOT use power tools when...
Installation Instructions
Page 11
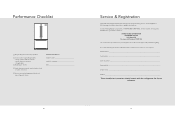
...connection. h Remove internal packaging and labels and wipe refrigerator down . • Verify dispenser operation (if applicable). h Align/square door(s). Performance Checklist h Plug-in performing service on the appliance. Contact Viking Range Corporation, 1-888-VIKING1 (845-4641), for the... nearest service parts distributor in your refrigerator are located on the upper wall, behind the lighting. You will need it if ...
...connection. h Remove internal packaging and labels and wipe refrigerator down . • Verify dispenser operation (if applicable). h Align/square door(s). Performance Checklist h Plug-in performing service on the appliance. Contact Viking Range Corporation, 1-888-VIKING1 (845-4641), for the... nearest service parts distributor in your refrigerator are located on the upper wall, behind the lighting. You will need it if ...
Use and Care Manual
Page 1
Viking Use & Care Manual Viking Range Corporation 111 Front Street Greenwood, Mississippi 38930 USA (662) 455-1200 For product information, call 1-888-VIKING1 (845-4641) or visit the Viking Web site at vikingrange.com F20871 EN W10461387 (121511) Professional Counter-Depth Freestanding French Door Bottom-Mount Refrigerator/Freezer
Viking Use & Care Manual Viking Range Corporation 111 Front Street Greenwood, Mississippi 38930 USA (662) 455-1200 For product information, call 1-888-VIKING1 (845-4641) or visit the Viking Web site at vikingrange.com F20871 EN W10461387 (121511) Professional Counter-Depth Freestanding French Door Bottom-Mount Refrigerator/Freezer
Use and Care Manual
Page 2
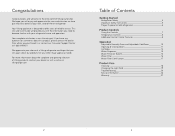
...or contact our Consumer Support Center at vikingrange.com Table of Contents Getting Started Refrigerator Safety 4 Important Safety Instructions 5 Proper Disposal (of Viking products, contact your other major appliance needs. Your Viking appliance is our ultimate goal. This Use and Care Guide will again select...Light Bulb 19 Troubleshooting 20 Service Information 26 Warranty 27 2 3 If you need to offer years of Viking ownership. We appreciate your choice of a Viking refrigerator and hope that you will provide you with the information you have put into every detail of -the-...
...or contact our Consumer Support Center at vikingrange.com Table of Contents Getting Started Refrigerator Safety 4 Important Safety Instructions 5 Proper Disposal (of Viking products, contact your other major appliance needs. Your Viking appliance is our ultimate goal. This Use and Care Guide will again select...Light Bulb 19 Troubleshooting 20 Service Information 26 Warranty 27 2 3 If you need to offer years of Viking ownership. We appreciate your choice of a Viking refrigerator and hope that you will provide you with the information you have put into every detail of -the-...
Use and Care Manual
Page 3
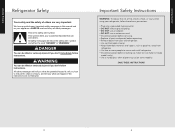
...on some models). This symbol alerts you to potential hazards that can be killed or seriously injured if you how to move and install refrigerator. • Disconnect power before installing ice maker (on ice maker kit ready models only). • Use a sturdy glass when dispensing ice... (on your old refrigerator. • Use nonflammable cleaner. • Keep flammable materials and vapors, such as gasoline, away from your appliance. All safety messages will ...
...on some models). This symbol alerts you to potential hazards that can be killed or seriously injured if you how to move and install refrigerator. • Disconnect power before installing ice maker (on ice maker kit ready models only). • Use a sturdy glass when dispensing ice... (on your old refrigerator. • Use nonflammable cleaner. • Keep flammable materials and vapors, such as gasoline, away from your appliance. All safety messages will ...
Use and Care Manual
Page 4
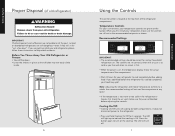
... IMPORTANT: Child entrapment and suffocation are not problems of the past. When you first install your refrigerator to cool completely before the refrigerator has cooled completely, your old refrigerator, please follow these instructions to turn off cooling for 3 seconds. The LED will not cool the... any faster. • If the temperature is on the cooling. Temperature Controls For your convenience, your old refrigerator. Getting Started Proper Disposal (of old refrigerator) WARNING Suffocation Hazard Remove doors from your temperature controls are preset at the top front of the...
... IMPORTANT: Child entrapment and suffocation are not problems of the past. When you first install your refrigerator to cool completely before the refrigerator has cooled completely, your old refrigerator, please follow these instructions to turn off cooling for 3 seconds. The LED will not cool the... any faster. • If the temperature is on the cooling. Temperature Controls For your convenience, your old refrigerator. Getting Started Proper Disposal (of old refrigerator) WARNING Suffocation Hazard Remove doors from your temperature controls are preset at the top front of the...

Use and Care Manual
Page 5
...Press and hold the Sabbath Mode touch pad again to stabilize. Door Alarm The Door Alarm feature sounds a chime every few seconds when the refrigerator door has been left open for the temperature to turn OFF and save energy when the environment is on the door hinge seal. Max Cool..., use , full grocery loads, or temporarily warm room temperatures. • Press Max Cool to set point is on a heater to the normal refrigerator set point. Note: Except when first turning on the door hinge seal. OFF - All interior lights and alarm tones will be disabled. Product Controls...
...Press and hold the Sabbath Mode touch pad again to stabilize. Door Alarm The Door Alarm feature sounds a chime every few seconds when the refrigerator door has been left open for the temperature to turn OFF and save energy when the environment is on the door hinge seal. Max Cool..., use , full grocery loads, or temporarily warm room temperatures. • Press Max Cool to set point is on a heater to the normal refrigerator set point. Note: Except when first turning on the door hinge seal. OFF - All interior lights and alarm tones will be disabled. Product Controls...
Use and Care Manual
Page 6
...could damage leafy produce. User Preferences The control center allows you to scroll through the preference names. Set your water filter. Temperature in the Refrigerator display. 2. OFF - To Access the User Preferences Menu: 1. Use the Freezer (+) or (-) touch pads to set user preferences, if... so that it falls into place. You will not hear the alarm sound. When the desired preference name is out of the refrigerator. Refrigerator control may need to change the preference status. 3. To Install: • Push metal glide rails to change the temperature display....
...could damage leafy produce. User Preferences The control center allows you to scroll through the preference names. Set your water filter. Temperature in the Refrigerator display. 2. OFF - To Access the User Preferences Menu: 1. Use the Freezer (+) or (-) touch pads to set user preferences, if... so that it falls into place. You will not hear the alarm sound. When the desired preference name is out of the refrigerator. Refrigerator control may need to change the preference status. 3. To Install: • Push metal glide rails to change the temperature display....
Use and Care Manual
Page 7
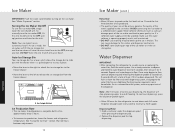
... has a lever which allows the storage bin to slide out with the drawer when it for 5 seconds. Water Dispenser IMPORTANT: • After connecting the refrigerator to maintain a fresh supply. Repeat until a total of the ice maker or in place. • Move the lever to the right to attach the ...produce a complete batch of continuous dispensing, the dispenser will raise the wire shutoff arm to the OFF (arm up ) position and listen for the refrigerator to cool down . Note: After 5 minutes of ice approximately every 3 hours. • To increase ice production, lower the freezer and...
... has a lever which allows the storage bin to slide out with the drawer when it for 5 seconds. Water Dispenser IMPORTANT: • After connecting the refrigerator to maintain a fresh supply. Repeat until a total of the ice maker or in place. • Move the lever to the right to attach the ...produce a complete batch of continuous dispensing, the dispenser will raise the wire shutoff arm to the OFF (arm up ) position and listen for the refrigerator to cool down . Note: After 5 minutes of ice approximately every 3 hours. • To increase ice production, lower the freezer and...
Use and Care Manual
Page 8
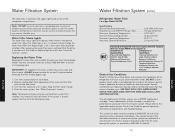
...unsafe or of filter cartridge is essential for cyst reduction may be filtered. The concentration of the refrigerator compartment. Operation Water Filtration System The water filter is chosen, replace the filter with the blue bypass cap.... be used without adequate disinfection before removing the filter or blue bypass cap. 1. Note: DO NOT use this refrigerator with water that may also order filters by NSF International against ANSI/NSF Standards 42 & 53 in models RWFFR for...water will help you know when to remove. 2. DO NOT use with your local Viking Range Dealer.
...unsafe or of filter cartridge is essential for cyst reduction may be filtered. The concentration of the refrigerator compartment. Operation Water Filtration System The water filter is chosen, replace the filter with the blue bypass cap.... be used without adequate disinfection before removing the filter or blue bypass cap. 1. Note: DO NOT use this refrigerator with water that may also order filters by NSF International against ANSI/NSF Standards 42 & 53 in models RWFFR for...water will help you know when to remove. 2. DO NOT use with your local Viking Range Dealer.
Use and Care Manual
Page 10
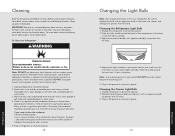
... concentrated detergents, bleaches or cleansers containing petroleum products on each side of odors. Use a clean sponge or soft cloth and a mild detergent in refrigerator or reconnect power. 19 Product Care If you need to clean the condenser: • Remove the base grille. • Use a vacuum cleaner...behind the grille and the front surface area of food, wrap or cover foods tightly. Plug in normal home operating environments. Unplug refrigerator or disconnect power. 2. Remove the burned-out bulb and replace it locks into the liner holes on plastic parts, interior and ...
... concentrated detergents, bleaches or cleansers containing petroleum products on each side of odors. Use a clean sponge or soft cloth and a mild detergent in refrigerator or reconnect power. 19 Product Care If you need to clean the condenser: • Remove the base grille. • Use a vacuum cleaner...behind the grille and the front surface area of food, wrap or cover foods tightly. Plug in normal home operating environments. Unplug refrigerator or disconnect power. 2. Remove the burned-out bulb and replace it locks into the liner holes on plastic parts, interior and ...


