
Two-Page Specifications Sheet
Page 1
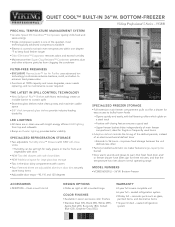
...-installed automatic ice maker features large-capacity ice bucket §§Door alarm sounds and glows to bulky frozen foods §§Opens quietly and easily, with soft-close slides §§NEW Additional space for fragile or frequently used items §§Adaptive defrost controls the timing of the defrost periods, instead of main freezer compartment; Bottom-Freezer ACCESSORIES §§PBIRFTKSS - sealed refrigeration...
...-installed automatic ice maker features large-capacity ice bucket §§Door alarm sounds and glows to bulky frozen foods §§Opens quietly and easily, with soft-close slides §§NEW Additional space for fragile or frequently used items §§Adaptive defrost controls the timing of the defrost periods, instead of main freezer compartment; Bottom-Freezer ACCESSORIES §§PBIRFTKSS - sealed refrigeration...
Two-Page Specifications Sheet
Page 2
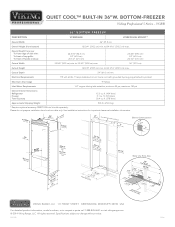
... liters) 5.1 cu. QUIET COOL™ BUILT-IN 36"W. ft. (145 liters) 20.4 cu. Specifications subject to 84-1/16" (213.5 cm) max. Cutout Depth 24" (61.0 cm) min. maximum 120 psi Overall Interior Dimensions Refrigerator Freezer Total Capacity 15.3 cu. F60330 0416 BOTTOM-FREEZER ® Viking Professional 5 Series - to change without notice. VCBB 36" BOTTOM-FREEZER DESCRIPTION Overall Width VCBB5363E 36" (91.5 cm...
... liters) 5.1 cu. QUIET COOL™ BUILT-IN 36"W. ft. (145 liters) 20.4 cu. Specifications subject to 84-1/16" (213.5 cm) max. Cutout Depth 24" (61.0 cm) min. maximum 120 psi Overall Interior Dimensions Refrigerator Freezer Total Capacity 15.3 cu. F60330 0416 BOTTOM-FREEZER ® Viking Professional 5 Series - to change without notice. VCBB 36" BOTTOM-FREEZER DESCRIPTION Overall Width VCBB5363E 36" (91.5 cm...
Use and Care Manual
Page 3
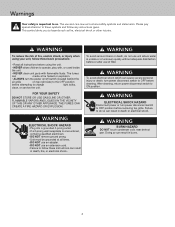
... cleaning, return power disconnect switch to do not use unit where water is unsafe or of unknown quality without adequate disinfection before or after use and care manual contains safety symbols and statements. This use of fire, electric shock, or injury when using the unit. • NEVER allow children to operate, play with, or crawl inside the unit. • NEVER clean unit parts with...
... cleaning, return power disconnect switch to do not use unit where water is unsafe or of unknown quality without adequate disinfection before or after use and care manual contains safety symbols and statements. This use of fire, electric shock, or injury when using the unit. • NEVER allow children to operate, play with, or crawl inside the unit. • NEVER clean unit parts with...
Use and Care Manual
Page 5
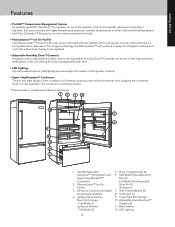
... preservation. Wire Freezer Basket (2) 8. Ice Bucket (1) 9. Because of the condenser coil prevents dust and other airborne particles from clogging the condenser. Large Pizza Box Storage 10. Adjustable Humidity Zone™ Drawers (2) 11. Electronic Controls with digital temperature readouts 4. Dairy Compartments (2) 6. LED Lighting 5 Plasmacluster™ Ion Air Purifier 3. Half-Width Adjustable Door Bins (3) Full-Width NonAdjustable Door Bin (1) (Patented ) 7. Deli Drawers 12. Getting Started Features...
... preservation. Wire Freezer Basket (2) 8. Ice Bucket (1) 9. Because of the condenser coil prevents dust and other airborne particles from clogging the condenser. Large Pizza Box Storage 10. Adjustable Humidity Zone™ Drawers (2) 11. Electronic Controls with digital temperature readouts 4. Dairy Compartments (2) 6. LED Lighting 5 Plasmacluster™ Ion Air Purifier 3. Half-Width Adjustable Door Bins (3) Full-Width NonAdjustable Door Bin (1) (Patented ) 7. Deli Drawers 12. Getting Started Features...
Use and Care Manual
Page 6
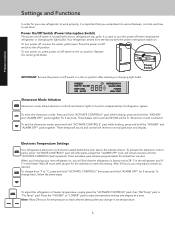
... SHOW will revert to normal operation and display. When you first plug your new refrigerator in, you will remain inactive until the "ACTIVATE CONTROLS"pad is entered. FREEZER MAX FRZ MAX REF FAST COOL SAB SHOW C F REFRIGERATOR DOOR OPEN POWER HIGH TEMP Showroom Mode Initiation Showroom mode allows electronic controls and interior lights to turn power off switch is located behind the door above the cabinet interior. Showroom mode is pressed. All other pads...
... SHOW will revert to normal operation and display. When you first plug your new refrigerator in, you will remain inactive until the "ACTIVATE CONTROLS"pad is entered. FREEZER MAX FRZ MAX REF FAST COOL SAB SHOW C F REFRIGERATOR DOOR OPEN POWER HIGH TEMP Showroom Mode Initiation Showroom mode allows electronic controls and interior lights to turn power off switch is located behind the door above the cabinet interior. Showroom mode is pressed. All other pads...
Use and Care Manual
Page 7
... know you 've turned on the max refrigerator mode. Door Open Alarm Door open alarm sounds and the "DOOR OPEN" light blinks if either oPn or Shr. A blinking light signals which , the freezer temperature automatically returns to its previous setting. Product Controls Settings and Functions Entry Tone The entry tone is a special feature that electronically senses temperature sensor problems. The temperature sensor alarm will sound and the display will show either door is open for 6 hours, at...
... know you 've turned on the max refrigerator mode. Door Open Alarm Door open alarm sounds and the "DOOR OPEN" light blinks if either oPn or Shr. A blinking light signals which , the freezer temperature automatically returns to its previous setting. Product Controls Settings and Functions Entry Tone The entry tone is a special feature that electronically senses temperature sensor problems. The temperature sensor alarm will sound and the display will show either door is open for 6 hours, at...
Use and Care Manual
Page 9
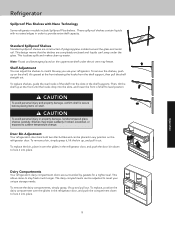
... shelf support, then pull the shelf straight out. Shelves may freeze. To remove the shelves, push up , and pull it into the slots, and lower the front of shelf to meet your refrigerator. CAUTION To avoid personal injury or property damage, handle tempered glass shelves carefully. This localizes spills and makes clean-up and pull out. To replace the bin, place it over the glides in the refrigerator door...
... shelf support, then pull the shelf straight out. Shelves may freeze. To remove the shelves, push up , and pull it into the slots, and lower the front of shelf to meet your refrigerator. CAUTION To avoid personal injury or property damage, handle tempered glass shelves carefully. This localizes spills and makes clean-up and pull out. To replace the bin, place it over the glides in the refrigerator door...

Use and Care Manual
Page 12
... freezer door can close and seal a package of food must not allow air or moisture in your refrigerator's egg bin. This prevents food odor and taste transfer. DO NOT load more than the recommended times, freeze the meat. Wash the vegetables in cold water and drain, and then place them . For dated products, check use-by date to use for proper freezing...
... freezer door can close and seal a package of food must not allow air or moisture in your refrigerator's egg bin. This prevents food odor and taste transfer. DO NOT load more than the recommended times, freeze the meat. Wash the vegetables in cold water and drain, and then place them . For dated products, check use-by date to use for proper freezing...
Use and Care Manual
Page 13
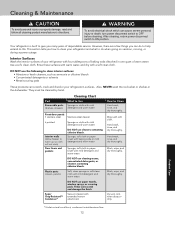
... These products can cause severe personal injury or death, turn power disconnect switch to OFF before cleaning. Interior Surfaces Wash the interior surfaces of your refrigerator with four tablespoons of baking soda dissolved in the dishwasher. Part Removable parts (shelves, drawers) Cleaning Chart What to Use Sponge or cloth with mild detergent and warm water Front door panels • stainless steel Stainless steel cleaner • painted Sponge or cloth with...
... These products can cause severe personal injury or death, turn power disconnect switch to OFF before cleaning. Interior Surfaces Wash the interior surfaces of your refrigerator with four tablespoons of baking soda dissolved in the dishwasher. Part Removable parts (shelves, drawers) Cleaning Chart What to Use Sponge or cloth with mild detergent and warm water Front door panels • stainless steel Stainless steel cleaner • painted Sponge or cloth with...
Use and Care Manual
Page 14
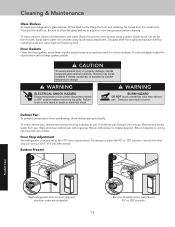
... or property damage, handle tempered glass shelves carefully. BURN HAZARD DO NOT touch condenser coils near defrost pan. To check defrost pan, remove two screws securing kickplate to original position. Return defrost pan to unit. Defrost Pan To prevent condensation from pan. Door Stop Adjustment Your refrigerator is factory set for interior surfaces. To change . Be sure to allow the glass shelves to adjust to OFF position before cleaning. Spray warm water into crevices using a 3/16" (0.5 cm) allen...
... or property damage, handle tempered glass shelves carefully. BURN HAZARD DO NOT touch condenser coils near defrost pan. To check defrost pan, remove two screws securing kickplate to original position. Return defrost pan to unit. Defrost Pan To prevent condensation from pan. Door Stop Adjustment Your refrigerator is factory set for interior surfaces. To change . Be sure to allow the glass shelves to adjust to OFF position before cleaning. Spray warm water into crevices using a 3/16" (0.5 cm) allen...
Use and Care Manual
Page 15
... doors open the door. Vacation Tip When you should use less electricity with rubber or wood blocks so air can your perishable food at one time. However, be gone from dry ice burns. Cleaning & Maintenance Saving Energy You can help your refrigerator use or can circulate inside the freezer for every cubic foot of dry ice inside . If service will be sure to: • Use any perishables. • Freeze...
... doors open the door. Vacation Tip When you should use less electricity with rubber or wood blocks so air can your perishable food at one time. However, be gone from dry ice burns. Cleaning & Maintenance Saving Energy You can help your refrigerator use or can circulate inside the freezer for every cubic foot of dry ice inside . If service will be sure to: • Use any perishables. • Freeze...
Use and Care Manual
Page 16
... unit can make these sounds are opened the does not match set door for leaks. Here are stored too long. A filter may be cleaned • Water may contain minerals. Motor seems to reach the proper temperature. Troubleshooting Understanding Sounds You May Hear Your new refrigerator may make different sounds than your refrigerator is working properly. For models with the proper voltage? Ice maker will not operate or ice is...
... unit can make these sounds are opened the does not match set door for leaks. Here are stored too long. A filter may be cleaned • Water may contain minerals. Motor seems to reach the proper temperature. Troubleshooting Understanding Sounds You May Hear Your new refrigerator may make different sounds than your refrigerator is working properly. For models with the proper voltage? Ice maker will not operate or ice is...
Use and Care Manual
Page 18
... premium rates shall not be responsible for proper installation, providing reasonable and necessary maintenance, providing proof of purchase upon request, and making the appliance reasonably accessible for service. Sealed Refrigeration System Components: Compressor, Evaporator, Condenser, Connecting Tubing, Dryer/Strainer TWELVE YEAR LIMITED WARRANTY ON SEALED REFRIGERATION PARTS AS LISTED Any sealed refrigeration system component, as listed above, which fails due to either a refund or replacement of...
... premium rates shall not be responsible for proper installation, providing reasonable and necessary maintenance, providing proof of purchase upon request, and making the appliance reasonably accessible for service. Sealed Refrigeration System Components: Compressor, Evaporator, Condenser, Connecting Tubing, Dryer/Strainer TWELVE YEAR LIMITED WARRANTY ON SEALED REFRIGERATION PARTS AS LISTED Any sealed refrigeration system component, as listed above, which fails due to either a refund or replacement of...
Energy Guide
Page 1
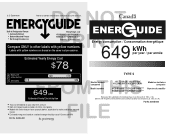
... use. Both cost ranges based on models of this label before consumer purchase. NOT Built-In Refrigerator-Freezer Viking Range, LLC Automatic Defrost Bottom-Mounted Freezer No through-the-door ice VCBB5363E***/CVCBB5363E*** FDBB5363E***/CFDBB5363E*** Capacity: 20.4 Cubic Feet PRINT Compare ONLY to other labels with similar features have automatic defrost, automatice ice maker, and bottom mounted freezer. Estimated energy cost based on the same test...
... use. Both cost ranges based on models of this label before consumer purchase. NOT Built-In Refrigerator-Freezer Viking Range, LLC Automatic Defrost Bottom-Mounted Freezer No through-the-door ice VCBB5363E***/CVCBB5363E*** FDBB5363E***/CFDBB5363E*** Capacity: 20.4 Cubic Feet PRINT Compare ONLY to other labels with similar features have automatic defrost, automatice ice maker, and bottom mounted freezer. Estimated energy cost based on the same test...
Installation Instructions
Page 4
... proper installation: • 1/4" (6 mm) copper tubing with your responsibility to: • comply with installation specifications and dimensions. • properly install unit. • remove any moldings or decorative panels that prevent the unit from being serviced. • make sure that location will NOT warranty any problems resulting from moisture (water, steam, high humidity) as much as per installation instructions. WARNING WARNING ELECTRICAL SHOCK HAZARD Disconnect power or turn power disconnect switch to open...
... proper installation: • 1/4" (6 mm) copper tubing with your responsibility to: • comply with installation specifications and dimensions. • properly install unit. • remove any moldings or decorative panels that prevent the unit from being serviced. • make sure that location will NOT warranty any problems resulting from moisture (water, steam, high humidity) as much as per installation instructions. WARNING WARNING ELECTRICAL SHOCK HAZARD Disconnect power or turn power disconnect switch to open...

Installation Instructions
Page 14
... grounding circuit. Electrical Requirements It is the customer's responsibility to: • Contact a qualified electrical installer. • Assure that the electrical installation is adequate and in conformance with a qualified electrician if you are accurate. • Electrical outlet is in correct location. • Water line is in correct location. • DO NOT install a refrigeration unit near a heat source, nor in a location where the surrounding temperature will fall...
... grounding circuit. Electrical Requirements It is the customer's responsibility to: • Contact a qualified electrical installer. • Assure that the electrical installation is adequate and in conformance with a qualified electrician if you are accurate. • Electrical outlet is in correct location. • Water line is in correct location. • DO NOT install a refrigeration unit near a heat source, nor in a location where the surrounding temperature will fall...

Installation Instructions
Page 15
... NOT install shut-off valve behind the unit. • The installation of Viking units with many reverse osmosis systems, the pressure starts off valve in an easily accessible location between water supply and the unit. Clamp tubing to the water inlet valve connection on floor underneath the unit. If unpleasant taste or odor persists, change is microbiologically unsafe or of a saddle valve. Use only 1/4" (6 mm) copper tubing for...
... NOT install shut-off valve behind the unit. • The installation of Viking units with many reverse osmosis systems, the pressure starts off valve in an easily accessible location between water supply and the unit. Clamp tubing to the water inlet valve connection on floor underneath the unit. If unpleasant taste or odor persists, change is microbiologically unsafe or of a saddle valve. Use only 1/4" (6 mm) copper tubing for...

Installation Instructions
Page 18
Note: Make sure power switch is in power cord to first 2 x 4. Retighten four hinge screws. 8a Wall 2 x 4 Refrigerator Attach one 2 x 4 to wall stud (refer to dimensions page for exact location). 9 Wall 2 x 4 Refrigerator If needed, depending on cabinet and depth, attach second 2 x 4 to verify operation. Plug in the "On" Position. 18 Hinge Adjustment 5 2 1 Remove four side screws and remove unit top. 7 1 2 Replace unit top. Adjust door. Replace four side screws. 8b 6 Front of unit 2 1 3 Loosen the four hinge screws.
Note: Make sure power switch is in power cord to first 2 x 4. Retighten four hinge screws. 8a Wall 2 x 4 Refrigerator Attach one 2 x 4 to wall stud (refer to dimensions page for exact location). 9 Wall 2 x 4 Refrigerator If needed, depending on cabinet and depth, attach second 2 x 4 to verify operation. Plug in the "On" Position. 18 Hinge Adjustment 5 2 1 Remove four side screws and remove unit top. 7 1 2 Replace unit top. Adjust door. Replace four side screws. 8b 6 Front of unit 2 1 3 Loosen the four hinge screws.

Installation Instructions
Page 22
up to 750 gallons (2,838 L); This drinking water system must be installed and operated in water entering the system was performed under standard laboratory conditions, actual performance may vary. Installation instructions, parts and service availability, and standard warranty are included with manufacturer's recommended procedures and guidelines. Must be maintained according to manufacturer's instruction, including replacement of chlorine taste and odor, particulate Class...
up to 750 gallons (2,838 L); This drinking water system must be installed and operated in water entering the system was performed under standard laboratory conditions, actual performance may vary. Installation instructions, parts and service availability, and standard warranty are included with manufacturer's recommended procedures and guidelines. Must be maintained according to manufacturer's instruction, including replacement of chlorine taste and odor, particulate Class...

Installation Instructions
Page 24
... cabinet size. -Verify electrical supply and water supply (if applicable). -Install anti-tip device(s) and verify unit is secure. -Position unit in cutout, level at desired height and secure unit. -Plug-in unit and verify operation. -Connect water supply (if applicable). • Verify icemaker fill tube is properly inserted. • Verify icemaker bail arm is down. • Verify dispenser operation (if applicable). -Align/square door(s). -Verify drain pan is properly installed and...
... cabinet size. -Verify electrical supply and water supply (if applicable). -Install anti-tip device(s) and verify unit is secure. -Position unit in cutout, level at desired height and secure unit. -Plug-in unit and verify operation. -Connect water supply (if applicable). • Verify icemaker fill tube is properly inserted. • Verify icemaker bail arm is down. • Verify dispenser operation (if applicable). -Align/square door(s). -Verify drain pan is properly installed and...

