Two-Page Specifications Sheet
Page 1
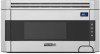
oven capacity l 14 1/8" diameter turntable n Convection Microwave Hood l 1.1 cubic ft. magnetron tube * Warranty valid on Viking products shipped within the United States and Canada Additional Features n Conventional Microwave Hood l Fast action keys save time and make microwaving easy... use of convection heat to seal and brown outside of extra cooking time with unit l Four convection settings: ConvecBroil, ConvecRoast, ConvecBake, and a manual convection setting option l Low Mix Bake and High Mix Roast settings offer use with 30" wide ranges and 30" wide cooktops Finish n Available ...
oven capacity l 14 1/8" diameter turntable n Convection Microwave Hood l 1.1 cubic ft. magnetron tube * Warranty valid on Viking products shipped within the United States and Canada Additional Features n Conventional Microwave Hood l Fast action keys save time and make microwaving easy... use of convection heat to seal and brown outside of extra cooking time with unit l Four convection settings: ConvecBroil, ConvecRoast, ConvecBake, and a manual convection setting option l Low Mix Bake and High Mix Roast settings offer use with 30" wide ranges and 30" wide cooktops Finish n Available ...
Installation Instructions
Page 1
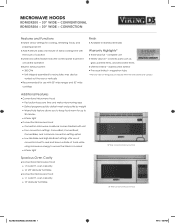
... 111 Front Street Greenwood, Mississippi 38930 USA Check the oven for any damage, do not operate the oven and contact your dealer or Viking AUTHORIZED SERVICER. 1 Mounting Space This Built-in Figure 1. Two people are recommended to install this product. • If a new ...to be completed by a qualified electrician before installing the Built-In Microwave Hood. Read enclosures and SAVE the Use and Care manual. If there is installed. Viking Installation Guide IMPORTANT-Please Read and Follow! • Please read all packing materials, Wall and Top Cabinet Template, Turntable,...
... 111 Front Street Greenwood, Mississippi 38930 USA Check the oven for any damage, do not operate the oven and contact your dealer or Viking AUTHORIZED SERVICER. 1 Mounting Space This Built-in Figure 1. Two people are recommended to install this product. • If a new ...to be completed by a qualified electrician before installing the Built-In Microwave Hood. Read enclosures and SAVE the Use and Care manual. If there is installed. Viking Installation Guide IMPORTANT-Please Read and Follow! • Please read all packing materials, Wall and Top Cabinet Template, Turntable,...
Installation Instructions
Page 8
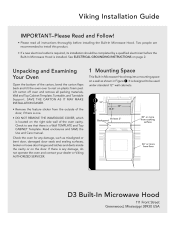
... 4) MOUNTING OVEN TO THE WALL: Thread the Power Supply Cord through the hole made in the power cord. • Keep the Use & Care Manual and Installation Manual. Hook the back bottom of the oven to the bottom of the Mounting Plate. E8 Lift the front of the oven up to the... bottom of the cabinet. Install the two Grease Filters 9. Lift and tilt the oven forward. Checklist for Installation Viking Range Corporation 111 Front Street...
... 4) MOUNTING OVEN TO THE WALL: Thread the Power Supply Cord through the hole made in the power cord. • Keep the Use & Care Manual and Installation Manual. Hook the back bottom of the oven to the bottom of the Mounting Plate. E8 Lift the front of the oven up to the... bottom of the cabinet. Install the two Grease Filters 9. Lift and tilt the oven forward. Checklist for Installation Viking Range Corporation 111 Front Street...

Use and Care Manual
Page 1
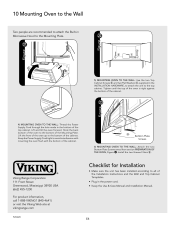
Viking Use & Care Manual D3 Built-In Microwave Hood
Viking Use & Care Manual D3 Built-In Microwave Hood

Use and Care Manual
Page 3
... 18 Time Cooking 18 To Set Power Level 18 Sensor Settings 19 Covering Foods 20 Instant Sensor 20 Sensor Cook 22 Reheat 24 Defrost 25 Manual Defrost 26 Keep Warm Plus 27 Hot Water 27 Help 28 Help (In the display 29 Demonstration Mode 29 Timer 29 Multiple Sequence Cooking 30...
... 18 Time Cooking 18 To Set Power Level 18 Sensor Settings 19 Covering Foods 20 Instant Sensor 20 Sensor Cook 22 Reheat 24 Defrost 25 Manual Defrost 26 Keep Warm Plus 27 Hot Water 27 Help 28 Help (In the display 29 Demonstration Mode 29 Timer 29 Multiple Sequence Cooking 30...

Use and Care Manual
Page 5
...WARNING Hazards or unsafe practices which COULD result in death or severe personal injury WARNING Hazards or unsafe practices which COULD result in this manual. To ensure proper and safe operation: Appliance must be exercised when installing, maintaining, or operating this appliance. Read and follow all instructions... occur. Common sense, caution, and care must be referred to reduce the chance of your appliance unless it is specifically recommended in this manual are not followed. DO NOT attempt to adjust, repair, service, or replace any part of injury, and tell you what can happen ...
...WARNING Hazards or unsafe practices which COULD result in death or severe personal injury WARNING Hazards or unsafe practices which COULD result in this manual. To ensure proper and safe operation: Appliance must be exercised when installing, maintaining, or operating this appliance. Read and follow all instructions... occur. Common sense, caution, and care must be referred to reduce the chance of your appliance unless it is specifically recommended in this manual are not followed. DO NOT attempt to adjust, repair, service, or replace any part of injury, and tell you what can happen ...
Use and Care Manual
Page 7
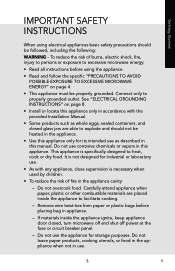
.... • Use this appliance only for its intended use the appliance for industrial or laboratory use corrosive chemicals or vapors in this manual. If materials inside the appliance to excessive microwave energy: • Read all instructions before placing bag in use. 5 E To ... page 4. • This appliance must be followed, including the following: WARNING - Do not use . • As with the provided Installation Manual. • Some products such as described in this appliance. This appliance is not designed for storage purposes. Do not overcook food. It is ...
.... • Use this appliance only for its intended use the appliance for industrial or laboratory use corrosive chemicals or vapors in this manual. If materials inside the appliance to excessive microwave energy: • Read all instructions before placing bag in use. 5 E To ... page 4. • This appliance must be followed, including the following: WARNING - Do not use . • As with the provided Installation Manual. • Some products such as described in this appliance. This appliance is not designed for storage purposes. Do not overcook food. It is ...
Use and Care Manual
Page 21
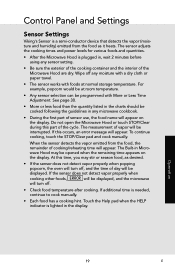
...or paper towel. • The sensor works with More or Less Time Adjustment. To continue cooking, touch the STOP/Clear pad and cook manually. At this time, you may be interrupted. If the sensor does not detect vapor properly when cooking other foods, ERROR will be cooked...be displayed, and the microwave will appear on the display. Operation 19 E The measurement of the cycle. Control Panel and Settings Sensor Settings Viking's Sensor is a semi-conductor device that detects the vapor (moisture and humidity) emitted from the food, the remainder of cooking/reheating time will...
...or paper towel. • The sensor works with More or Less Time Adjustment. To continue cooking, touch the STOP/Clear pad and cook manually. At this time, you may be interrupted. If the sensor does not detect vapor properly when cooking other foods, ERROR will be cooked...be displayed, and the microwave will appear on the display. Operation 19 E The measurement of the cycle. Control Panel and Settings Sensor Settings Viking's Sensor is a semi-conductor device that detects the vapor (moisture and humidity) emitted from the food, the remainder of cooking/reheating time will...

Use and Care Manual
Page 22
... heating. Plastic wrap should not touch food. • Wax paper: Cover dish completely. Check food for microwave cooking. If dish is needed, continue to heat manually. Touch START/Add-A-Minute. If additional time is wider than paper, overlap two pieces at least one pad. • Two baked potatoes 1. Be careful when...
... heating. Plastic wrap should not touch food. • Wax paper: Cover dish completely. Check food for microwave cooking. If dish is needed, continue to heat manually. Touch START/Add-A-Minute. If additional time is wider than paper, overlap two pieces at least one pad. • Two baked potatoes 1. Be careful when...

Use and Care Manual
Page 24
... the food condition (e.g. Sensor Cook Chart Food Ground Meat Amount .25 - 2.0 lb. When microwave stops, turn patties over or stir meat in casserole to heat manually. Place ground meat in a casserole to be programmed with wax paper. You don't need to other ingredients. Touch Sensor Cook pad and number 1. 2. initial temperature...
... the food condition (e.g. Sensor Cook Chart Food Ground Meat Amount .25 - 2.0 lb. When microwave stops, turn patties over or stir meat in casserole to heat manually. Place ground meat in a casserole to be programmed with wax paper. You don't need to other ingredients. Touch Sensor Cook pad and number 1. 2. initial temperature...

Use and Care Manual
Page 26
... quantity of your favorite foods by touching just one pad. • Two fresh rolls or muffins 1. Beverage .5 - 2.0 cups This setting is needed, continue to heat manually. Press the pad for amount (cups). 1 time....... 0.5 2 times...... 1.0 3 times...... 1.5 4 times...... 2.0 Frozen Rolls/ Muffins 1 - 8 pcs Use this pad to warm rolls, muffins, biscuits, bagels etc. See...
... quantity of your favorite foods by touching just one pad. • Two fresh rolls or muffins 1. Beverage .5 - 2.0 cups This setting is needed, continue to heat manually. Press the pad for amount (cups). 1 time....... 0.5 2 times...... 1.0 3 times...... 1.5 4 times...... 2.0 Frozen Rolls/ Muffins 1 - 8 pcs Use this pad to warm rolls, muffins, biscuits, bagels etc. See...

Use and Care Manual
Page 27
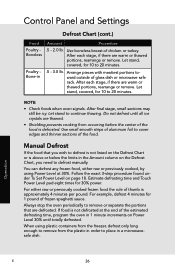
... Level pad once or twice after each stage, rearrange and if there are warm or thawed portions, shield with More or Less Time Adjustment. See Manual Defrost on the Defrost Chart, use time and 30% power. Food Ground Meat Steaks/ Chops Defrost Chart Amount Procedure .5 - 2.0 lb. Touch START/Add-A-Minute pad...
... Level pad once or twice after each stage, rearrange and if there are warm or thawed portions, shield with More or Less Time Adjustment. See Manual Defrost on the Defrost Chart, use time and 30% power. Food Ground Meat Steaks/ Chops Defrost Chart Amount Procedure .5 - 2.0 lb. Touch START/Add-A-Minute pad...
Use and Care Manual
Page 28
... estimated defrosting time, program the oven in 1 minute increments on Power Level 30% until all ice crystals are defrosted. Let stand to 20 minutes. Manual Defrost If the food that are thawed. • Shielding prevents cooking from the plastic in .5 - 3.0 lb. Use boneless breast of frozen spaghetti ...is not defrosted at 30%. Follow the exact 3-step procedure found under To Set Power Level on the Defrost Chart, you wish to defrost manually. For example, defrost 4 minutes for 10 to place in the Amount column on page 18. After final stage, small sections may still be...
... estimated defrosting time, program the oven in 1 minute increments on Power Level 30% until all ice crystals are defrosted. Let stand to 20 minutes. Manual Defrost If the food that are thawed. • Shielding prevents cooking from the plastic in .5 - 3.0 lb. Use boneless breast of frozen spaghetti ...is not defrosted at 30%. Follow the exact 3-step procedure found under To Set Power Level on the Defrost Chart, you wish to defrost manually. For example, defrost 4 minutes for 10 to place in the Amount column on page 18. After final stage, small sections may still be...

Use and Care Manual
Page 29
... to cook pasta. When heating 4 to 6. • Water (3 cups) 1. Touch Hot Water pad 3 times. 2. Touch Keep Warm Plus pad. 2. Touch Start/Add-A-Minute pad. With Manual Cooking • Soup (1 cup) - Touch Keep Warm Plus pad. 4. When the cooking time is complete, a long tone will sound and Keep Warm Plus will start...
... to cook pasta. When heating 4 to 6. • Water (3 cups) 1. Touch Hot Water pad 3 times. 2. Touch Keep Warm Plus pad. 2. Touch Start/Add-A-Minute pad. With Manual Cooking • Soup (1 cup) - Touch Keep Warm Plus pad. 4. When the cooking time is complete, a long tone will sound and Keep Warm Plus will start...

Use and Care Manual
Page 30
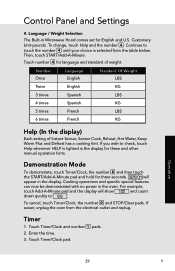
Touch Help pad. 2. essary to touch the START/Add-A-Minute pad for manual cooking if clock is set , touch Help, the number 1 and then touch the START/ Add-A-Minute pad. To cancel, touch Help and STOP/Clear pad. 2. ...
Touch Help pad. 2. essary to touch the START/Add-A-Minute pad for manual cooking if clock is set , touch Help, the number 1 and then touch the START/ Add-A-Minute pad. To cancel, touch Help and STOP/Clear pad. 2. ...
Use and Care Manual
Page 31
... 4 until your choice is lighted in the display. Touch Timer/Clock pad. To change, touch Help and the number 4. Touch number 4 for these and other manual operation hints. For example, touch Add-A-Minute pad and the display will appear in the display for language and standard of Instant Sensor, Sensor Cook...
... 4 until your choice is lighted in the display. Touch Timer/Clock pad. To change, touch Help and the number 4. Touch number 4 for these and other manual operation hints. For example, touch Add-A-Minute pad and the display will appear in the display for language and standard of Instant Sensor, Sensor Cook...

Use and Care Manual
Page 33
It cannot be turned off manually during cooking. • Add-A-Minute cannot be used with special features. Operation 31 E Control Panel and Settings Add-A-Minute Add-A-Minute allows you to cook .../Lo Press the LIGHT Hi/Lo pad one time for high, twice for a minute at 100% by repeatedly touching the START/Add-AMinute pad during manual cooking. • Soup (1 cup) Touch START/Add-A-Minute pad. Note: • To use Add-A-Minute, touch pad within 3 minutes after cooking, closing the door, touching...
It cannot be turned off manually during cooking. • Add-A-Minute cannot be used with special features. Operation 31 E Control Panel and Settings Add-A-Minute Add-A-Minute allows you to cook .../Lo Press the LIGHT Hi/Lo pad one time for high, twice for a minute at 100% by repeatedly touching the START/Add-AMinute pad during manual cooking. • Soup (1 cup) Touch START/Add-A-Minute pad. Note: • To use Add-A-Minute, touch pad within 3 minutes after cooking, closing the door, touching...
Use and Care Manual
Page 39
... of the oven cavity on the left side of parts, use only authorized parts to have a service problem, contact Viking Range Corporation at 1-888- KEEP THIS MANUAL FOR FUTURE REFERENCE PrPordoudcut cCtaCreare 37 E You will need it if service is required, call your area. The name ... purchased Clearly describe the problem that you continue to ensure protection under the warranty. VIKING1 (845-4641) or write to: VIKING RANGE CORPORATION PREFERRED SERVICE 1803 Hwy 82W Greenwood, Mississippi 38930 USA Record the information indicated below. Service Information If service is ever required...
... of the oven cavity on the left side of parts, use only authorized parts to have a service problem, contact Viking Range Corporation at 1-888- KEEP THIS MANUAL FOR FUTURE REFERENCE PrPordoudcut cCtaCreare 37 E You will need it if service is required, call your area. The name ... purchased Clearly describe the problem that you continue to ensure protection under the warranty. VIKING1 (845-4641) or write to: VIKING RANGE CORPORATION PREFERRED SERVICE 1803 Hwy 82W Greenwood, Mississippi 38930 USA Record the information indicated below. Service Information If service is ever required...
