Two-Page Specifications Sheet
Page 1
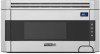
... use with the touch of extra cooking time with 30" wide ranges and 30" wide cooktops Finish n Available in exhaust system l 300 CFM l Unit shipped assembled to ensure the interior is cooked l Interior light 30" Wide Conventional Microwave Hood Spacious Oven Cavity n Conventional Microwave Hood l 1.5 cubic ft. CONVECTION Features and Functions n Instant sensor settings for use of convection heat to seal and brown outside of foods while using microwave energy to recirculate; Microwave Hoods RDMOR200 - 30" wide - oven capacity l 14 1/8" diameter turntable n Convection Microwave...
... use with the touch of extra cooking time with 30" wide ranges and 30" wide cooktops Finish n Available in exhaust system l 300 CFM l Unit shipped assembled to ensure the interior is cooked l Interior light 30" Wide Conventional Microwave Hood Spacious Oven Cavity n Conventional Microwave Hood l 1.5 cubic ft. CONVECTION Features and Functions n Instant sensor settings for use of convection heat to seal and brown outside of foods while using microwave energy to recirculate; Microwave Hoods RDMOR200 - 30" wide - oven capacity l 14 1/8" diameter turntable n Convection Microwave...
Installation Instructions
Page 1
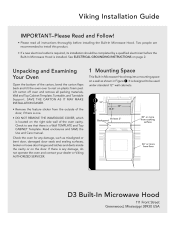
... 2. Viking Installation Guide IMPORTANT-Please Read and Follow! • Please read all packing materials, Wall and Top Cabinet Template, Turntable, and Turntable Suppor t. Lift carton off oven and remove all instructions thoroughly before the Built-In Microwave Hood is any damage, such as shown in Microwave Hood requires a mounting space on a wall as misaligned or bent door, damaged door seals and sealing surfaces, broken or loose door hinges and latches and dents inside...
... 2. Viking Installation Guide IMPORTANT-Please Read and Follow! • Please read all packing materials, Wall and Top Cabinet Template, Turntable, and Turntable Suppor t. Lift carton off oven and remove all instructions thoroughly before the Built-In Microwave Hood is any damage, such as shown in Microwave Hood requires a mounting space on a wall as misaligned or bent door, damaged door seals and sealing surfaces, broken or loose door hinges and latches and dents inside...
Installation Instructions
Page 2
... the top cabinet above the Built-in Microwave Hood mounting location as feasible or check position and signal of all items which locates the nails in the stud. • Use a hammer to tap lightly across the mounting surface to find a solid sound. It must be capable of supporting a weight of 110 pounds-the oven and contents-AND the weight of receiving antenna. IMPORTANT: * Power cord opening to fill...
... the top cabinet above the Built-in Microwave Hood mounting location as feasible or check position and signal of all items which locates the nails in the stud. • Use a hammer to tap lightly across the mounting surface to find a solid sound. It must be capable of supporting a weight of 110 pounds-the oven and contents-AND the weight of receiving antenna. IMPORTANT: * Power cord opening to fill...
Installation Instructions
Page 3
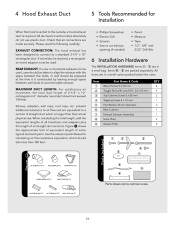
... vented to a standard 3-1/4" x 10" rectangular duct. Figure 3 shows the approximate feet of equivalent length of straight duct which should not exceed 140 feet. All ductwork must be used , care should be taken to align the exhaust with nuts #10 - 24 x 50 mm Top Cabinet Screw 5 x 85 mm Tapping Screw 4 x 12 mm Flat Washer 30 mm diameter Rear Cushion Exhaust Damper Assembly Scale Plate Grease Filter QTY 4 4 2 1 2 1 1 2 2 1 2 3 4 5 6 7 8 9 figure Parts Included Parts...
... vented to a standard 3-1/4" x 10" rectangular duct. Figure 3 shows the approximate feet of equivalent length of straight duct which should not exceed 140 feet. All ductwork must be used , care should be taken to align the exhaust with nuts #10 - 24 x 50 mm Top Cabinet Screw 5 x 85 mm Tapping Screw 4 x 12 mm Flat Washer 30 mm diameter Rear Cushion Exhaust Damper Assembly Scale Plate Grease Filter QTY 4 4 2 1 2 1 1 2 2 1 2 3 4 5 6 7 8 9 figure Parts Included Parts...
Installation Instructions
Page 4
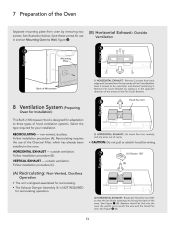
... Hood Fan Unit carefully and slip wires out of the Charcoal Filter, which has already been installed in the opposite direction of the arrow on the Fan Cover Bracket. See Figure 7 (B). Remove Fan Cover Bracket by removing two screws. non-vented, ductless. Follow installation procedure (A). Follow installation procedure (B). outside ventilation. Replace Hood Fan Unit into the oven. Recirculating requires the use in section Mounting Oven to Wall, figure /. (B) Horizontal Exhaust: Outside Ventilation figure Mounting Plate Back of Microwave 1) HORIZONTAL EXHAUST: Remove...
... Hood Fan Unit carefully and slip wires out of the Charcoal Filter, which has already been installed in the opposite direction of the arrow on the Fan Cover Bracket. See Figure 7 (B). Remove Fan Cover Bracket by removing two screws. non-vented, ductless. Follow installation procedure (A). Follow installation procedure (B). outside ventilation. Replace Hood Fan Unit into the oven. Recirculating requires the use in section Mounting Oven to Wall, figure /. (B) Horizontal Exhaust: Outside Ventilation figure Mounting Plate Back of Microwave 1) HORIZONTAL EXHAUST: Remove...

Installation Instructions
Page 5
... same direction as the arrow on the Fan Cover Bracket. Make sure the fan blades are mounted to pinch the lead wire between the inner bracket and the Hood Fan Unit. Replace Hood Fan Unit into Wire Box. " (A) Rotate 90˚ (B) 9 figure 3) VERTICAL EXHAUST: Rotate the Hood Fan Unit 90˚ so that the fan blade openings are facing the top of the Fan Cover Bracket. Follow instructions on wall template provided. 2) VERTICAL EXHAUST: Lift Hood Fan Unit carefully...
... same direction as the arrow on the Fan Cover Bracket. Make sure the fan blades are mounted to pinch the lead wire between the inner bracket and the Hood Fan Unit. Replace Hood Fan Unit into Wire Box. " (A) Rotate 90˚ (B) 9 figure 3) VERTICAL EXHAUST: Rotate the Hood Fan Unit 90˚ so that the fan blade openings are facing the top of the Fan Cover Bracket. Follow instructions on wall template provided. 2) VERTICAL EXHAUST: Lift Hood Fan Unit carefully...

Installation Instructions
Page 6
... the Fan Cover Bracket, which were removed in Step 1. The next step is now rotated for locations. Put Toggle Nuts on wall and top cabinet templates. Match 5/8" holes (not in studs), drilled through WALL TEMPLATE into matched openings on Mounting Plate. Insert Toggle Bolts into wall to corresponding holes on Mounting Plate. See Figure % and WALL TEMPLATE for vertical exhaust operation. $ figure 7 Exhaust Damper Assembly OVEN INSTALLATION: The Scale Plates are used to help locate the mounting plate. This oven must...
... the Fan Cover Bracket, which were removed in Step 1. The next step is now rotated for locations. Put Toggle Nuts on wall and top cabinet templates. Match 5/8" holes (not in studs), drilled through WALL TEMPLATE into matched openings on Mounting Plate. Insert Toggle Bolts into wall to corresponding holes on Mounting Plate. See Figure % and WALL TEMPLATE for vertical exhaust operation. $ figure 7 Exhaust Damper Assembly OVEN INSTALLATION: The Scale Plates are used to help locate the mounting plate. This oven must...

Use and Care Manual
Page 3
Table of Contents Getting Started Warnings 3 Important Safety Instructions 5 Important-Please Read and Follow___________ 8 Electrical Grounding Instructions___________ 8 Before Using Microwave Hood 9 Setting the Clock 15 To Set The Clock 15 Stop/Clear 15 Product Controls Features 16 Electronic Display / Features 17 Operation Control Panel and Settings 18 Time Cooking 18 To Set Power Level 18 Sensor Settings 19 Covering Foods 20 Instant Sensor 20 Sensor Cook 22 Reheat 24 Defrost 25 Manual Defrost 26 Keep Warm Plus 27 Hot Water 27 Help 28 Help (In...
Table of Contents Getting Started Warnings 3 Important Safety Instructions 5 Important-Please Read and Follow___________ 8 Electrical Grounding Instructions___________ 8 Before Using Microwave Hood 9 Setting the Clock 15 To Set The Clock 15 Stop/Clear 15 Product Controls Features 16 Electronic Display / Features 17 Operation Control Panel and Settings 18 Time Cooking 18 To Set Power Level 18 Sensor Settings 19 Covering Foods 20 Instant Sensor 20 Sensor Cook 22 Reheat 24 Defrost 25 Manual Defrost 26 Keep Warm Plus 27 Hot Water 27 Help 28 Help (In...

Use and Care Manual
Page 11
... Follow BEFORE USING MICROWAVE HOOD NEVER use the oven without the turntable and support nor turn both clockwise and counterclockwise. ALWAYS have food in the oven. Let hot air or steam escape before the minimum time and add time accordingly. It is rated 950 watts by using recipes or package directions check food a minute or two before removing or replacing food. • PREPARED FOOD WARNING: Follow food manufacturer's instructions. Getting Started IMPORTANT - Generally, covered foods will not...
... Follow BEFORE USING MICROWAVE HOOD NEVER use the oven without the turntable and support nor turn both clockwise and counterclockwise. ALWAYS have food in the oven. Let hot air or steam escape before the minimum time and add time accordingly. It is rated 950 watts by using recipes or package directions check food a minute or two before removing or replacing food. • PREPARED FOOD WARNING: Follow food manufacturer's instructions. Getting Started IMPORTANT - Generally, covered foods will not...

Use and Care Manual
Page 18
... Heat deflector E 16 Press a third time to open . 6 Safety door latches - remove screws to operate. 7 Cook and time display 8 LIGHT Hi/Lo pad - Carefully place the turntable support in the motor shaft in the center of the oven door as it is open door 12 Louver 13 Nameplate 14 Louver screws - Press a third time to turn the light off . 10 Control panel 11 One touch DOOR OPEN Push to turn the fan off . 9 FAN Hi/Lo pad - Press again for Hi. controls interior light Press...
... Heat deflector E 16 Press a third time to open . 6 Safety door latches - remove screws to operate. 7 Cook and time display 8 LIGHT Hi/Lo pad - Carefully place the turntable support in the motor shaft in the center of the oven door as it is open door 12 Louver 13 Nameplate 14 Louver screws - Press a third time to turn the light off . 10 Control panel 11 One touch DOOR OPEN Push to turn the fan off . 9 FAN Hi/Lo pad - Press again for Hi. controls interior light Press...

Use and Care Manual
Page 20
... are eleven preset power levels. Touch START/Add-A-Minute. Enter cooking time 500. 2. Touch Start/Add-A-Minute pad. Touch Power Level 8 times. 3. To Set Power Level There are both zeros. • Cook for 5 minutes at 30% 1. Touch Power Level pad number of times for power levels High Medium High Medium Med Low/Defrost Low Operation E 18 Control Panel and Settings Time Cooking Your Built-in Microwave Hood can be programmed for 5 minutes at 100% 1. Using lower power levels increases the cooking time, which is recommended for foods such as cheese...
... are eleven preset power levels. Touch START/Add-A-Minute. Enter cooking time 500. 2. Touch Start/Add-A-Minute pad. Touch Power Level 8 times. 3. To Set Power Level There are both zeros. • Cook for 5 minutes at 30% 1. Touch Power Level pad number of times for power levels High Medium High Medium Med Low/Defrost Low Operation E 18 Control Panel and Settings Time Cooking Your Built-in Microwave Hood can be programmed for 5 minutes at 100% 1. Using lower power levels increases the cooking time, which is recommended for foods such as cheese...
Use and Care Manual
Page 21
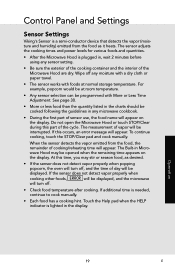
... example, popcorn would be displayed. If additional time is lighted in the display. Control Panel and Settings Sensor Settings Viking's Sensor is plugged in, wait 2 minutes before using any sensor setting. • Be sure the exterior of the cooking container and the interior of the Microwave Hood are dry. The Built-in Microwave Hood may stir or season food, as it heats. The sensor adjusts the cooking times and power levels for various foods and quantities. • After the Microwave Hood is...
... example, popcorn would be displayed. If additional time is lighted in the display. Control Panel and Settings Sensor Settings Viking's Sensor is plugged in, wait 2 minutes before using any sensor setting. • Be sure the exterior of the cooking container and the interior of the Microwave Hood are dry. The Built-in Microwave Hood may stir or season food, as it heats. The sensor adjusts the cooking times and power levels for various foods and quantities. • After the Microwave Hood is...

Use and Care Manual
Page 24
... plastic wrap. Control Panel and Settings Sensor Cook You can be added to other ingredients. Touch Start/Add-A-Minute pad. Note: • Sensor Cook can cook many foods by touching the Sensor Cook pad and the food number. Place ground meat in casserole to heat manually. Operation E 22 Check food for 2 to calculate cooking time or power level. • Ground Meat 1. Re-cover and touch START/ Add-A-Minute. After cooking, let stand, covered, for temperature after heating. When microwave stops, turn patties over...
... plastic wrap. Control Panel and Settings Sensor Cook You can be added to other ingredients. Touch Start/Add-A-Minute pad. Note: • Sensor Cook can cook many foods by touching the Sensor Cook pad and the food number. Place ground meat in casserole to heat manually. Operation E 22 Check food for 2 to calculate cooking time or power level. • Ground Meat 1. Re-cover and touch START/ Add-A-Minute. After cooking, let stand, covered, for temperature after heating. When microwave stops, turn patties over...

Use and Care Manual
Page 25
... - 1.25 lb. When oven stops, turn over. Re-cover and touch START/Add-AMinute. Control Panel and Settings Sensor Cook Chart (cont.) Food Rice Amount Procedure .5 - 2.0 cups Place rice into a deep casserole and add double quantity of casserole .5 cup 1 cup 1 cup 2 cups 1.5 quart 2 quart 1.5 cups 3 cups 2 cups 4 cups 2.5 or 3 quart 3 quart or larger Fish/ Seafood .25 - 2.0 lb. Rice Water Size of water. Chicken...
... - 1.25 lb. When oven stops, turn over. Re-cover and touch START/Add-AMinute. Control Panel and Settings Sensor Cook Chart (cont.) Food Rice Amount Procedure .5 - 2.0 cups Place rice into a deep casserole and add double quantity of casserole .5 cup 1 cup 1 cup 2 cups 1.5 quart 2 quart 1.5 cups 3 cups 2 cups 4 cups 2.5 or 3 quart 3 quart or larger Fish/ Seafood .25 - 2.0 lb. Rice Water Size of water. Chicken...

Use and Care Manual
Page 27
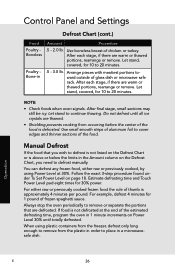
... amount. Touch START/Add-A-Minute pad. 4. Touch the Power Level pad once or twice after each stage, rearrange and if there are warm or thawed portions, shield with More or Less Time Adjustment. Enter weight 3.0 lb. Remove any warm portions. After the first stage, open the door. Note: • Any Defrost choice can be displayed. 2. Operation 25 E Control Panel and Settings Defrost Defrost automatically defrosts all the foods shown in...
... amount. Touch START/Add-A-Minute pad. 4. Touch the Power Level pad once or twice after each stage, rearrange and if there are warm or thawed portions, shield with More or Less Time Adjustment. Enter weight 3.0 lb. Remove any warm portions. After the first stage, open the door. Note: • Any Defrost choice can be displayed. 2. Operation 25 E Control Panel and Settings Defrost Defrost automatically defrosts all the foods shown in...
Use and Care Manual
Page 28
... glass dish or microwave safe rack. You can defrost any frozen food, either raw or previously cooked frozen food the rule of the estimated defrosting time, program the oven in .5 - 3.0 lb. Always stop the oven periodically to 20 minutes. Manual Defrost If the food that are warm or thawed portions, rearrange or remove. Poultry Bone-in 1 minute increments on page 18. Arrange pieces with meatiest portions toward outside...
... glass dish or microwave safe rack. You can defrost any frozen food, either raw or previously cooked frozen food the rule of the estimated defrosting time, program the oven in .5 - 3.0 lb. Always stop the oven periodically to 20 minutes. Manual Defrost If the food that are warm or thawed portions, rearrange or remove. Poultry Bone-in 1 minute increments on page 18. Arrange pieces with meatiest portions toward outside...
Use and Care Manual
Page 31
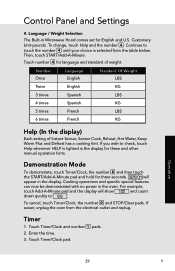
... cancel, touch Timer/Clock, the number 0 and STOP/Clear pads. Enter the time. 3. Touch number 4 for these and other manual operation hints. If you wish to touch the number 4 until your choice is lighted in the oven. Cooking operations and specific special features can now be demonstrated with no power in the display for language and standard of Instant Sensor, Sensor Cook, Reheat, Hot Water, Keep Warm Plus and Defrost has a cooking hint. Control Panel and Settings 4. Continue...
... cancel, touch Timer/Clock, the number 0 and STOP/Clear pads. Enter the time. 3. Touch number 4 for these and other manual operation hints. If you wish to touch the number 4 until your choice is lighted in the oven. Cooking operations and specific special features can now be demonstrated with no power in the display for language and standard of Instant Sensor, Sensor Cook, Reheat, Hot Water, Keep Warm Plus and Defrost has a cooking hint. Control Panel and Settings 4. Continue...

Use and Care Manual
Page 35
... set in the Built-in place. 1. Wipe interior with a brush to assure good oven performance. for easy cleaning. The turntable motor shaft is located on the tab toward the front of dishwasher. Waveguide Cover The waveguide cover is not sealed, so excess water or spills should be removed for stubborn stains use ammonia or other filter. 2. Do not remove the waveguide cover. Never operate the fan or oven without the filters in Microwave Hood...
... set in the Built-in place. 1. Wipe interior with a brush to assure good oven performance. for easy cleaning. The turntable motor shaft is located on the tab toward the front of dishwasher. Waveguide Cover The waveguide cover is not sealed, so excess water or spills should be removed for stubborn stains use ammonia or other filter. 2. Do not remove the waveguide cover. Never operate the fan or oven without the filters in Microwave Hood...
Use and Care Manual
Page 39
... of parts, use only authorized parts to : VIKING RANGE CORPORATION PREFERRED SERVICE 1803 Hwy 82W Greenwood, Mississippi 38930 USA Record the information indicated below. If you continue to have a service problem, contact Viking Range Corporation at 1-888- The model and serial number for your dealer or authorized service agency. Service Information If service is ever required. You will need it if service is required, call your oven are unable...
... of parts, use only authorized parts to : VIKING RANGE CORPORATION PREFERRED SERVICE 1803 Hwy 82W Greenwood, Mississippi 38930 USA Record the information indicated below. If you continue to have a service problem, contact Viking Range Corporation at 1-888- The model and serial number for your dealer or authorized service agency. Service Information If service is ever required. You will need it if service is required, call your oven are unable...
Use and Care Manual
Page 40
... its free installation, except as scratches on how long an implied warranty lasts, so the above limitation or exclusions may also have other than an authorized Viking Range Corporation service agency or representative. Some jurisdictions do not allow the exclusion or limitation of purchase upon request, and making the appliance reasonably accessible for products used in kitchen lighting, product locations...
... its free installation, except as scratches on how long an implied warranty lasts, so the above limitation or exclusions may also have other than an authorized Viking Range Corporation service agency or representative. Some jurisdictions do not allow the exclusion or limitation of purchase upon request, and making the appliance reasonably accessible for products used in kitchen lighting, product locations...


