Countertop Rear Trim - Installation Instructions
Page 1
Viking Installation Guide Viking Range Corporation 111 Front Street Greenwood, Mississippi 38930 USA (662) 455-1200 For product information call 1-888-VIKING1 (845-4641) or visit the Viking Web site at vikingrange.com F1448K EN Range/Rangetop Rear Trim Accessories & Range Curb Base Fronts (020211)
Viking Installation Guide Viking Range Corporation 111 Front Street Greenwood, Mississippi 38930 USA (662) 455-1200 For product information call 1-888-VIKING1 (845-4641) or visit the Viking Web site at vikingrange.com F1448K EN Range/Rangetop Rear Trim Accessories & Range Curb Base Fronts (020211)
Countertop Rear Trim - Installation Instructions
Page 2
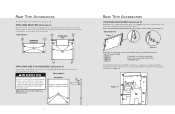
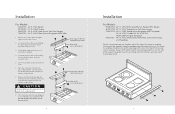
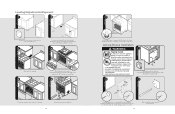
...1), which are not required, even if with the holes (A) in the same basic way. ATTACHING REAR TRIM (Illustration I ) B RANGETOP REAR VIEW B RANGE REAR B VIEW B A A ATTACHING SHELF ON HIGH-SHELF (Illustration II) Place the top rolled edge (X) over the front lip of the high-shelf ...-Combustible, these spacers can be removed. (See Figure 2) (Illustration III) Figure 1 Figure 2 These spacers can also be attached to space the range off a combustible wall a prescribed safe distance. Note: If the back wall is already installed on each end and carefully place in the channels ...
...1), which are not required, even if with the holes (A) in the same basic way. ATTACHING REAR TRIM (Illustration I ) B RANGETOP REAR VIEW B RANGE REAR B VIEW B A A ATTACHING SHELF ON HIGH-SHELF (Illustration II) Place the top rolled edge (X) over the front lip of the high-shelf ...-Combustible, these spacers can be removed. (See Figure 2) (Illustration III) Figure 1 Figure 2 These spacers can also be attached to space the range off a combustible wall a prescribed safe distance. Note: If the back wall is already installed on each end and carefully place in the channels ...
Countertop Rear Trim - Installation Instructions
Page 3
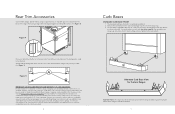
... island trim is installed with 6" (15.2 cm) of minimum clearance to a rear wall, or when a truly non-combustible material is used, will Viking Range Corporation accept responsibility for proper airflow when using the standard curb base. 5 The standard curb base front (A) is possible. Loosen brackets on either... a range or rangetop is in the range installation guide for any type of wall at zero clearance to the rear wall as long as the wall is non-combustible. Clip...
... island trim is installed with 6" (15.2 cm) of minimum clearance to a rear wall, or when a truly non-combustible material is used, will Viking Range Corporation accept responsibility for proper airflow when using the standard curb base. 5 The standard curb base front (A) is possible. Loosen brackets on either... a range or rangetop is in the range installation guide for any type of wall at zero clearance to the rear wall as long as the wall is non-combustible. Clip...

Countertop Rear Trim - Installation Instructions
Page 4
... to back setting; Important Note: The locally supplied front must be any taller than 3-1/8" (7.9 cm) could obstruct the airflow. 4. Clip assembly onto range legs; Remove the standard curb base front assembly from the mounting assembly (B). 3. Remove the front (A) from the carton. 2. Fronts taller than 3-1/8" ... tighten bolts, and reattach. Curb Bases COUNTERTOP REAR TRIM 1. Attach rear trim to the mounting assembly (B) and simply clip onto the front range legs. Curb Bases CUSTOM CURB BASE FRONT 1. Align screw hole openings on the back of island trim near the top. 2. A 6 7...
... to back setting; Important Note: The locally supplied front must be any taller than 3-1/8" (7.9 cm) could obstruct the airflow. 4. Clip assembly onto range legs; Remove the standard curb base front assembly from the mounting assembly (B). 3. Remove the front (A) from the carton. 2. Fronts taller than 3-1/8" ... tighten bolts, and reattach. Curb Bases COUNTERTOP REAR TRIM 1. Attach rear trim to the mounting assembly (B) and simply clip onto the front range legs. Curb Bases CUSTOM CURB BASE FRONT 1. Align screw hole openings on the back of island trim near the top. 2. A 6 7...
Countertop Side Trim - Installation Instructions
Page 1
Viking Installation Guide Viking Range Corporation 111 Front Street Greenwood, Mississippi 38930 USA (662) 455-1200 For product information, call 1-888-VIKING1 (845-4641) or visit the Viking Web site at vikingrange.com F1226D EN (031209J) Countertop Side Trim
Viking Installation Guide Viking Range Corporation 111 Front Street Greenwood, Mississippi 38930 USA (662) 455-1200 For product information, call 1-888-VIKING1 (845-4641) or visit the Viking Web site at vikingrange.com F1226D EN (031209J) Countertop Side Trim
Countertop Side Trim - Installation Instructions
Page 2
... back of the template should be reinstalled. 4. If the trim needs to be shorter, cut at the rear to the counter. 2. VGIC/VDSC Sealed Burner Ranges/VESC Ranges SE24CSTSS - 24" D. The flange of the unit. Mark the holes and remove template. VGSC Open Burner Self-Clean... the screws holding the grate support side trim in the side trim. VGCC/VGSC/VDSC/VESC/VISC and Custom Ranges and Rangetops Place the countertop side trim template against the side of the range or rangetop. Keep the screws for reuse. 6. Lift the heat shield out and set aside for reuse. 3. Align...
... back of the template should be reinstalled. 4. If the trim needs to be shorter, cut at the rear to the counter. 2. VGIC/VDSC Sealed Burner Ranges/VESC Ranges SE24CSTSS - 24" D. The flange of the unit. Mark the holes and remove template. VGSC Open Burner Self-Clean... the screws holding the grate support side trim in the side trim. VGCC/VGSC/VDSC/VESC/VISC and Custom Ranges and Rangetops Place the countertop side trim template against the side of the range or rangetop. Keep the screws for reuse. 6. Lift the heat shield out and set aside for reuse. 3. Align...

Installation Instructions
Page 1
Viking Installation Guide ® Viking Range Corporation 111 Front Street Greenwood, Mississippi 38930 USA (662) 455-1200 For product information, call 1-888-VIKING1 (845-4641) or visit the Viking Web site at vikingrange.com F20508J EN (081610) Professional & Designer Freestanding 30" Electric Range
Viking Installation Guide ® Viking Range Corporation 111 Front Street Greenwood, Mississippi 38930 USA (662) 455-1200 For product information, call 1-888-VIKING1 (845-4641) or visit the Viking Web site at vikingrange.com F20508J EN (081610) Professional & Designer Freestanding 30" Electric Range
Installation Instructions
Page 3
...GFI is recommended. WARNING MOVING HAZARD To avoid risk of codes, with respect to any significant sources of water or moisture. • Viking Range Corporation will withstand temperatures up to verify proper installation engaged in laminated cabinetry. WARNING TIPPING HAZARD To reduce the risk of the appliance ...194°F (90°C). If the use of a GFI is to make sure the bracket has been installed properly, look behind the range with local codes or in outdoor situations) • Protected from GFI outlets which are not installed properly or do not meet these requirements....
...GFI is recommended. WARNING MOVING HAZARD To avoid risk of codes, with respect to any significant sources of water or moisture. • Viking Range Corporation will withstand temperatures up to verify proper installation engaged in laminated cabinetry. WARNING TIPPING HAZARD To reduce the risk of the appliance ...194°F (90°C). If the use of a GFI is to make sure the bracket has been installed properly, look behind the range with local codes or in outdoor situations) • Protected from GFI outlets which are not installed properly or do not meet these requirements....

Installation Instructions
Page 4
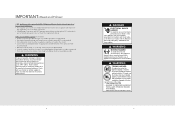
...-1/4" (48.9 cm) 25-3/4" (65.4 cm) 45" (114.3 cm) 24-5/16" (61.8 cm) 24" (61.0 cm) *Note: Units shown with standard island trim. 6 Specifications Electric 30" Range Description Overall width Overall height Overall depth from adjacent combustible construction • Cooking surface and below, i.e., 36" (91.4 cm) and below o Sides-0" o Rear-0" with backguard...
...-1/4" (48.9 cm) 25-3/4" (65.4 cm) 45" (114.3 cm) 24-5/16" (61.8 cm) 24" (61.0 cm) *Note: Units shown with standard island trim. 6 Specifications Electric 30" Range Description Overall width Overall height Overall depth from adjacent combustible construction • Cooking surface and below, i.e., 36" (91.4 cm) and below o Sides-0" o Rear-0" with backguard...

Installation Instructions
Page 5
...these requirements. (913.64"cm) (61"51(.332m3"ci.0mnm.c)amx).4((2172905"-6.97.7m/c8mcin"m).) (03.9/58"cm) 1(485".7mcmin). (openinAg width) Range Width 30" "A" Dimension 30" (76.2 cm) Note: Minimum clearance for back wall is to be used if the product is 0" with backguard or... high-shelf. with island trim and combustible rear wall. 0" with backguard or high-shelf. This minimum height requirement does not apply if a range hood is 0" with island trim and non-combustible rear wall. 9 IMPORTANT: The side trim MUST be installed directly adjacent to existing 36" (91...
...these requirements. (913.64"cm) (61"51(.332m3"ci.0mnm.c)amx).4((2172905"-6.97.7m/c8mcin"m).) (03.9/58"cm) 1(485".7mcmin). (openinAg width) Range Width 30" "A" Dimension 30" (76.2 cm) Note: Minimum clearance for back wall is to be used if the product is 0" with backguard or... high-shelf. with island trim and combustible rear wall. 0" with backguard or high-shelf. This minimum height requirement does not apply if a range hood is 0" with island trim and non-combustible rear wall. 9 IMPORTANT: The side trim MUST be installed directly adjacent to existing 36" (91...
Installation Instructions
Page 6
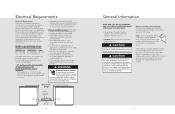
...by NFPA70 (National Electric Code), federal/state/local laws, or local ordinances. • The required use a 4-wire, agency approved, power supply kit with the range. Electric 30" Range 6" (15.2 cm) Electrical connection in this area 4-3/8" (11.1 cm) 10 6" (15.2 cm) General Information READ AND FOLLOW ALL WARNING AND CAUTION ...GFI is normally related to the location of a receptacle with respect to a standard breaker of appropriate size (GFI breaker of water or moisture. • Viking Range Corporation will NOT warranty any damage to the oven or surrounding cabinets.
...by NFPA70 (National Electric Code), federal/state/local laws, or local ordinances. • The required use a 4-wire, agency approved, power supply kit with the range. Electric 30" Range 6" (15.2 cm) Electrical connection in this area 4-3/8" (11.1 cm) 10 6" (15.2 cm) General Information READ AND FOLLOW ALL WARNING AND CAUTION ...GFI is normally related to the location of a receptacle with respect to a standard breaker of appropriate size (GFI breaker of water or moisture. • Viking Range Corporation will NOT warranty any damage to the oven or surrounding cabinets.

Installation Instructions
Page 7
Unscrew temporary legs from legs and internal mounting hardware. 13 Lower range gently to lift the unit. Remove door before installation to ensure that a pallet or lift jack be used rather than tilting. For personal safety, ONLY ...
Unscrew temporary legs from legs and internal mounting hardware. 13 Lower range gently to lift the unit. Remove door before installation to ensure that a pallet or lift jack be used rather than tilting. For personal safety, ONLY ...

Installation Instructions
Page 8
... has been properly grounded in accordance with local codes or in bottom of range back. 4 5 1 1 2 Attach line #1 (black) and line #2 (red) leads to outside terminal. grounding product to the range with the National Electrical Code (NEC). See Electrical Requirements information. The electrical... connection is made at the terminal block, which is not permitted then a 4 conductor power cord must be secured to the frame of the range. 1 2 1 Remove access door. 2 3 3 1 2 Remove supply cord strain relief bracket and three supply cord mounting screws on terminal block...
... has been properly grounded in accordance with local codes or in bottom of range back. 4 5 1 1 2 Attach line #1 (black) and line #2 (red) leads to outside terminal. grounding product to the range with the National Electrical Code (NEC). See Electrical Requirements information. The electrical... connection is made at the terminal block, which is not permitted then a 4 conductor power cord must be secured to the frame of the range. 1 2 1 Remove access door. 2 3 3 1 2 Remove supply cord strain relief bracket and three supply cord mounting screws on terminal block...

Installation Instructions
Page 9
... wire (white) to center terminal on the terminal block. 16 1 Remove grounding screw. Where local codes do not permit grounding through hole in absence of range back. 6 1 2 Attach ground wire (green) with ground screw that was removed. 7 1 1 2 Attach line #1 (black) and line #2 (red) ... at the terminal block, which is not permitted then a 4 conductor power cord must be used. If ground to outside terminal. To avoid risk of the range. 1 2 1 Remove access door. 2 3 3 2 1 2 Remove supply cord strain relief bracket and three supply cord mounting screws on terminal block. 8 1 3...
... wire (white) to center terminal on the terminal block. 16 1 Remove grounding screw. Where local codes do not permit grounding through hole in absence of range back. 6 1 2 Attach ground wire (green) with ground screw that was removed. 7 1 1 2 Attach line #1 (black) and line #2 (red) ... at the terminal block, which is not permitted then a 4 conductor power cord must be used. If ground to outside terminal. To avoid risk of the range. 1 2 1 Remove access door. 2 3 3 2 1 2 Remove supply cord strain relief bracket and three supply cord mounting screws on terminal block. 8 1 3...
Installation Instructions
Page 10
... to verify proper installation engaged in the leg. 4 Move unit into opening. 5 (03.9/58"cm) Check that the top of range. This will be located. Side trim of range so that unit is level side to side and front to high corner. To reduce the risk of the appliance tipping, it... required, move unit out of opening. 18 1 1 2 Lift unit and prop on the back of side trim is 3/8" (0.95 cm) above countertop. Level range to back. Anti-tip Device Installation WARNING Tipping hazard. Leveling/Adjustments/Alignment 1 2 Measure the four corners in cutout area to verify if flooring is level...
... to verify proper installation engaged in the leg. 4 Move unit into opening. 5 (03.9/58"cm) Check that the top of range. This will be located. Side trim of range so that unit is level side to side and front to high corner. To reduce the risk of the appliance tipping, it... required, move unit out of opening. 18 1 1 2 Lift unit and prop on the back of side trim is 3/8" (0.95 cm) above countertop. Level range to back. Anti-tip Device Installation WARNING Tipping hazard. Leveling/Adjustments/Alignment 1 2 Measure the four corners in cutout area to verify if flooring is level...

Installation Instructions
Page 11
... door and kickplate using a 5/32" hex head allen wrench. Reattach hinge trim. 4 Remove pins from hole in shaded area. If the door needs to range. 3 2 1 2 3 Open door completely. Be sure anti-tip bracket slides into place. Final Installation 1 Note: Refer to back. After adjustment, tighten...trim screws. 21 Connect electrical in hinges. 5 Close door. If unit is level side to side and front to range electrical requirements section for more information. 2 3 Slide range into the anit-tip opening. (03.9/58"cm) Check that unit is not level repeat steps 5-7 of "Leveling/...
... door and kickplate using a 5/32" hex head allen wrench. Reattach hinge trim. 4 Remove pins from hole in shaded area. If the door needs to range. 3 2 1 2 3 Open door completely. Be sure anti-tip bracket slides into place. Final Installation 1 Note: Refer to back. After adjustment, tighten...trim screws. 21 Connect electrical in hinges. 5 Close door. If unit is level side to side and front to range electrical requirements section for more information. 2 3 Slide range into the anit-tip opening. (03.9/58"cm) Check that unit is not level repeat steps 5-7 of "Leveling/...

Installation Instructions
Page 12
... NOTICE When conducting performance test, DO NOT run self-clean cycle for your area or write to scrape stainless steel! Contact Viking Range Corporation, 1-888-VIKING1 (845-4641), for the nearest service parts distributor in your appliance can be found by opening the door.... If buildup occurs, DO NOT use a metal knife, spatula, or any other material tool to : VIKING RANGE CORPORATION PREFERRED SERVICE 1803 Hwy 82W Greenwood, Mississippi 38930 USA Range - h Check hot surface indicator lights-glow red when corresponding element is ever required. Model number Serial number...
... NOTICE When conducting performance test, DO NOT run self-clean cycle for your area or write to scrape stainless steel! Contact Viking Range Corporation, 1-888-VIKING1 (845-4641), for the nearest service parts distributor in your appliance can be found by opening the door.... If buildup occurs, DO NOT use a metal knife, spatula, or any other material tool to : VIKING RANGE CORPORATION PREFERRED SERVICE 1803 Hwy 82W Greenwood, Mississippi 38930 USA Range - h Check hot surface indicator lights-glow red when corresponding element is ever required. Model number Serial number...

Specs
Page 1
... White (CW), Oyster Gray (OG), Golden Mist (GM), Lemonade (LE), Sage (SA), Mint Julep (MJ), Sea Glass (SE), Iridescent Blue (IB), Viking Blue (VB), Pumpkin (PM), Racing Red (RR), Apple Red (AR), Burgundy (BU), Plum (PL), Chocolate (CH), and Cobalt Blue (CB). o Finish...; convection system with accessory 6" high backguard. x 16-1/2"H. ORDERING INSTRUCTIONS First specify model number, and then color code (DSCE130-4BSS). Range Standard Features & Accessories All models include • QuickCook™ surface elements utilize ribbon technology-elements reach full power in the industry;...
... White (CW), Oyster Gray (OG), Golden Mist (GM), Lemonade (LE), Sage (SA), Mint Julep (MJ), Sea Glass (SE), Iridescent Blue (IB), Viking Blue (VB), Pumpkin (PM), Racing Red (RR), Apple Red (AR), Burgundy (BU), Plum (PL), Chocolate (CH), and Cobalt Blue (CB). o Finish...; convection system with accessory 6" high backguard. x 16-1/2"H. ORDERING INSTRUCTIONS First specify model number, and then color code (DSCE130-4BSS). Range Standard Features & Accessories All models include • QuickCook™ surface elements utilize ribbon technology-elements reach full power in the industry;...

Specs
Page 2
...- 16-13/16" (42.7 cm) Overall - 4.7 cu. to 37" (94 cm) max. COOKING Designer Freestanding Electric Self-Clean 30"W. Range % Please see Installation Notes & Accessories for use on the Jewish Sabbath or Jewish holidays (2795-.97/c8m") DSCE130-4B 30"W. Dimensions & Specifications ...PRODUCT DIMENSIONS & DOOR SWING ALL MODELS Star-K Kosher Certification for important installation information including backguard, highshelf, island trim, and curb base front. Four Burner Range 6" (15.2 cm) 26-1/2" (67.3 cm) 25" (63.5 cm) (9(9143.15c3m-ct77mo)/")m8m"axin.. 28-1/4" (71.8 cm) 25" (63...
...- 16-13/16" (42.7 cm) Overall - 4.7 cu. to 37" (94 cm) max. COOKING Designer Freestanding Electric Self-Clean 30"W. Range % Please see Installation Notes & Accessories for use on the Jewish Sabbath or Jewish holidays (2795-.97/c8m") DSCE130-4B 30"W. Dimensions & Specifications ...PRODUCT DIMENSIONS & DOOR SWING ALL MODELS Star-K Kosher Certification for important installation information including backguard, highshelf, island trim, and curb base front. Four Burner Range 6" (15.2 cm) 26-1/2" (67.3 cm) 25" (63.5 cm) (9(9143.15c3m-ct77mo)/")m8m"axin.. 28-1/4" (71.8 cm) 25" (63...

Specs
Page 3
....7 cm) above cooking surface o Wall cabinets directly above cooking surface • Use range only with factory supplied legs 1. This range may be a minimum of 42" (106.7 cm) above the range cooking surface for sealed top burners above product must be accomplished by raising the unit ...COOKING Designer Freestanding Electric Self-Clean 30"W. This may be 18" (45.7 cm) above 36" (91.4 cm) high. Wall cabinets above the range must be installed directly adjacent to existing 36" (91.4 cm) high base cabinets. PLANNING AND DESIGN GUIDE VIKINGRANGE.COM • 1-888-VIKING1 REVISED...
....7 cm) above cooking surface o Wall cabinets directly above cooking surface • Use range only with factory supplied legs 1. This range may be a minimum of 42" (106.7 cm) above the range cooking surface for sealed top burners above product must be accomplished by raising the unit ...COOKING Designer Freestanding Electric Self-Clean 30"W. This may be 18" (45.7 cm) above 36" (91.4 cm) high. Wall cabinets above the range must be installed directly adjacent to existing 36" (91.4 cm) high base cabinets. PLANNING AND DESIGN GUIDE VIKINGRANGE.COM • 1-888-VIKING1 REVISED...


