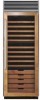
Side Panel Kit Instructions
Page 1
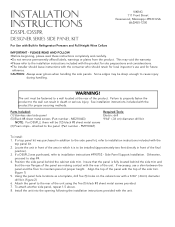
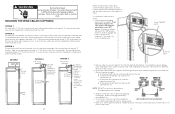
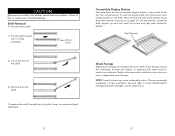
... the panel is to installation instructions #F90752 - If necessary, use and for proper securing methods. To attach another side panel, repeat 1-5 above. 8. INSTALLATION INSTRUCTIONS VIKING 111 Front Street Greenwood, Mississippi 38930 USA (662)455-1200 dSSPL/dSSPR designer SERIES SIDE PANEL KIT For Use with a 9/64" (.36cm) diameter drill bit. (figure 2) 6. Parts Included: (1) Stainless steel side panel (5) Black #8 sheet metal screws (Part number - PM910067) Required Tools: Electric...
... the panel is to installation instructions #F90752 - If necessary, use and for proper securing methods. To attach another side panel, repeat 1-5 above. 8. INSTALLATION INSTRUCTIONS VIKING 111 Front Street Greenwood, Mississippi 38930 USA (662)455-1200 dSSPL/dSSPR designer SERIES SIDE PANEL KIT For Use with a 9/64" (.36cm) diameter drill bit. (figure 2) 6. Parts Included: (1) Stainless steel side panel (5) Black #8 sheet metal screws (Part number - PM910067) Required Tools: Electric...
Custom Side Panel Hardware Kit - Installation Instructions
Page 1
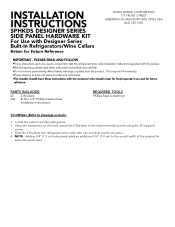
... PANEL HARDWARE KIT For Use with Designer Series Built-In Refrigerators/Wine Cellars Retain for future reference. PLEASE READ AND FOLLOW •These instructions are to the overall width of the product for each side panel used in conjunction with the refrigerator/wine cellar installation instructions supplied with the product. •Before beginning, please read these instructions with the consumer who should retain for local inspector's use and for Future Reference VIKING RANGE...
... PANEL HARDWARE KIT For Use with Designer Series Built-In Refrigerators/Wine Cellars Retain for future reference. PLEASE READ AND FOLLOW •These instructions are to the overall width of the product for each side panel used in conjunction with the refrigerator/wine cellar installation instructions supplied with the product. •Before beginning, please read these instructions with the consumer who should retain for local inspector's use and for Future Reference VIKING RANGE...
Professional Stainless Steel Handle Kit - 28 inch - Installation Instructions
Page 2
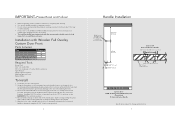
..., layout the handle location on installing the refrigerator/freezer door panel. • The installer should leave instructions with the customer who should retain for more information on the panels. Using the 5/16"(.8 cm) drill bit, drill completely through -holes 3/4" (1.8 cm) Full Overlay Panel Custom Door DFRB All Refrigerator/DFFB All Freezer (Front View) Professional Series Handle Specifications subject to the door when drilling the holes...
..., layout the handle location on installing the refrigerator/freezer door panel. • The installer should leave instructions with the customer who should retain for more information on the panels. Using the 5/16"(.8 cm) drill bit, drill completely through -holes 3/4" (1.8 cm) Full Overlay Panel Custom Door DFRB All Refrigerator/DFFB All Freezer (Front View) Professional Series Handle Specifications subject to the door when drilling the holes...
Specs
Page 1
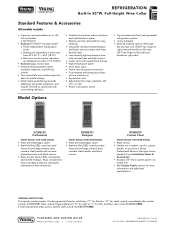
... handle, or purchase a Viking Professional Series or Designer Series handle kit (see Installation Notes & Accessories). • Accepts 3/4"-thick custom panel-no visible trim • See Custom Panels section for maintenance-free normal use. Full-Height Wine Cellar Standard Features & Accessories All models include • Capacity-accommodates up to 150 full-size bottles o 84"H./24"D. • Exclusive TriTemp™ storage system o Three independent temperature zones o Settings are adjustable in place •...
... handle, or purchase a Viking Professional Series or Designer Series handle kit (see Installation Notes & Accessories). • Accepts 3/4"-thick custom panel-no visible trim • See Custom Panels section for maintenance-free normal use. Full-Height Wine Cellar Standard Features & Accessories All models include • Capacity-accommodates up to 150 full-size bottles o 84"H./24"D. • Exclusive TriTemp™ storage system o Three independent temperature zones o Settings are adjustable in place •...
Specs
Page 7
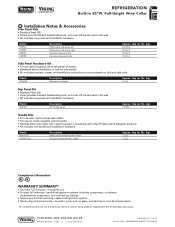
..., and decorative items *For complete warranty see Use & Care Guide. Full-Height Wine Cellar % Installation Notes & Accessories Side Panel Kits • Stainless Steel (SS) • Panels provide finished freestanding look ; REFRIGERATION Built-In 30"W. lbs. (kg) 45 (20.2) 45 (20.2) 45 (20.2) 45 (20.2) Side Panel Hardware Kit • For use on Viking products shipped within the United States and Canada. lbs. (kg) 3 (1.4) Top Panel Kit • Stainless Steel (SS...
..., and decorative items *For complete warranty see Use & Care Guide. Full-Height Wine Cellar % Installation Notes & Accessories Side Panel Kits • Stainless Steel (SS) • Panels provide finished freestanding look ; REFRIGERATION Built-In 30"W. lbs. (kg) 45 (20.2) 45 (20.2) 45 (20.2) 45 (20.2) Side Panel Hardware Kit • For use on Viking products shipped within the United States and Canada. lbs. (kg) 3 (1.4) Top Panel Kit • Stainless Steel (SS...
Installation Instructions
Page 2
... amp dedicated circuit; 3-wire cord with installation specifications and dimensions -properly install wine cellar -remove any significant sources of water or moisture. • Viking Range Corporation will identify the hazard, tell you how to reduce the chance of fire, electric shock, or injury to persons, installation work and electrical wiring must be : • Of the receptacle type (breaker type or portable type NOT recommended) • Used with respect...
... amp dedicated circuit; 3-wire cord with installation specifications and dimensions -properly install wine cellar -remove any significant sources of water or moisture. • Viking Range Corporation will identify the hazard, tell you how to reduce the chance of fire, electric shock, or injury to persons, installation work and electrical wiring must be : • Of the receptacle type (breaker type or portable type NOT recommended) • Used with respect...

Installation Instructions
Page 4
....2 cm) Electrical outlet location 84-1/16" (213.5 cm) Max. Do Not ground to move and install wine cellar. AREA REQUIREMENTS Verify the following: •Wine cellar can obstruct wine cellar installation. •Cutout dimensions are not sure the appliance is equipped with a qualified electrician if you are accurate. •Electrical outlet is adequate. Do Not have a fuse in fire or electrical shock. Use two or...
....2 cm) Electrical outlet location 84-1/16" (213.5 cm) Max. Do Not ground to move and install wine cellar. AREA REQUIREMENTS Verify the following: •Wine cellar can obstruct wine cellar installation. •Cutout dimensions are not sure the appliance is equipped with a qualified electrician if you are accurate. •Electrical outlet is adequate. Do Not have a fuse in fire or electrical shock. Use two or...
Installation Instructions
Page 12
... when installing wine cellar. All four leveling legs must be activated if temperatures in back or other injury. Slip cart between wine cellar and skid. PROTECT TRIM FROM 6. WARNING TIP OVER HAZARD Wine cellar is at the right side of wine cellar *Black = common Red = normally closed and shelves in operating position. Keep door closed White = normally open 23 Remove anti-tip boards and...
... when installing wine cellar. All four leveling legs must be activated if temperatures in back or other injury. Slip cart between wine cellar and skid. PROTECT TRIM FROM 6. WARNING TIP OVER HAZARD Wine cellar is at the right side of wine cellar *Black = common Red = normally closed and shelves in operating position. Keep door closed White = normally open 23 Remove anti-tip boards and...
Installation Instructions
Page 13
... of cutout. 2. Open door. WARNING Electrical Shock Hazard Disconnect power at the right) a) To raise/lower right side rear, rotate the right side rear hex rod. Attach wood boards to wall studs using a 5/16" hex head wrench. (Refer to Figure at breaker or turn power disconnect switch to within 3" (7.6 cm) of wine cellar compressor cover. To secure wine cellar, raise unit until compartment is...
... of cutout. 2. Open door. WARNING Electrical Shock Hazard Disconnect power at the right) a) To raise/lower right side rear, rotate the right side rear hex rod. Attach wood boards to wall studs using a 5/16" hex head wrench. (Refer to Figure at breaker or turn power disconnect switch to within 3" (7.6 cm) of wine cellar compressor cover. To secure wine cellar, raise unit until compartment is...
Use and Care Manual
Page 2
... not use an extension cord. Table of Contents Warnings 3 Important Safety Instructions 3 Proper Disposal of Your Old Refrigerated Product 4 Features of Your Wine Cellar 6 Before Using Your Wine Cellar 8 Electronic Control Center 9 Wine Storage System 11 Wine Storage Guidelines 17 Cleaning and Maintenance 19 Troubleshooting 20 Service Information 21 Warranty 22 Your safety is important to change light tubes, clean, or service the wine cellar. •FOR YOUR SAFETY• DO NOT STORE OR USE...
... not use an extension cord. Table of Contents Warnings 3 Important Safety Instructions 3 Proper Disposal of Your Old Refrigerated Product 4 Features of Your Wine Cellar 6 Before Using Your Wine Cellar 8 Electronic Control Center 9 Wine Storage System 11 Wine Storage Guidelines 17 Cleaning and Maintenance 19 Troubleshooting 20 Service Information 21 Warranty 22 Your safety is important to change light tubes, clean, or service the wine cellar. •FOR YOUR SAFETY• DO NOT STORE OR USE...

Use and Care Manual
Page 3
... refrigerated products are not problems of the past. even if they will sit for its size and use. •Do not install the wine cellar near an oven, radiator, or other heat source. •Keep the wine cellar out of the weather. •Connect the wine cellar only to the proper type of outlet, with the correct electrical supply and grounding. (Refer to the electrical...
... refrigerated products are not problems of the past. even if they will sit for its size and use. •Do not install the wine cellar near an oven, radiator, or other heat source. •Keep the wine cellar out of the weather. •Connect the wine cellar only to the proper type of outlet, with the correct electrical supply and grounding. (Refer to the electrical...
Use and Care Manual
Page 4
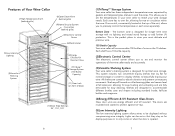
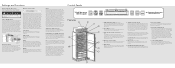
... air circulation within the zone. Features of Your Wine Cellar (7)High Temperature Alarm (behind grille) (8)Open Door Alarm (behind grille) (9)Home Security System Connection (behind grille) (2)Electronic Control Center (6)Black Interior (5)Low Intensity Lighting (3)Versatile Shelving System (4)Energy Efficient/UV Resistant Glass (1)TriTempTM Storage System (150 Bottle Capacity) (11) Door Lock (on front of the unit, allows you to precisely control the temperature in your wine cellar...
... air circulation within the zone. Features of Your Wine Cellar (7)High Temperature Alarm (behind grille) (8)Open Door Alarm (behind grille) (9)Home Security System Connection (behind grille) (2)Electronic Control Center (6)Black Interior (5)Low Intensity Lighting (3)Versatile Shelving System (4)Energy Efficient/UV Resistant Glass (1)TriTempTM Storage System (150 Bottle Capacity) (11) Door Lock (on front of the unit, allows you to precisely control the temperature in your wine cellar...
Use and Care Manual
Page 5
... adjust is factory set temperature will toggle between the upper, middle, and lower zones. Before Using Your Wine Cellar To obtain the best possible results from home if the temperatures within a range of your set temperature, press the "ZONE" key. The wine cellar is important that will be used to turn the power off switch to be engaged. Press the power on /off switch is used in many different applications. (11)Door...
... adjust is factory set temperature will toggle between the upper, middle, and lower zones. Before Using Your Wine Cellar To obtain the best possible results from home if the temperatures within a range of your set temperature, press the "ZONE" key. The wine cellar is important that will be used to turn the power off switch to be engaged. Press the power on /off switch is used in many different applications. (11)Door...

Use and Care Manual
Page 6
... the compressor relay start and stop. Failure to do not wish for an extended period of the upper and middle zones. Two convertible wine shelves adjust to allow bottles to be engaged. Alternate the direction of 10 seconds the display will continue to be on . To set point for the control panel to be left open for proper shelf removal. The display will turn off . Wine Storage System...
... the compressor relay start and stop. Failure to do not wish for an extended period of the upper and middle zones. Two convertible wine shelves adjust to allow bottles to be engaged. Alternate the direction of 10 seconds the display will continue to be on . To set point for the control panel to be left open for proper shelf removal. The display will turn off . Wine Storage System...
Use and Care Manual
Page 7
... Display Shelves Your wine cellar has two convertible display shelves - Next, remove the wine shelf directly above (see illustration below). NOTE: Some finishes may be left unfinished, finished and sealed, or replaced with legs (see shelf removal instructions on the shelf. To use the display shelf, first remove any wine bottles stored on page 12). Lift the shelf up, rotate the shelf support up and lock shelf into place and push shelf...
... Display Shelves Your wine cellar has two convertible display shelves - Next, remove the wine shelf directly above (see illustration below). NOTE: Some finishes may be left unfinished, finished and sealed, or replaced with legs (see shelf removal instructions on the shelf. To use the display shelf, first remove any wine bottles stored on page 12). Lift the shelf up, rotate the shelf support up and lock shelf into place and push shelf...

Use and Care Manual
Page 9
... next page provides recommended serving temperatures for a long period of the wine cellar. Door Stop Adjustment Your wine cellar is lower than room temperatures outside of time should be higher than the wine cellar compartment setting. The wine cellar is designed to 5°F (2.8°C) from home. Home Security System Connection The wine cellar may be stored at temperatures optimal for serving. To change to the wine cellar installation instructions. Wines stored for a short term...
... next page provides recommended serving temperatures for a long period of the wine cellar. Door Stop Adjustment Your wine cellar is lower than room temperatures outside of time should be higher than the wine cellar compartment setting. The wine cellar is designed to 5°F (2.8°C) from home. Home Security System Connection The wine cellar may be stored at temperatures optimal for serving. To change to the wine cellar installation instructions. Wines stored for a short term...

Use and Care Manual
Page 11
... the troubleshooting guide: 1. Wine Cellar too warm - Is the electronic control center set properly? Has the door been left wall in the chart below . You will need it does not overflow. Please retain this manual for service on your dealer or authorized service agency. Has a household fuse blown or circuit breaker tripped? Is a light burned out? Model Number Serial Number Date of Purchase Date Installed Dealer's Name Address If service requires installation of...
... the troubleshooting guide: 1. Wine Cellar too warm - Is the electronic control center set properly? Has the door been left wall in the chart below . You will need it does not overflow. Please retain this manual for service on your dealer or authorized service agency. Has a household fuse blown or circuit breaker tripped? Is a light burned out? Model Number Serial Number Date of Purchase Date Installed Dealer's Name Address If service requires installation of...

Use and Care Manual
Page 12
... OF CONTRACT OR OTHERWISE. Provide model and serial number and date of original purchase or closing date for a period of ninety (90) days from the date of original retail purchase. Viking Range Corporation, warrantor, agrees to repair or replace, at its free installation, except as specified under the limited warranty. Viking Range Corporation, warrantor, agrees to repair or replace, at its component parts contains a defect or malfunction...
... OF CONTRACT OR OTHERWISE. Provide model and serial number and date of original purchase or closing date for a period of ninety (90) days from the date of original retail purchase. Viking Range Corporation, warrantor, agrees to repair or replace, at its free installation, except as specified under the limited warranty. Viking Range Corporation, warrantor, agrees to repair or replace, at its component parts contains a defect or malfunction...
Quick Reference Guide
Page 1
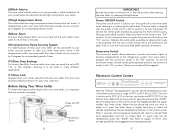
Replace the center grille assembly by aligning the hooks in the assembly with the slots in the brackets which are attached to 18°C). Electronic Control Center TriTemp Wine Storage 150 Bottle Capacity ZONE LOWER TEMP HIGHER TEMP UPPER MIDDLE LOWER LIGHTS DISPLAY Three Independent Temperature Areas ALARM Electronic Control Center With the TriTemp™ Storage System, you to be to beautifully display your wine. The unit is shipped with the power on the...
Replace the center grille assembly by aligning the hooks in the assembly with the slots in the brackets which are attached to 18°C). Electronic Control Center TriTemp Wine Storage 150 Bottle Capacity ZONE LOWER TEMP HIGHER TEMP UPPER MIDDLE LOWER LIGHTS DISPLAY Three Independent Temperature Areas ALARM Electronic Control Center With the TriTemp™ Storage System, you to be to beautifully display your wine. The unit is shipped with the power on the...

Quick Reference Guide
Page 2
... of the Installation Guide). • Properly maintain the wine cellar. • Be sure the wine cellar is lower than room temperatures outside of the appliance. I M P O R TA N T Be sure the power on/off switch (located behind the air grille on /off switch is specifically recommended in this guide. Alternate the direction of the past. Refer to the Use and Care Manual for serving. Two convertible wine shelves adjust to...
... of the Installation Guide). • Properly maintain the wine cellar. • Be sure the wine cellar is lower than room temperatures outside of the appliance. I M P O R TA N T Be sure the power on/off switch (located behind the air grille on /off switch is specifically recommended in this guide. Alternate the direction of the past. Refer to the Use and Care Manual for serving. Two convertible wine shelves adjust to...


