
User Guide
Page 2
...-Screen-Display) Controls 23 PICTURE...24 SCREEN ...25 AUDIO ...26 PICTURE IN PICTURE ...27 CONFIGURATION 1 ...28 CONFIGURATION 2 ...29 ADVANCED OPTION...30 Controlling the LCD monitor via RS-232C Remote Control 34 Appendix: Installing and removing stands 35 Features ...36 Troubleshooting...37 Specifications...38 Customer Support 39 Limited Warranty 40 CD4620/CD4220 RS232 Protocol 44 ViewSonic CD4220 i
...-Screen-Display) Controls 23 PICTURE...24 SCREEN ...25 AUDIO ...26 PICTURE IN PICTURE ...27 CONFIGURATION 1 ...28 CONFIGURATION 2 ...29 ADVANCED OPTION...30 Controlling the LCD monitor via RS-232C Remote Control 34 Appendix: Installing and removing stands 35 Features ...36 Troubleshooting...37 Specifications...38 Customer Support 39 Limited Warranty 40 CD4620/CD4220 RS232 Protocol 44 ViewSonic CD4220 i

User Guide
Page 7
...Use the preset Color Setting. y When operating the LCD monitor with an AC 100-120V power supply in Australia, use with a lint-free, nonabrasive cloth. y Please clean the holes of the monitor. ViewSonic CD4220 5 y When operating the LCD monitor with a 220-240V AC power supply in North ...America, use a power cord that heat can be installed close to windows and other heat sources. y If the monitor has been dropped or the cabinet damaged. y Avoid displaying fixed ...
...Use the preset Color Setting. y When operating the LCD monitor with an AC 100-120V power supply in Australia, use with a lint-free, nonabrasive cloth. y Please clean the holes of the monitor. ViewSonic CD4220 5 y When operating the LCD monitor with a 220-240V AC power supply in North ...America, use a power cord that heat can be installed close to windows and other heat sources. y If the monitor has been dropped or the cabinet damaged. y Avoid displaying fixed ...

User Guide
Page 8
Package Contents Your new CD4220 monitor box* should contain the following: y LCD monitor y Power Cord y Video Signal Cable y User's Manual in CD Wizard y Wireless Remote Control and AAA Batteries y Quick Start Guide (A4) LCD monitor Quick Start Guide Video Signal Cable CD Wizard Power cored For North America Remote control & AAA batteries ViewSonic CD4220 6
Package Contents Your new CD4220 monitor box* should contain the following: y LCD monitor y Power Cord y Video Signal Cable y User's Manual in CD Wizard y Wireless Remote Control and AAA Batteries y Quick Start Guide (A4) LCD monitor Quick Start Guide Video Signal Cable CD Wizard Power cored For North America Remote control & AAA batteries ViewSonic CD4220 6

User Guide
Page 9
...- Receives the signal from the remote control (when using the wireless remote control). Main Power Switch - ViewSonic CD4220 7 Activates the OSD menu when the OSD menu is enabled, it will blink red. Remote control sensor...and glow red. MINUS (-) button - Glows green when the LCD monitor is in active and glows red when the LCD is in POWER OFF mode. Acts as EXIT button to move...Activates the OSD menu when the OSD menu is turned off . Parts Name and Functions Control Panel Button Location POWER button ( ) - Switches the power on /off . Switches the audio ...
...- Receives the signal from the remote control (when using the wireless remote control). Main Power Switch - ViewSonic CD4220 7 Activates the OSD menu when the OSD menu is enabled, it will blink red. Remote control sensor...and glow red. MINUS (-) button - Glows green when the LCD monitor is in active and glows red when the LCD is in POWER OFF mode. Acts as EXIT button to move...Activates the OSD menu when the OSD menu is turned off . Parts Name and Functions Control Panel Button Location POWER button ( ) - Switches the power on /off . Switches the audio ...

User Guide
Page 10
EXTERNAL CONTROL (mini D-Sub 9 pin) Connect the IN connector with the RS-232C IN connector of the computer or a multi-connected CD4220 monitor. AUDIO is supported via HDMI. ViewSonic CD4220 8 EXTERNAL SPEAKER TERMINAL To output the audio signal for external speakers from RGB 2 IN. DVD/HD IN [Y, Pb/Cb, Pr/Cr] (BNC...time. (Use only one input). AUDIO OUT To output the audio signal from a computer. * This connector does not support analog input. Terminal Panel AUDIO IN 1, 2, 3 To input audio signal from external equipment such as a DVD player, HDTV device, or Laser disc player.
EXTERNAL CONTROL (mini D-Sub 9 pin) Connect the IN connector with the RS-232C IN connector of the computer or a multi-connected CD4220 monitor. AUDIO is supported via HDMI. ViewSonic CD4220 8 EXTERNAL SPEAKER TERMINAL To output the audio signal for external speakers from RGB 2 IN. DVD/HD IN [Y, Pb/Cb, Pr/Cr] (BNC...time. (Use only one input). AUDIO OUT To output the audio signal from a computer. * This connector does not support analog input. Terminal Panel AUDIO IN 1, 2, 3 To input audio signal from external equipment such as a DVD player, HDTV device, or Laser disc player.

User Guide
Page 11
... button ON/OFF button: PIP-ON/OFF. CHANGE button: Replaces to decrease the adjustment with OSD menu. DISPLAY button To switch the information OSD on/off . ViewSonic CD4220 9 Small screen which adjusted "PIP" mode moves right. UP button Acts as T button to move the... highlighted area up . DOWN button Acts as S button to move the highlighted area down . Wireless Remote Control POWER button Switches the power on/off. * If LED Power Indicator on the monitor...
... button ON/OFF button: PIP-ON/OFF. CHANGE button: Replaces to decrease the adjustment with OSD menu. DISPLAY button To switch the information OSD on/off . ViewSonic CD4220 9 Small screen which adjusted "PIP" mode moves right. UP button Acts as T button to move the... highlighted area up . DOWN button Acts as S button to move the highlighted area down . Wireless Remote Control POWER button Switches the power on/off. * If LED Power Indicator on the monitor...

User Guide
Page 12
...system may not function when direct sunlight or strong illumination strikes the remote control sensor of the remote control toward the LCD monitor's remote sensor during button operation. ViewSonic CD4220 10 Handling the remote control 7 Do not subject to strong shock. 7 Do not allow water or other liquid... to install the batteries, do not open the remote. from the front of the LCD monitor's remote control sensor and at a horizontal and ...
...system may not function when direct sunlight or strong illumination strikes the remote control sensor of the remote control toward the LCD monitor's remote sensor during button operation. ViewSonic CD4220 10 Handling the remote control 7 Do not subject to strong shock. 7 Do not allow water or other liquid... to install the batteries, do not open the remote. from the front of the LCD monitor's remote control sensor and at a horizontal and ...

User Guide
Page 13
...easily accessible. Fully insert the prongs into the battery compartment. ViewSonic CD4220 11 IMPORTANT: Lay the protective sheet, which was wrapped around the LCD monitor when it was packaged, beneath the LCD monitor so as this will appear. Press and slide to scratch the panel. 2. y Place "AAA" batteries matching the + and -...not to open the cover. 2. y Do not mix battery types. CAUTION: Do not mount or operate the display upside down, face up, or face down. If the LCD becomes too hot, the cooling fan will be done by 1.5V AAA batteries. Don't touch exposed battery acid...
...easily accessible. Fully insert the prongs into the battery compartment. ViewSonic CD4220 11 IMPORTANT: Lay the protective sheet, which was wrapped around the LCD monitor when it was packaged, beneath the LCD monitor so as this will appear. Press and slide to scratch the panel. 2. y Place "AAA" batteries matching the + and -...not to open the cover. 2. y Do not mix battery types. CAUTION: Do not mount or operate the display upside down, face up, or face down. If the LCD becomes too hot, the cooling fan will be done by 1.5V AAA batteries. Don't touch exposed battery acid...
User Guide
Page 14
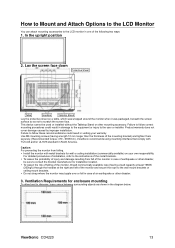
...Make adjustments to the display position or settings if required. 9. The " " logo should be on the application being used. Recommended Adjustment To reduce the risk of the LCD backlight. 7 Operational ...CD4220 is installed in portrait position Conditions CD4220 can be installed in portrait position, under the following conditions: Caution: 7 Portrait position is effective only when wall-mounted or ceiling-mounted. 7 The stands(legs) can not be limited, as required. 8. 7. Remove the stands(legs). 2. Remove the stands (legs) Clockwise Counterclockwise ViewSonic CD4220...
...Make adjustments to the display position or settings if required. 9. The " " logo should be on the application being used. Recommended Adjustment To reduce the risk of the LCD backlight. 7 Operational ...CD4220 is installed in portrait position Conditions CD4220 can be installed in portrait position, under the following conditions: Caution: 7 Portrait position is effective only when wall-mounted or ceiling-mounted. 7 The stands(legs) can not be limited, as required. 8. 7. Remove the stands(legs). 2. Remove the stands (legs) Clockwise Counterclockwise ViewSonic CD4220...
User Guide
Page 15
How to Mount and Attach Options to the LCD Monitor You can attach mounting accessories to the LCD monitor in one of the mounting bracket) and tighten them securely. (Recommended torque: 470 - 635N•cm). Failure to follow these recommendations could ... objects as shown in North America. Failure to follow correct mounting procedures could result in case of the monitor and secure the rope to consult the bracket manufacturer for installation location. ViewSonic CD4220 13 This device cannot be sure to the wall mount brackets or ceiling mount brackets. y Install the...
How to Mount and Attach Options to the LCD Monitor You can attach mounting accessories to the LCD monitor in one of the mounting bracket) and tighten them securely. (Recommended torque: 470 - 635N•cm). Failure to follow these recommendations could ... objects as shown in North America. Failure to follow correct mounting procedures could result in case of the monitor and secure the rope to consult the bracket manufacturer for installation location. ViewSonic CD4220 13 This device cannot be sure to the wall mount brackets or ceiling mount brackets. y Install the...

User Guide
Page 16
...y Though the recommended prevention from fall in the figure, secure the monitor to a solid wall or pillar using rope (commercially available) strong enough to lessen the probability of the monitor. (CD4220: approx. 30 kg) When you cannot ensure sufficient strength, provide adequate... any kind of brackets and base to prevent the monitor from falling is securing the monitor. y Before moving the monitor, remove the rope that is attached. Commercially available Rope, etc. ViewSonic CD4220 14 4. To avoid monitor from falling Take measures to which prevention device from...
...y Though the recommended prevention from fall in the figure, secure the monitor to a solid wall or pillar using rope (commercially available) strong enough to lessen the probability of the monitor. (CD4220: approx. 30 kg) When you cannot ensure sufficient strength, provide adequate... any kind of brackets and base to prevent the monitor from falling is securing the monitor. y Before moving the monitor, remove the rope that is attached. Commercially available Rope, etc. ViewSonic CD4220 14 4. To avoid monitor from falling Take measures to which prevention device from...

User Guide
Page 17
Connections Before making connections: 7 First turn off the power of equipment. Wiring Diagram DVD HD PC VCR LCD monitor (second monitor) Equipment with each separate piece of all the attached equipment and make connections. 7 Refer to the user manual included with Digital interface ViewSonic CD4220 15
Connections Before making connections: 7 First turn off the power of equipment. Wiring Diagram DVD HD PC VCR LCD monitor (second monitor) Equipment with each separate piece of all the attached equipment and make connections. 7 Refer to the user manual included with Digital interface ViewSonic CD4220 15

User Guide
Page 18
... 15 pin to display your computer's screen image. y The AUDIO IN 1, 2, 3 or HDMI can select HDMI only when RGB 1 is selected. y The AUDIO OUT jack outputs sound from the AUDIO INPUT button. To audio output To analog RGB output LCD monitor (second monitor) ViewSonic CD4220 16 You can... be used for audio input. Connect the LCD Monitor to a Personal Computer y To connect the RGB 2 IN connector (mini D-sub 15 pin) on the LCD monitor, use the RGB OUT connector (mini D-sub 15...
... 15 pin to display your computer's screen image. y The AUDIO IN 1, 2, 3 or HDMI can select HDMI only when RGB 1 is selected. y The AUDIO OUT jack outputs sound from the AUDIO INPUT button. To audio output To analog RGB output LCD monitor (second monitor) ViewSonic CD4220 16 You can... be used for audio input. Connect the LCD Monitor to a Personal Computer y To connect the RGB 2 IN connector (mini D-sub 15 pin) on the LCD monitor, use the RGB OUT connector (mini D-sub 15...

User Guide
Page 19
y The signal input from the AUDIO INPUT button. y To maintain display quality, use a cable with a quality prescribed by DVI standards. (See 29 page "HDMI INPUT MODE" ) y The AUDIO IN 1, 2, 3 or HDMI can connect to HDMI output ..., select AUDIO 1, 2 , 3 or HDMI from HDMI connector cannot be output to a Computer with a Digital Output y The RGB 1, RGB 1 IN connector accepts a HDMI cable. Connect the LCD Monitor to the RGB OUT connector. * Cables are not supply. ViewSonic CD4220 17
y The signal input from the AUDIO INPUT button. y To maintain display quality, use a cable with a quality prescribed by DVI standards. (See 29 page "HDMI INPUT MODE" ) y The AUDIO IN 1, 2, 3 or HDMI can connect to HDMI output ..., select AUDIO 1, 2 , 3 or HDMI from HDMI connector cannot be output to a Computer with a Digital Output y The RGB 1, RGB 1 IN connector accepts a HDMI cable. Connect the LCD Monitor to the RGB OUT connector. * Cables are not supply. ViewSonic CD4220 17

User Guide
Page 20
Connecting a DVD Player with an RCA pin jack to the BNC connector cable (not provided). Refer to your LCD monitor will need a BNC-to-RCA adapter to connect a DVD player with component out Connecting your DVD player to your DVD player owner...connector (BNC) on the LCD monitor, use a separately available BNC connector cable. y The AUDIO IN 2 and 3 (both RCA) can select HDMI only when RGB 1 is selected. Connect the LCD Monitor to display DVD video. For connection, select [AUDIO 1], [AUDIO 2], [AUDIO 3] or [HDMI] from the AUDIO INPUT button. ViewSonic CD4220 18 You can be used...
Connecting a DVD Player with an RCA pin jack to the BNC connector cable (not provided). Refer to your LCD monitor will need a BNC-to-RCA adapter to connect a DVD player with component out Connecting your DVD player to your DVD player owner...connector (BNC) on the LCD monitor, use a separately available BNC connector cable. y The AUDIO IN 2 and 3 (both RCA) can select HDMI only when RGB 1 is selected. Connect the LCD Monitor to display DVD video. For connection, select [AUDIO 1], [AUDIO 2], [AUDIO 3] or [HDMI] from the AUDIO INPUT button. ViewSonic CD4220 18 You can be used...

User Guide
Page 21
... been made. y Do not reverse the audio left and right jacks. You can connect your stereo amplifier to a Stereo Amplifier y Turn on the amplifier. ViewSonic CD4220 19 Connect the LCD Monitor to your amplifier owner's manual for audio input. For connection, select [AUIDO1], [AUDIO2], [AUDIO3] or [HDMI] from the selected Audio input. y The AUDIO...
... been made. y Do not reverse the audio left and right jacks. You can connect your stereo amplifier to a Stereo Amplifier y Turn on the amplifier. ViewSonic CD4220 19 Connect the LCD Monitor to your amplifier owner's manual for audio input. For connection, select [AUIDO1], [AUDIO2], [AUDIO3] or [HDMI] from the selected Audio input. y The AUDIO...

User Guide
Page 22
The monitor can be powered on mode before using the following three options: 1. Pressing the Main Power Switch. Be sure to turn the Main Power Switch to ... and OFF Modes The LCD monitor power indicator will not activate the on the LCD monitor. NOTE: When the Main Power Switch is used to turn on the Main Power button on or red in off the LCD monitor, the remote control and the power button will turn green while powered on the LCD monitor. 3. ViewSonic CD4220 20 NOTE: Before...
The monitor can be powered on mode before using the following three options: 1. Pressing the Main Power Switch. Be sure to turn the Main Power Switch to ... and OFF Modes The LCD monitor power indicator will not activate the on the LCD monitor. NOTE: When the Main Power Switch is used to turn on the Main Power button on or red in off the LCD monitor, the remote control and the power button will turn green while powered on the LCD monitor. 3. ViewSonic CD4220 20 NOTE: Before...

User Guide
Page 23
...-linearity. (Some round image will be expanded beyond the active display area. DYNAMIC: Expand 4:3 pictures to set to enter a Power Saving Mode when no signal is not displayed. ZOOM ZOOM ViewSonic CD4220 21 This could potentially increase the life and decrease the power ...Using Power Management The LCD monitor follows the VESA approved DPM Power Management function. Picture Size RGB 1, 2 FULL NORMAL CUSTOM REAL DVD/HD, VIDEO FULL NORMAL DYNAMIC REAL CUSTOM Signal Type NORMAL SIZE Recommended Size NORMAL 4:3 DYNAMIC Squeeze FULL NORMAL: Display by the inputted signal...
...-linearity. (Some round image will be expanded beyond the active display area. DYNAMIC: Expand 4:3 pictures to set to enter a Power Saving Mode when no signal is not displayed. ZOOM ZOOM ViewSonic CD4220 21 This could potentially increase the life and decrease the power ...Using Power Management The LCD monitor follows the VESA approved DPM Power Management function. Picture Size RGB 1, 2 FULL NORMAL CUSTOM REAL DVD/HD, VIDEO FULL NORMAL DYNAMIC REAL CUSTOM Signal Type NORMAL SIZE Recommended Size NORMAL 4:3 DYNAMIC Squeeze FULL NORMAL: Display by the inputted signal...

User Guide
Page 30
... press "SET" button to cancel and return the previous menu. ViewSonic CD4220 28 y BRIGHTNESS: The brightness is automatically selected. y See note (1) for movement). y NTSC: Specific selection of PAL. y Selecting VIDEO "ON", the monitor will be disabled when "MOTION" is lost . CONFIGURATION RESET y... the horizontal position, vertical position and clock-phase will go to reset all configuration settings. POWER SAVE y Selecting RGB "ON", the monitor will adjust automatically. y AUTO: NTSC, PAL, SECAM, PAL60 or 4.43 NTSC is decreased when selected "ON". y 4.43NTSC: ...
... press "SET" button to cancel and return the previous menu. ViewSonic CD4220 28 y BRIGHTNESS: The brightness is automatically selected. y See note (1) for movement). y NTSC: Specific selection of PAL. y Selecting VIDEO "ON", the monitor will be disabled when "MOTION" is lost . CONFIGURATION RESET y... the horizontal position, vertical position and clock-phase will go to reset all configuration settings. POWER SAVE y Selecting RGB "ON", the monitor will adjust automatically. y AUTO: NTSC, PAL, SECAM, PAL60 or 4.43 NTSC is decreased when selected "ON". y 4.43NTSC: ...

User Guide
Page 31
... can select how long the monitor waits after the last touch of a button to 24 hours is available. y When the OFF TIMER is use. OFF TIMER y To select OFF TIMER mode ON/OFF. y A time between 1 to shut off the OSD control menu. ViewSonic CD4220 29 OSD V POSITION y Adjusts... the vertical position of the OSD menu. y The preset choices are 5 -120 seconds. y The information OSD will display when input signal or source change or warning message like as it is set,...
... can select how long the monitor waits after the last touch of a button to 24 hours is available. y When the OFF TIMER is use. OFF TIMER y To select OFF TIMER mode ON/OFF. y A time between 1 to shut off the OSD control menu. ViewSonic CD4220 29 OSD V POSITION y Adjusts... the vertical position of the OSD menu. y The preset choices are 5 -120 seconds. y The information OSD will display when input signal or source change or warning message like as it is set,...
