English Owners Manual
Page 3
... Indicators 2 Warning 4 Introduction 6 Features 6 Technical Support and Service 7 Maritime Radio Services Operation 7 Included in your Package 8 Getting Started 9 Mounting the Drop-in Charger 9 Attaching the Antenna 9 Attaching the Battery Pack 10 Attaching the Beltclip 10 Charging the Battery Pack 11 Operation 12 Turning On the Unit and Setting Squelch 12 Selecting...
... Indicators 2 Warning 4 Introduction 6 Features 6 Technical Support and Service 7 Maritime Radio Services Operation 7 Included in your Package 8 Getting Started 9 Mounting the Drop-in Charger 9 Attaching the Antenna 9 Attaching the Battery Pack 10 Attaching the Beltclip 10 Charging the Battery Pack 11 Operation 12 Turning On the Unit and Setting Squelch 12 Selecting...

English Owners Manual
Page 4
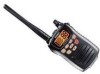
Triple Watch Button (16/9/TRI) 18 Channel Down Button (M) 19 Speaker 2 Controls and Indicators 1 10 11 12 2 5 6 13 14 7 15 8 16 17 9 18 3 19 4 1 Antenna 2 Belt Clip 3 Battery 4 Battery Release Clip 5 PTT (Push to Talk) Key 6 USA/International/Canadian Button (UIC) 7 WX Mode/Weather Alert Button (WX/ALERT) 8 TX Power/Lock Button (1/5W/LOCK) 9 Microphone 10 Speaker MIC (Optional) Jack 11 Volume/Power Knob 12 Squelch Knob 13 LCD Display 14 Memory/FIPS Button (MEM/FIPS) 15 Scan Button (SCAN) 16 Channel Up Button (L) 17 16/9 -
Triple Watch Button (16/9/TRI) 18 Channel Down Button (M) 19 Speaker 2 Controls and Indicators 1 10 11 12 2 5 6 13 14 7 15 8 16 17 9 18 3 19 4 1 Antenna 2 Belt Clip 3 Battery 4 Battery Release Clip 5 PTT (Push to Talk) Key 6 USA/International/Canadian Button (UIC) 7 WX Mode/Weather Alert Button (WX/ALERT) 8 TX Power/Lock Button (1/5W/LOCK) 9 Microphone 10 Speaker MIC (Optional) Jack 11 Volume/Power Knob 12 Squelch Knob 13 LCD Display 14 Memory/FIPS Button (MEM/FIPS) 15 Scan Button (SCAN) 16 Channel Up Button (L) 17 16/9 -
English Owners Manual
Page 6
Warning! • The VOYAGER is waterproof only when both the antenna and the battery are properly attached. • Do not operate the transmitter of any radio equipment unless all the Radio Frequency (RF) connectors are secure ... equipment without proper supervision. • Have your radio equipment serviced by a qualified technician. • Do not operate the transmitter of any radio equipment with the antenna touching or close to the eyes, face, or exposed body parts. 4
Warning! • The VOYAGER is waterproof only when both the antenna and the battery are properly attached. • Do not operate the transmitter of any radio equipment unless all the Radio Frequency (RF) connectors are secure ... equipment without proper supervision. • Have your radio equipment serviced by a qualified technician. • Do not operate the transmitter of any radio equipment with the antenna touching or close to the eyes, face, or exposed body parts. 4
English Owners Manual
Page 10
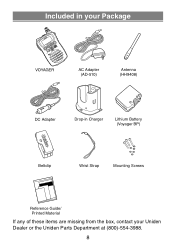
Included in your Package VOYAGER AC Adapter (AD-510) Antenna (HH9408) DC Adapter Drop-in Charger Lithium Battery (Voyager BP) Beltclip Wrist Strap Mounting Screws Reference Guide/ Printed Material If any of these items are missing from the box, contact your Uniden Dealer or the Uniden Parts Department at (800)-554-3988. 8
Included in your Package VOYAGER AC Adapter (AD-510) Antenna (HH9408) DC Adapter Drop-in Charger Lithium Battery (Voyager BP) Beltclip Wrist Strap Mounting Screws Reference Guide/ Printed Material If any of these items are missing from the box, contact your Uniden Dealer or the Uniden Parts Department at (800)-554-3988. 8

English Owners Manual
Page 11
To wall: Insert the two mounting screws into the drop-in charger. Be sure the antenna is firmly seated. 9 Attaching the Antenna Attach the antenna to either a counter or wall. When you mount the drop-in charger on the charger. Place the charger with the screws through the larger holes ... other end into the wall keeping the same space as follows. Getting Started Mounting the Drop-in Charger 1 Mount the drop-in charger to the VOYAGER. To counter: Attach the drop-in charger using the mounting screws and washers as the holes on your boat, use the DC adapter instead.
To wall: Insert the two mounting screws into the drop-in charger. Be sure the antenna is firmly seated. 9 Attaching the Antenna Attach the antenna to either a counter or wall. When you mount the drop-in charger on the charger. Place the charger with the screws through the larger holes ... other end into the wall keeping the same space as follows. Getting Started Mounting the Drop-in Charger 1 Mount the drop-in charger to the VOYAGER. To counter: Attach the drop-in charger using the mounting screws and washers as the holes on your boat, use the DC adapter instead.
English Owners Manual
Page 33
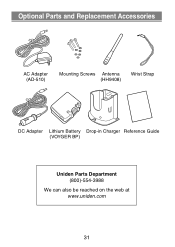
Optional Parts and Replacement Accessories AC Adapter (AD-510) Mounting Screws Antenna (HH9408) Wrist Strap DC Adapter Lithium Battery Drop-in Charger Reference Guide (VOYGER BP) Uniden Parts Department (800)-554-3988 We can also be reached on the web at www.uniden.com 31
Optional Parts and Replacement Accessories AC Adapter (AD-510) Mounting Screws Antenna (HH9408) Wrist Strap DC Adapter Lithium Battery Drop-in Charger Reference Guide (VOYGER BP) Uniden Parts Department (800)-554-3988 We can also be reached on the web at www.uniden.com 31

English Owners Manual
Page 34
Specifications General Channels Freq. Temp. Oper. Audio 170mA Specifications shown are typical and subject to change without antenna) Weight (w/battery & antenna) 54 US/International/Canada 89 US/International/Canada 10 PLL 1.5 PPM (at 25°C) 1.5 PPM (at 25°C) -4°F (-20°C) to +122°F(+50&#... kHz Selectivity Hum & Noise Ratio 43 dB Audio Output Power 0.6 W @ 10 % THD Current Drain Squelched 40mA Max. Control Freq. Tol. Transmit Receive Weather Transmit Receive Antenna Microphone Display Speaker Power Source Size (without notice. 32
Specifications General Channels Freq. Temp. Oper. Audio 170mA Specifications shown are typical and subject to change without antenna) Weight (w/battery & antenna) 54 US/International/Canada 89 US/International/Canada 10 PLL 1.5 PPM (at 25°C) 1.5 PPM (at 25°C) -4°F (-20°C) to +122°F(+50&#... kHz Selectivity Hum & Noise Ratio 43 dB Audio Output Power 0.6 W @ 10 % THD Current Drain Squelched 40mA Max. Control Freq. Tol. Transmit Receive Weather Transmit Receive Antenna Microphone Display Speaker Power Source Size (without notice. 32

English Owners Manual
Page 35
... range but will not charge. Cause: Low voltage ⇒ The unit is not designed to the charger can be a result of sight blocked ⇒ Increase antenna height. Will not transmit while on the charger. Damage to transmit while on the charger. Cause: Charger inoperative ⇒ Replace charger. Battery will transmit on...
... range but will not charge. Cause: Low voltage ⇒ The unit is not designed to the charger can be a result of sight blocked ⇒ Increase antenna height. Will not transmit while on the charger. Damage to transmit while on the charger. Cause: Charger inoperative ⇒ Replace charger. Battery will transmit on...

English Owners Manual
Page 36
Unauthorized antennas, modifications, or attachments could impair call quality, damage the VOYAGER, or result in Report and Order FCC 96-326 adopted an updated safety standard for typical body-worn operations using an external speaker microphone, USE ONLY THE UNIDEN MODEL HHVTA07. Body-... purpose may invalidate your local dealer for a replacement antenna. WARNING! Please contact your authority to operate this radio transmitter to operate the radio without adult supervision and the knowledge of the VOYAGER complies with the safety standard previously set by FCC regulated...
Unauthorized antennas, modifications, or attachments could impair call quality, damage the VOYAGER, or result in Report and Order FCC 96-326 adopted an updated safety standard for typical body-worn operations using an external speaker microphone, USE ONLY THE UNIDEN MODEL HHVTA07. Body-... purpose may invalidate your local dealer for a replacement antenna. WARNING! Please contact your authority to operate this radio transmitter to operate the radio without adult supervision and the knowledge of the VOYAGER complies with the safety standard previously set by FCC regulated...