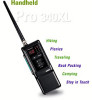
English Owners Manual
Page 1
... Communications Act and with parts other part of a unique nature, with the rules of CB users. Among its many features, the PRO340XL includes: • Superheterodyne circuitry to enhance receiver quality. • Phase Locked Loop Synthesizer techniques to assure precise frequency control. • Flexible operation that Citizens Band Radio Service operators are strictly prohibited. Any adjustments or alterations which...
... Communications Act and with parts other part of a unique nature, with the rules of CB users. Among its many features, the PRO340XL includes: • Superheterodyne circuitry to enhance receiver quality. • Phase Locked Loop Synthesizer techniques to assure precise frequency control. • Flexible operation that Citizens Band Radio Service operators are strictly prohibited. Any adjustments or alterations which...
English Owners Manual
Page 2
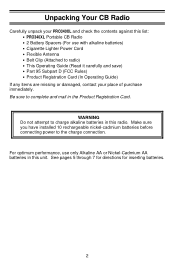
... Guide) If any items are missing or damaged, contact your place of purchase immediately. For optimum performance, use with alkaline batteries) • Cigarette Lighter Power Cord • Flexible Antenna • Belt Clip (Attached to charge alkaline batteries in this unit. See pages 5 through 7 for directions for inserting batteries. 2 Unpacking Your CB Radio Carefully unpack your PRO340XL...
... Guide) If any items are missing or damaged, contact your place of purchase immediately. For optimum performance, use with alkaline batteries) • Cigarette Lighter Power Cord • Flexible Antenna • Belt Clip (Attached to charge alkaline batteries in this unit. See pages 5 through 7 for directions for inserting batteries. 2 Unpacking Your CB Radio Carefully unpack your PRO340XL...
English Owners Manual
Page 3
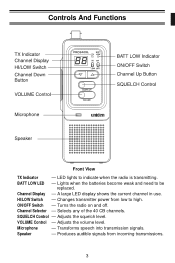
... any of the 40 CB channels. Speaker - Channel Selector - Produces audible signals from low to high. Adjusts the volume level. HI/LOW Switch - Changes transmitter power from incoming transmissions. 3 Adjusts the squelch level. Lights when the batteries become weak and need to indicate when the radio is transmitting. VOLUME Control - BATT LOW LED - Microphone - LED lights to be replaced.
... any of the 40 CB channels. Speaker - Channel Selector - Produces audible signals from low to high. Adjusts the volume level. HI/LOW Switch - Changes transmitter power from incoming transmissions. 3 Adjusts the squelch level. Lights when the batteries become weak and need to indicate when the radio is transmitting. VOLUME Control - BATT LOW LED - Microphone - LED lights to be replaced.

English Owners Manual
Page 4
... - Connects to charge nickel-cadmium batteries while installed in the radio. Connection for a 12V DC power source to belt for portability. Align the two keys on the PRO340XL antenna connector with the key slots in place. 4 Provides a connection for a 12V DC external power source. CHARGE Connection - Connecting the Antenna 1. POWER Connection - Push-to transmit mode. Switches the CB from receive...
... - Connects to charge nickel-cadmium batteries while installed in the radio. Connection for a 12V DC power source to belt for portability. Align the two keys on the PRO340XL antenna connector with the key slots in place. 4 Provides a connection for a 12V DC external power source. CHARGE Connection - Connecting the Antenna 1. POWER Connection - Push-to transmit mode. Switches the CB from receive...
English Owners Manual
Page 5
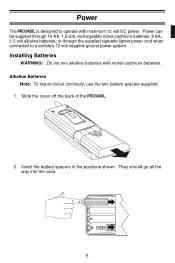
... Note: To insure circuit continuity, use the two battery spacers supplied. 1. Slide the cover off the back of the PRO340XL. 2. Power can be supplied through the supplied cigarette lighter power cord when connected to operate... with nickel-cadmium batteries. Insert the battery spacers in the positions shown. or through 10 AA, 1.2 volt, rechargeable nickel-cadmium batteries; 8 AA, 1.5 volt alkaline batteries; They should go all the way into the case. - 5 Installing...
... Note: To insure circuit continuity, use the two battery spacers supplied. 1. Slide the cover off the back of the PRO340XL. 2. Power can be supplied through the supplied cigarette lighter power cord when connected to operate... with nickel-cadmium batteries. Insert the battery spacers in the positions shown. or through 10 AA, 1.2 volt, rechargeable nickel-cadmium batteries; 8 AA, 1.5 volt alkaline batteries; They should go all the way into the case. - 5 Installing...
English Owners Manual
Page 6
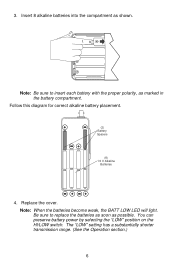
... "LOW" setting has a substantially shorter transmission range. (See the Operation section.) 6 Replace the cover. Insert 8 alkaline batteries into the compartment as marked in the battery compartment. Be sure to insert each battery with the proper polarity, as shown. - Follow this diagram for correct... alkaline battery placement. (2) Battery Spacers (8) 1.5 V Alkaline Batteries 4. Note: When the batteries become weak, the BATT LOW LED will light. You can preserve battery power by selecting the "LOW" position on the HI...
... "LOW" setting has a substantially shorter transmission range. (See the Operation section.) 6 Replace the cover. Insert 8 alkaline batteries into the compartment as marked in the battery compartment. Be sure to insert each battery with the proper polarity, as shown. - Follow this diagram for correct... alkaline battery placement. (2) Battery Spacers (8) 1.5 V Alkaline Batteries 4. Note: When the batteries become weak, the BATT LOW LED will light. You can preserve battery power by selecting the "LOW" position on the HI...
English Owners Manual
Page 7
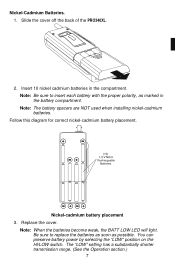
...NOT used when installing nickel-cadmium batteries. Be sure to insert each battery with the proper polarity, as possible. Nickel-Cadmium Batteries. 1. Replace the cover. You can preserve battery power by selecting the "LOW" position on the HI/LOW switch. Follow this diagram for correct ...nickel-cadmium battery placement. Nickel-cadmium battery placement 3. Slide the cover off the back of the PRO340XL. 2. Note: When ...
...NOT used when installing nickel-cadmium batteries. Be sure to insert each battery with the proper polarity, as possible. Nickel-Cadmium Batteries. 1. Replace the cover. You can preserve battery power by selecting the "LOW" position on the HI/LOW switch. Follow this diagram for correct ...nickel-cadmium battery placement. Nickel-cadmium battery placement 3. Slide the cover off the back of the PRO340XL. 2. Note: When ...
English Owners Manual
Page 8
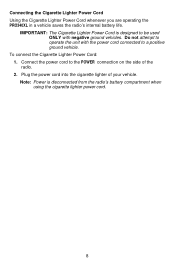
...: The Cigarette Lighter Power Cord is disconnected from the radio's battery compartment when using the cigarette lighter power cord. 8 Connecting the Cigarette Lighter Power Cord Using the Cigarette Lighter Power Cord whenever you are operating the PRO340XL in a vehicle saves the radio's internal battery life. Note: Power is designed to be used ONLY with the power cord connected to the POWER connection on the side...
...: The Cigarette Lighter Power Cord is disconnected from the radio's battery compartment when using the cigarette lighter power cord. 8 Connecting the Cigarette Lighter Power Cord Using the Cigarette Lighter Power Cord whenever you are operating the PRO340XL in a vehicle saves the radio's internal battery life. Note: Power is designed to be used ONLY with the power cord connected to the POWER connection on the side...
English Owners Manual
Page 9
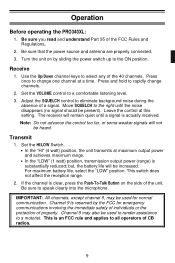
Operation Before operating the PRO340XL: 1. Be sure that the power source and antenna are properly connected. 3. Receive 1. Use the Up/Down channel keys to select any of a signal. Set the VOLUME control to speak clearly into the microphone. Adjust the SQUELCH control to rapidly change one channel at a time. For... Turn the unit on the side of CB radios. 9 Press and hold to eliminate background noise during the absence of the 40 channels. Note: Do not advance the control too far, or some weaker signals will not be increased. Leave the control at maximum output power and...
Operation Before operating the PRO340XL: 1. Be sure that the power source and antenna are properly connected. 3. Receive 1. Use the Up/Down channel keys to select any of a signal. Set the VOLUME control to speak clearly into the microphone. Adjust the SQUELCH control to rapidly change one channel at a time. For... Turn the unit on the side of CB radios. 9 Press and hold to eliminate background noise during the absence of the 40 channels. Note: Do not advance the control too far, or some weaker signals will not be increased. Leave the control at maximum output power and...
English Owners Manual
Page 10
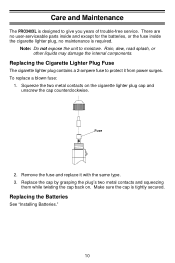
... lighter plug cap and unscrew the cap counterclockwise. 2. Squeeze the two metal contacts on . Remove the fuse and replace it from power surges. Replacing the Batteries See "Installing Batteries." 10 Make sure the cap is required. Rain, dew, road splash, or other liquids may ... Maintenance The PRO340XL is designed to protect it with the same type. 3. Replacing the Cigarette Lighter Plug Fuse The cigarette lighter plug contains a 2-ampere fuse to give you years of trouble-free service. Note: Do not expose the unit to moisture. There are no user-serviceable parts inside and ...
... lighter plug cap and unscrew the cap counterclockwise. 2. Squeeze the two metal contacts on . Remove the fuse and replace it from power surges. Replacing the Batteries See "Installing Batteries." 10 Make sure the cap is required. Rain, dew, road splash, or other liquids may ... Maintenance The PRO340XL is designed to protect it with the same type. 3. Replacing the Cigarette Lighter Plug Fuse The cigarette lighter plug contains a 2-ampere fuse to give you years of trouble-free service. Note: Do not expose the unit to moisture. There are no user-serviceable parts inside and ...
English Owners Manual
Page 11
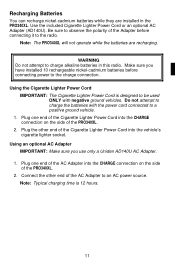
... PRO340XL will not operate while the batteries are installed in this radio. Using the Cigarette Lighter Power Cord IMPORTANT: The Cigarette Lighter Power Cord is 12 hours. 11 Using an optional AC Adapter IMPORTANT: Make sure you have installed 10 rechargeable nickel-cadmium batteries before connecting it to the radio. Connect the other end of the Cigarette Lighter Power Cord into...
... PRO340XL will not operate while the batteries are installed in this radio. Using the Cigarette Lighter Power Cord IMPORTANT: The Cigarette Lighter Power Cord is 12 hours. 11 Using an optional AC Adapter IMPORTANT: Make sure you have installed 10 rechargeable nickel-cadmium batteries before connecting it to the radio. Connect the other end of the Cigarette Lighter Power Cord into...
English Owners Manual
Page 12
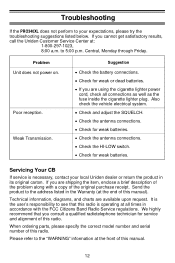
... adjust the SQUELCH. • Check the antenna connections. • Check for weak batteries. • Check the antenna connections. • Check the HI-LOW switch. • Check for service and alignment of this manual). Technical information, diagrams, and charts are using the cigarette lighter power cord, check all times in accordance with a copy of this manual. 12 We highly recommend that this radio...
... adjust the SQUELCH. • Check the antenna connections. • Check for weak batteries. • Check the antenna connections. • Check the HI-LOW switch. • Check for service and alignment of this manual). Technical information, diagrams, and charts are using the cigarette lighter power cord, check all times in accordance with a copy of this manual. 12 We highly recommend that this radio...
English Owners Manual
Page 13
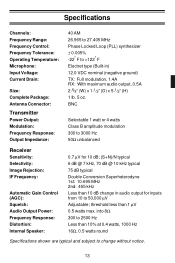
...Ω unbalanced Receiver Sensitivity: Selectivity: Image Rejection: IF Frequency: Automatic Gain Control (AGC): Squelch: Audio Output Power: Frequency Response: Distortion: Internal Speaker: 0.7 µV for inputs from 10 to 50,000 µV Adjustable; Specifications Channels: Frequency Range: Frequency Control: Frequency Tolerance: Operating Temperature: Microphone: Input Voltage: Current Drain: Size: Complete Package: Antenna Connector: Transmitter Power Output: Modulation: Frequency Response: Output Impedance: 40 AM 26.965 to 27.405 MHz...
...Ω unbalanced Receiver Sensitivity: Selectivity: Image Rejection: IF Frequency: Automatic Gain Control (AGC): Squelch: Audio Output Power: Frequency Response: Distortion: Internal Speaker: 0.7 µV for inputs from 10 to 50,000 µV Adjustable; Specifications Channels: Frequency Range: Frequency Control: Frequency Tolerance: Operating Temperature: Microphone: Input Voltage: Current Drain: Size: Complete Package: Antenna Connector: Transmitter Power Output: Modulation: Frequency Response: Output Impedance: 40 AM 26.965 to 27.405 MHz...
English Owners Manual
Page 15
... Antenna 4 Power 5 Installing Batteries 5 Alkaline Batteries 5 Nickel-Cadmium Batteries 7 Connecting the Cigarette Lighter Power Cord 8 Operation 9 Before operating the PRO340XL 9 Receive 9 Transmit 9 Care and Maintenance 10 Replacing the Cigarette Lighter Plug Fuse 10 Replacing the Batteries 10 Recharging Batteries 11 Using the Cigarette Lighter Power Cord 11 Using an Optional AC Adapter 11 Troubleshooting 12 Servicing Your CB 12 Specifications 13 Features, Specifications and availability of Uniden...
... Antenna 4 Power 5 Installing Batteries 5 Alkaline Batteries 5 Nickel-Cadmium Batteries 7 Connecting the Cigarette Lighter Power Cord 8 Operation 9 Before operating the PRO340XL 9 Receive 9 Transmit 9 Care and Maintenance 10 Replacing the Cigarette Lighter Plug Fuse 10 Replacing the Batteries 10 Recharging Batteries 11 Using the Cigarette Lighter Power Cord 11 Using an Optional AC Adapter 11 Troubleshooting 12 Servicing Your CB 12 Specifications 13 Features, Specifications and availability of Uniden...
English Owners Manual
Page 16
... instructions in this Operating Guide you are certain that the product does not conform to this warranty at : Uniden America Corporation Parts and Service 4700 Amon Carter Blvd. Include evidence of original purchase and a note describing the defect that has caused you . LEGAL REMEDIES: This warranty gives you specific legal rights, and you without charge for parts, service...
... instructions in this Operating Guide you are certain that the product does not conform to this warranty at : Uniden America Corporation Parts and Service 4700 Amon Carter Blvd. Include evidence of original purchase and a note describing the defect that has caused you . LEGAL REMEDIES: This warranty gives you specific legal rights, and you without charge for parts, service...

English Owners Manual
Page 17
® ©1994 Uniden America Corporation. All rights reserved. UTUD01347ZZ Printed in the Philippines
® ©1994 Uniden America Corporation. All rights reserved. UTUD01347ZZ Printed in the Philippines


