English Owners Manual
Page 2
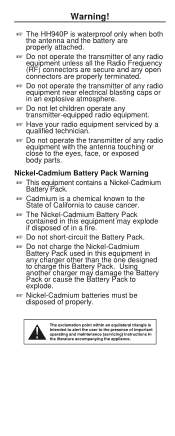
... to the eyes, face, or exposed body parts. The Nickel-Cadmium Battery Pack contained in an explosive atmosphere. Nickel-Cadmium batteries must be disposed of any open connectors are properly attached. Do not operate the transmitter of properly. Warning! The HH940P is a chemical known to the State of any radio equipment with the...
... to the eyes, face, or exposed body parts. The Nickel-Cadmium Battery Pack contained in an explosive atmosphere. Nickel-Cadmium batteries must be disposed of any open connectors are properly attached. Do not operate the transmitter of properly. Warning! The HH940P is a chemical known to the State of any radio equipment with the...
English Owners Manual
Page 3
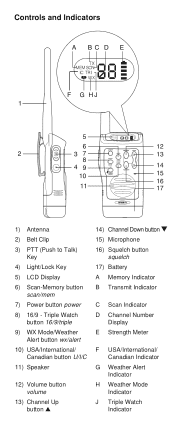
...) USA/International/ Canadian button U/I/C 11) Speaker 12) Volume button volume 13) Channel Up button 14) Channel Down button 15) Microphone 16) Squelch button squelch 17) Battery A Memory Indicator B Transmit Indicator C Scan Indicator D Channel Number Display E Strength Meter F USA/International/ Canadian Indicator G Weather Alert Indicator H Weather Mode Indicator J Triple Watch Indicator...
...) USA/International/ Canadian button U/I/C 11) Speaker 12) Volume button volume 13) Channel Up button 14) Channel Down button 15) Microphone 16) Squelch button squelch 17) Battery A Memory Indicator B Transmit Indicator C Scan Indicator D Channel Number Display E Strength Meter F USA/International/ Canadian Indicator G Weather Alert Indicator H Weather Mode Indicator J Triple Watch Indicator...

English Owners Manual
Page 4
... 2 Technical Support and Service . . . 2 Maritime Radio Services Operation . 3 Parts and Accessories 4 Getting Started 5 Mounting the Drop-in Charger . . . . 5 Attaching the Antenna 5 Attaching the Battery Pack . . . . . 6 Charging the Battery Pack. . . . . . 6 Operation 8 Setting the Squelch 8 Selecting a Channel 10 One-touch Channel 16/9 10 Monitoring Weather Channels . . . 11 Triple Watch 11 Weather Alert 12 USA...
... 2 Technical Support and Service . . . 2 Maritime Radio Services Operation . 3 Parts and Accessories 4 Getting Started 5 Mounting the Drop-in Charger . . . . 5 Attaching the Antenna 5 Attaching the Battery Pack . . . . . 6 Charging the Battery Pack. . . . . . 6 Operation 8 Setting the Squelch 8 Selecting a Channel 10 One-touch Channel 16/9 10 Monitoring Weather Channels . . . 11 Triple Watch 11 Weather Alert 12 USA...
English Owners Manual
Page 5
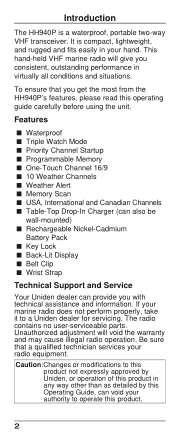
...Channels Table-Top Drop-In Charger (can also be wall-mounted) Rechargeable Nickel-Cadmium Battery Pack Key Lock Back-Lit Display Belt Clip Wrist Strap Technical Support and Service Your Uniden dealer can void your radio equipment. Caution:Changes or modifications to this product not ... Guide, can provide you with technical assistance and information. To ensure that a qualified technician services your authority to a Uniden dealer for servicing. Introduction The HH940P is compact, lightweight, and rugged and fits easily in your hand. This hand-held VHF marine radio will void the...
...Channels Table-Top Drop-In Charger (can also be wall-mounted) Rechargeable Nickel-Cadmium Battery Pack Key Lock Back-Lit Display Belt Clip Wrist Strap Technical Support and Service Your Uniden dealer can void your radio equipment. Caution:Changes or modifications to this product not ... Guide, can provide you with technical assistance and information. To ensure that a qualified technician services your authority to a Uniden dealer for servicing. Introduction The HH940P is compact, lightweight, and rugged and fits easily in your hand. This hand-held VHF marine radio will void the...

English Owners Manual
Page 8
Be sure the battery pack fits tightly against the HH940P's body. Before operating the HH940P, charge the battery pack for 15 hours without interruption in the drop-in charger. 6 Attaching the Battery Pack 1. Charging the Battery Pack Your marine radio is powered by a specially-designed nickel-cadmium battery pack. Use a quarter to turn the screw that connects the battery pack to the HH940P. Slide the battery pack onto the bottom of the radio. 2.
Be sure the battery pack fits tightly against the HH940P's body. Before operating the HH940P, charge the battery pack for 15 hours without interruption in the drop-in charger. 6 Attaching the Battery Pack 1. Charging the Battery Pack Your marine radio is powered by a specially-designed nickel-cadmium battery pack. Use a quarter to turn the screw that connects the battery pack to the HH940P. Slide the battery pack onto the bottom of the radio. 2.

English Owners Manual
Page 9
The charger won't overcharge the battery pack. The red LED lights and stays on. Place the HH940P in the drop-in charger! You can monitor incoming calls while the HH940P is in the drop-in charger. 2. Do not transmit when the HH940P is in the drop-in charger. 1. You can charge the battery pack alone or connected to the HH940P. 7
The charger won't overcharge the battery pack. The red LED lights and stays on. Place the HH940P in the drop-in charger! You can monitor incoming calls while the HH940P is in the drop-in charger. 2. Do not transmit when the HH940P is in the drop-in charger. 1. You can charge the battery pack alone or connected to the HH940P. 7
English Owners Manual
Page 20
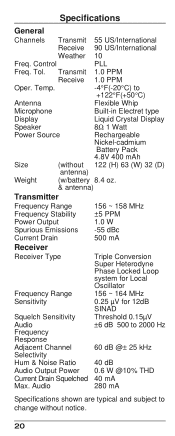
...;C) Antenna Flexible Whip Microphone Built-in Electret type Display Liquid Crystal Display Speaker 8Ω 1 Watt Power Source Rechargeable Nickel-cadmium Battery Pack 4.8V 400 mAh Size (without 122 (H) 63 (W) 32 (D) antenna) Weight (w/battery 8.4 oz. & antenna) Transmitter Frequency Range 156 ~ 158 MHz Frequency Stability ±5 PPM Power Output 1.0 W Spurious Emissions -55 dBc Current...
...;C) Antenna Flexible Whip Microphone Built-in Electret type Display Liquid Crystal Display Speaker 8Ω 1 Watt Power Source Rechargeable Nickel-cadmium Battery Pack 4.8V 400 mAh Size (without 122 (H) 63 (W) 32 (D) antenna) Weight (w/battery 8.4 oz. & antenna) Transmitter Frequency Range 156 ~ 158 MHz Frequency Stability ±5 PPM Power Output 1.0 W Spurious Emissions -55 dBc Current...


