Owners Manual
Page 3
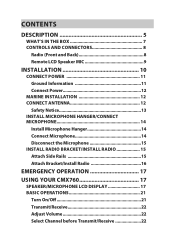
... Speaker MIC 9 INSTALLATION 10 CONNECT POWER 11 Ground Information 11 Connect Power 12 MARINE INSTALLATION 12 CONNECT ANTENNA 12 Safety Notice 13 INSTALL MICROPHONE HANGER/CONNECT MICROPHONE 14 Install Microphone Hanger 14 Connect Microphone 14 Disconnect the Microphone 15 INSTALL RADIO BRACKET/INSTALL RADIO 15 Attach Side Rails 15 Attach Bracket/Install Radio 16 EMERGENCY OPERATION 17 USING YOUR CMX760 17 SPEAKER/MICROPHONE LCD DISPLAY 17 BASIC OPERATIONS 21 Turn On/Off 21 Transmit/Receive 22 Adjust...
... Speaker MIC 9 INSTALLATION 10 CONNECT POWER 11 Ground Information 11 Connect Power 12 MARINE INSTALLATION 12 CONNECT ANTENNA 12 Safety Notice 13 INSTALL MICROPHONE HANGER/CONNECT MICROPHONE 14 Install Microphone Hanger 14 Connect Microphone 14 Disconnect the Microphone 15 INSTALL RADIO BRACKET/INSTALL RADIO 15 Attach Side Rails 15 Attach Bracket/Install Radio 16 EMERGENCY OPERATION 17 USING YOUR CMX760 17 SPEAKER/MICROPHONE LCD DISPLAY 17 BASIC OPERATIONS 21 Turn On/Off 21 Transmit/Receive 22 Adjust...
Owners Manual
Page 4
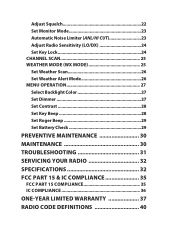
Adjust Squelch 22 Set Monitor Mode 23 Automatic Noise Limiter (ANL/HI CUT 23 Adjust Radio Sensitivity (LO/DX 24 Set Key Lock 24 CHANNEL SCAN 25 WEATHER MODE (WX MODE 25 Set Weather Scan 26 Set Weather Alert Mode 26 MENU OPERATION 27 Select Backlight Color 27 Set Dimmer 27 Set Contrast 28 Set Key Beep 28 Set Roger Beep 29 Set Battery Check 29 PREVENTIVE MAINTENANCE 30 MAINTENANCE 30 TROUBLESHOOTING 31 SERVICING YOUR RADIO 32 SPECIFICATIONS 32 FCC PART 15 & IC COMPLIANCE 35 FCC PART 15 COMPLIANCE 35 IC COMPLIANCE 36 ONE-YEAR LIMITED WARRANTY 37 RADIO CODE DEFINITIONS 40
Adjust Squelch 22 Set Monitor Mode 23 Automatic Noise Limiter (ANL/HI CUT 23 Adjust Radio Sensitivity (LO/DX 24 Set Key Lock 24 CHANNEL SCAN 25 WEATHER MODE (WX MODE 25 Set Weather Scan 26 Set Weather Alert Mode 26 MENU OPERATION 27 Select Backlight Color 27 Set Dimmer 27 Set Contrast 28 Set Key Beep 28 Set Roger Beep 29 Set Battery Check 29 PREVENTIVE MAINTENANCE 30 MAINTENANCE 30 TROUBLESHOOTING 31 SERVICING YOUR RADIO 32 SPECIFICATIONS 32 FCC PART 15 & IC COMPLIANCE 35 FCC PART 15 COMPLIANCE 35 IC COMPLIANCE 36 ONE-YEAR LIMITED WARRANTY 37 RADIO CODE DEFINITIONS 40
Owners Manual
Page 5
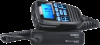
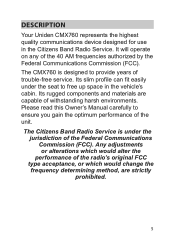
... the unit. DESCRIPTION Your Uniden CMX760 represents the highest quality communications device designed for use in the vehicle's cabin. Any adjustments or alterations which would alter the performance of the radio's original FCC type acceptance, or which would change the frequency determining method, are capable of trouble-free service. Please read this Owner's Manual carefully to provide years of...
... the unit. DESCRIPTION Your Uniden CMX760 represents the highest quality communications device designed for use in the vehicle's cabin. Any adjustments or alterations which would alter the performance of the radio's original FCC type acceptance, or which would change the frequency determining method, are capable of trouble-free service. Please read this Owner's Manual carefully to provide years of...
Owners Manual
Page 7
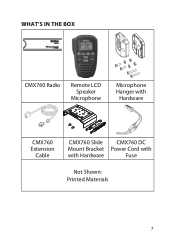
WHAT'S IN THE BOX CMX760 Radio Remote LCD Speaker Microphone Microphone Hanger with Hardware CMX760 Extension Cable CMX760 Slide CMX760 DC Mount Bracket Power Cord with with Hardware Fuse Not Shown: Printed Materials 7
WHAT'S IN THE BOX CMX760 Radio Remote LCD Speaker Microphone Microphone Hanger with Hardware CMX760 Extension Cable CMX760 Slide CMX760 DC Mount Bracket Power Cord with with Hardware Fuse Not Shown: Printed Materials 7
Owners Manual
Page 10
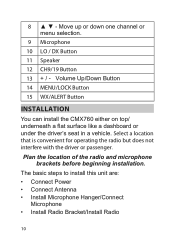
.... Select a location that is convenient for operating the radio but does not interfere with the driver or passenger. The basic steps to install this unit are: • Connect Power • Connect Antenna • Install Microphone Hanger/Connect Microphone • Install Radio Bracket/Install Radio 10 8 ▲ ▼ - Move up or down one channel or menu selection. 9 Microphone 10 LO / DX Button 11 Speaker 12 CH9...
.... Select a location that is convenient for operating the radio but does not interfere with the driver or passenger. The basic steps to install this unit are: • Connect Power • Connect Antenna • Install Microphone Hanger/Connect Microphone • Install Radio Bracket/Install Radio 10 8 ▲ ▼ - Move up or down one channel or menu selection. 9 Microphone 10 LO / DX Button 11 Speaker 12 CH9...

Owners Manual
Page 11
The CMX760 can operate on the fuse block or to prevent a short circuit. As an alternative, the power cord may be taken to a point in the wiring harness. If in any 12volt DC negative ground system vehicle. However, caution must be installed and used in doubt, contact your vehicle dealer for information. Then connect the black power cord to the positive...
The CMX760 can operate on the fuse block or to prevent a short circuit. As an alternative, the power cord may be taken to a point in the wiring harness. If in any 12volt DC negative ground system vehicle. However, caution must be installed and used in doubt, contact your vehicle dealer for information. Then connect the black power cord to the positive...

Owners Manual
Page 12
.... The unit should turn off . To achieve the maximum transmission distance, Uniden strongly recommends that you install only a high quality antenna. Connect Power 1. Connect the power cord to the Ignition Switch Accessory Terminal, the vehicle chassis, or negative (-) battery terminal. 4. Next, connect the black power cord to the power connector from the radio. 2. CONNECT ANTENNA Because the maximum power output of the transmitter is...
.... The unit should turn off . To achieve the maximum transmission distance, Uniden strongly recommends that you install only a high quality antenna. Connect Power 1. Connect the power cord to the Ignition Switch Accessory Terminal, the vehicle chassis, or negative (-) battery terminal. 4. Next, connect the black power cord to the power connector from the radio. 2. CONNECT ANTENNA Because the maximum power output of the transmitter is...
Owners Manual
Page 13
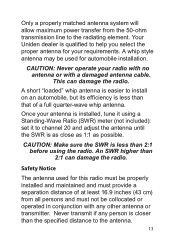
...the radio. CAUTION: Make sure the SWR is as close as 1:1 as possible. Your Uniden dealer is qualified to channel 20 and adjust the antenna until the SWR is less than 2:1 can damage the radio. Never transmit if any other antenna or transmitter. A short "loaded" whip antenna is ... Only a properly matched antenna system will allow maximum power transfer from all persons and must not be used for automobile installation. An SWR higher than 2:1 before using a Standing-Wave Ratio (SWR) meter (not included): set it using the radio. A whip style antenna may be collocated or operated...
...the radio. CAUTION: Make sure the SWR is as close as 1:1 as possible. Your Uniden dealer is qualified to channel 20 and adjust the antenna until the SWR is less than 2:1 can damage the radio. Never transmit if any other antenna or transmitter. A short "loaded" whip antenna is ... Only a properly matched antenna system will allow maximum power transfer from all persons and must not be used for automobile installation. An SWR higher than 2:1 before using a Standing-Wave Ratio (SWR) meter (not included): set it using the radio. A whip style antenna may be collocated or operated...
Owners Manual
Page 14
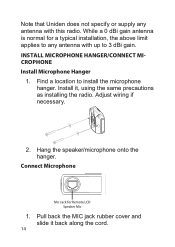
... installing the radio. Install it back along the cord. 14 Hang the speaker/microphone onto the hanger. Connect Microphone Mic Jack for a typical installation, the above limit applies to any antenna with up to 3 dBi gain. Adjust wiring if necessary. 2. Note that Uniden does not specify or supply any antenna with this radio. While a 0 dBi gain antenna is normal for Remote LCD Speaker Mic 1. INSTALL MICROPHONE HANGER/CONNECT MICROPHONE Install Microphone...
... installing the radio. Install it back along the cord. 14 Hang the speaker/microphone onto the hanger. Connect Microphone Mic Jack for a typical installation, the above limit applies to any antenna with up to 3 dBi gain. Adjust wiring if necessary. 2. Note that Uniden does not specify or supply any antenna with this radio. While a 0 dBi gain antenna is normal for Remote LCD Speaker Mic 1. INSTALL MICROPHONE HANGER/CONNECT MICROPHONE Install Microphone...
Owners Manual
Page 15
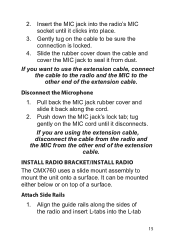
...clicks into the L-tab 15 Align the guide rails along the cord. 2. 2. Insert the MIC jack into the radio's MIC socket until it from the other end of the extension cable. INSTALL RADIO BRACKET/INSTALL RADIO The CMX760 uses a slide mount assembly to be mounted either below or on the MIC cord until it back along the... cable, connect the cable to the radio and the MIC to seal it disconnects. Attach Side Rails 1. Gently tug on the cable to mount the unit onto a surface. Disconnect the Microphone 1. Push down the cable and cover the MIC jack to the other end of the...
...clicks into the L-tab 15 Align the guide rails along the cord. 2. 2. Insert the MIC jack into the radio's MIC socket until it from the other end of the extension cable. INSTALL RADIO BRACKET/INSTALL RADIO The CMX760 uses a slide mount assembly to be mounted either below or on the MIC cord until it back along the... cable, connect the cable to the radio and the MIC to seal it disconnects. Attach Side Rails 1. Gently tug on the cable to mount the unit onto a surface. Disconnect the Microphone 1. Push down the cable and cover the MIC jack to the other end of the...

Owners Manual
Page 21
Press and hold the POWER key to turn the CMX760 on. 2. You do not have to the ON state. Press and hold the POWER again to turn it off Meter on - - No signal Transmitting, received or Received transmitted RF signal S/RF strength. * Items with an asterisk ( * ) indicate that it remembers that they are not displayed on the LCD screen...
Press and hold the POWER key to turn the CMX760 on. 2. You do not have to the ON state. Press and hold the POWER again to turn it off Meter on - - No signal Transmitting, received or Received transmitted RF signal S/RF strength. * Items with an asterisk ( * ) indicate that it remembers that they are not displayed on the LCD screen...
Owners Manual
Page 30
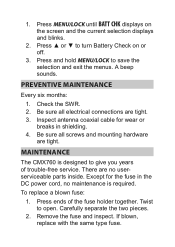
.... Check the SWR. 2. Remove the fuse and inspect. Be sure all screws and mounting hardware are no maintenance is designed to open. Twist to give you years of the fuse holder together. Inspect antenna coaxial cable for the fuse in shielding. 4. 1. Except for wear or breaks in the DC power cord, no userserviceable parts inside. Press ends of trouble-free service.
.... Check the SWR. 2. Remove the fuse and inspect. Be sure all screws and mounting hardware are no maintenance is designed to open. Twist to give you years of the fuse holder together. Inspect antenna coaxial cable for the fuse in shielding. 4. 1. Except for wear or breaks in the DC power cord, no userserviceable parts inside. Press ends of trouble-free service.
Owners Manual
Page 31
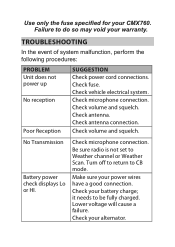
... only the fuse specified for your power wires have a good connection. Check microphone connection. No Transmission Battery power check displays Lo or HI. Make sure your CMX760. Check your alternator. Failure to be fully charged. TROUBLESHOOTING In the event of system malfunction, perform the following procedures: PROBLEM Unit does not power up No reception Poor Reception SUGGESTION Check power cord connections...
... only the fuse specified for your power wires have a good connection. Check microphone connection. No Transmission Battery power check displays Lo or HI. Make sure your CMX760. Check your alternator. Failure to be fully charged. TROUBLESHOOTING In the event of system malfunction, perform the following procedures: PROBLEM Unit does not power up No reception Poor Reception SUGGESTION Check power cord connections...
Owners Manual
Page 32
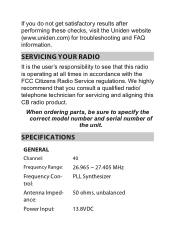
... CB radio product. When ordering parts, be sure to see that you do not get satisfactory results after performing these checks, visit the Uniden website (www.uniden.com) for servicing and aligning this radio is the user's responsibility to specify the correct model number and serial number of the unit. If you consult a qualified radio/ telephone technician for troubleshooting and FAQ information.
... CB radio product. When ordering parts, be sure to see that you do not get satisfactory results after performing these checks, visit the Uniden website (www.uniden.com) for servicing and aligning this radio is the user's responsibility to specify the correct model number and serial number of the unit. If you consult a qualified radio/ telephone technician for troubleshooting and FAQ information.
Owners Manual
Page 33
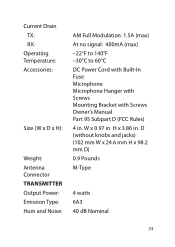
D (without knobs and jacks) (102 mm W x 24.6 mm H x 98.2 mm D) 0.9 Pounds M-Type 4 watts 6A3 40 dB Nominal 33 W x 0.97 in . H x 3.86 in . Current Drain TX: RX: Operating Temperature: Accessories: Size (W x D x H): Weight: Antenna Connector TRANSMITTER Output Power: Emission Type: Hum and Noise: AM Full Modulation: 1.5A (max) At no signal: 400mA (max) -22°F to 140°F -30°C to 60°C DC Power Cord with Built-In Fuse Microphone Microphone Hanger with Screws Mounting Bracket with Screws Owner's Manual Part 95 Subpart D (FCC Rules) 4 in.
D (without knobs and jacks) (102 mm W x 24.6 mm H x 98.2 mm D) 0.9 Pounds M-Type 4 watts 6A3 40 dB Nominal 33 W x 0.97 in . H x 3.86 in . Current Drain TX: RX: Operating Temperature: Accessories: Size (W x D x H): Weight: Antenna Connector TRANSMITTER Output Power: Emission Type: Hum and Noise: AM Full Modulation: 1.5A (max) At no signal: 400mA (max) -22°F to 140°F -30°C to 60°C DC Power Cord with Built-In Fuse Microphone Microphone Hanger with Screws Mounting Bracket with Screws Owner's Manual Part 95 Subpart D (FCC Rules) 4 in.

Owners Manual
Page 35
.... FCC PART 15 & IC COMPLIANCE FCC PART 15 COMPLIANCE This device complies with Part 15 of the FCC rules. Operation is subject to change without notice. Changes or modifications not expressly approved by the party responsible for compliance could void your authority to operate the equipment. 35 Maximum Audio W Output Power Alert Sense dB Alert Frequency Hz Squelch...
.... FCC PART 15 & IC COMPLIANCE FCC PART 15 COMPLIANCE This device complies with Part 15 of the FCC rules. Operation is subject to change without notice. Changes or modifications not expressly approved by the party responsible for compliance could void your authority to operate the equipment. 35 Maximum Audio W Output Power Alert Sense dB Alert Frequency Hz Squelch...

Owners Manual
Page 37
... configurations not sold by Uniden, (C) improperly installed, (D) serviced or repaired by someone other than an authorized Uniden service center for one year, to the original retail owner, this Uniden Product to the original user shall terminate and be free from defects in materials and craftsmanship with only the limitations or exclusions set out below. Tout changement ou modification non approuvé...
... configurations not sold by Uniden, (C) improperly installed, (D) serviced or repaired by someone other than an authorized Uniden service center for one year, to the original retail owner, this Uniden Product to the original user shall terminate and be free from defects in materials and craftsmanship with only the limitations or exclusions set out below. Tout changement ou modification non approuvé...

Owners Manual
Page 38
... covered by the owner's manual for parts, service, or any other cost (except shipping and handling) incurred by warrantor or its option, may replace the unit with the performance of any conjunction with equipment or parts or as detailed by this warranty, (E) used in connection with a new or refurbished unit. Warrantor, at its option, repair or replace the defective...
... covered by the owner's manual for parts, service, or any other cost (except shipping and handling) incurred by warrantor or its option, may replace the unit with the performance of any conjunction with equipment or parts or as detailed by this warranty, (E) used in connection with a new or refurbished unit. Warrantor, at its option, repair or replace the defective...

Owners Manual
Page 39
...instructions in its original packaging). The Product should include all parts and accessories originally packaged with the Product. The Product should be shipped freight prepaid, by traceable means, to return it. Include evidence of America. This warranty is defective, pack the Product carefully (preferably in the owner's manual... you may not apply to you to warrantor at: Uniden America Service C/O Saddle Creek 743 Henrietta Creek Rd., Suite 100 Roanoke, TX 76262 39 LEGAL REMEDIES: This warranty gives you specific legal rights, and ...
...instructions in its original packaging). The Product should include all parts and accessories originally packaged with the Product. The Product should be shipped freight prepaid, by traceable means, to return it. Include evidence of America. This warranty is defective, pack the Product carefully (preferably in the owner's manual... you may not apply to you to warrantor at: Uniden America Service C/O Saddle Creek 743 Henrietta Creek Rd., Suite 100 Roanoke, TX 76262 39 LEGAL REMEDIES: This warranty gives you specific legal rights, and ...

Owners Manual
Page 40
...Codes" used by CODE MEANING 10-34 Trouble at this station 10-35 Confidential information 10-36 Correct time is 10-37 10-38 10-39 10-41 10-42 10-43 10-44 Wrecker needed at Ambulance needed at I have a message for faster communication and better understanding. CODE ... poorly Receiving well Stop transmitting OK, message received Relay message Busy, stand by Out of service, leaving air In service, subject to channel Traffic accident at Traffic tie up at Your message is delivered Please turn to call Repeat message Transmission completed, standing by CB radio operators for you 40
...Codes" used by CODE MEANING 10-34 Trouble at this station 10-35 Confidential information 10-36 Correct time is 10-37 10-38 10-39 10-41 10-42 10-43 10-44 Wrecker needed at Ambulance needed at I have a message for faster communication and better understanding. CODE ... poorly Receiving well Stop transmitting OK, message received Relay message Busy, stand by Out of service, leaving air In service, subject to channel Traffic accident at Traffic tie up at Your message is delivered Please turn to call Repeat message Transmission completed, standing by CB radio operators for you 40


