
English Owners Manual
Page 3
... 5 Features 5 Technical Support and Service 6 Maritime Radio Services Operation 6 Included in Your Package 7 Getting Started 8 Mounting the Cradle 8 Attaching the Antenna 8 Attaching the Rechargeable Battery Pack 8 Using the Alkaline Battery Case 9 Attaching the Beltclip 9 Charging the Battery Pack 10 Operation 11 Turning On the Unit and Setting Squelch 11 Selecting a Channel 12 One-touch Channel 16/9/TRI 12 Triple Watch 13 Monitoring Weather Channels 14 Emergency/Weather Alert 15 USA, International and Canadian Channels 16 Programming a Channel into...
... 5 Features 5 Technical Support and Service 6 Maritime Radio Services Operation 6 Included in Your Package 7 Getting Started 8 Mounting the Cradle 8 Attaching the Antenna 8 Attaching the Rechargeable Battery Pack 8 Using the Alkaline Battery Case 9 Attaching the Beltclip 9 Charging the Battery Pack 10 Operation 11 Turning On the Unit and Setting Squelch 11 Selecting a Channel 12 One-touch Channel 16/9/TRI 12 Triple Watch 13 Monitoring Weather Channels 14 Emergency/Weather Alert 15 USA, International and Canadian Channels 16 Programming a Channel into...
English Owners Manual
Page 4
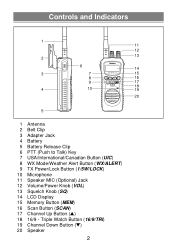
... 2 13 6 14 3 7 ATLANTIS 2 5 0 15 8 WX ALERT UIC MEN SCAN 16 9 1/5W 16/9 TRI 17 LOCK 18 4 10 MIC 19 20 5 1 Antenna 2 Belt Clip 3 Adapter Jack 4 Battery 5 Battery Release Clip 6 PTT (Push to Talk) Key 7 USA/International/Canadian Button (UIC) 8 WX Mode/Weather Alert Button (WX/ALERT) 9 TX Power/Lock Button (1/5W/LOCK) 10 Microphone 11 Speaker MIC (Optional) Jack 12 Volume/Power Knob (VOL) 13 Squelch Knob (SQ) 14 LCD Display 15 Memory Button (MEM) 16 Scan Button (SCAN) 17 Channel Up Button (L) 18 16/9 - Triple...
... 2 13 6 14 3 7 ATLANTIS 2 5 0 15 8 WX ALERT UIC MEN SCAN 16 9 1/5W 16/9 TRI 17 LOCK 18 4 10 MIC 19 20 5 1 Antenna 2 Belt Clip 3 Adapter Jack 4 Battery 5 Battery Release Clip 6 PTT (Push to Talk) Key 7 USA/International/Canadian Button (UIC) 8 WX Mode/Weather Alert Button (WX/ALERT) 9 TX Power/Lock Button (1/5W/LOCK) 10 Microphone 11 Speaker MIC (Optional) Jack 12 Volume/Power Knob (VOL) 13 Squelch Knob (SQ) 14 LCD Display 15 Memory Button (MEM) 16 Scan Button (SCAN) 17 Channel Up Button (L) 18 16/9 - Triple...
English Owners Manual
Page 6
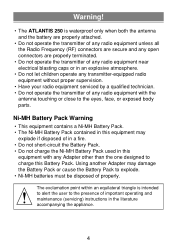
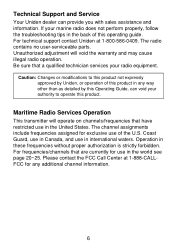
... not let children operate any transmitter-equipped radio equipment without proper supervision. • Have your radio equipment serviced by a qualified technician. • Do not operate the transmitter of any radio equipment with any Adapter other than the one designed to charge this equipment with the antenna touching or close to the eyes, face, or exposed body parts. Using another Adapter may explode...
... not let children operate any transmitter-equipped radio equipment without proper supervision. • Have your radio equipment serviced by a qualified technician. • Do not operate the transmitter of any radio equipment with any Adapter other than the one designed to charge this equipment with the antenna touching or close to the eyes, face, or exposed body parts. Using another Adapter may explode...
English Owners Manual
Page 7
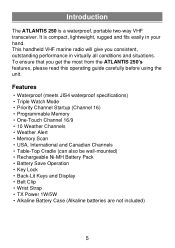
... a waterproof, portable two-way VHF transceiver. This handheld VHF marine radio will give you get the most from the ATLANTIS 250's features, please read this operating guide carefully before using the unit. Features • Waterproof (meets JIS4 waterproof specifications) • Triple Watch Mode • Priority Channel Startup (Channel 16) • Programmable Memory • One-Touch Channel 16/9 • 10 Weather Channels • Weather Alert • Memory Scan • USA, International and Canadian Channels • Table...
... a waterproof, portable two-way VHF transceiver. This handheld VHF marine radio will give you get the most from the ATLANTIS 250's features, please read this operating guide carefully before using the unit. Features • Waterproof (meets JIS4 waterproof specifications) • Triple Watch Mode • Priority Channel Startup (Channel 16) • Programmable Memory • One-Touch Channel 16/9 • 10 Weather Channels • Weather Alert • Memory Scan • USA, International and Canadian Channels • Table...
English Owners Manual
Page 8
... contact the FCC Call Center at 1-800-586-0409. For technical support contact Uniden at 1-888-CALLFCC for exclusive use in the United States. Coast Guard, use in Canada, and use in the world see page 20~25. Technical Support and Service Your Uniden dealer can void your radio equipment. The radio contains no user-serviceable parts. Unauthorized adjustment will operate on channels/frequencies that have restricted use in any...
... contact the FCC Call Center at 1-800-586-0409. For technical support contact Uniden at 1-888-CALLFCC for exclusive use in the United States. Coast Guard, use in Canada, and use in the world see page 20~25. Technical Support and Service Your Uniden dealer can void your radio equipment. The radio contains no user-serviceable parts. Unauthorized adjustment will operate on channels/frequencies that have restricted use in any...
English Owners Manual
Page 9
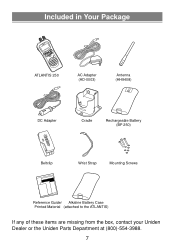
Included in Your Package ATLANTIS 2 5 0 SCAN MEN UIC WALXERT 16T/R9 I 1/5W MIC LOCK ATLANTIS 250 AC Adapter (AD-0003) Antenna (HH9408) DC Adapter Cradle Rechargeable Battery (BP 250) Beltclip Wrist Strap Mounting Screws Reference Guide/ Alkaline Battery Case Printed Material (attached to the ATLANTIS) If any of these items are missing from the box, contact your Uniden Dealer or the Uniden Parts Department at (800)-554-3988. 7
Included in Your Package ATLANTIS 2 5 0 SCAN MEN UIC WALXERT 16T/R9 I 1/5W MIC LOCK ATLANTIS 250 AC Adapter (AD-0003) Antenna (HH9408) DC Adapter Cradle Rechargeable Battery (BP 250) Beltclip Wrist Strap Mounting Screws Reference Guide/ Alkaline Battery Case Printed Material (attached to the ATLANTIS) If any of these items are missing from the box, contact your Uniden Dealer or the Uniden Parts Department at (800)-554-3988. 7
English Owners Manual
Page 10
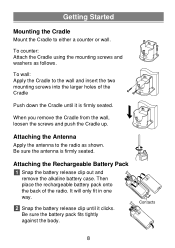
...Attaching the Rechargeable Battery Pack 1 Snap the battery release clip out and remove the alkaline battery case. To counter: Attach the Cradle using the mounting screws and washers as shown. Attaching the Antenna Apply the antenna to the radio as follows. Then place the rechargeable battery pack onto ...battery pack fits tightly against the body. It will only fit in one way. 2 Snap the battery release clip until it clicks. Getting Started Mounting the Cradle Mount the Cradle to the wall and insert the two mounting screws into the larger holes of the radio. Be sure the antenna...
...Attaching the Rechargeable Battery Pack 1 Snap the battery release clip out and remove the alkaline battery case. To counter: Attach the Cradle using the mounting screws and washers as shown. Attaching the Antenna Apply the antenna to the radio as follows. Then place the rechargeable battery pack onto ...battery pack fits tightly against the body. It will only fit in one way. 2 Snap the battery release clip until it clicks. Getting Started Mounting the Cradle Mount the Cradle to the wall and insert the two mounting screws into the larger holes of the radio. Be sure the antenna...
English Owners Manual
Page 11
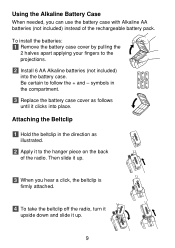
... the beltclip in the compartment. 3 Replace the battery case cover as illustrated. 2 Apply it to the hanger piece on the back of the rechargeable battery pack. AA AA AA AA AA AA Using the Alkaline Battery Case When needed, you hear a click, the beltclip is firmly attached. 4 To take the beltclip off the radio, turn it upside down and slide it...
... the beltclip in the compartment. 3 Replace the battery case cover as illustrated. 2 Apply it to the hanger piece on the back of the rechargeable battery pack. AA AA AA AA AA AA Using the Alkaline Battery Case When needed, you hear a click, the beltclip is firmly attached. 4 To take the beltclip off the radio, turn it upside down and slide it...
English Owners Manual
Page 12
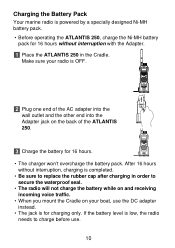
... ATLANTIS 250. 3 Charge the battery for charging only. Charging the Battery Pack Your marine radio is powered by a specially designed Ni-MH battery pack. • Before operating the ATLANTIS 250, charge the Ni-MH battery pack for 16 hours without interruption, charging is completed. • Be sure to replace the rubber cap after charging in the Cradle. ATLANTIS 2 5 0 WX ALERT UIC 1/5W LOCK MEN SCAN 16/9 TRI MIC 2 Plug one end of the AC adapter...
... ATLANTIS 250. 3 Charge the battery for charging only. Charging the Battery Pack Your marine radio is powered by a specially designed Ni-MH battery pack. • Before operating the ATLANTIS 250, charge the Ni-MH battery pack for 16 hours without interruption, charging is completed. • Be sure to replace the rubber cap after charging in the Cradle. ATLANTIS 2 5 0 WX ALERT UIC 1/5W LOCK MEN SCAN 16/9 TRI MIC 2 Plug one end of the AC adapter...
English Owners Manual
Page 13
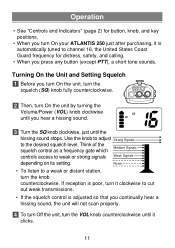
... setting. SPKR MIC SQ VOL 2 Then, turn On the unit by turning the Volume/Power (VOL) knob clockwise until you continually hear a hissing sound, the unit will not scan properly. 4 To turn Off the unit, turn the VOL knob counterclockwise until the hissing sound stops. Think of the squelch control as a frequency gate which Medium Signals controls access to the desired squelch level. Noise • To listen to channel 16, the United...
... setting. SPKR MIC SQ VOL 2 Then, turn On the unit by turning the Volume/Power (VOL) knob clockwise until you continually hear a hissing sound, the unit will not scan properly. 4 To turn Off the unit, turn the VOL knob counterclockwise until the hissing sound stops. Think of the squelch control as a frequency gate which Medium Signals controls access to the desired squelch level. Noise • To listen to channel 16, the United...
English Owners Manual
Page 14
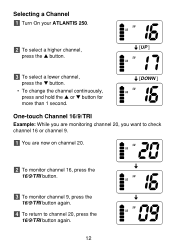
Selecting a Channel 1 Turn On your ATLANTIS 250. 2 To select a higher channel, press the L button. [UP ] 3 To select a lower channel, press the M button. • To change the channel continuously, press and hold the L or M button for more than 1 second. [DOWN ] One-touch Channel 16/9/TRI Example: While you are monitoring channel 20, you want to check channel 16 or channel 9. 1 You are now on channel 20. 2 To monitor channel 16, press the 16/9/TRI button. 3 To monitor channel 9, press the 16/9/TRI button again. 4 To return to channel 20, press the 16/9/TRI button again. 12
Selecting a Channel 1 Turn On your ATLANTIS 250. 2 To select a higher channel, press the L button. [UP ] 3 To select a lower channel, press the M button. • To change the channel continuously, press and hold the L or M button for more than 1 second. [DOWN ] One-touch Channel 16/9/TRI Example: While you are monitoring channel 20, you want to check channel 16 or channel 9. 1 You are now on channel 20. 2 To monitor channel 16, press the 16/9/TRI button. 3 To monitor channel 9, press the 16/9/TRI button again. 4 To return to channel 20, press the 16/9/TRI button again. 12

English Owners Manual
Page 15
... tone sounds and TRIPLE appears on channel 9 if you listen to the Triple Watch mode, simply press the button again. 13 A double confirmation tone sounds and TRIPLE disappears. • While in Triple Watch mode, you can change the currently selected channel using the L or M button. • A momentary press of the 16/9/TRI button interrupts Triple Watch mode and remains on 16, or on the display...
... tone sounds and TRIPLE appears on channel 9 if you listen to the Triple Watch mode, simply press the button again. 13 A double confirmation tone sounds and TRIPLE disappears. • While in Triple Watch mode, you can change the currently selected channel using the L or M button. • A momentary press of the 16/9/TRI button interrupts Triple Watch mode and remains on 16, or on the display...
English Owners Manual
Page 16
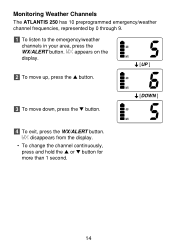
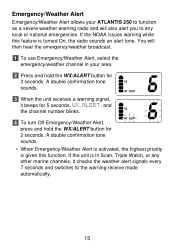
Monitoring Weather Channels The ATLANTIS 250 has 10 preprogrammed emergency/weather channel frequencies, represented by 0 through 9. 1 To listen to the emergency/weather channels in your area, press the WX/ALERT button. WX disappears from the display. • To change the channel continuously, press and hold the L or M button for more than 1 second. 14 WX appears on the display. [UP ] 2 To move up, press the L button. 3 To move down, press the M button. [DOWN ] 4 To exit, press the WX/ALERT button.
Monitoring Weather Channels The ATLANTIS 250 has 10 preprogrammed emergency/weather channel frequencies, represented by 0 through 9. 1 To listen to the emergency/weather channels in your area, press the WX/ALERT button. WX disappears from the display. • To change the channel continuously, press and hold the L or M button for more than 1 second. 14 WX appears on the display. [UP ] 2 To move up, press the L button. 3 To move down, press the M button. [DOWN ] 4 To exit, press the WX/ALERT button.
English Owners Manual
Page 17
... marine channels, it beeps for 2 seconds. A double confirmation tone sounds. • When Emergency/Weather Alert is activated, the highest priority is turned On, the radio sounds an alert tone. If the NOAA issues warning while this feature is given this function. If the unit is in your ATLANTIS 250 to function as a severe weather warning radio and will then hear the emergency/weather broadcast. 1 To use Emergency/Weather Alert, select the emergency/weather channel in Scan...
... marine channels, it beeps for 2 seconds. A double confirmation tone sounds. • When Emergency/Weather Alert is activated, the highest priority is turned On, the radio sounds an alert tone. If the NOAA issues warning while this feature is given this function. If the unit is in your ATLANTIS 250 to function as a severe weather warning radio and will then hear the emergency/weather broadcast. 1 To use Emergency/Weather Alert, select the emergency/weather channel in Scan...
English Owners Manual
Page 18
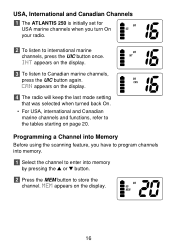
... M button. 2 Press the MEM button to international marine channels, press the UIC button once. MEM appears on the display. 3 To listen to the tables starting on page 20. INT appears on the display. 16 Programming a Channel into Memory Before using the scanning feature, you turn On your radio. 2 To listen to store the channel. CAN appears on the display. 4 The radio will keep the last mode setting that...
... M button. 2 Press the MEM button to international marine channels, press the UIC button once. MEM appears on the display. 3 To listen to the tables starting on page 20. INT appears on the display. 16 Programming a Channel into Memory Before using the scanning feature, you turn On your radio. 2 To listen to store the channel. CAN appears on the display. 4 The radio will keep the last mode setting that...
English Owners Manual
Page 20
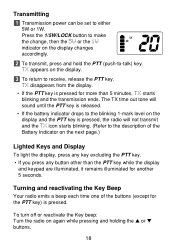
... TX time out tone will sound until the PTT key is released. • If the battery indicator drops to the blinking 1-mark level on the display. 3 To return to the description of the buttons (except for the PTT key) is pressed for another 5 seconds. To turn off or reactivate the Key beep: Turn the radio on the next page.) Lighted Keys and Display To light the display...
... TX time out tone will sound until the PTT key is released. • If the battery indicator drops to the blinking 1-mark level on the display. 3 To return to the description of the buttons (except for the PTT key) is pressed for another 5 seconds. To turn off or reactivate the Key beep: Turn the radio on the next page.) Lighted Keys and Display To light the display...
English Owners Manual
Page 21
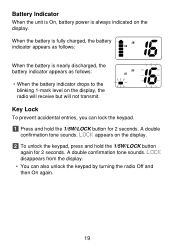
... unit is On, battery power is nearly discharged, the battery indicator appears as follows: • When the battery indicator drops to the blinking 1-mark level on the display, the radio will receive but will not transmit. LOCK appears on the display. A double confirmation tone sounds. A double confirmation tone sounds. When the battery is fully charged, the battery indicator appears as follows: When the battery is always indicated on the display. 2 To unlock...
... unit is On, battery power is nearly discharged, the battery indicator appears as follows: • When the battery indicator drops to the blinking 1-mark level on the display, the radio will receive but will not transmit. LOCK appears on the display. A double confirmation tone sounds. A double confirmation tone sounds. When the battery is fully charged, the battery indicator appears as follows: When the battery is always indicated on the display. 2 To unlock...
English Owners Manual
Page 29
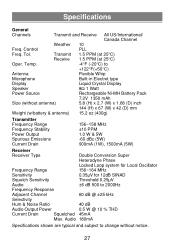
... type Display Liquid Crystal Display Speaker 8Ω 1 Watt Power Source Rechargeable Ni-MH Battery Pack 7.2V 1350 mAh Size (without notice. 27 Control PLL Freq. Temp. -4°F (-20°C) to 2000Hz Frequency Response Adjacent Channel 60 dB @ ±25 kHz Selectivity Hum & Noise Ratio 40 dB Audio Output Power 0.5 W @ 10 % THD Current Drain Squelched 45mA Max. Tol. Transmit 1.5 PPM (at 25°C) Receive 1.5 PPM (at 25°C) Oper.
... type Display Liquid Crystal Display Speaker 8Ω 1 Watt Power Source Rechargeable Ni-MH Battery Pack 7.2V 1350 mAh Size (without notice. 27 Control PLL Freq. Temp. -4°F (-20°C) to 2000Hz Frequency Response Adjacent Channel 60 dB @ ±25 kHz Selectivity Hum & Noise Ratio 40 dB Audio Output Power 0.5 W @ 10 % THD Current Drain Squelched 45mA Max. Tol. Transmit 1.5 PPM (at 25°C) Receive 1.5 PPM (at 25°C) Oper.
English Owners Manual
Page 31
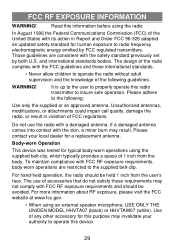
... to insure safe operation. Body-worn Operation This device was tested for a replacement antenna. The use the radio with the skin, a minor burn may invalidate your local dealer for typical body-worn operations using an external speaker microphone, USE ONLY THE UNIDEN MODEL HHVTA07 (black) or HHVTAW07 (white). FCC RF EXPOSURE INFORMATION WARNING! Please contact your authority to the supplied belt-clip. For hand-held...
... to insure safe operation. Body-worn Operation This device was tested for a replacement antenna. The use the radio with the skin, a minor burn may invalidate your local dealer for typical body-worn operations using an external speaker microphone, USE ONLY THE UNIDEN MODEL HHVTA07 (black) or HHVTAW07 (white). FCC RF EXPOSURE INFORMATION WARNING! Please contact your authority to the supplied belt-clip. For hand-held...
English Owners Manual
Page 32
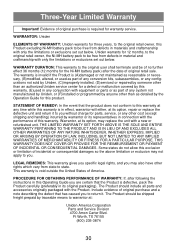
... sold by Uniden, (C)improperly installed, (D)serviced or repaired by the Operation Guide for three years, to the original retail owner, this Product excluding Ni-MH battery pack to warrantor at any time while this warranty, (E)used in any other rights which vary from state to the original user shall terminate and be of original retail sale. THE LIMITED WARRANTY SET FORTH ABOVE...
... sold by Uniden, (C)improperly installed, (D)serviced or repaired by the Operation Guide for three years, to the original retail owner, this Product excluding Ni-MH battery pack to warrantor at any time while this warranty, (E)used in any other rights which vary from state to the original user shall terminate and be of original retail sale. THE LIMITED WARRANTY SET FORTH ABOVE...


