English Owners Manual
Page 3
... Unit and Setting Squelch 11 Selecting a Channel 12 One-touch Channel 16/9/TRI 12 Triple Watch 13 Monitoring Weather Channels 14 Emergency/Weather Alert 15 USA, International and Canadian Channels 16 Programming a Channel into Memory 16 Deleting a Channel from Memory 17 Scanning 17 Transmitting 18 Lighted Keys and Display 18 Turning and reactivating the Key Beep 18 Battery Indicator 19 Key Lock 19 Marine Channels - International 22 Marine Channels - Canada 24 Optional Parts and Replacement Accessories 26 Specifications...
... Unit and Setting Squelch 11 Selecting a Channel 12 One-touch Channel 16/9/TRI 12 Triple Watch 13 Monitoring Weather Channels 14 Emergency/Weather Alert 15 USA, International and Canadian Channels 16 Programming a Channel into Memory 16 Deleting a Channel from Memory 17 Scanning 17 Transmitting 18 Lighted Keys and Display 18 Turning and reactivating the Key Beep 18 Battery Indicator 19 Key Lock 19 Marine Channels - International 22 Marine Channels - Canada 24 Optional Parts and Replacement Accessories 26 Specifications...
English Owners Manual
Page 4
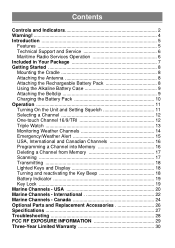
... 2 13 6 14 3 7 ATLANTIS 2 5 0 15 8 WX ALERT UIC MEN SCAN 16 9 1/5W 16/9 TRI 17 LOCK 18 4 10 MIC 19 20 5 1 Antenna 2 Belt Clip 3 Adapter Jack 4 Battery 5 Battery Release Clip 6 PTT (Push to Talk) Key 7 USA/International/Canadian Button (UIC) 8 WX Mode/Weather Alert Button (WX/ALERT) 9 TX Power/Lock Button (1/5W/LOCK) 10 Microphone 11 Speaker MIC (Optional) Jack 12 Volume/Power Knob (VOL) 13 Squelch Knob (SQ) 14 LCD Display 15 Memory Button (MEM) 16 Scan Button (SCAN) 17 Channel Up Button (L) 18 16/9 - Triple...
... 2 13 6 14 3 7 ATLANTIS 2 5 0 15 8 WX ALERT UIC MEN SCAN 16 9 1/5W 16/9 TRI 17 LOCK 18 4 10 MIC 19 20 5 1 Antenna 2 Belt Clip 3 Adapter Jack 4 Battery 5 Battery Release Clip 6 PTT (Push to Talk) Key 7 USA/International/Canadian Button (UIC) 8 WX Mode/Weather Alert Button (WX/ALERT) 9 TX Power/Lock Button (1/5W/LOCK) 10 Microphone 11 Speaker MIC (Optional) Jack 12 Volume/Power Knob (VOL) 13 Squelch Knob (SQ) 14 LCD Display 15 Memory Button (MEM) 16 Scan Button (SCAN) 17 Channel Up Button (L) 18 16/9 - Triple...
English Owners Manual
Page 6
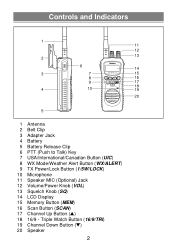
...; Do not operate the transmitter of any radio equipment with any Adapter other than the one designed to charge this Battery Pack. Warning! • The ATLANTIS 250 is intended to alert the user to the presence of important operating and maintenance (servicing) instructions in this equipment with the antenna touching or close to the eyes, face, or exposed body parts. Using another Adapter may explode if...
...; Do not operate the transmitter of any radio equipment with any Adapter other than the one designed to charge this Battery Pack. Warning! • The ATLANTIS 250 is intended to alert the user to the presence of important operating and maintenance (servicing) instructions in this equipment with the antenna touching or close to the eyes, face, or exposed body parts. Using another Adapter may explode if...
English Owners Manual
Page 7
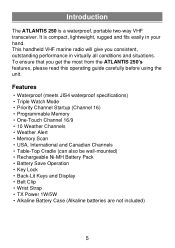
...) • Rechargeable Ni-MH Battery Pack • Battery Save Operation • Key Lock • Back-Lit Keys and Display • Belt Clip • Wrist Strap • TX Power 1W/5W • Alkaline Battery Case (Alkaline batteries are not included) 5 This handheld VHF marine radio will give you get the most from the ATLANTIS 250's features, please read this operating guide carefully before using the unit. It is a waterproof, portable two-way VHF transceiver. To...
...) • Rechargeable Ni-MH Battery Pack • Battery Save Operation • Key Lock • Back-Lit Keys and Display • Belt Clip • Wrist Strap • TX Power 1W/5W • Alkaline Battery Case (Alkaline batteries are not included) 5 This handheld VHF marine radio will give you get the most from the ATLANTIS 250's features, please read this operating guide carefully before using the unit. It is a waterproof, portable two-way VHF transceiver. To...
English Owners Manual
Page 8
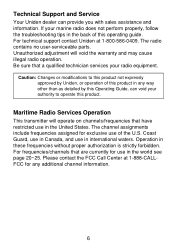
... no user-serviceable parts. Maritime Radio Services Operation This transmitter will void the warranty and may cause illegal radio operation. For frequencies/channels that have restricted use in any additional channel information. 6 Please contact the FCC Call Center at 1-800-586-0409. Technical Support and Service Your Uniden dealer can void your marine radio does not perform properly, follow the troubleshooting tips in the United States. Unauthorized adjustment will operate on channels/frequencies...
... no user-serviceable parts. Maritime Radio Services Operation This transmitter will void the warranty and may cause illegal radio operation. For frequencies/channels that have restricted use in any additional channel information. 6 Please contact the FCC Call Center at 1-800-586-0409. Technical Support and Service Your Uniden dealer can void your marine radio does not perform properly, follow the troubleshooting tips in the United States. Unauthorized adjustment will operate on channels/frequencies...
English Owners Manual
Page 9
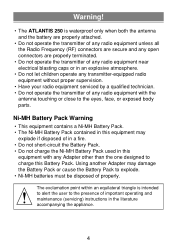
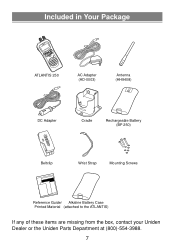
Included in Your Package ATLANTIS 2 5 0 SCAN MEN UIC WALXERT 16T/R9 I 1/5W MIC LOCK ATLANTIS 250 AC Adapter (AD-0003) Antenna (HH9408) DC Adapter Cradle Rechargeable Battery (BP 250) Beltclip Wrist Strap Mounting Screws Reference Guide/ Alkaline Battery Case Printed Material (attached to the ATLANTIS) If any of these items are missing from the box, contact your Uniden Dealer or the Uniden Parts Department at (800)-554-3988. 7
Included in Your Package ATLANTIS 2 5 0 SCAN MEN UIC WALXERT 16T/R9 I 1/5W MIC LOCK ATLANTIS 250 AC Adapter (AD-0003) Antenna (HH9408) DC Adapter Cradle Rechargeable Battery (BP 250) Beltclip Wrist Strap Mounting Screws Reference Guide/ Alkaline Battery Case Printed Material (attached to the ATLANTIS) If any of these items are missing from the box, contact your Uniden Dealer or the Uniden Parts Department at (800)-554-3988. 7
English Owners Manual
Page 10
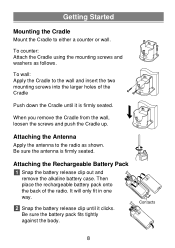
Attaching the Antenna Apply the antenna to the radio as follows. It will only fit in one way. 2 Snap the battery release clip until it clicks. To counter: Attach the Cradle using the mounting screws and washers as shown. Be sure the antenna is firmly seated. Then place the rechargeable battery pack onto the back of the Cradle Push down the...
Attaching the Antenna Apply the antenna to the radio as follows. It will only fit in one way. 2 Snap the battery release clip until it clicks. To counter: Attach the Cradle using the mounting screws and washers as shown. Be sure the antenna is firmly seated. Then place the rechargeable battery pack onto the back of the Cradle Push down the...
English Owners Manual
Page 11
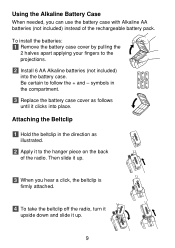
... needed, you hear a click, the beltclip is firmly attached. 4 To take the beltclip off the radio, turn it upside down and slide it up . 3 When you can use the battery case with Alkaline AA batteries (not included) instead of the radio. symbols in the direction as follows until it up . 9 Attaching the Beltclip 1 Hold the beltclip in the compartment. 3 Replace...
... needed, you hear a click, the beltclip is firmly attached. 4 To take the beltclip off the radio, turn it upside down and slide it up . 3 When you can use the battery case with Alkaline AA batteries (not included) instead of the radio. symbols in the direction as follows until it up . 9 Attaching the Beltclip 1 Hold the beltclip in the compartment. 3 Replace...
English Owners Manual
Page 12
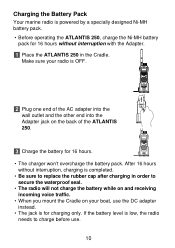
... ALERT UIC 1/5W LOCK MEN SCAN 16/9 TRI MIC • The charger won't overcharge the battery pack. Charging the Battery Pack Your marine radio is powered by a specially designed Ni-MH battery pack. • Before operating the ATLANTIS 250, charge the Ni-MH battery pack for charging only. After 16 hours without interruption, charging is completed. • Be sure to replace the rubber cap after charging in order to charge before use...
... ALERT UIC 1/5W LOCK MEN SCAN 16/9 TRI MIC • The charger won't overcharge the battery pack. Charging the Battery Pack Your marine radio is powered by a specially designed Ni-MH battery pack. • Before operating the ATLANTIS 250, charge the Ni-MH battery pack for charging only. After 16 hours without interruption, charging is completed. • Be sure to replace the rubber cap after charging in order to charge before use...
English Owners Manual
Page 13
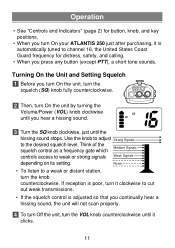
... Coast Guard frequency for distress, safety, and calling. • When you press any button (except PTT), a short tone sounds. If reception is adjusted so that you continually hear a hissing sound, the unit will not scan properly. 4 To turn Off the unit, turn On your ATLANTIS 250 just after purchasing, it clicks. 11 Noise • To listen to cut out weak transmissions. • If the squelch control is...
... Coast Guard frequency for distress, safety, and calling. • When you press any button (except PTT), a short tone sounds. If reception is adjusted so that you continually hear a hissing sound, the unit will not scan properly. 4 To turn Off the unit, turn On your ATLANTIS 250 just after purchasing, it clicks. 11 Noise • To listen to cut out weak transmissions. • If the squelch control is...
English Owners Manual
Page 14
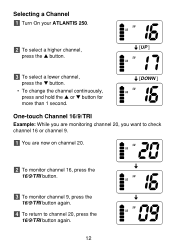
Selecting a Channel 1 Turn On your ATLANTIS 250. 2 To select a higher channel, press the L button. [UP ] 3 To select a lower channel, press the M button. • To change the channel continuously, press and hold the L or M button for more than 1 second. [DOWN ] One-touch Channel 16/9/TRI Example: While you are monitoring channel 20, you want to check channel 16 or channel 9. 1 You are now on channel 20. 2 To monitor channel 16, press the 16/9/TRI button. 3 To monitor channel 9, press the 16/9/TRI button again. 4 To return to channel 20, press the 16/9/TRI button again. 12
Selecting a Channel 1 Turn On your ATLANTIS 250. 2 To select a higher channel, press the L button. [UP ] 3 To select a lower channel, press the M button. • To change the channel continuously, press and hold the L or M button for more than 1 second. [DOWN ] One-touch Channel 16/9/TRI Example: While you are monitoring channel 20, you want to check channel 16 or channel 9. 1 You are now on channel 20. 2 To monitor channel 16, press the 16/9/TRI button. 3 To monitor channel 9, press the 16/9/TRI button again. 4 To return to channel 20, press the 16/9/TRI button again. 12

English Owners Manual
Page 15
... mode monitors channels 16 and 9 for 2 seconds. The marine radio checks channel 16 and 9 for activity every 2 seconds. 1 To select Triple Watch mode, press and hold the 16/9/TRI button for a signal while you can change the currently selected channel using the L or M button. • A momentary press of the 16/9/TRI button interrupts Triple Watch mode and remains on 16, or on the display...
... mode monitors channels 16 and 9 for 2 seconds. The marine radio checks channel 16 and 9 for activity every 2 seconds. 1 To select Triple Watch mode, press and hold the 16/9/TRI button for a signal while you can change the currently selected channel using the L or M button. • A momentary press of the 16/9/TRI button interrupts Triple Watch mode and remains on 16, or on the display...
English Owners Manual
Page 16
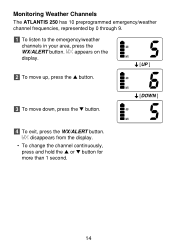
Monitoring Weather Channels The ATLANTIS 250 has 10 preprogrammed emergency/weather channel frequencies, represented by 0 through 9. 1 To listen to the emergency/weather channels in your area, press the WX/ALERT button. WX appears on the display. [UP ] 2 To move up, press the L button. 3 To move down, press the M button. [DOWN ] 4 To exit, press the WX/ALERT button. WX disappears from the display. • To change the channel continuously, press and hold the L or M button for more than 1 second. 14
Monitoring Weather Channels The ATLANTIS 250 has 10 preprogrammed emergency/weather channel frequencies, represented by 0 through 9. 1 To listen to the emergency/weather channels in your area, press the WX/ALERT button. WX appears on the display. [UP ] 2 To move up, press the L button. 3 To move down, press the M button. [DOWN ] 4 To exit, press the WX/ALERT button. WX disappears from the display. • To change the channel continuously, press and hold the L or M button for more than 1 second. 14
English Owners Manual
Page 17
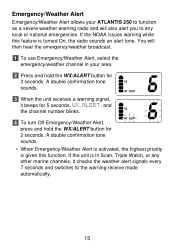
You will also alert you to the warning receive mode automatically. 15 A double confirmation tone sounds. 3 When the unit receives a warning signal, it checks the weather alert signals every 7 seconds and switches to any other marine channels, it beeps for 5 seconds. WX, ALERT, and the channel number blinks. 4 To turn Off Emergency/Weather Alert, press and hold the WX/ALERT button for 2 seconds. If the NOAA issues warning while this feature is given this...
You will also alert you to the warning receive mode automatically. 15 A double confirmation tone sounds. 3 When the unit receives a warning signal, it checks the weather alert signals every 7 seconds and switches to any other marine channels, it beeps for 5 seconds. WX, ALERT, and the channel number blinks. 4 To turn Off Emergency/Weather Alert, press and hold the WX/ALERT button for 2 seconds. If the NOAA issues warning while this feature is given this...
English Owners Manual
Page 18
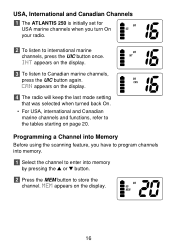
..., International and Canadian Channels 1 The ATLANTIS 250 is initially set for USA marine channels when you have to program channels into memory. 1 Select the channel to enter into Memory Before using the scanning feature, you turn On your radio. 2 To listen to international marine channels, press the UIC button once. CAN appears on the display. 4 The radio will keep the last mode setting that was selected when turned back On...
..., International and Canadian Channels 1 The ATLANTIS 250 is initially set for USA marine channels when you have to program channels into memory. 1 Select the channel to enter into Memory Before using the scanning feature, you turn On your radio. 2 To listen to international marine channels, press the UIC button once. CAN appears on the display. 4 The radio will keep the last mode setting that was selected when turned back On...
English Owners Manual
Page 20
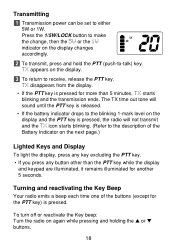
.... Transmitting 1 Transmission power can be set to -talk) key. Press the 1/5W/LOCK button to make the change, then the 5W or the 1W indicator on the display changes accordingly. 2 To transmit, press and hold the PTT (push-to either 5W or 1W. The TX time out tone will sound until the PTT key is pressed. Turning and reactivating the Key Beep Your radio emits a beep each time one of the Battery...
.... Transmitting 1 Transmission power can be set to -talk) key. Press the 1/5W/LOCK button to make the change, then the 5W or the 1W indicator on the display changes accordingly. 2 To transmit, press and hold the PTT (push-to either 5W or 1W. The TX time out tone will sound until the PTT key is pressed. Turning and reactivating the Key Beep Your radio emits a beep each time one of the Battery...
English Owners Manual
Page 21
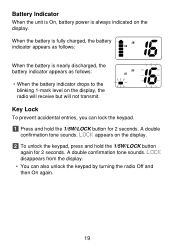
... charged, the battery indicator appears as follows: • When the battery indicator drops to the blinking 1-mark level on the display. A double confirmation tone sounds. LOCK disappears from the display. • You can lock the keypad. 1 Press and hold the 1/5W/LOCK button again for 2 seconds. A double confirmation tone sounds. LOCK appears on the display. 2 To unlock the keypad, press and hold the 1/5W/LOCK button for 2 seconds. Key Lock...
... charged, the battery indicator appears as follows: • When the battery indicator drops to the blinking 1-mark level on the display. A double confirmation tone sounds. LOCK disappears from the display. • You can lock the keypad. 1 Press and hold the 1/5W/LOCK button again for 2 seconds. A double confirmation tone sounds. LOCK appears on the display. 2 To unlock the keypad, press and hold the 1/5W/LOCK button for 2 seconds. Key Lock...
English Owners Manual
Page 29
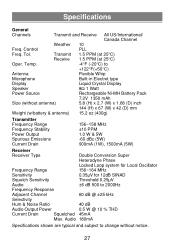
...°C) Antenna Flexible Whip Microphone Built-in Electret type Display Liquid Crystal Display Speaker 8Ω 1 Watt Power Source Rechargeable Ni-MH Battery Pack 7.2V 1350 mAh Size (without notice. 27 Temp. -4°F (-20°C) to 2000Hz Frequency Response Adjacent Channel 60 dB @ ±25 kHz Selectivity Hum & Noise Ratio 40 dB Audio Output Power 0.5 W @ 10 % THD Current Drain Squelched 45mA Max. Control PLL Freq. Specifications General Channels Transmit and Receive All...
...°C) Antenna Flexible Whip Microphone Built-in Electret type Display Liquid Crystal Display Speaker 8Ω 1 Watt Power Source Rechargeable Ni-MH Battery Pack 7.2V 1350 mAh Size (without notice. 27 Temp. -4°F (-20°C) to 2000Hz Frequency Response Adjacent Channel 60 dB @ ±25 kHz Selectivity Hum & Noise Ratio 40 dB Audio Output Power 0.5 W @ 10 % THD Current Drain Squelched 45mA Max. Control PLL Freq. Specifications General Channels Transmit and Receive All...
English Owners Manual
Page 31
... the supplied belt-clip. Body-worn Operation This device was tested for human exposure to insure safe operation. and international standards bodies. Unauthorized antennas, modifications, or attachments could impair call quality, damage the radio, or result in Report and Order FCC 96-326 adopted an updated safety standard for typical body-worn operations using an external speaker microphone, USE ONLY THE UNIDEN MODEL HHVTA07...
... the supplied belt-clip. Body-worn Operation This device was tested for human exposure to insure safe operation. and international standards bodies. Unauthorized antennas, modifications, or attachments could impair call quality, damage the radio, or result in Report and Order FCC 96-326 adopted an updated safety standard for typical body-worn operations using an external speaker microphone, USE ONLY THE UNIDEN MODEL HHVTA07...
English Owners Manual
Page 32
... not maintained as reasonable or necessary, (B)modified, altered, or used as part of any conversion kits, subassemblies, or any configurations not sold by Uniden, (C)improperly installed, (D)serviced or repaired by someone other than an authorized Uniden service center for a defect or malfunction covered by this warranty, (E)used in connection with equipment or parts or as detailed by traceable means to state. THIS...
... not maintained as reasonable or necessary, (B)modified, altered, or used as part of any conversion kits, subassemblies, or any configurations not sold by Uniden, (C)improperly installed, (D)serviced or repaired by someone other than an authorized Uniden service center for a defect or malfunction covered by this warranty, (E)used in connection with equipment or parts or as detailed by traceable means to state. THIS...


